Discover 10 expert tips for creating click-worthy recipe images that captivate and engage. Master lighting, styling, and angles for stunning food photography.
Food photography is more than just snapping a picture of a dish—it’s about crafting images that stop scrollers in their tracks, evoke hunger, and inspire action. Whether you’re a food blogger, a chef, or a content creator, high-quality recipe images can elevate your brand, drive traffic, and make your audience crave your creations. This comprehensive guide dives into the top 10 tips for creating click-worthy recipe images, blending technical precision with creative flair to help you produce professional-grade photos that shine on blogs, Pinterest, and social media.
From choosing the perfect background to optimizing images for the web, these strategies are designed to help you create visually stunning, appetizing photos that resonate with your audience. Let’s explore each tip in detail, complete with practical advice, expert insights, and actionable techniques to transform your food photography.
1. Choose the Perfect Background
The background sets the stage for your recipe images, subtly shaping the mood and drawing attention to the dish. A well-chosen backdrop enhances the food without overwhelming it, creating a cohesive and professional look.
Why Backgrounds Matter
As food photographer Alanna O’Neil notes, “The background is not just a surface where the dish will rest, but it subtly describes the rest of the mood and feeling of the scene.” A carefully selected background can evoke warmth, elegance, or simplicity, aligning with the dish’s theme and your brand’s aesthetic.
Selecting Colors and Textures
- Neutral Tones: Opt for muted colors like grays, whites, browns, or blacks to let the food’s vibrant hues take center stage. Neutral backgrounds prevent visual clutter and keep the focus on the dish.
- Contrasting Colors: For a modern twist, use subtle contrasting colors that complement the food without overpowering it. For example, a green salad pops against a soft red or coral backdrop.
- Textures for Depth: Textured surfaces like rustic wood, marble, or linen add visual interest without distracting from the food. Avoid shiny materials like granite or steel, which can create harsh reflections.
Budget-Friendly Background Options
You don’t need expensive props to create professional-looking photos. Here are affordable ideas:
- IKEA Linnmon Tabletops ($20–$25): Affordable and versatile for a clean, modern look.
- Ceramic Floor Tiles ($2–$6 each): Mimic marble or stone for an elegant effect.
- Crumpled Parchment Paper: Adds a rustic, handmade vibe for under $5.
- Antique Sheet Pans: Provide a vintage charm, often found at thrift stores for $5–$10.
Practical Tips
- Match the Mood: Pair rustic wood with comfort foods like stews or baked goods, and marble with delicate pastries or sophisticated dishes.
- Light vs. Dark: Light backgrounds reflect light, enhancing vibrancy, while dark surfaces absorb light for a moody, cozy feel.
- Test and Experiment: Try multiple surfaces to find the perfect fit for each recipe. Keep a collection of affordable backdrops to suit different dishes.
| Surface Type | Best Used For | Key Benefits |
|---|---|---|
| Rustic Wood | Comfort foods, baked goods | Adds warmth and character |
| Marble/Stone | Pastries, elegant dishes | Clean, polished look |
| Matte Surfaces | Glazed or shiny foods | Reduces reflections |
| Natural Linen | Fresh, casual dishes | Subtle texture, soft feel |
2. Master Lighting for Stunning Photos
Lighting is the backbone of food photography, shaping the mood, highlighting textures, and making colors pop. Whether you use natural or artificial light, a thoughtful setup ensures your photos look vibrant and professional.
Natural Light: The Gold Standard
Natural light offers a soft, flattering glow that enhances food’s textures and colors. Food photographer Jenna emphasizes consistency: “With artificial lighting, my photos come out much more consistent because there’s no variability in the temperature or brightness of my light source.” However, natural light remains a favorite for its authenticity.
Window Lighting Guide
| Window Direction | Best Shooting Time | Benefits |
|---|---|---|
| North-facing | 10 AM–2 PM | Even, steady light |
| East-facing | Morning | Warm, golden tones |
| West-facing | Late afternoon | Dramatic shadows |
| South-facing | Midday with diffusion | Bright, vibrant lighting |
Essential Lighting Tools
You don’t need a professional studio to achieve great results. Here’s a budget-friendly setup:
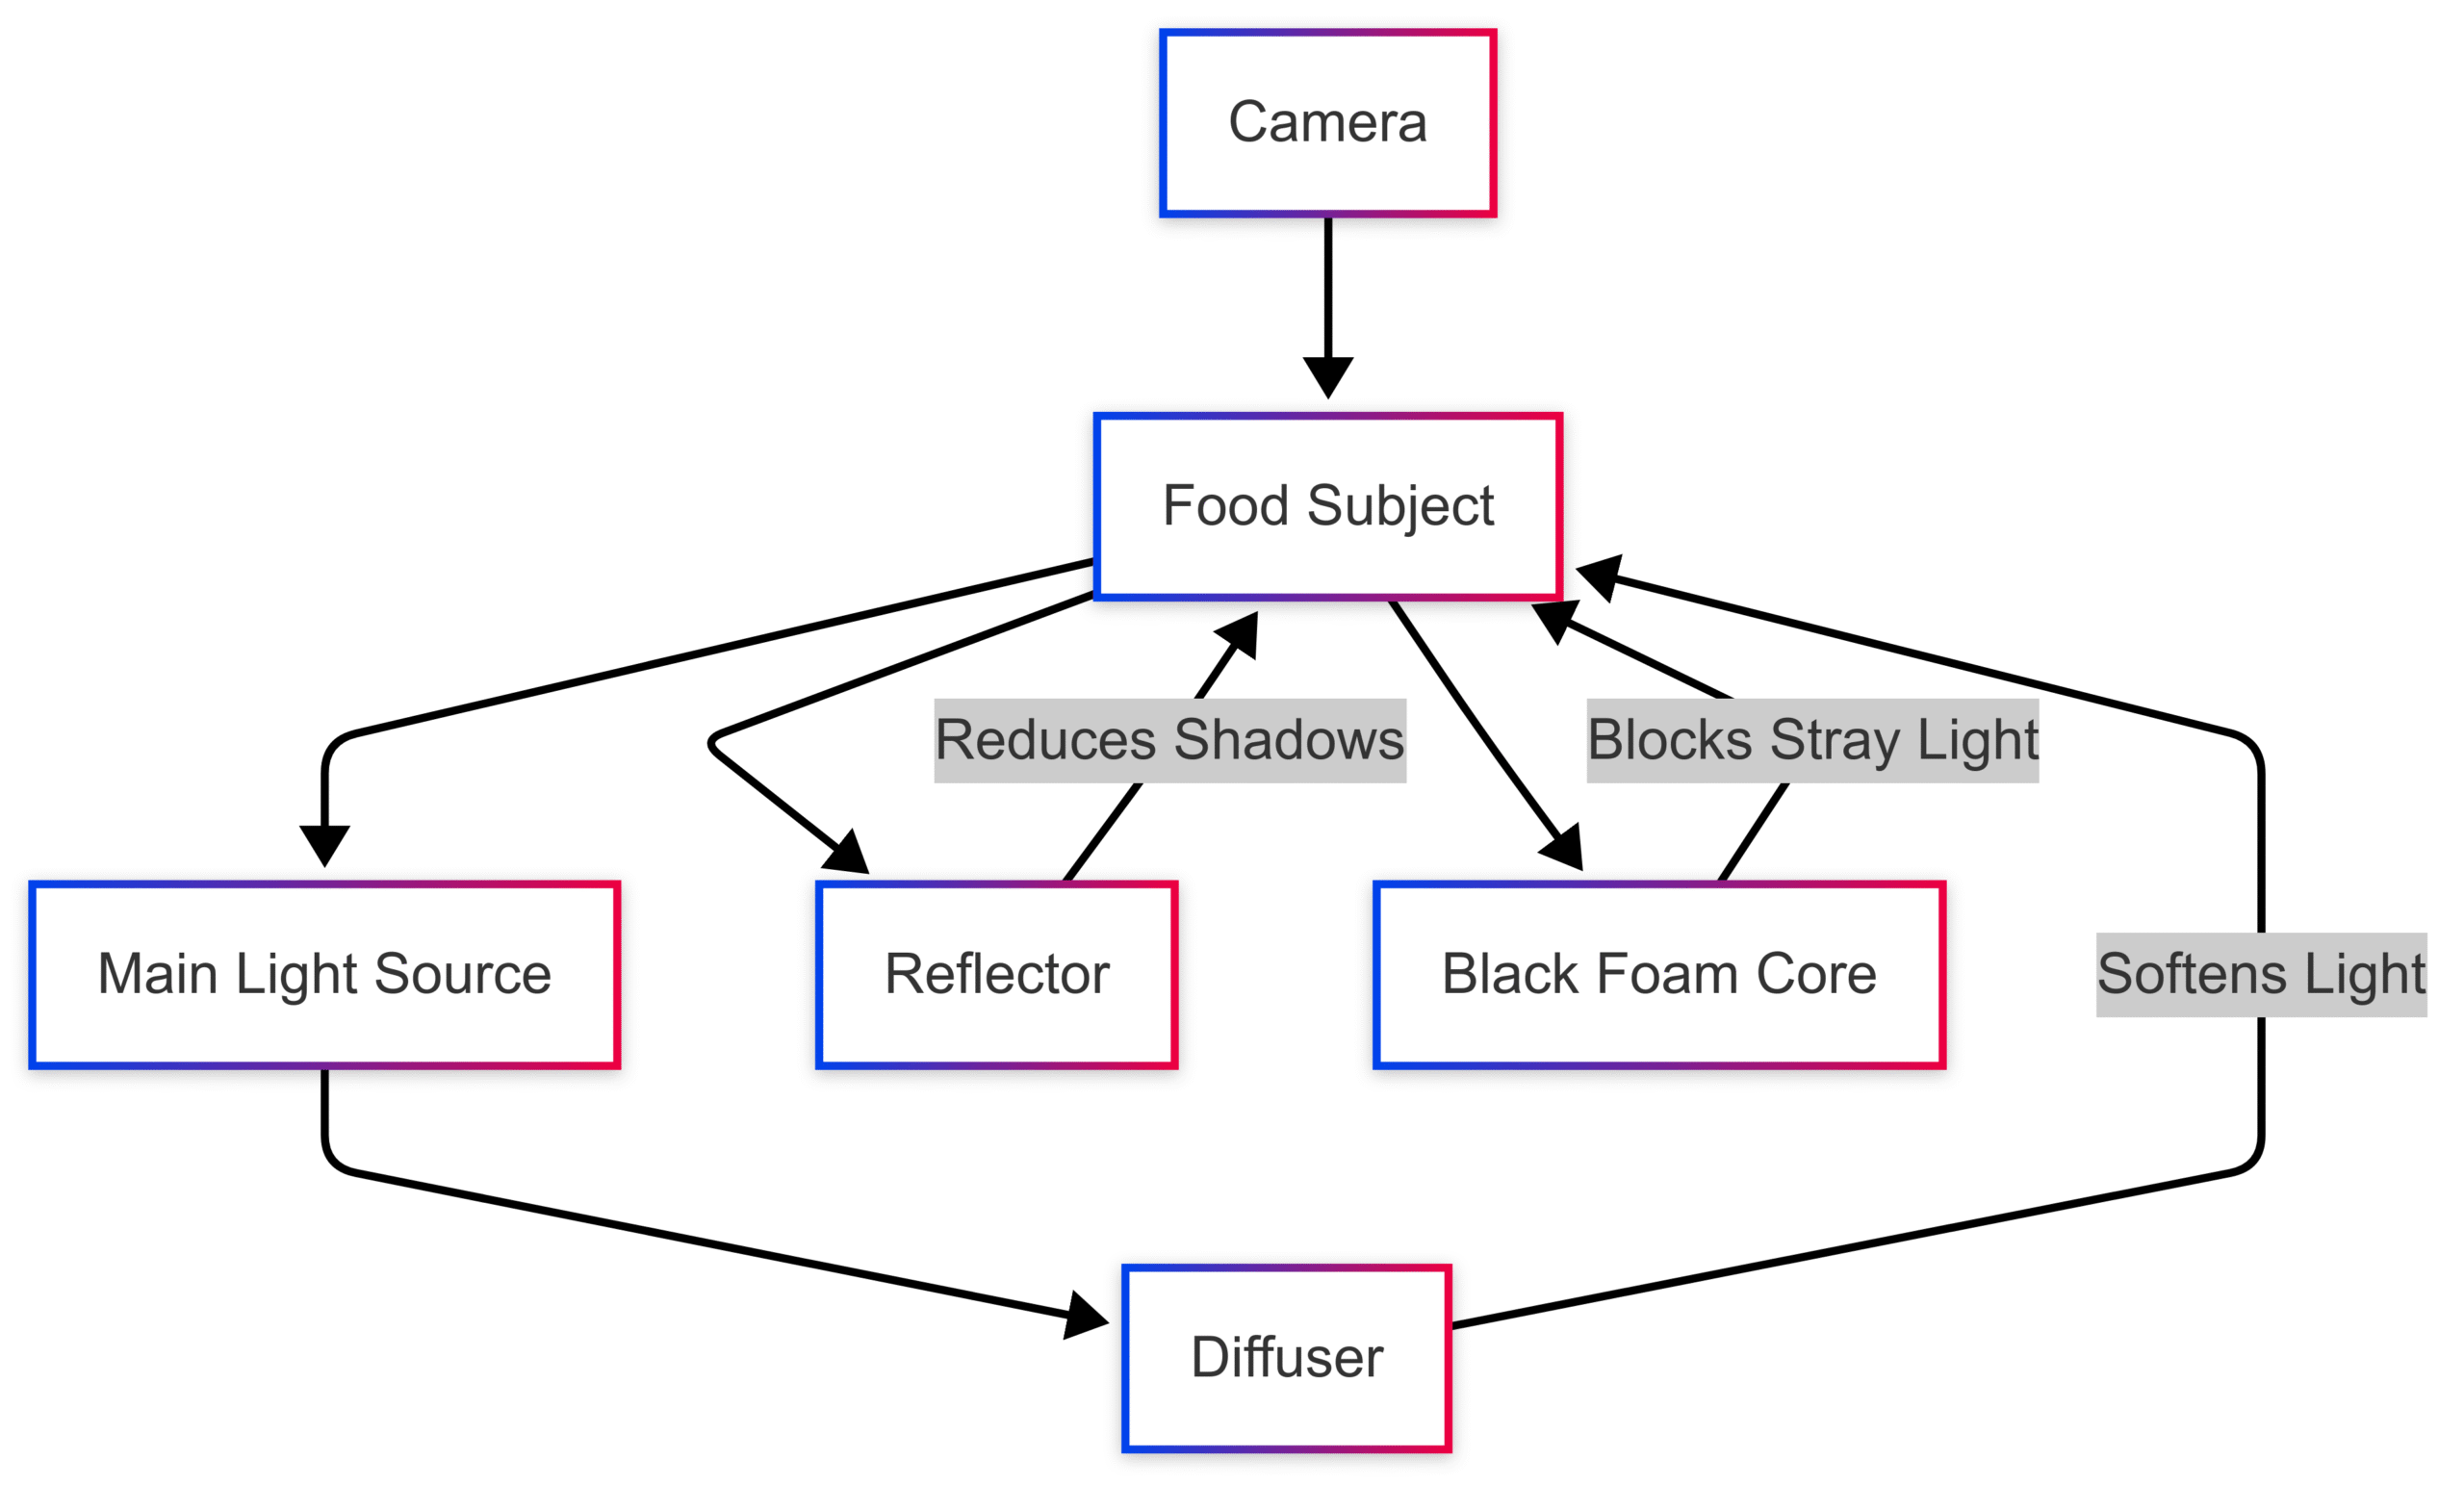
- Main Light Source: HDX 500w halogen ($20) for artificial light or a window for natural light.
- Diffuser: A white bedsheet or parchment paper to soften harsh light.
- Reflector: White foam core board ($5) to reduce shadows.
- Light Control: Black foam core board ($5) to block stray light.
Lighting Angles
- Side Lighting: Position light at a 45° angle with a reflector opposite to create soft, natural shadows that highlight texture.
- Back Lighting: Place light behind and slightly above the dish for a glowing effect, ideal for glassware or capturing steam.
Pro Tips
- Turn off overhead lights to avoid color casts.
- Use a diffuser to soften harsh shadows.
- Experiment with light height and angle to control shadow depth.
- Start with one light source and a reflector for simplicity.
Diagram: Basic Lighting Setup

3. Capture Clear Step-by-Step Shots
Step-by-step photos make recipes accessible and engaging, guiding readers through the cooking process. Food photographer Christina Peters advises, “Write every shot down to make sure you don’t leave anything out.”
Planning Your Shots
Create a shot list focusing on key moments:
- Ingredient Layout: Showcase raw ingredients and measured portions.
- Process Action: Highlight techniques like chopping or mixing.
- Visual Checkpoints: Show texture or color changes to indicate progress.
- Final Assembly: Capture plating or garnishing steps.
Technical Consistency
- Use consistent backgrounds, lighting, and angles across all shots for a cohesive look.
- Keep compositions simple to avoid distracting from the process.
Styling for Clarity
- Include only essential tools in the frame.
- Arrange ingredients logically to reflect the recipe’s flow.
- Use proper lighting to highlight the action area.
- Stick to neutral backgrounds to maintain focus.
Capturing Action
Use a tripod to keep shots sharp and framing consistent, especially for dynamic actions like pouring or slicing. A fast shutter speed (1/125 sec or faster) freezes motion effectively.
| Shot Type | Purpose | Key Elements |
|---|---|---|
| Ingredient Layout | Displays components | Raw ingredients, measured portions |
| Process Action | Shows techniques | Tools, hand positioning |
| Visual Checkpoints | Indicates progress | Texture, color changes |
| Final Assembly | Highlights plating | Step-by-step assembly |
4. Select the Right Camera Lens
The right lens can elevate your food photography, offering versatility or precision depending on the shot. Food photographer Lauren Short explains, “The trick is understanding what you’re trying to achieve and knowing what kind of lens will help.”
Lens Options for Food Photography
| Shot Type | Recommended Lens | Best For | Key Advantages |
|---|---|---|---|
| Overhead Scenes | Wide Angle (24–35mm) | Table spreads, process shots | Captures full setup |
| Standard Views | 50mm Prime | Hero shots, straight-on | Natural perspective |
| Detail Shots | 60mm+ Macro | Texture close-ups | Sharp details, blur |
| Food Portraits | 85–105mm | Plated dishes | Depth, compression |
Prime vs. Zoom Lenses
- Prime Lenses: Offer superior sharpness and wider apertures (e.g., f/1.8) for low-light shooting and beautiful background blur.
- Zoom Lenses: Provide flexibility but may sacrifice sharpness and light sensitivity.
Budget Tips
- Start with a 50mm prime lens ($100–$200) for versatility.
- Explore Sigma Art series lenses for high quality at lower prices.
- Rent lenses to test focal lengths before purchasing.
5. Achieve Sharp, Clear Images
Sharp images are critical for professional food photography. Fine-tuning your camera settings and technique ensures clarity and detail.
Camera Settings
| Setting | Recommended Range | Purpose | Best For |
|---|---|---|---|
| ISO | 100–400 | Reduces noise | Bright scenes |
| Shutter Speed | 1/125 sec or faster | Prevents blur | Handheld shots |
| Aperture | f/8–f/16 | Ensures sharpness | Full dish shots |
Focus Techniques
- Single-Point Focus: Use the center point for accuracy, then reframe for composition.
- Avoid Diffraction: Stick to f/8–f/16 to prevent softening from high apertures.
Stability Tips
- Use a tripod (e.g., Amazon Basics, ~$30) with a self-timer to eliminate shake.
- Clean lenses regularly to avoid smudges.
- Use a fast shutter speed for handheld shots.
Background Blur
For a dreamy effect:
- Use a wide aperture (f/1.8–f/2.8).
- Increase distance between subject and background.
- Focus on the dish’s most appealing feature.
6. Experiment with Angles
Angles bring out a dish’s best features, making it look irresistible. Different perspectives highlight unique aspects of the food.
Key Angles
| Angle | Ideal For | Highlights |
|---|---|---|
| Overhead (90°) | Pizzas, bowls | Ingredient layout, design |
| 3/4 View (45°) | Most dishes, drinks | Depth, texture |
| Straight-on (0°) | Burgers, cakes | Height, layers |
Strategic Angle Selection
- Flat Foods: Overhead shots showcase shape and color patterns.
- Tall Foods: Straight-on angles emphasize height and layers.
- Drinks/Garnishes: A 75° angle highlights glass shapes and garnishes.
Pro Tips
- Move around the dish to find its best angle.
- Shoot multiple perspectives for editing flexibility.
- Use a tripod for consistent, sharp images.
7. Control Light and Shadow
Light and shadow add depth and drama, transforming a flat image into a captivating one. MJ Anderson Photography says, “Lighting is the soul of food photography.”
Light Direction
- Side Lighting: Highlights texture with soft shadows.
- Back Lighting: Adds depth, ideal for lighter foods.
- Front Lighting: Shows details but can flatten the image.
Tools for Control
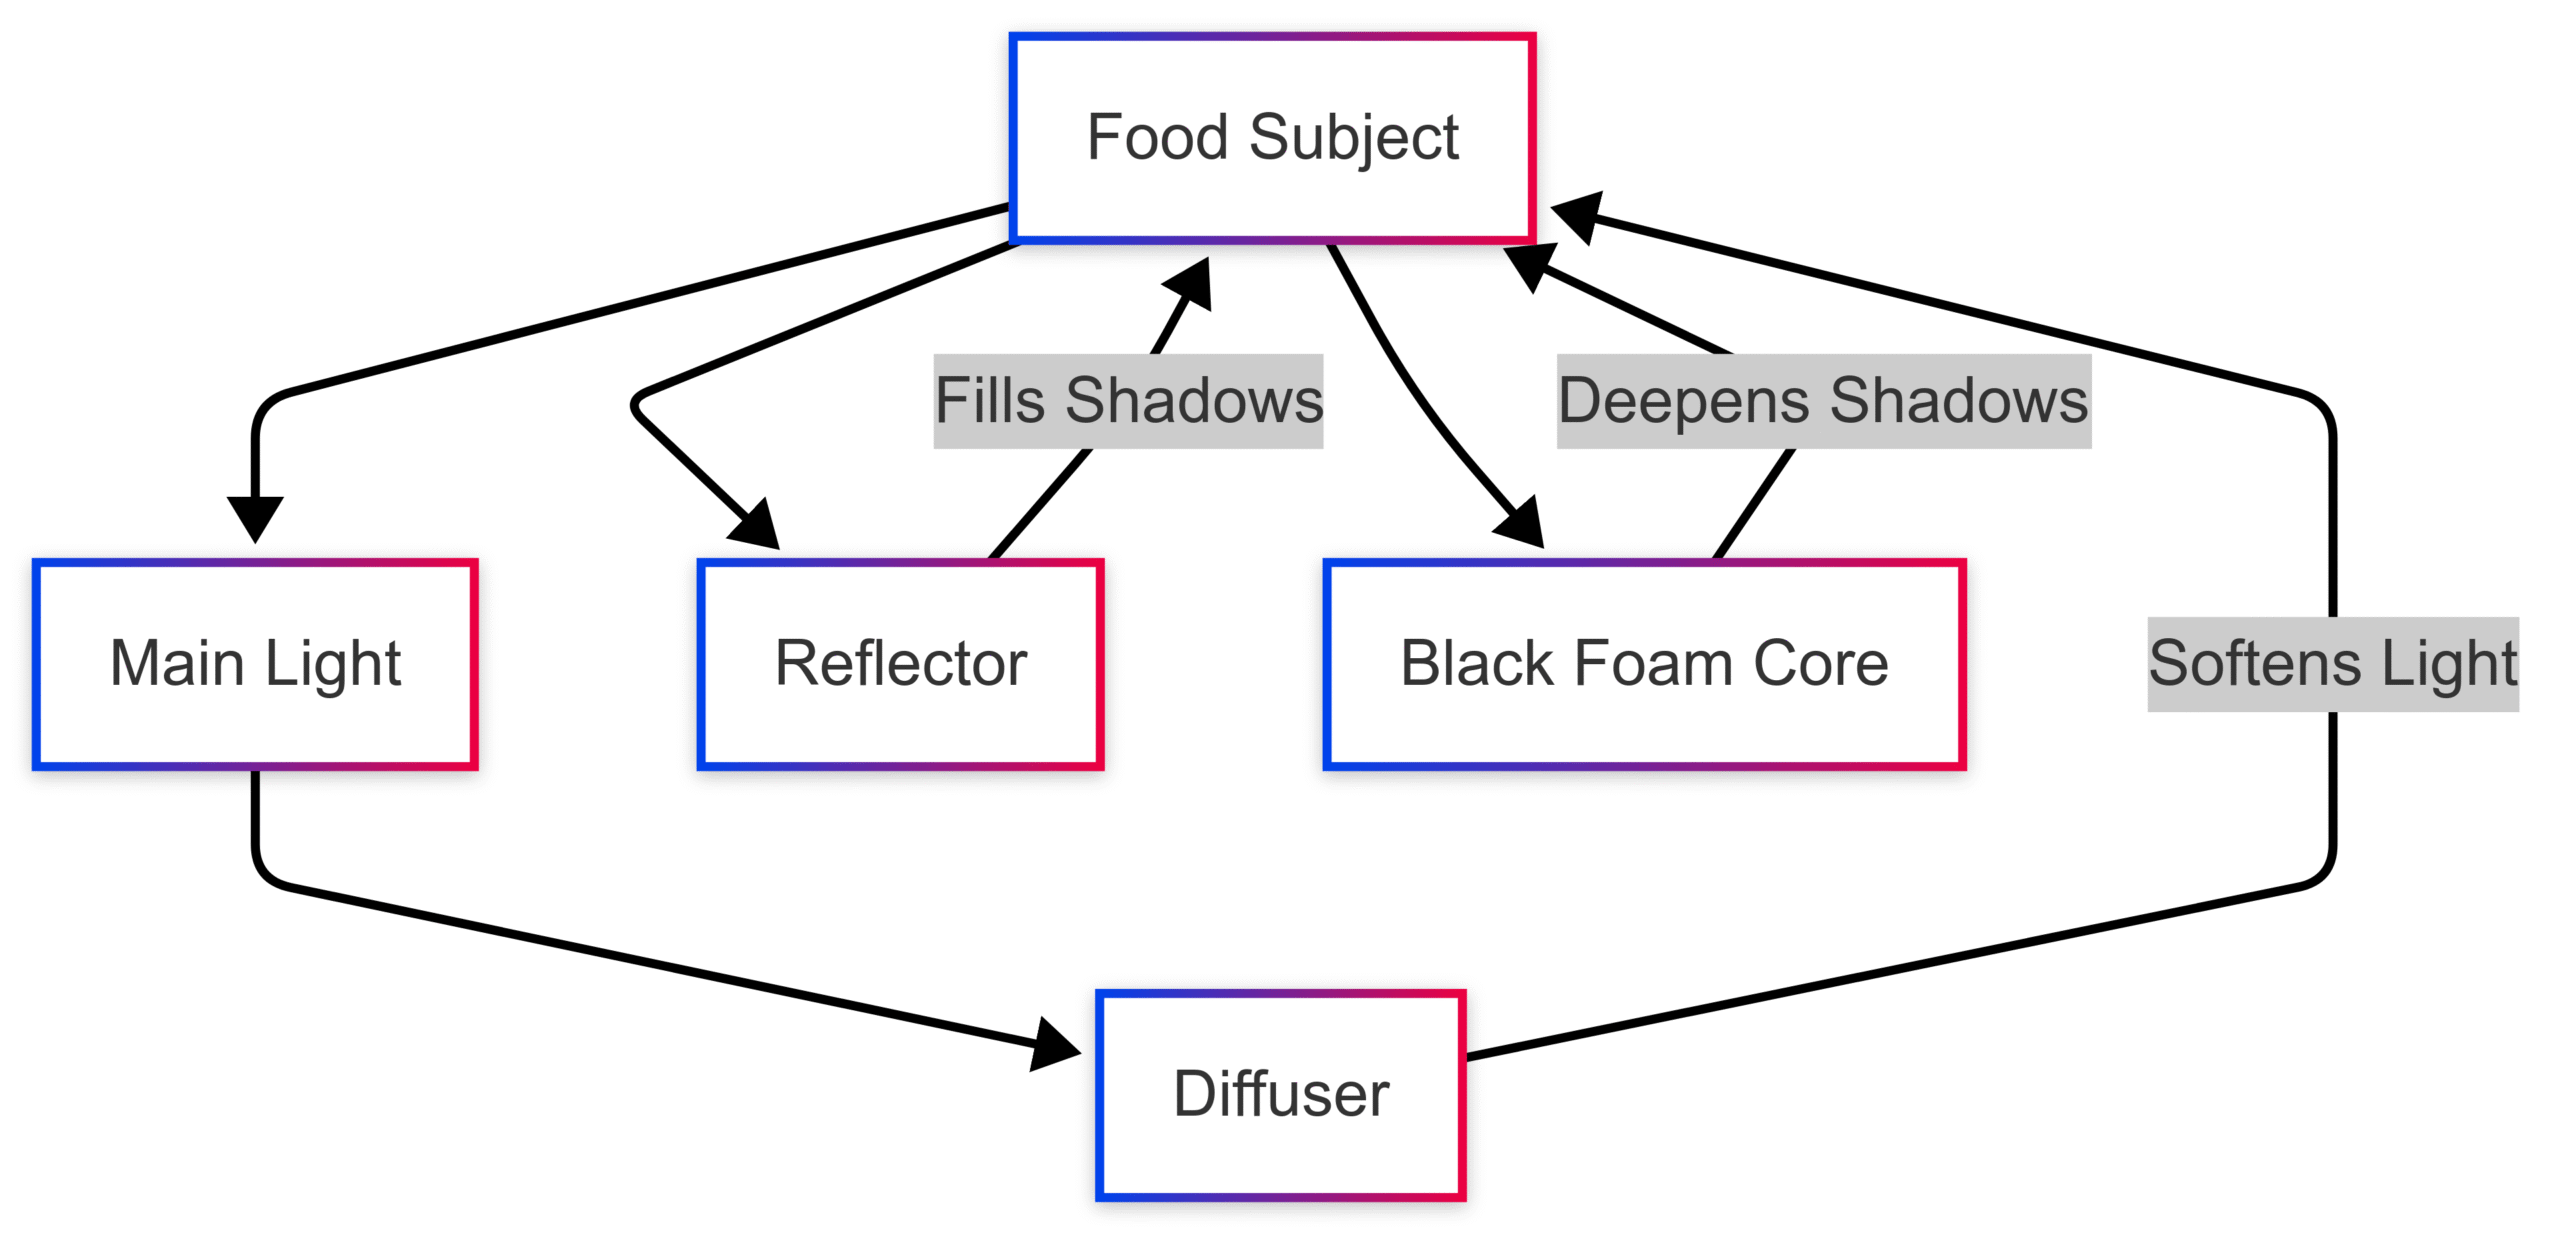
- Diffusers: Soften harsh light (e.g., white sheet, $5).
- Reflectors: Brighten shadows (e.g., white foam board, $5).
- Black Foam Core: Deepens shadows for drama ($5).
Shadow Techniques
- Move light closer for sharp shadows, farther for soft ones.
- Use reflectors to fill in shadows subtly.
- Experiment with silver or gold reflectors for color tone variations.
Diagram: Light and Shadow Control

8. Ensure Color Accuracy
Accurate colors make food look appetizing and true to life. Photographer Adam Long explains, “White balance is a way to set a photograph to neutral, to make the white look white.”
White Balance Setup
- Use a gray card or white paper to set custom white balance.
- Shoot in RAW for greater editing flexibility.
Color Correction Workflow
| Step | Action | Purpose |
|---|---|---|
| Base Correction | Set neutral white balance | Solid starting point |
| Temperature Adjustment | Tweak warmth/coolness | Corrects color casts |
| Selective Adjustments | Enhance food colors | Highlights key ingredients |
| Final Check | Compare with dish | Ensures realistic colors |
Advanced Tips
- Boost natural brightness of fresh ingredients.
- Avoid oversaturation for a realistic look.
- Use calibration tools for consistent colors across devices.
9. Style Food for Maximum Appeal
Food styling brings dishes to life, making them look edible and inviting. Jason Schreiber advises, “The food needs to look edible. If you can’t imagine putting it in your mouth, then it’s probably not a great garnish.”
Natural Plating
- Use smaller plates for generous-looking portions.
- Opt for matte surfaces to avoid reflections.
- Leave negative space for a clean look.
- Vary element heights for visual interest.
Styling Techniques
| Element | Purpose | Best Practice |
|---|---|---|
| Background | Sets mood | Dark for drama, light for freshness |
| Garnishes | Adds vibrancy | Use edible, complementary garnishes |
| Negative Space | Focuses on food | Leave intentional empty areas |
Authenticity Tips
- Use fresh, unblemished ingredients.
- Embrace slight imperfections (e.g., crumbs) for realism.
- Ensure garnishes align with the dish’s theme.
10. Optimize Images for the Web
Fast-loading, high-quality images are crucial for user engagement and SEO. Unoptimized images can account for 38% of a webpage’s weight on mobile devices, slowing load times and hurting conversions.
File Formats
| Format | Best For | Benefits |
|---|---|---|
| JPEG | Most recipe photos | Good quality, small file size |
| PNG | Text overlays | Crisp lines, transparency |
| WebP | Modern websites | Superior compression, high quality |
Image Dimensions
| Image Use | Suggested Dimensions | Aspect Ratio |
|---|---|---|
| Blog post images | 750px wide | Variable height |
| Featured recipes | 800 x 420px | 16:9 |
| Thumbnails | 400 x 400px | 1:1 |
Optimization Techniques
- Use lossy compression to reduce file size.
- Optimize for mobile (90% of traffic).
- Enable lazy loading for faster page loads.
- Use descriptive filenames for SEO.
File Size Guidelines
- Maximum: 20MB per image.
- Minimum Dimensions: 800 x 800px for zoom functionality.
- Maximum Dimensions: 2048 x 2048px for square images.
Conclusion
Creating click-worthy recipe images requires a blend of technical skill and creative vision. By mastering backgrounds, lighting, angles, and styling, you can produce photos that captivate and engage. As food photographer Kylie Mazon-Chambers notes, “Good food photos have the power to draw people in, evoke hunger or nostalgia, and convince them to make the recipe.”
Focus on one element at a time—whether it’s perfecting your lighting setup or experimenting with angles. Over time, your unique style will emerge, creating images that not only look stunning but also tell a story that resonates with your audience. With these 10 tips, you’re well-equipped to elevate your food photography and drive clicks, shares, and engagement.
Please share these Top 10 Tips for Creating Click-Worthy Recipe Images with your friends and do a comment below about your feedback.
We will meet you on next article.
Until you can read, 15 SEO Tips to Boost Organic Rankings & Traffic
