Learn how to take stunning food photos for your Shopify store with expert tips on lighting, composition, equipment, and editing to boost sales.
In the competitive world of e-commerce, captivating food photography can make your Shopify store stand out, drive customer engagement, and boost sales. High-quality images showcase your products in their best light, build trust, and create an emotional connection with potential buyers. According to a BigCommerce study, 67% of consumers consider product image quality paramount when making online purchases, while 22% of returns stem from products looking different in person than in photos. This guide dives deep into creating mouthwatering food photos, covering lighting, composition, equipment, editing, and integration with Shopify tools like Recipe Kit to maximize your store’s impact.
Why Food Photography Matters for Your Shopify Store
Food photography isn’t just about aesthetics; it’s a powerful tool for e-commerce success. A well-crafted image of a steaming dish or a perfectly plated dessert can entice customers, convey quality, and reinforce your brand identity. On platforms like Shopify, where visual appeal drives conversions, professional-grade photos are essential. They help:
- Build Trust: Consistent, high-quality images signal professionalism and reliability.
- Enhance Engagement: Visually appealing photos encourage customers to explore and interact with your store.
- Reduce Returns: Accurate, detailed images ensure customers know exactly what they’re buying, minimizing discrepancies.
- Boost SEO: Optimized images with proper alt tags and metadata improve search engine visibility.
Whether you’re a small business owner, a food blogger, or a marketer, mastering food photography can transform your Shopify store into a visual feast that converts browsers into buyers.
Setting Up Your Food Photography Studio
A well-designed studio setup is the foundation of stunning food photos. You don’t need a professional studio to get started—here’s how to create an effective setup at home or in a small space.
Choosing the Right Backdrop
The backdrop sets the stage for your food, ensuring the dish remains the focal point. Here are key considerations:
- Size: Use a backdrop at least 2×3 feet for smaller dishes, or 3×4 feet for larger scenes like tablescapes.
- Material: Opt for textured surfaces like real wood, concrete, or matte fabrics to add depth without distracting from the food. Vinyl backdrops are portable but avoid them for extreme close-ups, as patterns can distort.
- Color: Stick to neutral tones like off-white, gray, or natural wood to keep the focus on the dish. Avoid high-contrast or busy backgrounds that compete with your subject.
- Separation: Ensure the shooting surface and backdrop are distinct at the horizon line to create a clean, professional look.
For example, Ghia, a non-alcoholic apéritif brand, uses plain white backdrops to highlight its luxurious yet approachable aesthetic, as founder Melanie Masarin shared on the Shopify Masters podcast.
Essential Equipment
To capture sharp, professional images, invest in the following tools:
| Equipment | Purpose | Recommended Models | Price Range |
|---|---|---|---|
| DSLR/Mirrorless Camera | High-quality images with full control | Canon EOS R, Sony A7 III | $1,000–$2,500 |
| Macro Lens | Captures intricate details in close-ups | Canon EF 100mm f/2.8, Sony FE 90mm f/2.8 | $400–$1,200 |
| Tripod | Eliminates camera shake for sharp shots | Manfrotto 405, Vanguard Alta Pro | $100–$300 |
| Softbox | Diffused, even lighting | Neewer 24×24-inch Softbox | $50–$150 |
| Reflector | Softens shadows and brightens dark areas | Neewer 5-in-1 Reflector | $20–$50 |
| Color Checker | Ensures accurate color representation | X-Rite ColorChecker Passport | $100–$150 |
- Camera: A DSLR or mirrorless camera offers superior image quality and control over settings like aperture and shutter speed.
- Macro Lens: Ideal for capturing fine details, such as the texture of a crusty loaf or the glaze on a dessert.
- Tripod: A sturdy tripod, like the Manfrotto 405 with a geared head, ensures precise framing and eliminates blur.
- Lighting Tools: Softboxes and reflectors create soft, even illumination, while a frosted window can serve as a natural diffuser.
- Color Checker: Tools like the X-Rite ColorChecker Passport ensure colors are true-to-life, critical for food photography.
For budget-conscious photographers, a smartphone with a tripod and editing apps like Halide can suffice for basic shots, though a DSLR or mirrorless camera yields better results for professional use.
Mastering Lighting for Food Photography
Lighting is the cornerstone of food photography, transforming a dish into a visual masterpiece. As Julie Powell notes, “In the world of food photography, lighting is everything. It can transform a mundane dish into a mouthwatering masterpiece or render even the most delectable delicacy unappetizing.”
Natural Light vs. Studio Lighting
- Natural Light: Ideal for beginners, natural light is cost-effective and creates a soft, authentic look. Place your setup near a frosted window to diffuse light evenly, and turn off indoor lights to avoid color mismatches. Outdoor shaded areas also work well for balanced lighting.
- Studio Lighting: Softboxes and reflectors offer consistent, adjustable illumination. They’re perfect for controlled environments but require careful setup to avoid an artificial appearance.
Fixing Shadow Issues
Harsh shadows can obscure a dish’s details. To maintain a natural feel:
- Use a large, soft light source like a softbox or frosted window.
- Add a diffuser to soften light and a reflector opposite the light source to brighten darker areas.
- Experiment with light modifiers like LEE Filters’ Opal Frost or a simple bedsheet for budget-friendly diffusion.
Strategic Light Placement
Lighting angles enhance texture and depth:
- Side Lighting: Creates diagonal shadows to highlight texture, ideal for dishes with intricate surfaces like bread or pastries.
- 45° Angle Lighting: Enhances contours, giving food a three-dimensional look that’s perfect for e-commerce.
- Backlighting: Produces a glowing rim effect, great for translucent foods like sauces or fruits.
For example, Graza’s photo of steak and eggs with chimichurri uses angled natural light to emphasize the dish’s vibrant textures, making it irresistible to viewers.
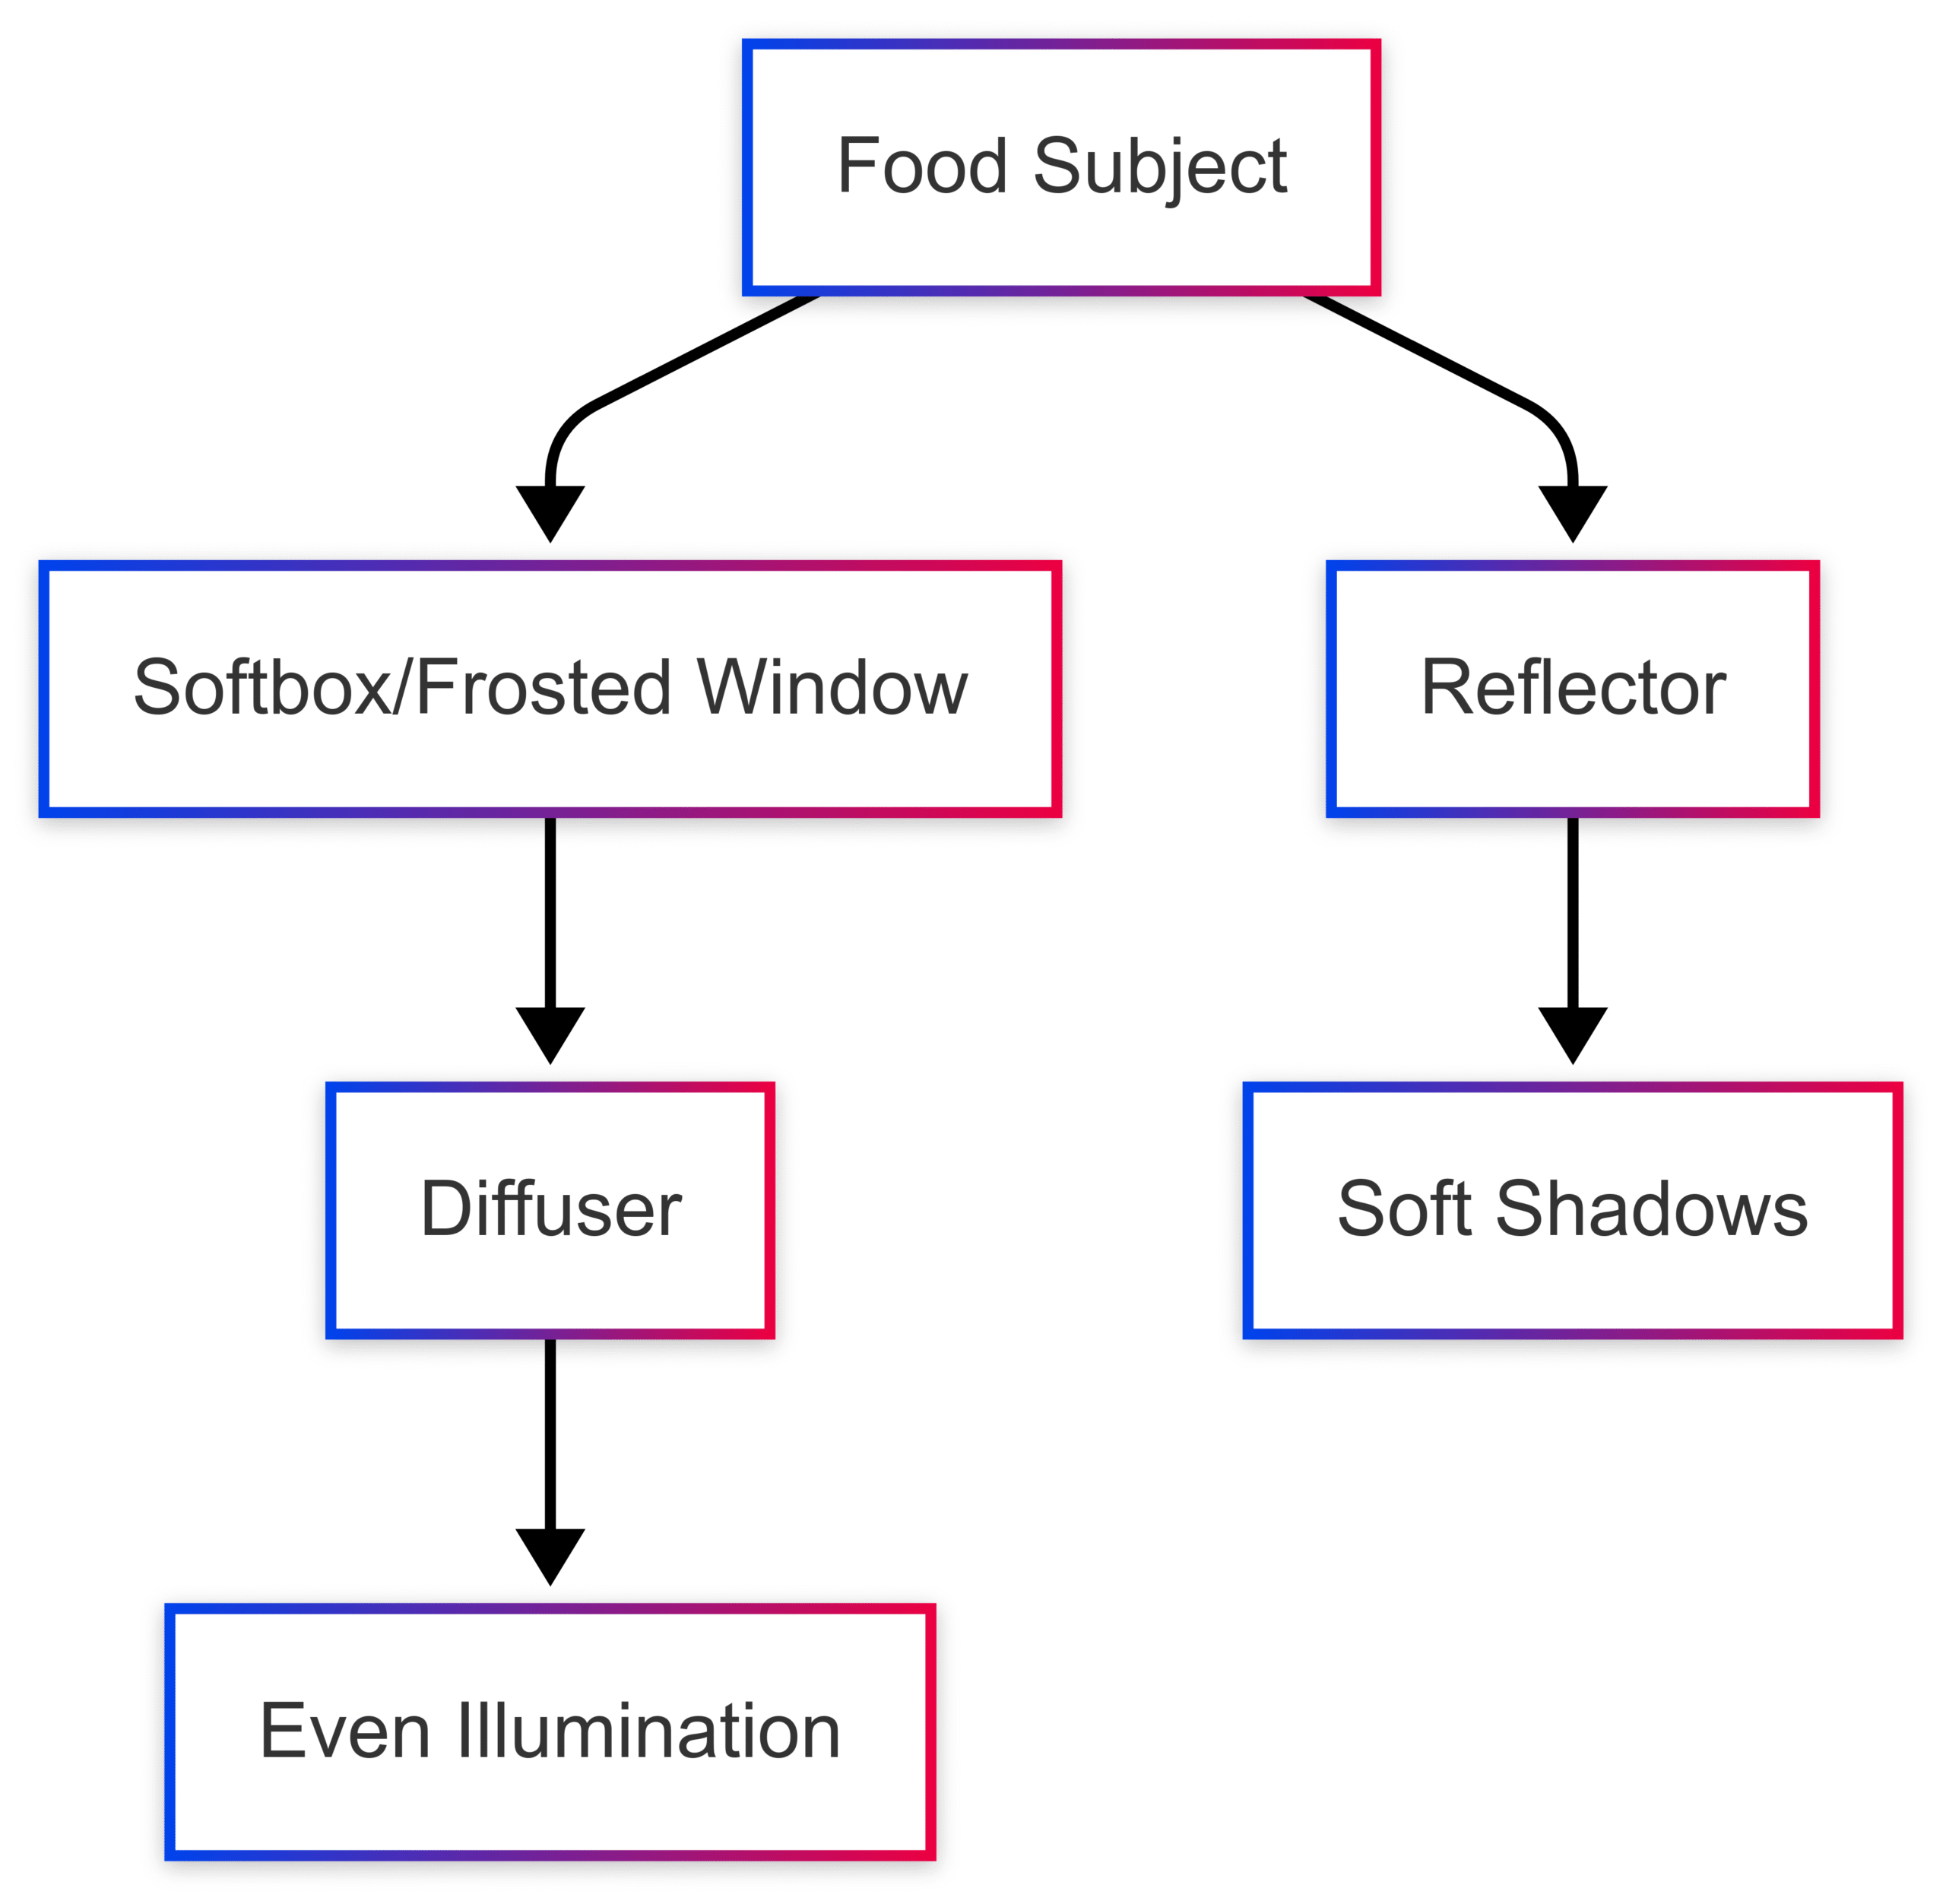
Here’s a simple diagram illustrating lighting setups:

This setup ensures balanced lighting with minimal shadows, enhancing your food’s visual appeal.
Composing Mouthwatering Food Shots
Composition determines how viewers engage with your photos. A thoughtful arrangement of food and props creates a visually striking image that guides the eye naturally.
Arranging Food and Props
- Balance: Place the main dish in the left two-thirds of the frame using the golden ratio (phi grid) to create a pleasing composition. Leave space for complementary props like utensils or garnishes.
- Leading Lines: Arrange props to subtly point toward the main dish, guiding the viewer’s focus. For example, a fork angled toward a slice of cake draws attention to the dessert.
- Negative Space: Avoid overcrowding by leaving empty space around the subject. Frame props at the edges to keep the dish center stage.
Creating Realistic Food Scenes
Natural setups resonate with viewers. Use the golden triangle technique:
- Place the focal point (e.g., a steaming bowl of soup) where diagonal grid lines intersect.
- Arrange props like napkins or cutting boards along the triangle’s edges to create flow.
- For layered shots, start with the dish at the golden spiral’s center, with props along the curve to guide the eye.
For example, Fly by Jing’s overhead shot of a hot pot uses leading lines and negative space to highlight vibrant ingredients, creating an engaging, dynamic image.
Camera Settings for Food Photography
Manual mode ensures consistency across shots. Key settings include:
| Setting | Purpose | Recommended Value |
|---|---|---|
| Aperture | Controls depth of field | f/8–f/11 for sharp focus across the scene |
| Shutter Speed | Manages light exposure and motion | 1/200s for flash; slower for natural light |
| ISO | Adjusts sensor sensitivity | 100–200 for minimal noise |
| White Balance | Ensures accurate colors | Match to light source (e.g., 6,000K for daylight) |
- Aperture: A mid-range f-stop like f/11 balances sharpness and depth of field. Lower f-stops (e.g., f/2.8) create a shallow depth of field for artistic shots, while higher values (e.g., f/22) increase focus but may reduce sharpness due to diffraction.
- Shutter Speed: Use 1/200s with flash to block ambient light or slower speeds (e.g., 1/15s) for natural light. Faster speeds (e.g., 1/1,000s) freeze motion, like pouring a beverage.
- ISO: Stick to the native ISO (100–200) for clean images with minimal noise.
- White Balance: Set to match your light source (e.g., 2,700K for incandescent, 6,000K for daylight) to avoid color casts. Avoid mixing warm and cool lights.
Smartphone users can adjust these settings using apps like Halide for greater control.
Editing Food Photos for Maximum Impact
Editing enhances your photos while keeping food looking natural and appetizing. Here’s a step-by-step approach:
- Connect Your Camera: Plug your camera into a computer via USB to review images on a larger screen using software like Adobe Lightroom or Capture One.
- Color Calibration: Use a color checker (e.g., X-Rite ColorChecker Passport) with Lightroom or Capture One plugins to ensure accurate colors.
- Adjust Exposure and Contrast: Brighten underexposed areas and enhance contrast to make textures pop.
- Sharpen Details: Apply selective sharpening to highlight food textures without overprocessing.
- Remove Distractions: Use tools like Photoshop to remove unwanted elements or clean up backgrounds.
- Compress Images: Reduce file sizes to under 20 MB while maintaining quality for faster Shopify store loading times.
For example, apps like PixPix or Spyne offer AI-powered editing features like background removal and color correction, streamlining the process for beginners.
Optimizing Photos for Shopify
Shopify’s image requirements ensure your photos look great and perform well:
- Resolution: 2048×2048 pixels (minimum 800×800; maximum 4472×4472).
- Aspect Ratio: 1:1 (square) for consistent display.
- File Size: Under 20 MB; up to 250 images per product.
- Format: JPEG, PNG, or GIF.
- Background: White or light-colored for a clean, professional look.
Optimization Tips
- Use Editing Tools: Adobe Photoshop, Canva, or Shopify apps like PixPix or Pxl for background removal and resizing.
- Add Branding: Include your logo or brand name subtly to reinforce identity.
- Show Multiple Angles: Capture front, side, and close-up shots to provide a comprehensive view.
- Incorporate Lifestyle Shots: Show products in use (e.g., a chef drizzling olive oil) to create emotional connections.
- Use Alt Tags: Add descriptive alt text (e.g., “Freshly baked sourdough loaf on wooden table”) to boost SEO.
- Test Performance: Use Shopify’s analytics to track which images drive the most sales and adjust accordingly.
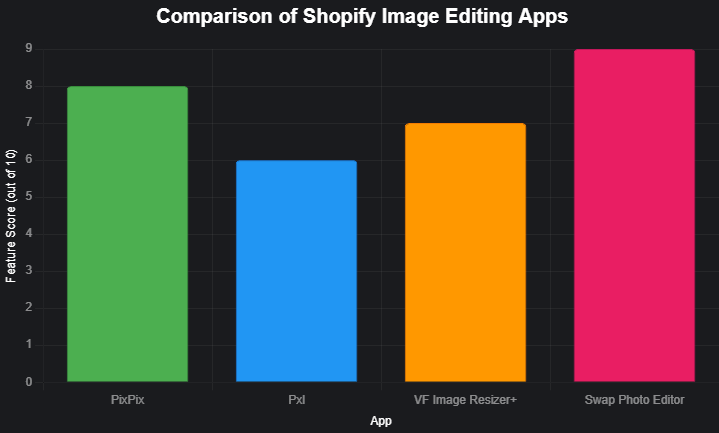
Here’s a chart comparing popular Shopify image editing apps:

This chart evaluates apps based on features like background removal, resizing, and SEO optimization, with Swap Photo Editor scoring highest for versatility.
Integrating with Shopify’s Recipe Kit
Recipe Kit enhances your Shopify store by integrating food photos with shoppable recipe cards. Key features include:
- Shoppable Cards: Link ingredients directly to products, streamlining the purchase process.
- SEO-Friendly Schema: Automatically generates recipe schema to improve search visibility.
- Customizable Designs: Match card styles to your brand for a cohesive look.
For example, a photo of a sizzling stir-fry can be paired with a Recipe Kit card listing ingredients like chili crisp, with direct links to purchase, creating a seamless shopping experience.
Advanced Food Photography Techniques
For those ready to elevate their skills, consider these advanced tips:
- Experiment with Lenses: Use a macro lens (e.g., Canon EF 100mm f/2.8) for close-ups or a probe lens (e.g., Laowa 24mm f/14) for unique angles, like shooting through a donut’s center.
- Focus Stacking: Combine multiple images with different focus points using software like FocusStacker to achieve sharp detail in macro shots.
- Light Modifiers: Use North Star filters for dazzling effects on glassware or nets/flags to control light precisely.
- Parallax Scrolling: Create dynamic website backgrounds with patterned or textured food images that scroll at different speeds, enhancing user experience.
Outsourcing to Professional Services
If time or resources are limited, professional photography services can deliver polished results. Popular options include:
- Pixelz: Affordable, high-quality product photos with fast turnaround.
- Simply Product Shots: Clean, professional images tailored for Shopify.
- Product Photography Studio: Offers lifestyle and 360-degree shots.
- Zenfolio: Combines photography services with portfolio tools for Shopify integration.
Research reviews and compare pricing to ensure quality aligns with your budget.
Conclusion: Elevate Your Shopify Store with Stunning Food Photos
Mastering food photography for your Shopify store involves a blend of technical skill and creative vision. By setting up a simple studio, optimizing lighting, composing thoughtful shots, and editing with precision, you can create images that captivate and convert. Tools like Recipe Kit and AI-powered editors like Spyne streamline the process, while professional services offer a hands-off solution. Invest in high-quality photos to build trust, enhance engagement, and drive sales, ensuring your Shopify store stands out in a crowded market.
Quick Action Plan:
- Set Up: Build a studio with neutral backdrops and essential gear.
- Light Smart: Use softboxes or natural light with reflectors for even illumination.
- Compose Carefully: Apply the golden ratio and leading lines for balanced shots.
- Edit Efficiently: Calibrate colors and optimize images for Shopify’s requirements.
- Integrate: Use Recipe Kit to link photos with shoppable recipes.
- Test and Refine: Analyze performance with Shopify analytics and adjust as needed.
With these strategies, your food photos will not only look delicious but also drive measurable results for your Shopify store.
Please share these How To Take Delicious Food Photos for Shopify Store with your friends and do a comment below about your feedback.
We will meet you on next article.
Until you can read, Peach Cobbler Cake Delight in Slow Cooker
