Artificial Lights for Food Photography
Artificial lighting has reshaped food photography, offering unmatched control, consistency, and creative freedom that natural light struggles to provide. While sunlight delivers a soft, appealing glow, its dependence on weather, time, and location often limits photographers. Artificial lights—dedicated off-camera sources like speedlights, continuous lights, and strobes—empower you to shoot in any environment, from a windowless basement to a late-night kitchen, with precise results. This comprehensive guide dives deep into every facet of artificial lighting for food photography, covering myths, types, specifications, essential equipment, budget hacks, detailed setups, advanced techniques, troubleshooting, emerging trends, and practical case studies. Designed for beginners transitioning from natural light and pros refining their craft, this article provides actionable insights to elevate your food photography to professional levels, ensuring vibrant, appetizing images every time.
The Case for Artificial Lighting in Food Photography
Natural light, sourced from the sun, has long been the gold standard for food photography due to its soft, diffused quality that enhances textures and colors. However, its limitations are significant and increasingly problematic in today’s fast-paced content creation landscape:
- Time Constraints: Shooting is restricted to daylight hours, often requiring precise timing to capture optimal light.
- Location Dependency: A window is essential, limiting setup options and excluding spaces like dark restaurants or basements.
- Inconsistency: Weather, seasons, and reflections from nearby surfaces (e.g., buildings, trees) cause unpredictable variations in brightness and color temperature.
- Limited Creativity: Natural light’s fixed direction and intensity restrict experimentation with diverse lighting styles.
Artificial lights—off-camera sources distinct from harsh household overheads—address these challenges head-on. By providing full control over light direction, intensity, and color, they enable photographers to work anywhere, anytime, with consistent results. For instance, a photographer faced with a shoot in a windowless speakeasy bar discovered that mastering artificial lighting was a game-changer, opening doors to new client projects and creative possibilities.
Key Benefits of Artificial Lighting
- Scheduling Flexibility: Shoot day or night, indoors or out, without reliance on sunlight.
- Location Freedom: Transform any space—basement, studio, or restaurant—into a viable shooting environment.
- Creative Versatility: Mimic soft morning light, dramatic sunset shadows, or experimental high-contrast looks.
- Consistency Across Shots: Uniform brightness and color simplify editing and ensure brand coherence.
- Confidence and Professionalism: Handle diverse projects with assurance, from editorial to commercial work.
Recent 2025 insights from sources like Caspa AI and Colbor Light emphasize how advancements in LED technology have made artificial lighting more accessible, energy-efficient, and tailored for food photography’s unique demands. Whether you’re a blogger aiming for consistency or a commercial photographer tackling high-pressure shoots, artificial lighting is a transformative tool.
Dispelling Myths About Artificial Lighting
Skepticism often holds photographers back from adopting artificial lights, rooted in misconceptions that are easily debunked.
Myth 1: It’s Too Complicated
Many assume artificial lighting requires technical expertise or complex setups. In reality, a basic kit—light, stand, and modifier—takes 10-15 minutes to assemble initially, dropping to under five with practice. Online resources, such as YouTube tutorials from The Bite Shot, simplify the learning curve, making it accessible for beginners.
Myth 2: Results Look Unnatural
This stems from experiences with harsh camera flashes (e.g., smartphone or point-and-shoot), which produce stark highlights and shadows. Off-camera artificial lights, however, allow precise placement, power adjustment, and diffusion. A 2025 comparison of tomato images—one shot with natural window light, another with a single LED and softbox—demonstrates indistinguishable results, proving artificial light can rival natural aesthetics.
Myth 3: It’s Prohibitively Expensive
While high-end strobes like Profoto can cost thousands, budget options deliver professional results. A $20 halogen work light with DIY diffusers or a $100 Godox SL60, as praised in recent Reddit discussions, prove affordability doesn’t compromise quality.
Myth 4: Setup is Time-Intensive
Modern lights, especially continuous LEDs, are plug-and-play, with pre-configured kits streamlining assembly. Continuous lights eliminate syncing complexities, making setups as quick as natural light arrangements.
Myth 5: It’s Only for Pros
Beginners can start with simple setups, like a single continuous light and softbox, and scale up as skills grow. The accessibility of 2025’s budget-friendly LEDs democratizes artificial lighting for all levels.
By addressing these myths, photographers can embrace artificial lighting as a natural extension of their toolkit, enhancing creativity without unnecessary complexity.
Types of Artificial Lights for Food Photography
Three primary types of artificial lights dominate food photography: speedlights, continuous lights, and strobes. Each offers distinct advantages, suited to specific workflows, budgets, and creative goals.
Speedlights: Compact and Portable
Speedlights are small, battery-powered flashes that sync with cameras, ideal for on-location shoots or small spaces.
Key Features:
- Power: 40-80W, suitable for close-ups but may require multiples for larger scenes.
- Portability: Lightweight, fits in a camera bag.
- Compatibility: Must match camera brand (e.g., Nikon, Canon).
- Pros: Affordable ($50-300), quick recycle times (<1 second), travel-friendly.
- Cons: Limited power; requires wireless triggers for off-camera use.
Popular Model: Godox V1 ($200), lauded in 2025 reviews for its round head, which softens light edges, perfect for glossy textures like sauces or beverages.
Use Case: A food blogger shooting in a small café uses a speedlight for portability, syncing it with a softbox for soft, even light on pastries.
Continuous Lights: Real-Time Precision
Continuous lights stay on, offering immediate visual feedback. They’re ideal for beginners, video shooters, and those transitioning from natural light.
Key Features:
- Power: 150-200W, adjustable for brightness.
- Color: Bi-color options (2700K-6500K) for warm or cool tones.
- Pros: No sync needed; real-time shadow/highlight visibility; video-compatible.
- Cons: Can generate heat; less intense than strobes for high-speed needs.
Top Picks for 2025:
- Godox SL-150W III: $250, CRI 96+, daylight-balanced, Bowens mount, praised for stability.
- Colbor PL8B: $100, compact for mobile photography, high CRI, ideal for iPhone users.
- Aputure Amaran 200d: $300, bi-color, favored for photo-video hybrids.
Use Case: A YouTuber creating recipe videos uses an Aputure Amaran for consistent lighting across stills and motion, adjusting color temperature for warm dessert shots.
Strobes: High-Power Precision
Strobes deliver intense light bursts, syncing with camera shutters. They excel in studios requiring bright, controlled illumination.
Key Features:
- Power: 500W+, ideal for deep depth of field (e.g., f/14).
- Pros: High output, fast recycle; handles large modifiers.
- Cons: Bulky, expensive ($300-1500+); requires triggers.
Standout Model: Profoto B10x ($1,000+), compact yet powerful, with Bowens mount, noted for portability in 2025 guides.
Use Case: A commercial photographer uses a Profoto strobe for a high-end restaurant shoot, ensuring every detail of a plated dish is sharp at f/16.
Comparison Table:
| Type | Power (W) | Portability | CRI Range | Best Use Case | Price Range (USD) |
|---|---|---|---|---|---|
| Speedlights | 40-80 | High | 90+ | Travel, Quick Shoots | $50-300 |
| Continuous | 150-200 | Medium | 95+ | Video, Real-Time Adjustments | $100-400 |
| Strobes | 500+ | Low | 96+ | Studio, High-Contrast Work | $300-1500+ |
Choosing the Right Type: Beginners favor continuous lights for ease; pros choose strobes for power. Speedlights suit mobile, budget-conscious shooters.
Key Specifications for Selecting Artificial Lights
Choosing the right light involves evaluating critical metrics to ensure quality and compatibility.
- Color Rendering Index (CRI): Measures color accuracy (0-100). Aim for 95+ for vibrant food colors (e.g., reds in tomatoes, greens in herbs). Low CRI causes greenish tints, ruining ingredient vibrancy.
- Bi-Color Functionality: Adjusts temperature (2700K-6500K) for warm (cozy pies) or cool (fresh salads) looks.
- Power Output: Minimum 150W for small sets; 200W+ for backlighting or large scenes.
- Power Source: Battery for mobility (e.g., Genaray PortaBright, $200+); plug-in for reliability. Include backups (batteries or extension cords).
- Mount System: Bowens mount for versatile modifier compatibility (softboxes, grids, snoots).
- Recycle Time: <1 second for strobes/speedlights to avoid delays.
- Heat Management: LEDs run cooler, critical for heat-sensitive foods like ice cream.
- Control Options: 2025 models like GVM SD500B ($400) offer app-based adjustments for brightness and color.
Recommended: Godox SL-150W III ($250, CRI 96+, bi-color, Bowens) balances cost, performance, and versatility.
Essential Equipment to Complement Your Lighting Setup
Lights alone don’t create professional results; complementary gear shapes the output.
- Light Stands: Adjustable (up to 13ft) for precise positioning. Budget: Neewer ($50); Pro: Manfrotto ($150).
- Mounts/Speed Rings: Bowens-compatible for secure modifier attachment.
- Modifiers:
- Softboxes: 48″ octagon ($80) for soft, even light, mimicking window glow.
- Umbrellas: $30, broad diffusion for large scenes.
- Diffusers: 40×60″ ($40) for gentle, natural glow.
- Grids/Snoots: $50, focus light for dramatic effects.
- Reflectors: 5-in-1 (white/silver/gold/black/translucent, $50) for filling shadows or adding warmth.
- Wireless Triggers: Godox XPro ($70) for strobes/speedlights.
- Tripods: Stabilize cameras for low shutter speeds ($100+).
- Color Meters: Sekonic C-700 ($1,500) for precise white balance, though optional for beginners.
Gear Table:
| Item | Function | Recommended Model | Price (USD) |
|---|---|---|---|
| Light Stand | Positioning | Neewer Adjustable | $50-100 |
| Softbox | Diffusion | Godox 48″ Octagon | $80 |
| Reflector | Shadow Fill | Neewer 5-in-1 150x100cm | $50 |
| Diffuser | Softening | Neewer 40×60″ | $40 |
| Trigger | Sync | Godox XPro | $70 |
| Tripod | Camera Stability | Manfrotto Compact | $100 |
These tools enable customization, turning raw light into appetizing, professional illumination.
Budget-Friendly Alternatives and DIY Hacks
High-end gear isn’t mandatory; affordable options deliver impressive results.
- HDX 500W Halogen Work Light: $20, bright but hot. Pair with double-layered parchment paper ($5) for diffusion. Adjust white balance to counter tungsten tint (3200K).
- LED Bulbs: High-CRI (90+) packs ($30) in softbox with 4-socket adapter ($20).
- DIY Diffusers: Bed sheets, sheer curtains, or parchment paper for softening.
- DIY Reflectors: White foam boards ($10) or black cardboard for contrast control.
2025 Budget Insights: Reddit communities and Caspa AI reviews highlight Godox SL60 ($100) and Neewer softbox kits ($50) as beginner favorites. X posts note the rise of compact LEDs for small-scale shoots.
Budget vs. Pro Comparison:

Case Study: A $30 halogen setup with parchment diffusion produced images rivaling a $300 Godox setup, though with slightly duller highlights and less color accuracy.
Mastering Artificial Lighting Setups
Two primary setups—side and back lighting—offer versatility for food photography.
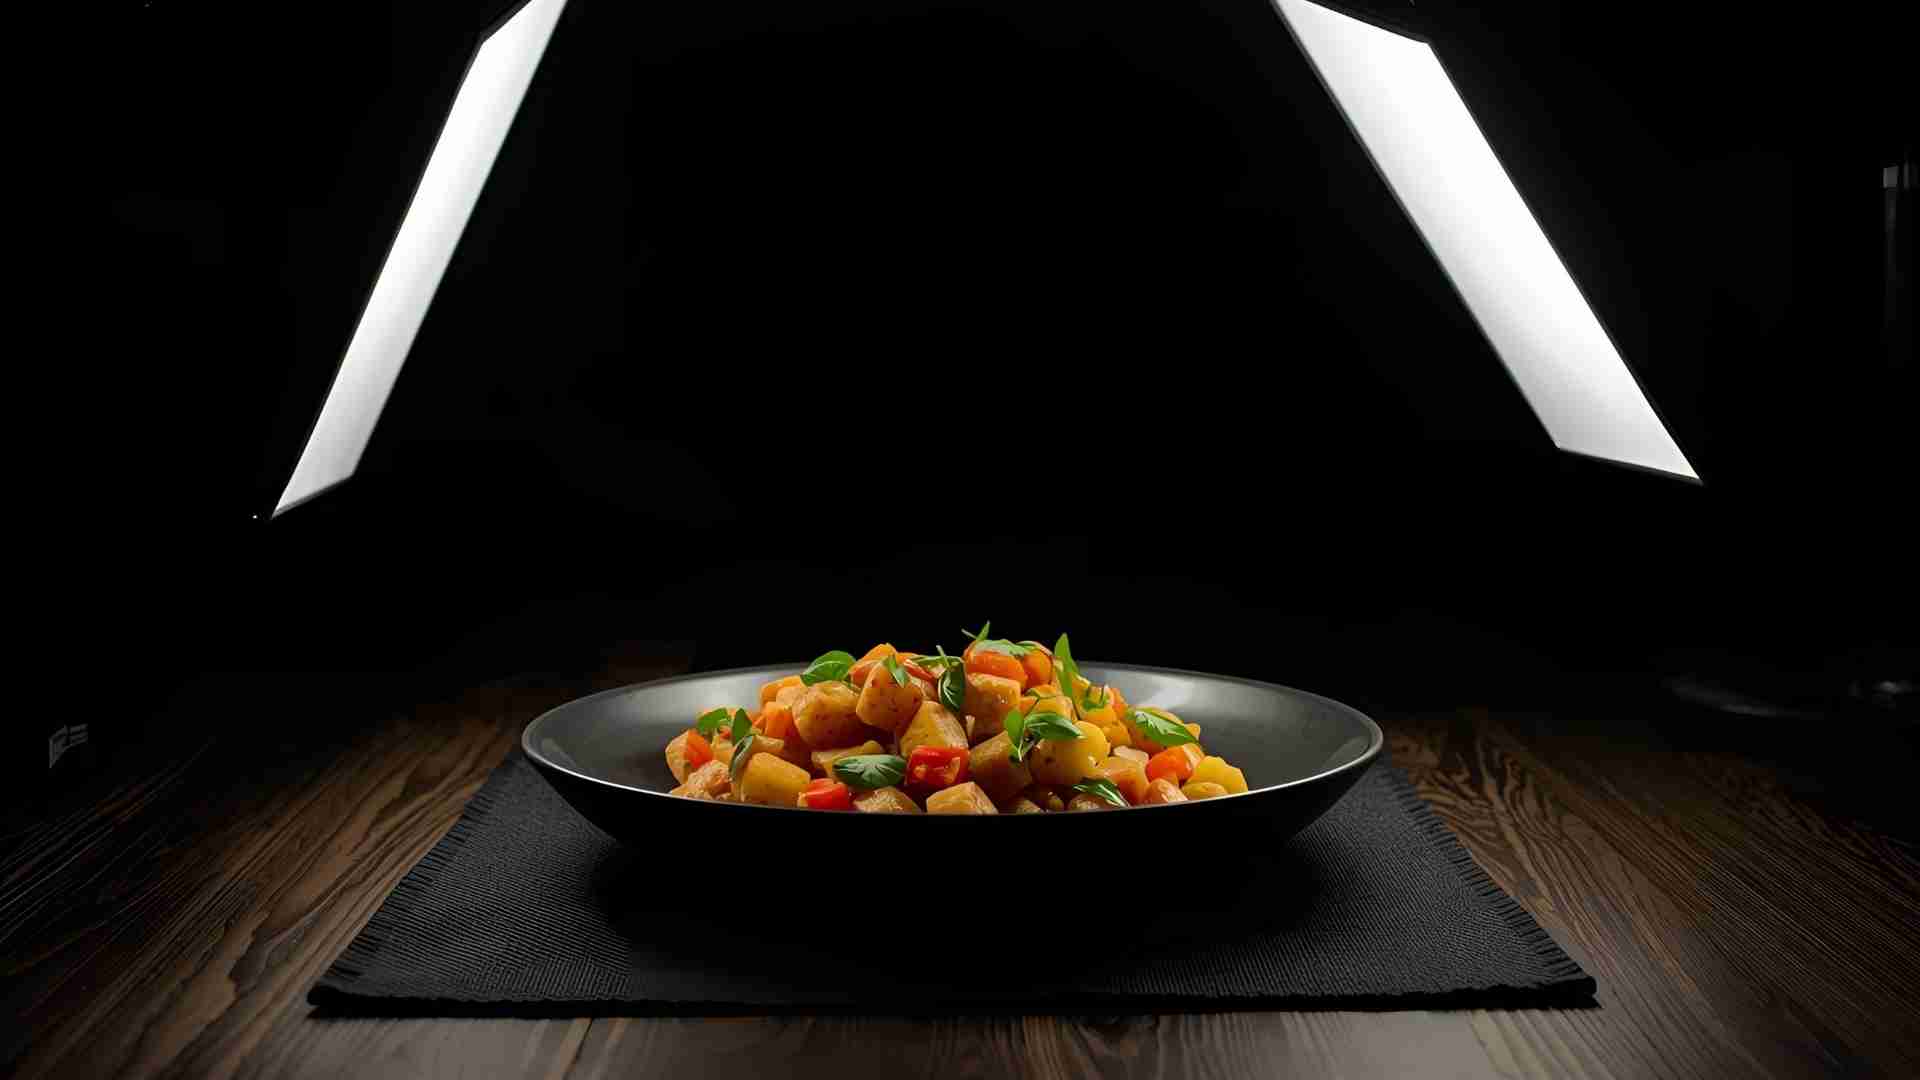
Side Lighting Setup
Ideal for textures (e.g., crusty bread, creamy soups). Position light at a 45-degree angle, slightly above subject, angled down. Place diffuser close for softness; reflector opposite to fill shadows.
Example Gear: Nikon D750, 105mm lens, Amaran 200x at 75% power.
Settings: 1/13s, f/14, ISO 200.
Result: Even illumination with gentle shadows, highlighting food texture.
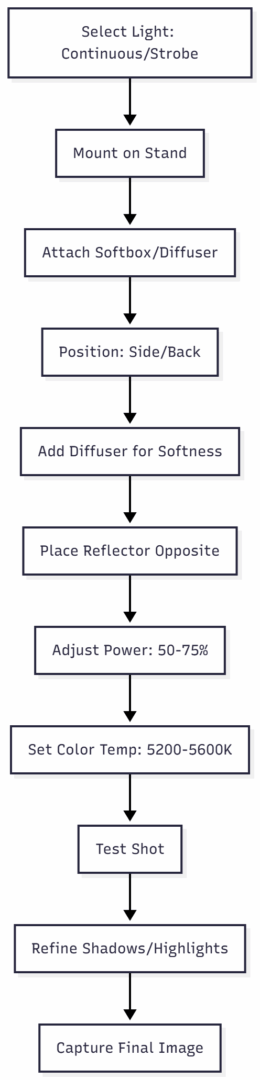
Step-by-Step:
- Mount light on stand, 3-4 feet from subject.
- Attach 48″ softbox with Bowens mount.
- Position diffuser between light and subject, 1-2 feet from food.
- Place 5-in-1 reflector (white side) opposite to soften shadows.
- Adjust light to 50-75% power, 5200K for daylight balance.
- Test and tweak angle for desired shadow length.
Back Lighting Setup
Perfect for shiny or translucent foods (e.g., olives, drinks). Place light behind subject, angled down to avoid silhouettes. Diffuser softens; reflector in front balances.
Example Gear: Fuji XT5, 80mm lens, Profoto B10x at 7.5 power.
Settings: 1/200s, f/14, ISO 160.
Result: Glowing highlights on glossy surfaces, enhancing visual appeal.
Step-by-Step:
- Mount light 4-5 feet behind subject, angled 30 degrees down.
- Attach large softbox for even diffusion.
- Place diffuser 1-2 feet from light to soften glare.
- Position reflector (silver side) in front to fill shadows.
- Set light to 5600K, 60-80% power.
- Test shot; adjust reflector angle for balance.
Advanced Workflow:
Practical Demonstrations
- Speedlight Demo: Promaster speedlight, 16″ softbox, backlit glasses. Strong shadows emphasize depth.
Settings: 1/200s, f/10, ISO 160, 1/2 power. - Continuous Demo: Amaran 200x with round diffuser, left-side lit tomatoes. Soft, even light.
Settings: 1/13s, f/14, ISO 200, 75% power. - Strobe Demo: Profoto B10x, large softbox, right-side lit tomatoes. Uniform coverage.
Settings: 1/200s, f/14, ISO 160, 7.5 power.
Case Study: A bundt cake shoot used side lighting for texture depth and backlighting for a glowing drizzle effect, showcasing versatility with one light. Another shoot with olives highlighted their glossy sheen using backlighting, with a reflector softening front shadows.
Advanced Techniques for Professional Lighting
Elevate your work with these expert strategies, informed by 2025 trends and insights.
- Layered Lighting: Use a key light (main source, 70% power) and fill light (secondary, 30% power) for nuanced depth. Example: Key light at 45 degrees, fill at 90 degrees for balanced shadows.
- Colored Gels: Blue ($10) for cool drinks, orange for warm desserts, enhancing mood.
- Hard vs. Soft Control: Small modifiers (grids, $50) for dramatic contrast; large softboxes for subtle glow.
- White Balance Mastery: Custom WB in-camera or Lightroom adjustments for precise color accuracy.
- Avoid Flat Light: Skip front/overhead lighting; favor side/back for dimension.
- Heat Management: LEDs for melting foods; use stand-ins (e.g., mashed potatoes for ice cream).
- App-Controlled Lights: GVM SD500B ($400) offers Bluetooth adjustments for real-time tweaks.
- Steam Effects: Hide microwaved sponges behind dishes for lasting steam.
- Reflection Control: Polarizing filters ($50) reduce glare on glossy sauces.
- Seasonal Moods: Warmer tones (3200K) for fall dishes; cooler (5600K) for summer salads.
- Dynamic Angles: Experiment with light height (low for long shadows, high for overhead shots).
- Texture Emphasis: Side light at shallow angles to highlight crusty or layered textures.
- Mood Boards: Create a Pinterest board with 50+ images to analyze lighting patterns (soft, harsh, directional) and replicate with artificial setups.
Exercise: Shoot the same dish (e.g., a salad) with three setups—soft side light, hard back light, and layered lighting. Compare results to refine your style.
Troubleshooting Common Food Photography Challenges
Issues arise in food photography; here’s how to solve them effectively.
| Problem | Cause | Solution |
|---|---|---|
| Harsh Shadows | Direct, small light source | Use larger softbox; add diffuser closer. |
| Color Casts | Low CRI or mixed lighting | High-CRI lights (95+); isolate sources. |
| Melting Foods | Hot lights, slow setup | Use LEDs; prep stand-ins (e.g., mashed potatoes). |
| Flat Textures | Even, front-facing light | Side light for shadow depth. |
| Glossy Reflections | Wrong light angle | Tilt dish; use polarizing filter. |
| Low Light Focus | Insufficient brightness | Tripod; increase ISO slightly (200-400). |
| Mixed Tones | Multiple light sources | Block ambient light; match Kelvin (5200K). |
| Dull Hot Foods | Cooling during setup | Undercook slightly; add steam effects. |
| Overexposed Highlights | High power, no diffusion | Lower power (50%); add diffuser layers. |
| Uneven Lighting | Poor modifier placement | Adjust softbox angle; use larger diffuser. |
Pro Tip: Plan compositions and test lighting in advance to keep food fresh and vibrant.
Emerging Trends in Artificial Lighting for 2025
Recent advancements, as noted by Caspa AI, Colbor Light, and GVM, shape the future of food photography lighting:
- AI-Assisted Lighting: Software predicts optimal light placement based on scene analysis.
- Sustainable LEDs: High-CRI, energy-efficient models reduce environmental impact.
- App-Controlled Systems: Bluetooth-enabled lights (e.g., GVM SD500B) for remote adjustments.
- COB LEDs: Chip-on-Board designs (e.g., Genaray PortaBright, $200) offer compact, high-output solutions.
- Hybrid Photo-Video Lights: Models like Aputure Amaran cater to growing demand for video content.
X posts highlight enthusiasm for compact LEDs and DIY hacks, reflecting a shift toward accessible, versatile setups.
Integrating with Digital Tools for Maximum Impact
Showcase your images with plugins like WP Recipe Maker, which offers SEO-optimized recipe cards with step-by-step photo integration. This ensures your lighting efforts translate into visually appealing, user-friendly online content. Pair with social media strategies to boost engagement, as 2025 trends emphasize visual storytelling on platforms like X.
Practical Case Studies for Inspiration
- Basement Bar Shoot: A windowless speakeasy required a Godox SL-150W with a 48″ softbox for side lighting. The setup mimicked window light, highlighting cocktail textures. Settings: 1/100s, f/11, ISO 200.
- Dessert Blog Post: A bundt cake shoot used backlighting (Profoto B10x) for a glowing drizzle effect, with a reflector softening shadows. Settings: 1/200s, f/14, ISO 160.
- Budget Setup Success: A $30 halogen light with parchment paper diffusion captured vibrant salad images, rivaling pro gear with slight color tweaks in post.
Building Your Lighting Style
To develop a signature look:
- Analyze Inspirations: Collect 50+ food images on Pinterest, noting shadow softness, highlight intensity, and light direction.
- Experiment: Test setups (soft side, hard back, layered) with one dish to compare effects.
- Iterate: Shoot weekly, tweaking modifiers and angles to refine your aesthetic.
Conclusion
Artificial lighting liberates food photographers from natural light’s constraints, offering control, consistency, and endless creative possibilities. From budget-friendly halogen hacks to professional strobes, the right setup transforms any space into a studio. Master side and back lighting, prioritize high-CRI lights, and experiment with advanced techniques to craft your unique style. With 2025’s advancements in LEDs and AI-driven tools, now is the perfect time to embrace artificial lighting and elevate your food photography to professional heights.
Please share this Artificial Lights for Food Photography with your friends and do a comment below about your feedback.
We will meet you on next article.
Until you can read, Learning to Shoot in Manual Mode: Comprehensive Guide