The Basic Light Setup For Food Photography
Master food photography with this guide to basic lighting setups. Learn to use natural and artificial light, diffusers, and reflectors for stunning results.
Food photography is an art form that relies heavily on light to create visually appealing images. The way light interacts with food can highlight textures, enhance colors, and evoke specific moods, transforming a simple dish into a mouthwatering masterpiece. Whether you’re a beginner or a seasoned photographer, mastering the basic light setup for food photography is essential. This comprehensive guide will walk you through the foundational techniques, equipment, and principles to create stunning food photos using both natural and artificial light. We’ll cover light direction, modifiers, and practical tips to elevate your photography, ensuring your images stand out on platforms like Google, Instagram, or client portfolios.
Why Lighting Matters in Food Photography
Photography, at its core, is about capturing light. In food photography, lighting is the key to showcasing the dish’s texture, color, and form. A well-lit image can make food look fresh, appetizing, and three-dimensional, while poor lighting can flatten the image or create unappealing shadows. The goal is to control the direction, quality, and intensity of light to create a balanced and visually engaging composition.
This guide focuses on the “basic” light setup, a term that might sound simple but forms the foundation for advanced techniques. Far from being limiting, this setup allows you to produce professional-quality images with minimal equipment. By understanding how to manipulate light, you can adapt to various scenarios, from home kitchens to professional studios, and create images that resonate with your audience.
The Foundational Light Setup for Food Photography
The basic light setup for food photography revolves around three core components: a light source, a diffuser, and a reflector. This setup is designed to produce soft, flattering light that enhances the food’s natural beauty. Here’s a breakdown of the setup:
- Light Source: Position your subject near a window to harness natural light. The light source should come from the side or behind the subject, depending on the desired effect.
- Diffuser: Place a diffuser (e.g., sheer curtain, muslin cloth, or professional diffuser panel) between the light source and the subject to soften the light and reduce harsh shadows.
- Reflector: Position a reflector (e.g., white foam board or a professional reflector) opposite the light source to bounce light back onto the subject, filling in shadows for a balanced look.
This setup is versatile and can be adapted to create different moods, from bright and airy to moody and dramatic, depending on how you manipulate the light.
Step-by-Step Setup
- Choose Your Light Source: Place your food setup near a window to take advantage of natural light. North-facing windows are ideal as they provide consistent, diffused light throughout the day. Avoid direct sunlight, as it creates harsh shadows that can overpower the subject.
- Add a Diffuser: If the natural light is too intense, place a diffuser between the window and the subject. A sheer curtain, baking paper, or a professional diffuser panel (like the Neewer 40″ x 60″) works well. The diffuser scatters light, creating a soft, even illumination.
- Incorporate a Reflector: Position a reflector opposite the light source to bounce light back onto the subject. A white foam board or a collapsible reflector (like the Neewer 24″ with handle) is affordable and effective. Adjust the reflector’s angle to control the amount of fill light.
- Fine-Tune the Setup: Experiment with the distance, angle, and height of the light source and reflector to achieve the desired effect. Closer light sources create softer light, while adjusting the angle can emphasize textures or create dramatic shadows.
This setup is the cornerstone of food photography lighting, providing a solid starting point for beginners and a reliable fallback for professionals.
Understanding Light Direction
The direction of light plays a critical role in shaping the mood and depth of your food photos. The two most common directions in food photography are side lighting and backlighting.
Side Lighting
Side lighting, where the light source is positioned to the side of the subject, is a go-to technique for food photography. It creates depth and dimension by casting soft shadows that highlight the food’s texture and form. For example, side lighting can emphasize the flaky layers of a croissant or the glossy surface of a sauce.
How to Achieve Side Lighting:
- Place the light source (window or artificial light) to the right or left of the subject.
- Position the camera perpendicular to the light source.
- Use a diffuser to soften the light and a reflector to fill in shadows on the opposite side.
Advantages:
- Enhances texture and detail.
- Creates a balanced, natural look suitable for most food types.
- Easy to set up and control.
Backlighting
Backlighting, where the light source is behind the subject, creates a dramatic, glowing effect. It’s ideal for highlighting shiny or translucent elements, such as the gloss on olives or the clarity of a glass of wine. However, backlighting can result in underexposed subjects if not balanced properly.
How to Achieve Backlighting:
- Position the light source behind the subject, slightly elevated and angled downward.
- Ensure the light doesn’t shine directly into the camera lens to avoid flare.
- Use a reflector in front of the subject to bounce light back and illuminate the front of the food.
Advantages:
- Creates a glowing, appetizing effect.
- Highlights reflective surfaces and textures.
- Adds a sense of depth and drama.
Avoiding Front Lighting
Front lighting, where the light source is directly in front of the subject, should generally be avoided in food photography. It flattens the image, reducing depth and making the food appear two-dimensional. Instead, focus on side or backlighting to create visually engaging compositions.
Light Modifiers: Tools to Shape Light
Light modifiers are essential for controlling the quality and direction of light. They allow you to soften, redirect, or block light to achieve the desired effect. Here are the key modifiers for food photography:
Diffusers
A diffuser softens light by scattering it, reducing harsh shadows and creating a more even illumination. Common diffusers include:
- Sheer Curtains or Muslin Cloth: Affordable and readily available, these can be hung over a window to diffuse natural light.
- Baking Paper: A budget-friendly option for softening light.
- Professional Diffusers: Products like the Neewer 40″ x 60″ diffuser panel offer consistent results and are versatile for both natural and artificial light.
Placement: Position the diffuser between the light source and the subject, closer to the light source for maximum effect.
Reflectors
Reflectors bounce light back onto the subject, filling in shadows and adding highlights. They come in various forms:
- White Foam Board: Affordable and effective, available at most craft stores.
- Collapsible Reflectors: Products like the Neewer 24″ reflector with handle are portable and offer multiple surfaces (e.g., white, silver, gold).
- Metallic Surfaces: For a stronger reflection, use aluminum foil or metallic reflectors.
Placement: Position the reflector opposite the light source, adjusting the angle to control the intensity of the fill light.
Flags and Gobos
Flags or gobos block light from specific areas, creating dramatic shadows or controlling light spill. Black foam boards or fabric can serve as flags, allowing you to shape light and add mood to your images.
Placement: Position flags to block unwanted light, such as light spilling onto the background or creating unwanted highlights.
Recommended Gear and Prices
| Item | Brand/Model | Price (USD) | Notes |
|---|---|---|---|
| Diffuser (Large) | Neewer 40″ x 60″ | ~$30 | Versatile for natural and artificial light. |
| Diffuser (Portable) | Neewer 24″ with Handle | ~$20 | Ideal for on-location shoots. |
| Reflector | Neewer 5-in-1 24″ Collapsible | ~$15 | Includes white, silver, gold, and black surfaces. |
| Foam Board (White/Black) | Generic 20″ x 30″ | ~$5 | Affordable, available at craft stores. |
| Clips for Foam Board | Generic Spring Clamps | ~$10 (set of 6) | Used to secure foam boards or diffusers. |
| Continuous Light | Pixapro LED200D mk II (Godox SL-200) | ~$200 | Professional-grade, adjustable color temperature. |
| Softbox | 120cm Octagonal Softbox | ~$50 | Double diffusion for soft, natural-looking light. |
Note: Prices are approximate and may vary based on retailer or region. Check platforms like Amazon or B&H Photo for current pricing.
Artificial Light in Food Photography
While natural light is ideal for beginners, artificial light offers greater control and consistency, especially in low-light conditions or professional settings. Here’s how to incorporate artificial light into your food photography setup.
Continuous Light vs. Flash
- Continuous Light: Allows you to see the lighting effect in real-time, making it easier to adjust. The Pixapro LED200D mk II (or Godox SL-200 LED) is a popular choice, offering adjustable brightness and color temperature.
- Flash: Provides more power and precision but requires more experience to master. Flash is ideal for freezing motion or capturing fast-paced shoots.
Choosing the Right Option: Beginners should start with continuous light for its ease of use. As you gain confidence, experiment with flash for more dynamic setups.
Color Temperature
Artificial lights have varying color temperatures, measured in Kelvin (K). For food photography, aim for a color temperature of 5000-5500K to mimic natural daylight and avoid unnatural color casts. Most modern continuous lights allow you to adjust the color temperature for flexibility.
Artificial Light Setup
To recreate the natural light look with artificial light:
- Position the Light: Place the continuous light or softbox to the side or behind the subject, mimicking natural light directions.
- Use a Softbox: A 120cm octagonal softbox with double diffusion creates soft, window-like light.
- Add a Reflector: Use a reflector to fill in shadows, ensuring the front of the subject is well-lit.
- Adjust Intensity: Move the light closer or farther to control brightness. Dimmer settings can create a softer, more natural effect.
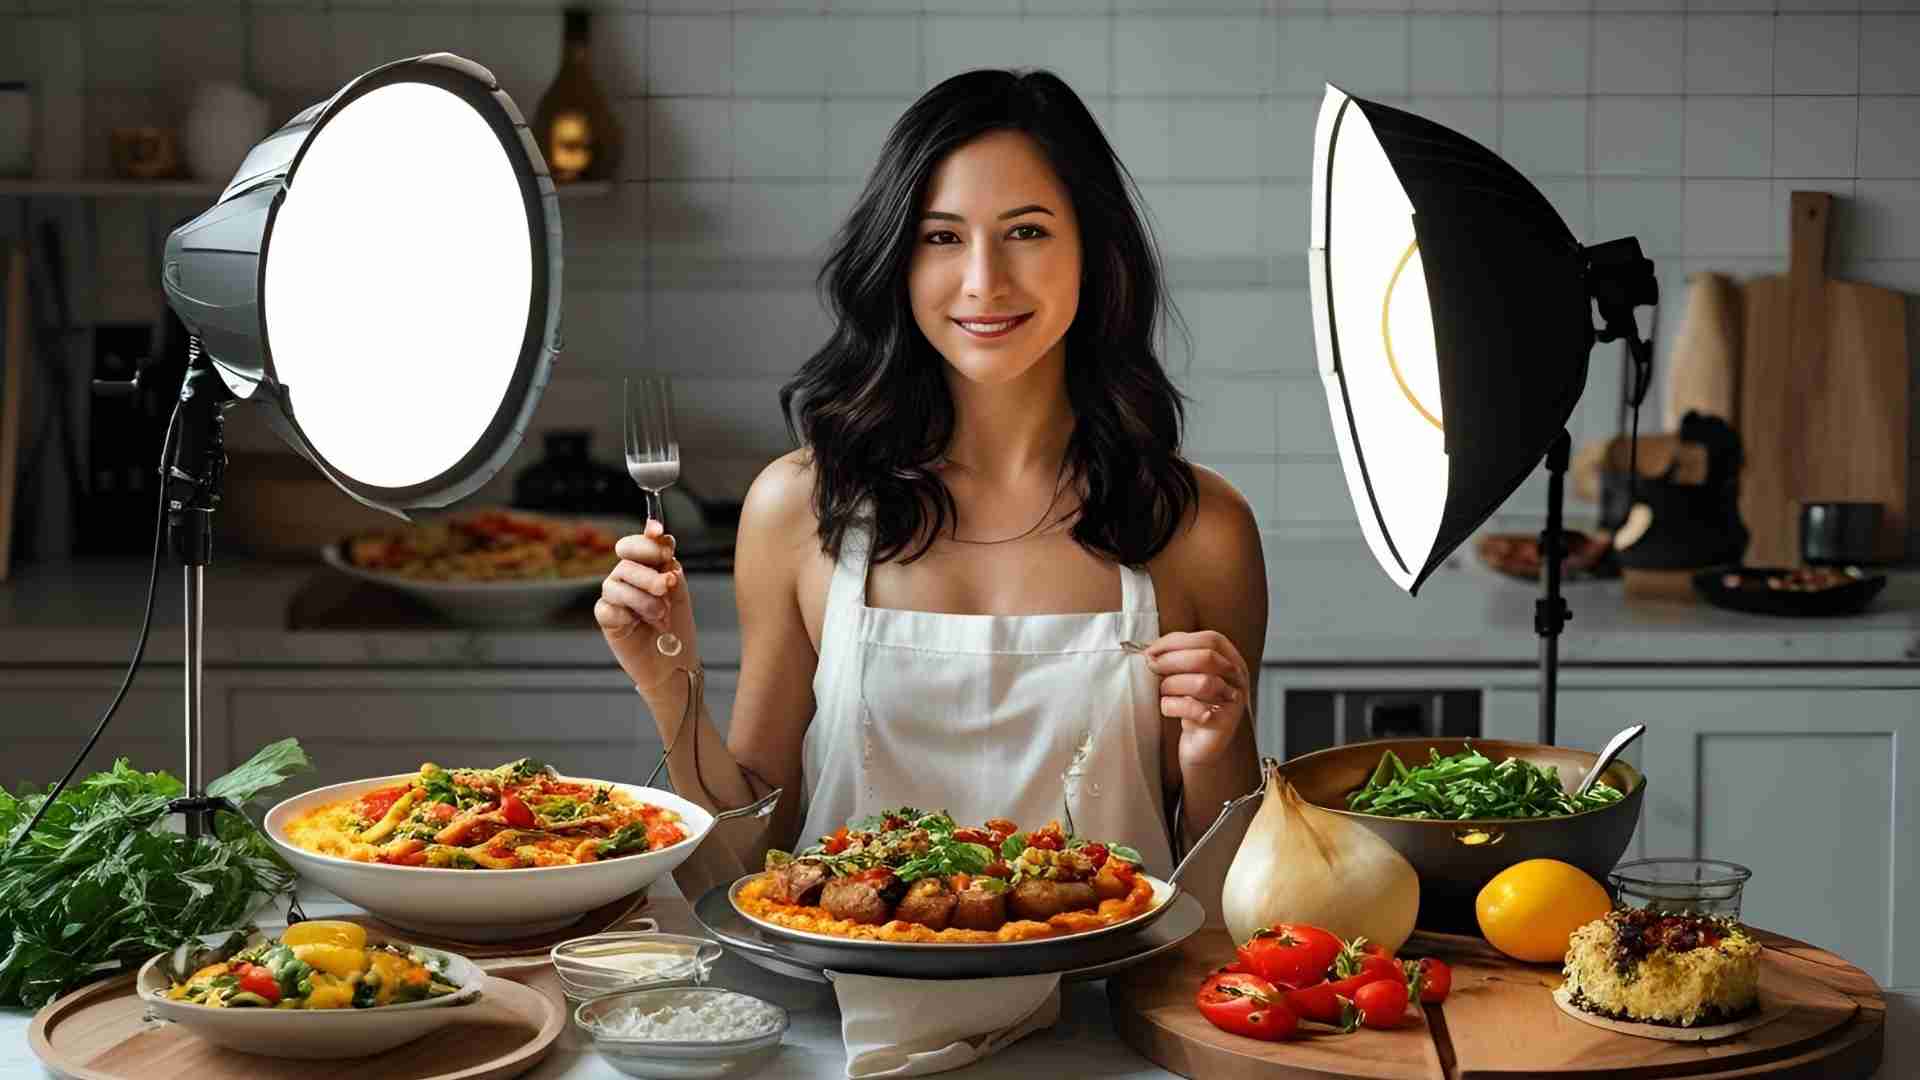
Example Setup (Diagram):
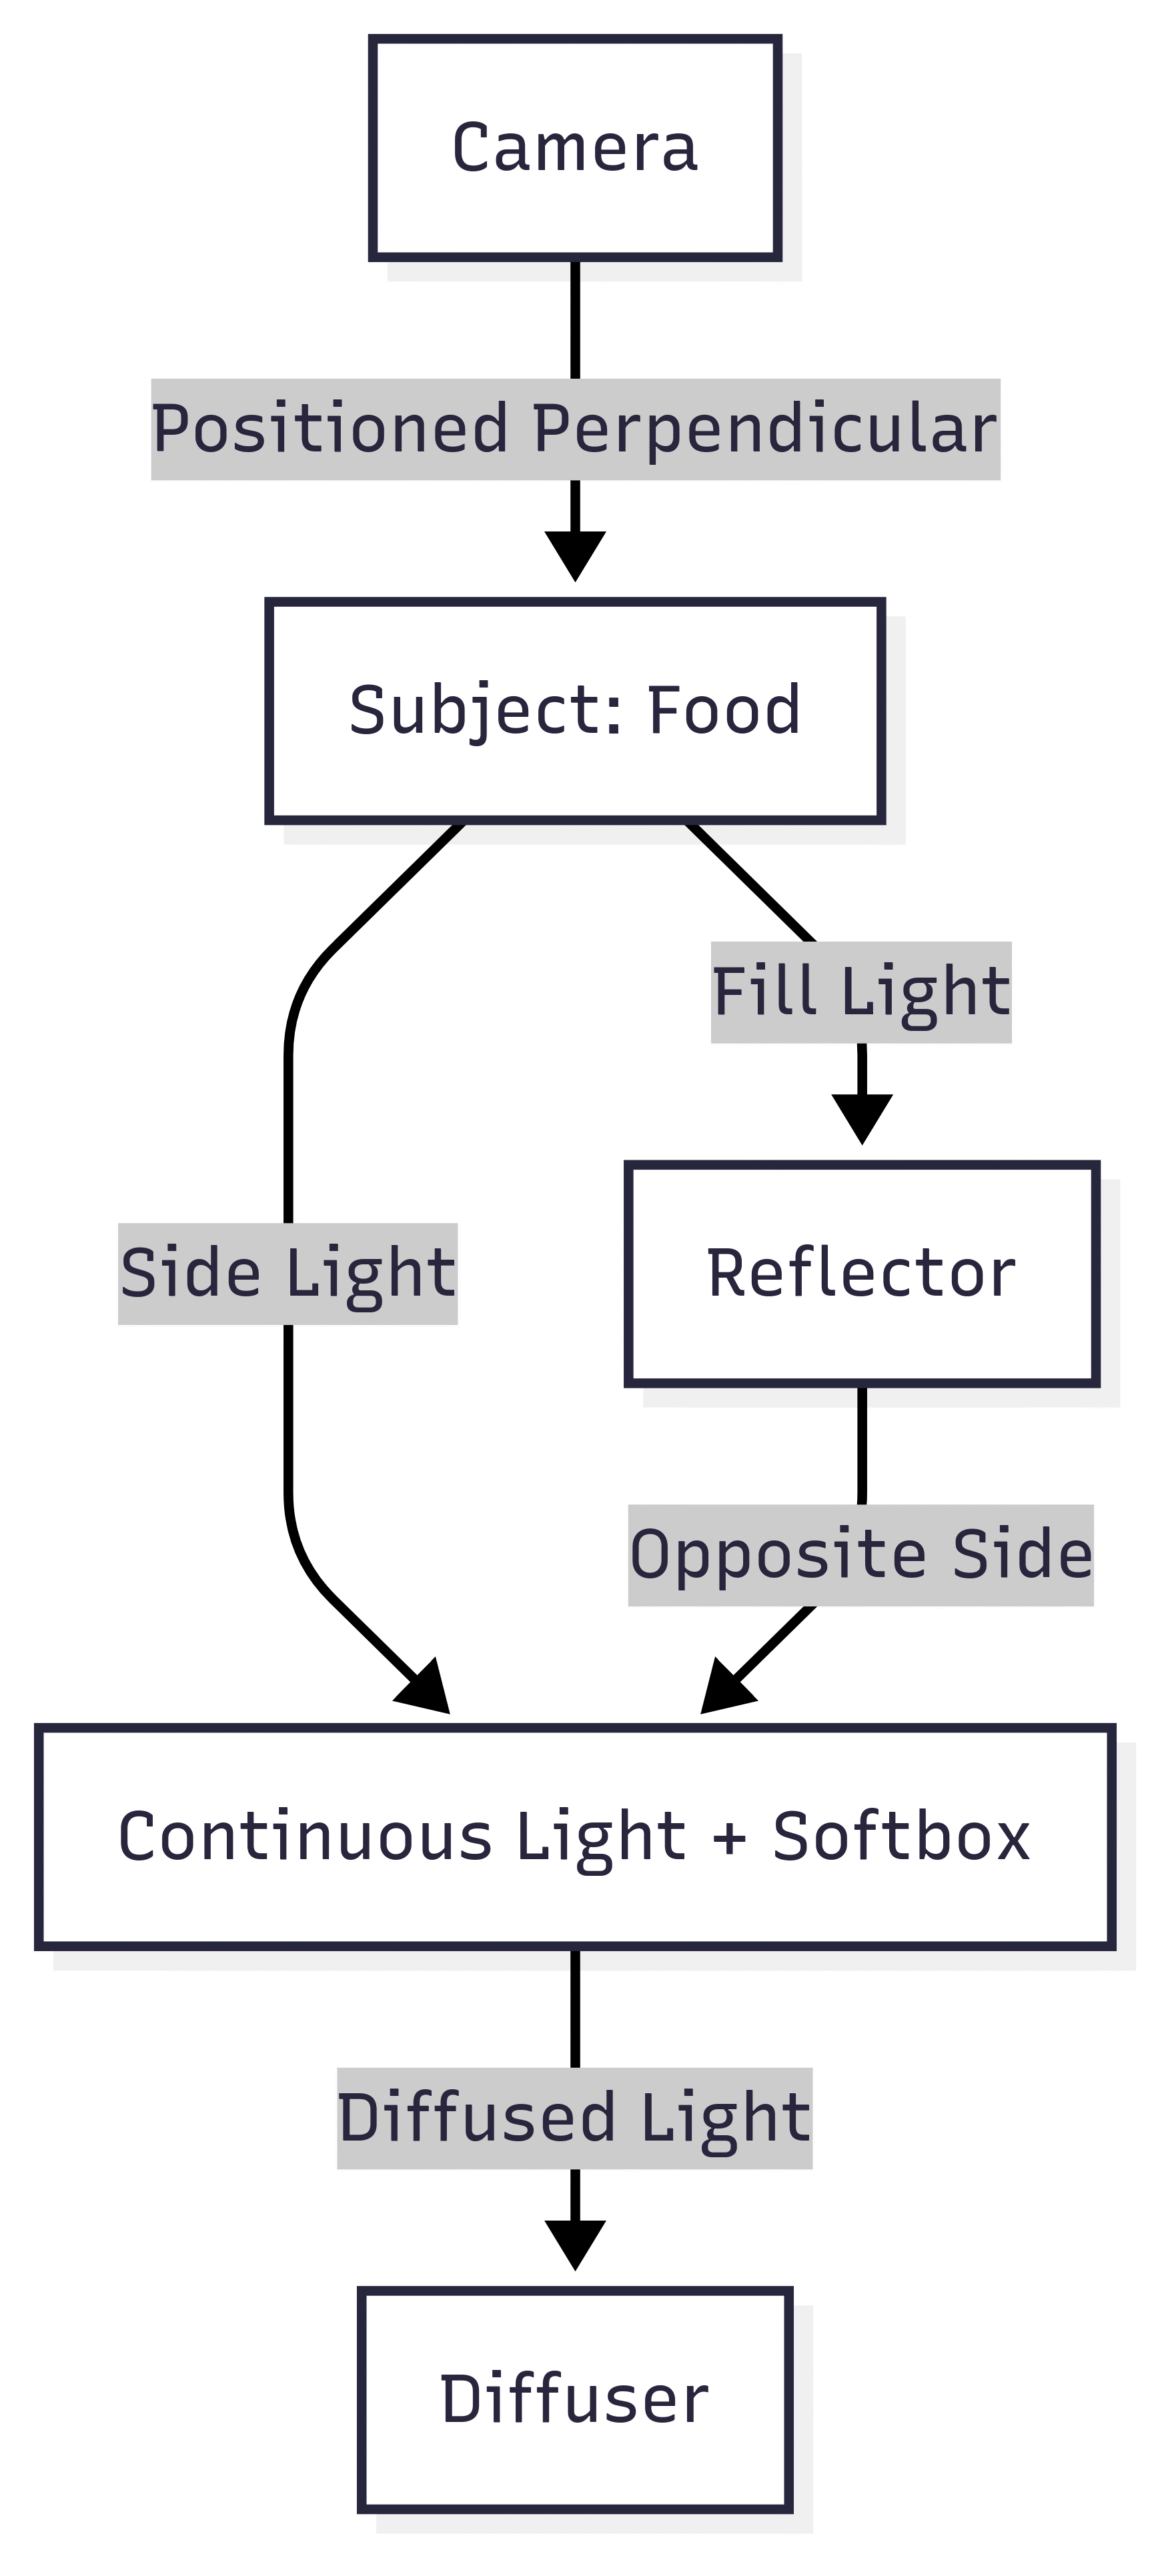
This diagram illustrates a side-lit setup with a continuous light, softbox, diffuser, and reflector.
Practical Tips for Mastering Food Photography Lighting
- Use a White Balance Card: Ensure accurate color representation by using a white balance card or gray card during your shoot. This is especially important when mixing natural and artificial light.
- Experiment with Composition: Use light to guide the viewer’s eye. For example, place highlights on the focal point of the dish to draw attention.
- Test Shots: Take multiple test shots to fine-tune light placement, diffuser position, and reflector angle. Review the images to ensure the desired mood and texture are achieved.
- Observe Light Changes: If using natural light, note how it changes throughout the day. Morning light is cooler and softer, while midday light is brighter and harsher.
- Practice with Different Foods: Experiment with various foods to understand how light interacts with different textures and surfaces. For example, glossy foods like olives benefit from backlighting, while matte foods like bread look great with side lighting.
Common Lighting Scenarios and Solutions
| Scenario | Lighting Solution |
|---|---|
| Harsh Shadows | Use a diffuser to soften the light or move the light source farther from the subject. |
| Flat, Lifeless Images | Avoid front lighting; switch to side or backlighting for depth and texture. |
| Overexposed Background (Backlighting) | Use a reflector to balance exposure or adjust camera settings (e.g., lower ISO). |
| Unnatural Color Cast | Adjust white balance or use a light source with a 5000-5500K color temperature. |
| Moody, Dramatic Look | Use a flag to block light and create deeper shadows, or reduce reflector intensity. |
Expanding Your Lighting Skills
Once you’ve mastered the basic setup, experiment with advanced techniques to add variety to your portfolio:
- Mixing Light Sources: Combine natural and artificial light for creative effects, ensuring consistent color temperatures.
- Using Gobos for Patterns: Create textured shadows by placing patterned objects (e.g., lace or leaves) between the light and subject.
- Adjusting Light Ratios: Vary the intensity of the main light and fill light to control contrast and mood.
Conclusion
Mastering the basic light setup for food photography is a game-changer for creating stunning, professional-quality images. By leveraging natural light, diffusers, reflectors, and artificial light sources, you can control the direction, quality, and intensity of light to highlight the food’s best features. Start with the foundational setup—side or backlighting with a diffuser and reflector—and experiment with angles, distances, and modifiers to develop your unique style. Whether you’re shooting for a blog, social media, or a client, these techniques will help you produce images that captivate and inspire.
For further learning, consider exploring resources like eBooks on food photography or experimenting with the recommended gear. With practice and patience, you’ll transform your food photos into works of art that stand out in a crowded digital space.
Please share these The Basic Light Setup For Food Photography with your friends and do a comment below about your feedback.
We will meet you on next article.
Until you can read, 5 Steps to Launch a WordPress Recipe Website