The Serious Eats Guide to Food Photography
Master food photography with our guide on lighting, composition, styling, camera settings, and editing for stunning, appetizing images.
Food photography is an art form that transforms a simple dish into a visual feast. Whether you’re a home cook sharing recipes on social media, a blogger aiming to captivate your audience, or an aspiring professional photographer, mastering food photography can elevate your work. This comprehensive guide covers the essentials—lighting, composition, styling, camera settings, and post-processing—to help you create mouthwatering images that stand out. From using natural light effectively to choosing the right props, we’ll break down the techniques and tools you need to make your food photos pop, whether you’re shooting with a smartphone or a professional camera.
Why Food Photography Matters
Food photography is more than just pointing a camera at a plate. It’s about capturing the essence of a dish—its colors, textures, and flavors—in a way that makes viewers hungry. A great food photo tells a story, evokes emotion, and invites the audience to imagine tasting the dish. In the digital age, where platforms like Instagram and Pinterest thrive on visuals, high-quality food photography can boost engagement, attract followers, and even drive business for restaurants or food brands.
The good news? You don’t need expensive gear to create stunning food photos. While professional cameras and lenses can enhance your work, the fundamentals of lighting, composition, and styling are what truly make a photo stand out. With practice and the right techniques, anyone can produce magazine-worthy images. This guide will walk you through each step, offering practical tips and insights to help you hone your craft.
Mastering Lighting: The Foundation of Great Food Photography
Lighting is the cornerstone of any great photograph, and food photography is no exception. The right light can highlight a dish’s textures, enhance its colors, and make it look irresistibly appetizing. Here’s how to get it right.
Natural Light: Your Best Friend
Natural light is the gold standard for food photography. It provides a soft, even glow that enhances the food’s natural colors without introducing harsh shadows or unnatural tints. The best natural light is indirect, such as that found in a shady spot on a sunny day or near a window away from direct sunlight. This diffused light creates a balanced, flattering effect that brings out the dish’s best qualities.
Pro Tip: Avoid direct sunlight, which can create harsh shadows and overexposed highlights that wash out details. If you’re shooting indoors, position your setup near a north-facing window for consistent, soft light throughout the day.
Avoiding Common Lighting Pitfalls
Harsh lighting, such as direct sunlight, overhead fixtures, or built-in camera flashes, can ruin a food photo. Direct sunlight casts stark shadows and bleaches light-colored foods, while indoor lights like incandescent bulbs often add an unflattering yellow cast. Camera flashes are equally problematic, creating glare and unnatural reflections that make food look unappetizing.
If you’re stuck with direct sunlight, use a diffuser to soften it. A white curtain, a sheer sheet, or even a piece of parchment paper can work wonders to diffuse light and reduce harshness. For indoor shoots, turn off artificial lights to avoid mixed lighting, which can complicate color balance.
Finding the Perfect Light Source
Great lighting often requires flexibility. Don’t be afraid to move your setup to find the best light. This might mean shooting in a dining room instead of the kitchen or even taking your dish outside to a shaded porch. Pay attention to how light changes throughout the day in your space, and plan your shoots around optimal conditions.
Chart: Optimal Lighting Angles
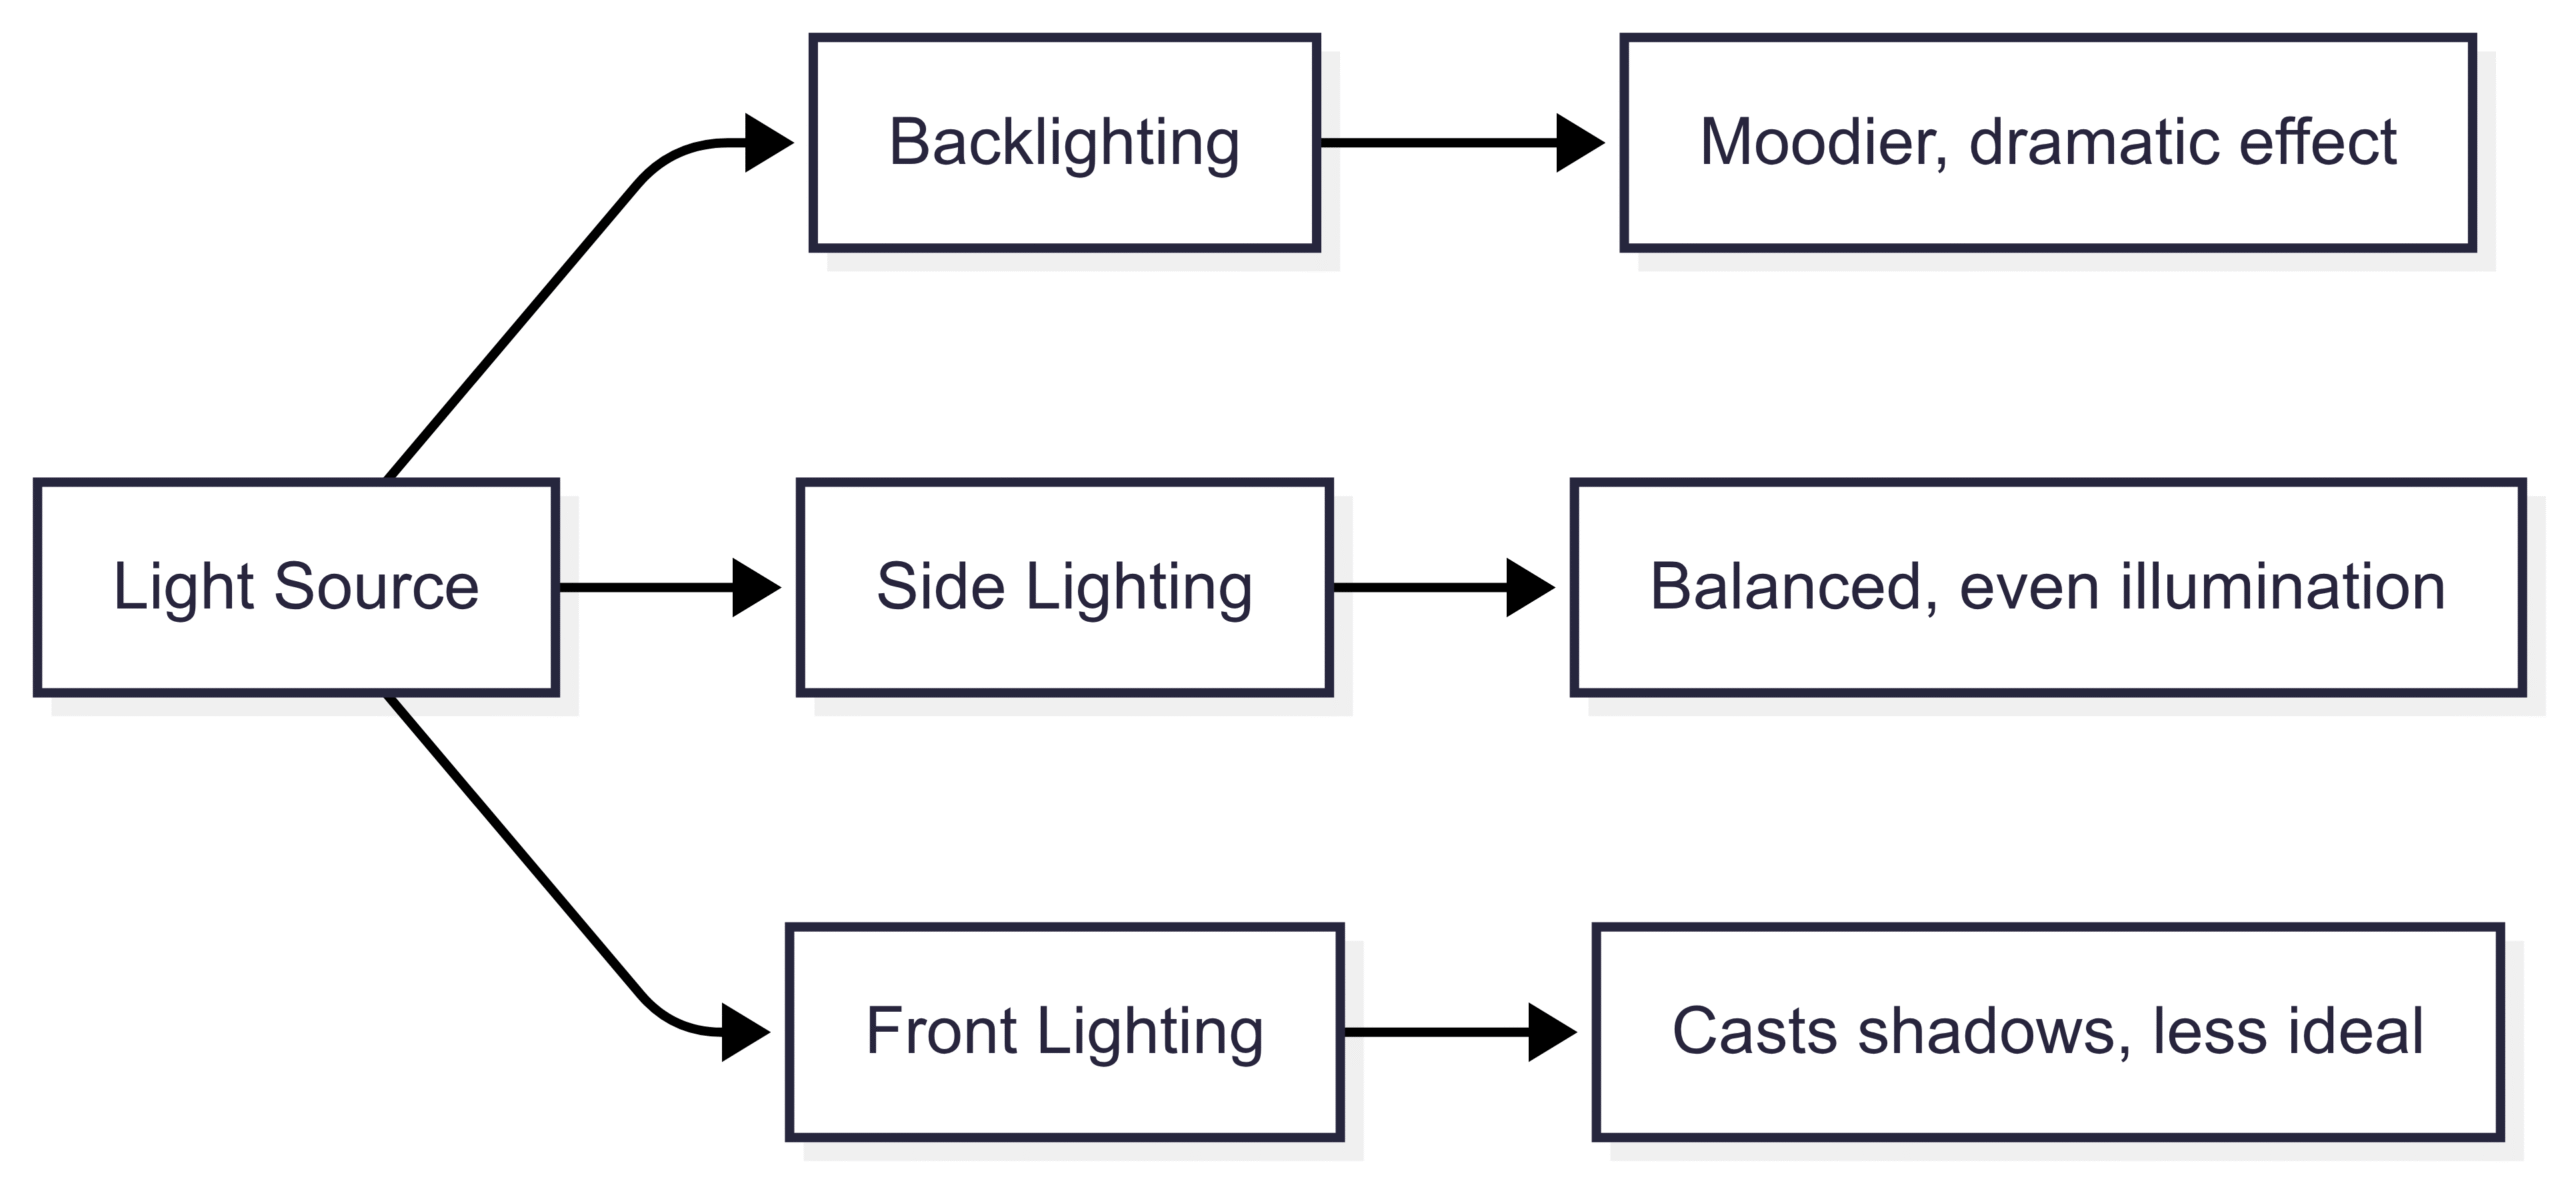
Position your dish so that light hits it at a slight angle, ideally from the side or slightly behind (backlighting). This enhances texture and depth, making the food look three-dimensional. Avoid front lighting, which can cast your shadow onto the dish.
Tools for Lighting Control
- Diffusers: Use a white sheet, curtain, or professional diffuser to soften harsh light.
- Reflectors: A white poster board or foam core can bounce light back onto the dish, filling in shadows. For a moodier effect, use a black board to absorb light.
- Artificial Lighting (Optional): If natural light isn’t available, consider a tabletop light like the Lowell Ego, which mimics daylight for consistent results. Studio lights with softbox attachments can also simulate natural light but are pricier, ranging from $100 to $500.
Crafting a Striking Composition
Composition is the art of arranging elements in your frame to create a visually appealing image. A well-composed food photo draws the viewer’s eye to the dish and communicates its story clearly. Here’s how to nail it.
The Rule of Thirds
The rule of thirds is a foundational principle in photography. Imagine dividing your frame into a 3×3 grid, like a tic-tac-toe board. Place the main subject—whether it’s the entire dish or a specific element like a drizzle of sauce—along the grid lines or at their intersections. This creates a balanced, dynamic image that feels natural to the eye.
Example: For a plate of pasta, position the plate so the focal point (e.g., a twirl of noodles) sits at one of the grid’s intersections rather than dead center. This slight offset makes the image more engaging.
Choosing the Right Angle
The angle you shoot from can make or break a photo. Different dishes shine at different angles:
- Top-Down (Overhead): Ideal for flat dishes like pizzas, salads, or charcuterie boards. This angle showcases the layout and colors of the food.
- 45-Degree Angle: Great for dishes with height, like layered cakes or ice cream cones, as it highlights their three-dimensional shape.
- Eye-Level: Perfect for tall dishes like burgers or stacked sandwiches, emphasizing their structure and details.
Experiment with multiple angles to find the one that best showcases your dish’s unique qualities. For example, a bowl of soup might look flat and uninteresting from above but come alive at a 45-degree angle that reveals its depth and garnishes.
Depth of Field
Depth of field refers to how much of your image is in focus. A shallow depth of field (achieved with a wide aperture, e.g., f/2.8) blurs the background, making the food stand out against a soft, dreamy backdrop. This is ideal for close-ups of a single dish or detail, like a glistening berry on a dessert. A deeper depth of field (e.g., f/8) keeps more of the scene in focus, which works well for busy compositions like a full table spread.
Keeping It Clean
Clutter distracts from the star of the show: the food. Ensure your background is free of unnecessary items like stray utensils, crumbs, or unrelated objects. Use plain or subtly textured backgrounds, such as a wooden table or a neutral tablecloth, to keep the focus on the dish.
Table: Common Composition Mistakes and Fixes
| Mistake | Fix |
|---|---|
| Centered subject | Use the rule of thirds to offset the subject for a dynamic composition. |
| Cluttered background | Clear the frame of distractions; use a plain or complementary background. |
| Slanted camera angle | Keep the camera level to avoid disorienting the viewer. |
| Overcrowded frame | Zoom in on a key detail or simplify the scene to focus on the food. |
Styling and Props: Bringing Your Dish to Life
Styling is where creativity shines in food photography. Thoughtful props and garnishes can elevate a dish from ordinary to extraordinary, telling a story that makes the viewer want to dig in.
Choosing Backgrounds
The background sets the stage for your dish. Opt for surfaces that complement the food without stealing the spotlight. Neutral options like wood, stone, or linen work well for most dishes, while subtle patterns or colors can add character for simpler foods. Avoid busy patterns or bright colors that distract from the dish.
Pro Tip: Create custom backgrounds by painting or staining a piece of wood, or visit a thrift store for unique tablecloths and placemats. A 2×3-foot wooden board can cost as little as $10 to DIY.
Selecting Props
Props like utensils, napkins, and glassware add context and personality to your photos. Choose props that enhance the dish’s story—for example, rustic wooden spoons for a hearty stew or sleek silverware for a modern dessert. Use a color wheel to select complementary colors (e.g., blue napkins with orange-hued soup) for visual harmony.
Budget Tip: Thrift stores are treasure troves for affordable props. A set of unique plates, glasses, and cutlery can often be found for under $30.
Enhancing Freshness
Freshness is key to making food look appetizing. Keep garnishes like herbs or citrus slices fresh by storing them in the fridge wrapped in a damp napkin. For a glossy, appetizing look, lightly brush oil onto meats, vegetables, or breads to add shine.
Garnishing Wisely
Garnishes can transform a lackluster dish. A sprinkle of herbs, a dollop of sour cream, or a scattering of spices can add texture and color. Ensure garnishes make sense for the dish—don’t add parsley to a dessert just because it looks pretty.
Example: For a bowl of chili, a swirl of sour cream, a sprinkle of shredded cheese, and a pinch of chopped cilantro can add contrast and vibrancy without overwhelming the dish.
Adding Action
Static shots can feel lifeless. Introduce a sense of action by including a hand lifting a spoon, a fork piercing a bite, or crumbs scattered in the foreground. These elements make the food feel approachable and enticing.
Camera Settings: Capturing the Perfect Shot
Whether you’re using a smartphone, a point-and-shoot, or a DSLR, understanding camera settings is crucial for sharp, well-exposed images. Here’s what you need to know.
Aperture
Aperture controls the amount of light entering the lens and affects depth of field. Use a wide aperture (low f-stop, e.g., f/2.8–f/5) for a shallow depth of field, ideal for isolating the subject against a blurred background. For broader shots where you want everything in focus, use a smaller aperture (higher f-stop, e.g., f/8–f/11).
Shutter Speed and ISO
Shutter speed determines how long the camera’s sensor is exposed to light. Faster shutter speeds (e.g., 1/80s or higher) prevent blur, especially when shooting handheld. In low light, increase ISO (e.g., 400–800) to make the sensor more sensitive to light, but avoid going too high (above 1600) to prevent graininess.
Shooting in RAW
If your camera supports RAW format, use it. RAW files retain more data than JPEGs, giving you greater flexibility in post-processing to adjust exposure, color, and sharpness without losing quality.
Stabilizing Your Camera
Camera shake can ruin a shot. Use a tripod for crisp images, especially in low light or when using slower shutter speeds. A basic tabletop tripod for smartphones costs around $15–$30, while a sturdy DSLR tripod like the Manfrotto ranges from $50–$200. If a tripod isn’t available, rest your camera on a stable surface or use an empty glass as a makeshift monopod.
Table: Recommended Camera Settings for Food Photography
| Setting | Recommendation | Purpose |
|---|---|---|
| Aperture | f/2.8–f/5 (shallow), f/8–f/11 (deep) | Control depth of field |
| Shutter Speed | 1/80s or faster (handheld) | Prevent blur |
| ISO | 400 or lower (bright light), 800 in low light | Balance light sensitivity and image quality |
| Format | RAW | Maximize post-processing flexibility |
Manual Mode for Precision
Shooting in manual mode gives you full control over aperture, shutter speed, and ISO, allowing you to adapt to challenging lighting conditions. For example, in a dimly lit restaurant, a wide aperture (f/2.8) and higher ISO (800) can compensate for low light while keeping the shutter speed fast enough to avoid blur. Use aperture priority (Av) mode to let the camera adjust shutter speed automatically while you focus on depth of field.
White Balance
Correct white balance ensures accurate colors. Indoor lighting often casts a yellow or orange hue, which can make food look unappetizing. Use your camera’s custom white balance setting by pointing it at a neutral white or gray object (e.g., a napkin) to calibrate colors. Alternatively, shoot in RAW and adjust white balance during editing.
Post-Processing: Polishing Your Images
Editing is the final step in creating stunning food photos. Software like Adobe Lightroom ($9.99/month with Creative Cloud) or Capture One ($24/month) offers powerful tools to enhance your images, but even free apps like Snapseed or Apple Photos can work for basic edits.
Key Editing Techniques
- Fix White Balance: Click on a neutral area (e.g., a white napkin) with the white balance tool to correct color casts. Adjust temperature and hue sliders for fine-tuning.
- Adjust Exposure and Contrast: Brighten or darken the image to ensure pure whites and deep blacks while preserving detail. Increase contrast to make colors pop.
- Enhance Saturation and Sharpness: Boost saturation slightly to enhance the food’s vibrancy, but avoid overdoing it. Sharpen the image to highlight textures like a crispy crust or creamy sauce.
- Crop and Straighten: Crop to improve composition or remove distractions. Straighten the image to correct any tilts.
Pro Tip: Always aim to make the food look delicious, not artificial. Subtle edits enhance the dish’s natural appeal without making it look overly processed.
Equipment: What You Really Need
You don’t need a professional studio to take great food photos. Here’s a breakdown of essential and optional tools, along with budget-friendly alternatives.
Essential Equipment
- Camera: A smartphone (e.g., iPhone 14, $699, or Google Pixel 8, $699) can produce excellent results with proper technique. For more control, a DSLR or mirrorless camera like the Canon EOS Rebel T7 ($479) or Sony A6400 ($898) is a great investment.
- Tripod: A tabletop tripod ($15–$30) for smartphones or a Manfrotto tripod ($50–$200) for DSLRs ensures stability.
- Reflector: A white poster board ($5–$10) or a collapsible 5-in-1 reflector ($20–$40) helps control light.
Optional Equipment
- Artificial Lighting: A Lowell Ego tabletop light ($130) mimics daylight for consistent results. Studio lights with softboxes ($100–$500) offer more flexibility but require setup space.
- Lenses: For DSLRs, a 50mm f/1.8 lens ($125–$200) is versatile for food photography, offering a shallow depth of field and sharp images.
- Editing Software: Adobe Lightroom ($9.99/month) or Capture One ($24/month) for professional edits; Snapseed (free) for basic adjustments.
Table: Equipment Costs and Alternatives
| Equipment | Price Range | Budget Alternative |
|---|---|---|
| Camera | $479–$898 (DSLR) | Smartphone ($0 if you already own one) |
| Tripod | $15–$200 | Stable surface or makeshift monopod |
| Reflector | $20–$40 | White poster board ($5–$10) |
| Artificial Light | $100–$500 | Natural light with diffuser (curtain, $5) |
| Editing Software | $9.99–$24/month | Free apps like Snapseed or Apple Photos |
Putting It All Together
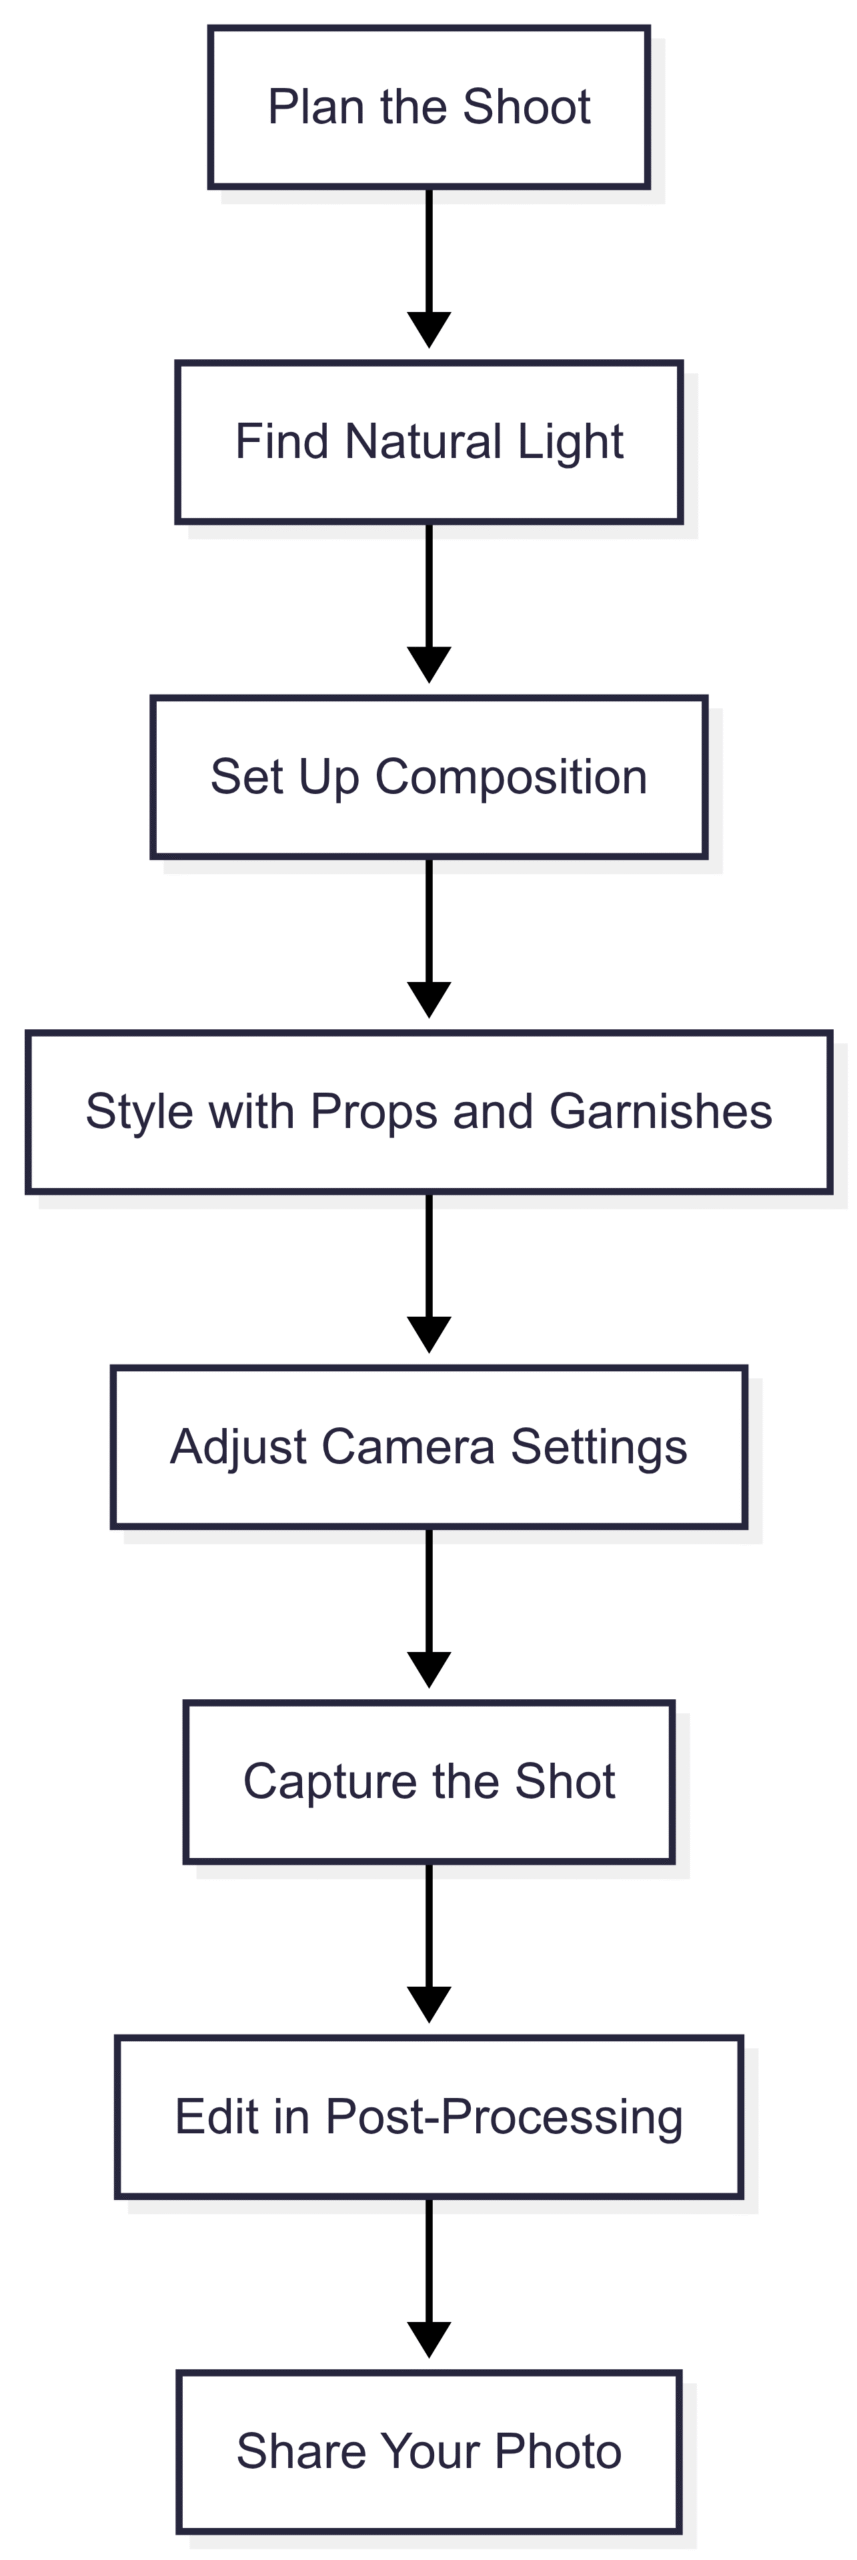
Creating a stunning food photo is about combining these elements—lighting, composition, styling, camera settings, and editing—into a cohesive process. Start by finding the best natural light in your space, then compose your shot using the rule of thirds and the ideal angle for your dish. Style the scene with complementary props and garnishes, ensuring the food remains the star. Use manual camera settings to control exposure and depth of field, and polish the image with subtle edits to enhance its appeal.
Chart: Food Photography Workflow
Tips for Continuous Improvement
- Practice Regularly: Shoot the same dish from multiple angles and lighting setups to develop your instincts.
- Study Great Photos: Analyze food photos on platforms like Instagram or in cookbooks to understand what makes them effective.
- Experiment with Styling: Try new props, backgrounds, and garnishes to find your unique style.
- Learn from Feedback: Share your photos on social media and pay attention to what resonates with your audience.
Conclusion
Food photography is a skill that anyone can master with practice and attention to detail. By focusing on natural light, thoughtful composition, creative styling, precise camera settings, and effective editing, you can create images that make viewers hungry. Whether you’re using a smartphone or a professional camera, the principles remain the same: celebrate the food’s colors, textures, and story. Start experimenting today, and soon you’ll be capturing photos that rival those in magazines.
We will meet you on next article.
Please share this The Serious Eats Guide to Food Photography with your friends and do a comment below about your feedback.
Until you can read, How to Easily Implement Shoppable Recipes on Your Blog
