Best Artificial Lights for Food Photography
Master artificial lighting for food photography with expert tips, equipment recommendations, and setups to achieve natural-looking, professional results.
Food photography thrives on light. It shapes mood, highlights textures, and makes dishes look irresistible. While natural light has long been the go-to for food photographers, its unpredictability—shifting weather, limited shooting hours, and inconsistent color temperatures—can frustrate even seasoned professionals. Artificial lighting offers a solution, providing control, consistency, and flexibility to create stunning, natural-looking images any time, anywhere. This guide explores why and how to transition to artificial lighting, detailing equipment, setups, and techniques to elevate your food photography.
Why Choose Artificial Lighting?
Switching from natural to artificial lighting can feel daunting, especially if you’re accustomed to the soft glow of a window. However, artificial lighting addresses many of natural light’s limitations, offering practical benefits that enhance both the shooting process and the final images.
Consistency
Natural light varies constantly. Clouds, reflections from nearby buildings, or even passing cars can alter brightness and color temperature mid-shoot, leading to inconsistent photos. One image might be warm and inviting, while the next appears overly bright or cool-toned. Artificial lighting eliminates these variables. With a stable light source, every shot maintains consistent temperature and brightness, ensuring a cohesive look across your portfolio.
Simplified Editing
Inconsistent natural light often requires tedious post-processing to balance color and exposure. Artificial lighting streamlines editing by producing uniform results. You can apply the same adjustments across multiple images with minimal tweaks, saving time and reducing frustration.
Flexible Timing
Natural light dictates your shooting schedule. The “golden hour” or optimal window light limits you to specific times, often rushing the creative process. Artificial lighting frees you from these constraints. Shoot morning, noon, or midnight—indoor or outdoor—knowing your lighting conditions remain constant. This flexibility is invaluable for process shots, multi-day projects, or tight deadlines.
Light Manipulation
Artificial lighting allows precise control over intensity, direction, and quality. You can move lights, adjust their strength, or modify their softness to suit your vision. This control fosters experimentation, helping you understand how light shapes your images and enabling creative freedom that natural light can’t match.
Overcoming Environmental Limitations
For photographers in cloudy regions, small apartments, or studios without large windows, natural light can be unreliable or unavailable. Artificial lighting ensures professional results regardless of your environment, making it a necessity for consistent output.
Understanding Natural Light’s Appeal
To make artificial lighting look natural, you need to understand what makes natural light so desirable in food photography. Natural light, particularly from a large window, creates a soft, diffused glow that evenly illuminates a scene. It’s typically warm (around 5200-5600K), with balanced highlights and soft shadows that enhance food’s textures without harsh contrasts. Replicating these qualities with artificial light is the key to achieving professional, natural-looking results.
Key Characteristics of Natural Light
- Large Light Source: A window acts as a broad light source, casting soft, even illumination.
- Warm Temperature: Daylight avoids extreme blue or orange tones, creating a flattering, natural look.
- Soft Shadows: Diffused natural light produces gentle shadows with smooth transitions.
- Glowy Highlights: It accentuates shiny surfaces, like oil on a dish, without overpowering the scene.
By mimicking these traits, artificial lighting can produce images indistinguishable from those shot in natural light.
Essential Artificial Lighting Equipment
Choosing the right equipment is critical for effective artificial lighting. The market offers countless options, but for food photography, continuous LED lights are ideal due to their similarity to natural light and versatility for both stills and video. Below is a breakdown of the essential gear, including specifications and price points, to build a reliable setup.
Recommended Continuous LED Lights
Continuous lights shine constantly, allowing you to see their effect on your scene in real-time, unlike flash, which only illuminates when triggered. Here are three high-quality options for food photography:
| Light | Specifications | Price (USD) | Pros | Cons |
|---|---|---|---|---|
| Godox SL-150W II LED Video Light | 150W, 5600K, CRI 96+, Bowens mount, dimmable | ~$300 | Affordable, daylight-balanced, high CRI for accurate colors | Slightly bulky for small spaces |
| Neewer LED Light Panel | 660W max, 3200-5600K adjustable, CRI 95+, dimmable | ~$150 | Budget-friendly, adjustable temperature, compact | Less powerful than Godox |
| MOUNTDOG Softbox Lighting Kit | 150W, 5500K, CRI 95+, includes softbox | ~$100 | All-in-one kit, good for beginners | Limited power for large setups |
- Godox SL-150W II: A favorite for its daylight-balanced 5600K temperature and high CRI (96+), ensuring true-to-life colors. Its Bowens mount compatibility makes it versatile for various modifiers. Ideal for photographers seeking professional results without breaking the bank.
- Neewer LED Light Panel: A cost-effective option with adjustable color temperature (3200-5600K), perfect for experimenting with warm or cool tones. Its compact design suits small studios.
- MOUNTDOG Softbox Lighting Kit: An entry-level kit that includes a softbox, making it a great starter option for beginners on a tight budget.
Softbox
A softbox diffuses light, creating a large, soft source that mimics a window. A 48-inch octagonal softbox is ideal for food photography, as it provides even illumination across a scene.
- Recommended: Neewer 48” Octagonal Softbox (~$80)
- Specifications: Bowens mount, includes inner and outer diffusers, collapsible for storage.
- Why It Works: The large size replicates window light, while double diffusion softens harsh light, reducing sharp shadows.
Light Stand
A sturdy light stand supports your softbox and allows height and angle adjustments.
- Recommended: Neewer Heavy-Duty Light Stand (~$50)
- Specifications: Adjustable height (3-13 feet), supports large softboxes, durable aluminum build.
- Why It Works: Its versatility accommodates various setups, from tabletop side lighting to overhead shots.
Tripod
Artificial lights are less intense than sunlight, requiring slower shutter speeds that can introduce camera shake. A tripod ensures sharp images.
- Recommended: Manfrotto Compact Action Tripod (~$80)
- Specifications: 5.6-foot max height, 3.3-lb weight capacity, fluid head for smooth adjustments.
- Why It Works: Affordable and reliable for food photography’s static setups.
Diffusers
Diffusers soften light further, placed between the light and subject. Many softboxes include diffusers, but standalone options offer flexibility.
- Recommended: Neewer 40”x60” Light Reflector (~$30)
- Specifications: Translucent fabric, portable, foldable.
- Why It Works: Adjustable distance from the light source controls softness, mimicking natural light’s glow.
Reflectors
Reflectors bounce light to fill shadows, creating a balanced look. A simple white foam board works well.
- Recommended: Generic 24”x36” White Foam Board (~$10)
- Specifications: Lightweight, rigid, reflective surface.
- Why It Works: Inexpensive and effective for softening shadows without additional equipment.
Total Estimated Cost
A complete setup (Godox SL-150W II, 48” softbox, light stand, tripod, diffuser, reflector) costs approximately $550-$600, offering professional results at a reasonable price.
Setting Up Artificial Lighting
With equipment in hand, setting up your artificial lighting is straightforward. The goal is to replicate natural light’s softness and direction while leveraging artificial light’s control.
Basic Setup Principles
- Eliminate Ambient Light: Turn off overhead lights and close curtains to avoid mixed light sources that disrupt white balance.
- Position the Light: Place the softbox behind or to the side of your food, mimicking window light. Adjust height and angle to control shadow direction.
- Use Diffusers: Position diffusers close to the light for softer illumination or farther for slightly harder light, depending on your desired effect.
- Add Reflectors: Place a reflector opposite the light to fill shadows. For moodier shots, use a black card to absorb light and deepen contrast.
- Experiment: Test different light positions, heights, and intensities. Small adjustments can dramatically change the mood and texture of your images.
Two Essential Lighting Setups
Using a single continuous light and softbox, you can create two distinct looks: backlighting and side lighting. These setups offer versatility for different foods and moods.
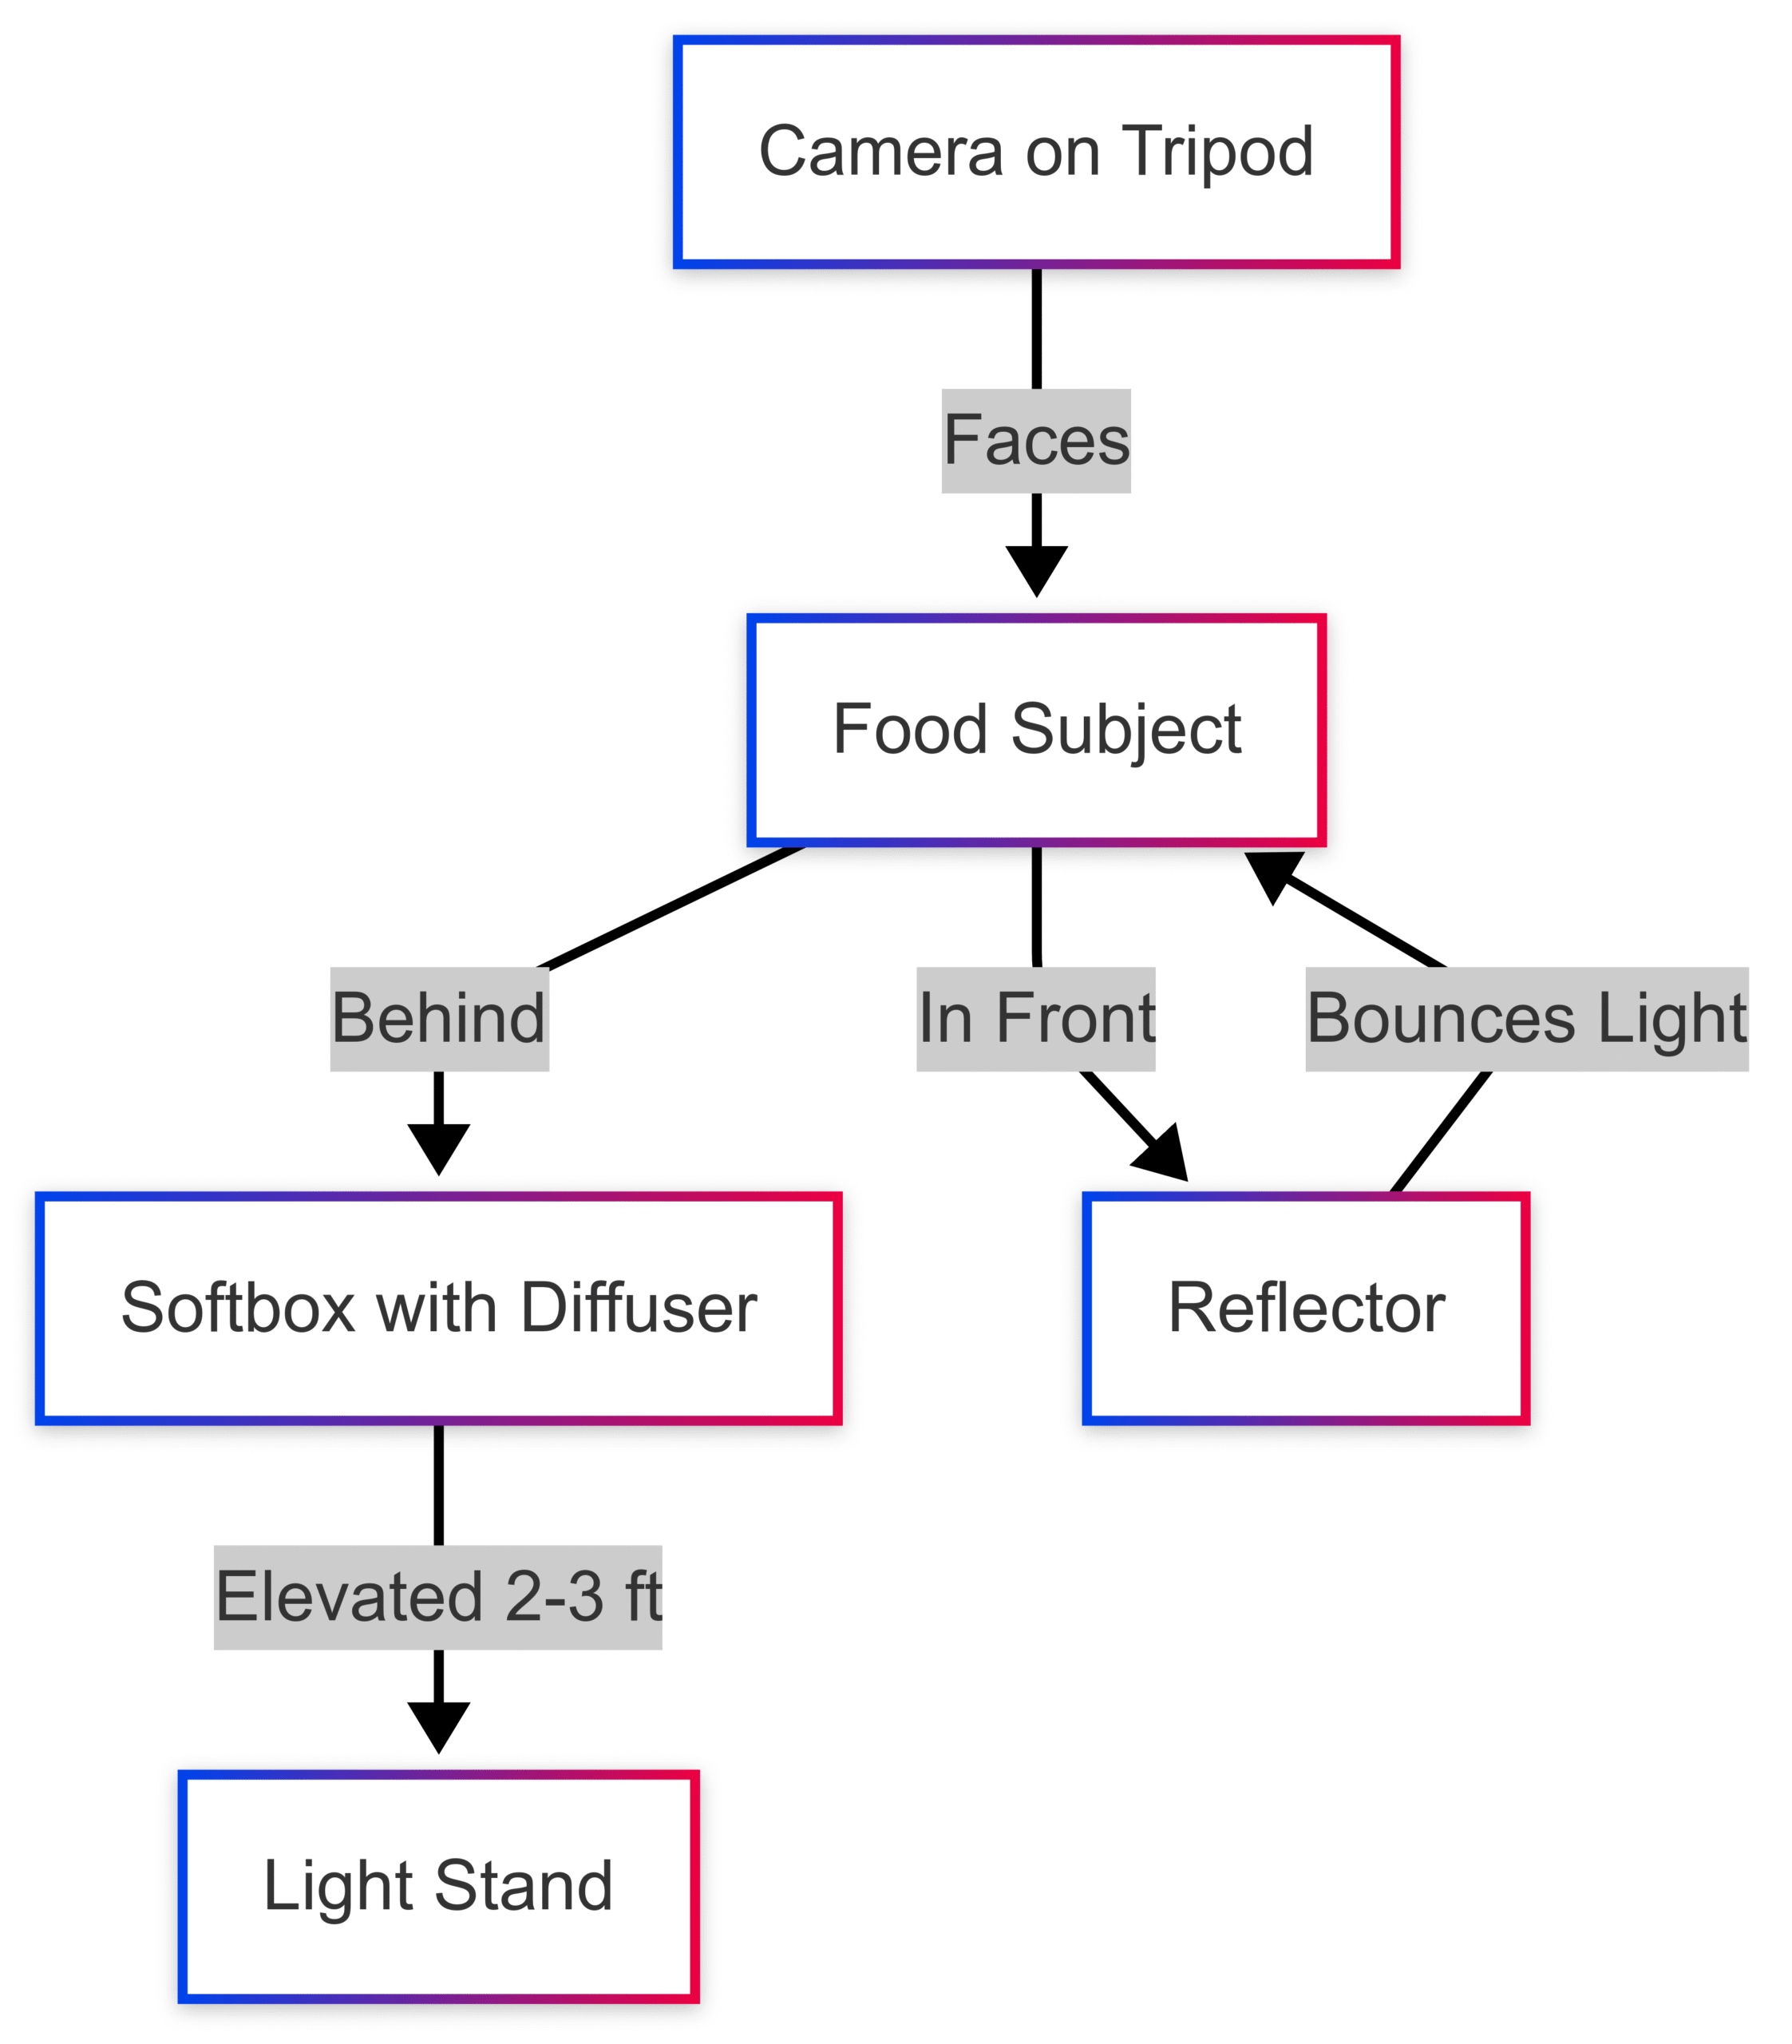
Backlighting Setup
Backlighting highlights shiny surfaces, like oil on olives or glaze on pastries, creating an appetizing glow.
- Setup:
- Place the softbox behind the food, elevated 2-3 feet above the table, angled slightly downward.
- Ensure the light doesn’t appear in the frame to avoid silhouetting.
- Position a reflector (white foam board) in front of the food to bounce light onto the subject’s front, preventing overexposure in the background.
- Camera Settings:
- ISO: 100-200 (low to minimize noise).
- Shutter Speed: 1/30-1/60s (adjust based on light intensity).
- Aperture: f/4-f/8 (for sufficient depth of field).
- Tips:
- Use a tripod to stabilize the camera at slower shutter speeds.
- Adjust the reflector’s angle to control shadow fill.
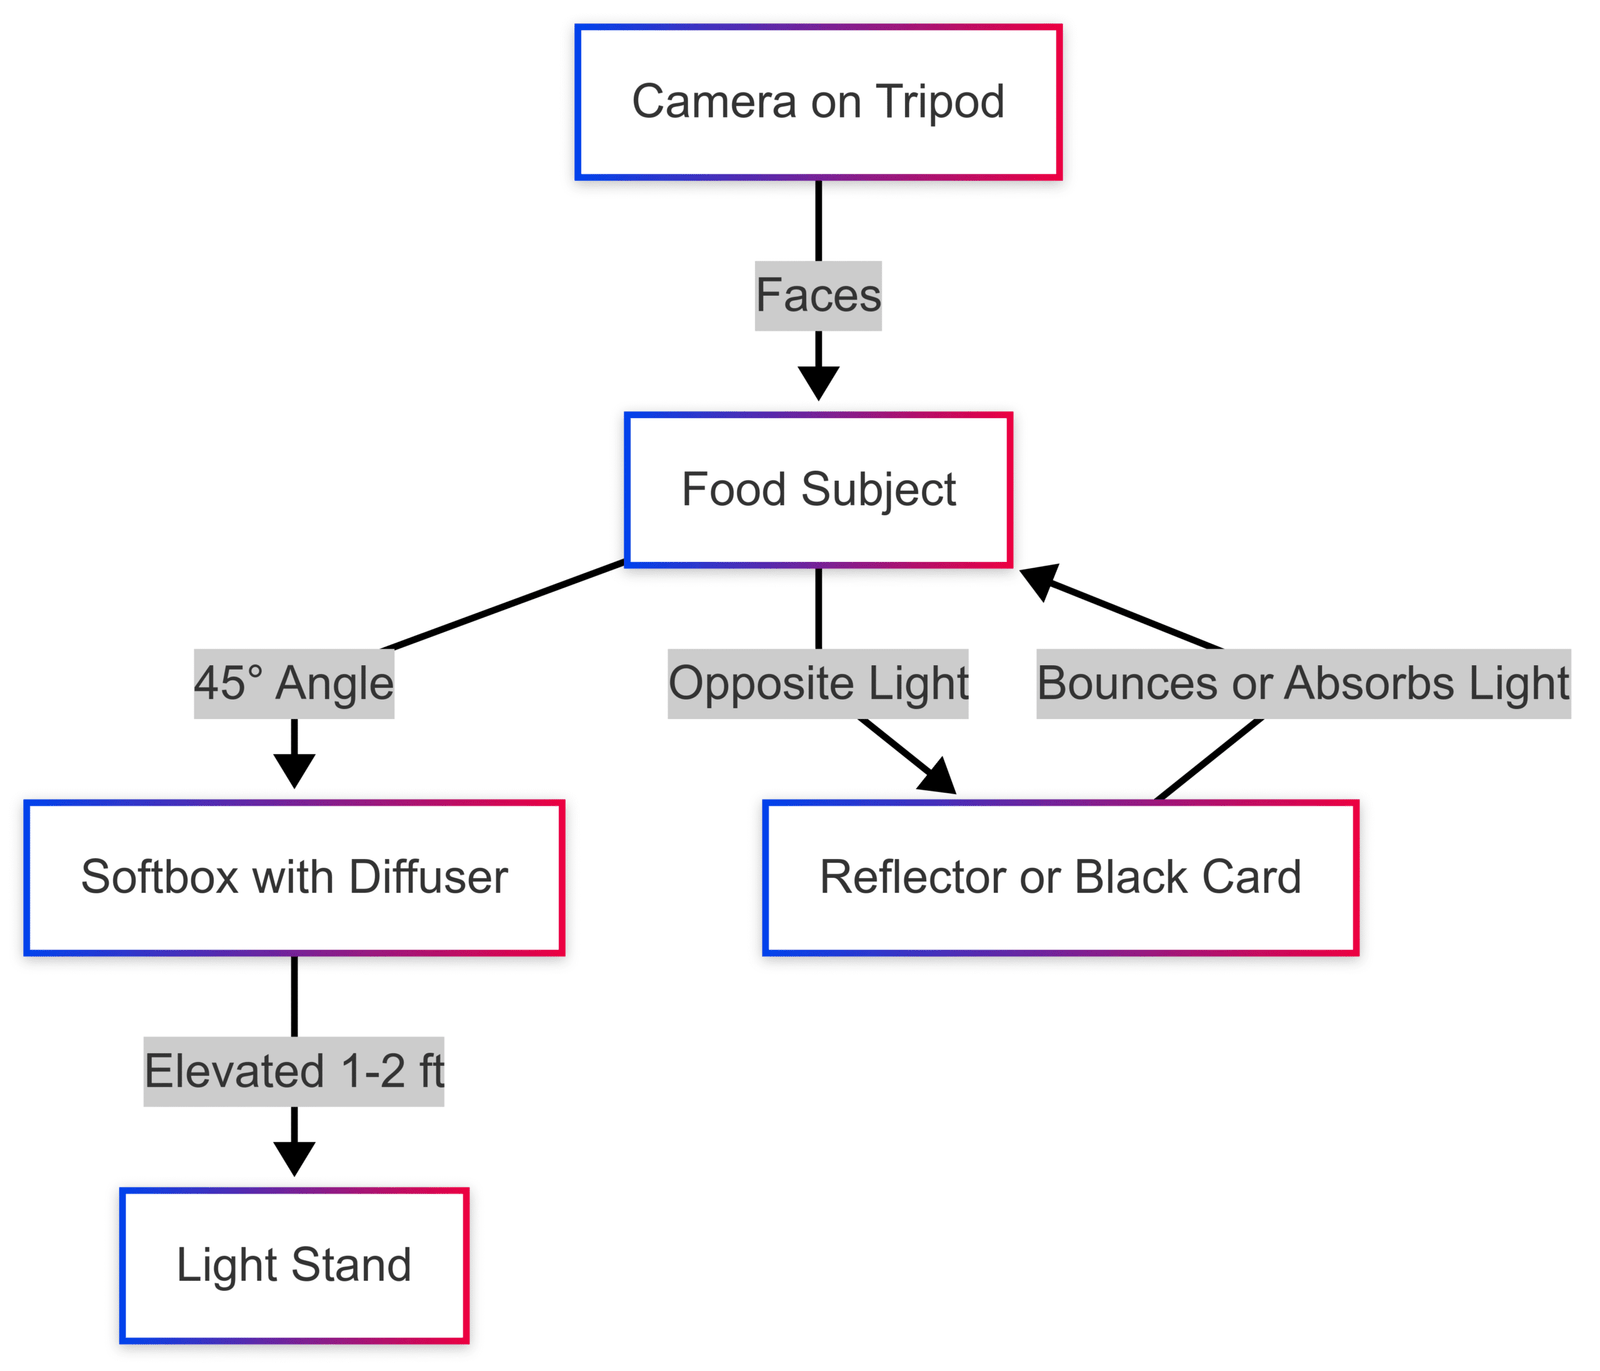
Side Lighting Setup
Side lighting is versatile, suitable for most foods, and creates dynamic shadows with a natural feel.
- Setup:
- Position the softbox at a 45-degree angle to the food, slightly elevated (1-2 feet above the table).
- Angle the light downward to cast soft shadows.
- Place a reflector opposite the light to soften shadows for a bright look, or use a black card for moodier, high-contrast images.
- Camera Settings:
- ISO: 100-200.
- Shutter Speed: 1/30-1/60s.
- Aperture: f/2.8-f/5.6 (for creative depth or sharpness).
- Tips:
- Experiment with light height and angle to vary shadow length and direction.
- For top-down shots, raise the light higher; for straight-on shots, lower it slightly.
Tips for Mastering Artificial Lighting
Transitioning to artificial lighting requires practice, but these tips will accelerate your learning curve:
- Run Test Shoots: Use simple subjects like cupcakes or fruit to experiment with light placement, height, and intensity. Mimic natural light positions for familiar results.
- Control Shadows: Artificial light can produce darker shadows than natural light. Use reflectors to soften them or black cards to enhance contrast.
- Adjust Light Temperature: If your light allows, tweak the color temperature (5200-5600K for daylight, warmer for cozy shots).
- Monitor White Balance: Set your camera’s white balance to “Daylight” or manually adjust to match your light’s Kelvin rating for accurate colors.
- Iterate and Learn: Expect a learning curve. Each shoot refines your understanding of how light interacts with your subject.
Advantages of Artificial Lighting in Practice
After years of relying on natural light, many photographers find artificial lighting transformative. The ability to shoot anytime, anywhere eliminates scheduling stress. Consistent lighting reduces editing time, allowing focus on creativity. Precise control over light direction and intensity opens new stylistic possibilities, from bright and airy to dark and moody.
For example, a side-lit shot of a rustic bread loaf can emphasize its crusty texture with soft shadows, while a backlit shot of glossy chocolate ganache can highlight its shine. These effects, achievable with one light and softbox, demonstrate artificial lighting’s versatility.
Common Challenges and Solutions
- Harsh Light: If light feels too intense, increase diffuser distance or add an extra diffusion layer.
- Color Casts: Ensure lights have a high CRI (90+) and match white balance to the light’s temperature.
- Dark Shadows: Use reflectors or lower light intensity to soften shadows.
- Setup Time: Practice assembling your gear to streamline the process. Collapsible softboxes and light stands save time and space.
Conclusion
Artificial lighting revolutionizes food photography by offering consistency, flexibility, and control that natural light can’t match. With the right equipment—continuous LED lights, a large softbox, a sturdy stand, and simple accessories—you can create natural-looking images that rival window-lit shots. By mastering backlighting and side lighting setups, you’ll gain the versatility to capture any dish in its best light, regardless of time or environment. Start with the recommended gear, experiment with setups, and practice regularly to unlock artificial lighting’s full potential. Your food photography will not only look professional but also reflect your unique creative vision.
Please share these Best Artificial Lights for Food Photography with your friends and do a comment below about your feedback.
We will meet you on next article.
Until you can read, A Huge SEO Tip That Most Food Bloggers Miss