Camera and Lighting Placement for Recipe Videos
Master camera and lighting placement for recipe videos with expert tips on setups, equipment, and techniques for stunning food visuals.
Creating engaging recipe videos requires more than just culinary skills—it demands a well-thought-out camera and lighting setup to showcase your dishes in the most appetizing way. Whether you’re filming for TikTok, YouTube, or a food blog, the right equipment and placement techniques can elevate your content from amateur to professional. This guide dives deep into the essentials of camera and lighting placement for recipe videos, offering practical advice, equipment recommendations, and advanced techniques to make your food look irresistible. From overhead Tasty-style shots to side-angle captures, we’ll cover everything you need to know to create visually stunning culinary content, even in environments with no natural light.
Why Camera and Lighting Placement Matters
The visual appeal of food in recipe videos directly influences viewer engagement. Proper lighting highlights textures, colors, and details, making dishes look mouthwatering, while strategic camera placement ensures every step of the cooking process is captured clearly. Poor lighting can cast unflattering shadows or create color imbalances, and incorrect camera angles can miss critical actions or clutter the frame with distractions. By mastering these elements, you can produce professional-grade videos that captivate your audience and enhance your brand.
This guide assumes you’re aiming for high-quality, Tasty-style recipe videos, typically characterized by overhead shots, vibrant lighting, and dynamic angles. Whether you’re a beginner with a smartphone or an experienced videographer with professional gear, the principles remain the same: control your light, frame your shot, and experiment to find what works best for your setup.
Essential Equipment for Recipe Video Lighting
Lighting is the backbone of food videography. It shapes how your audience perceives the texture, color, and appeal of your dishes. Below, we explore the key lighting equipment options, their specifications, and how to use them effectively.
Softboxes
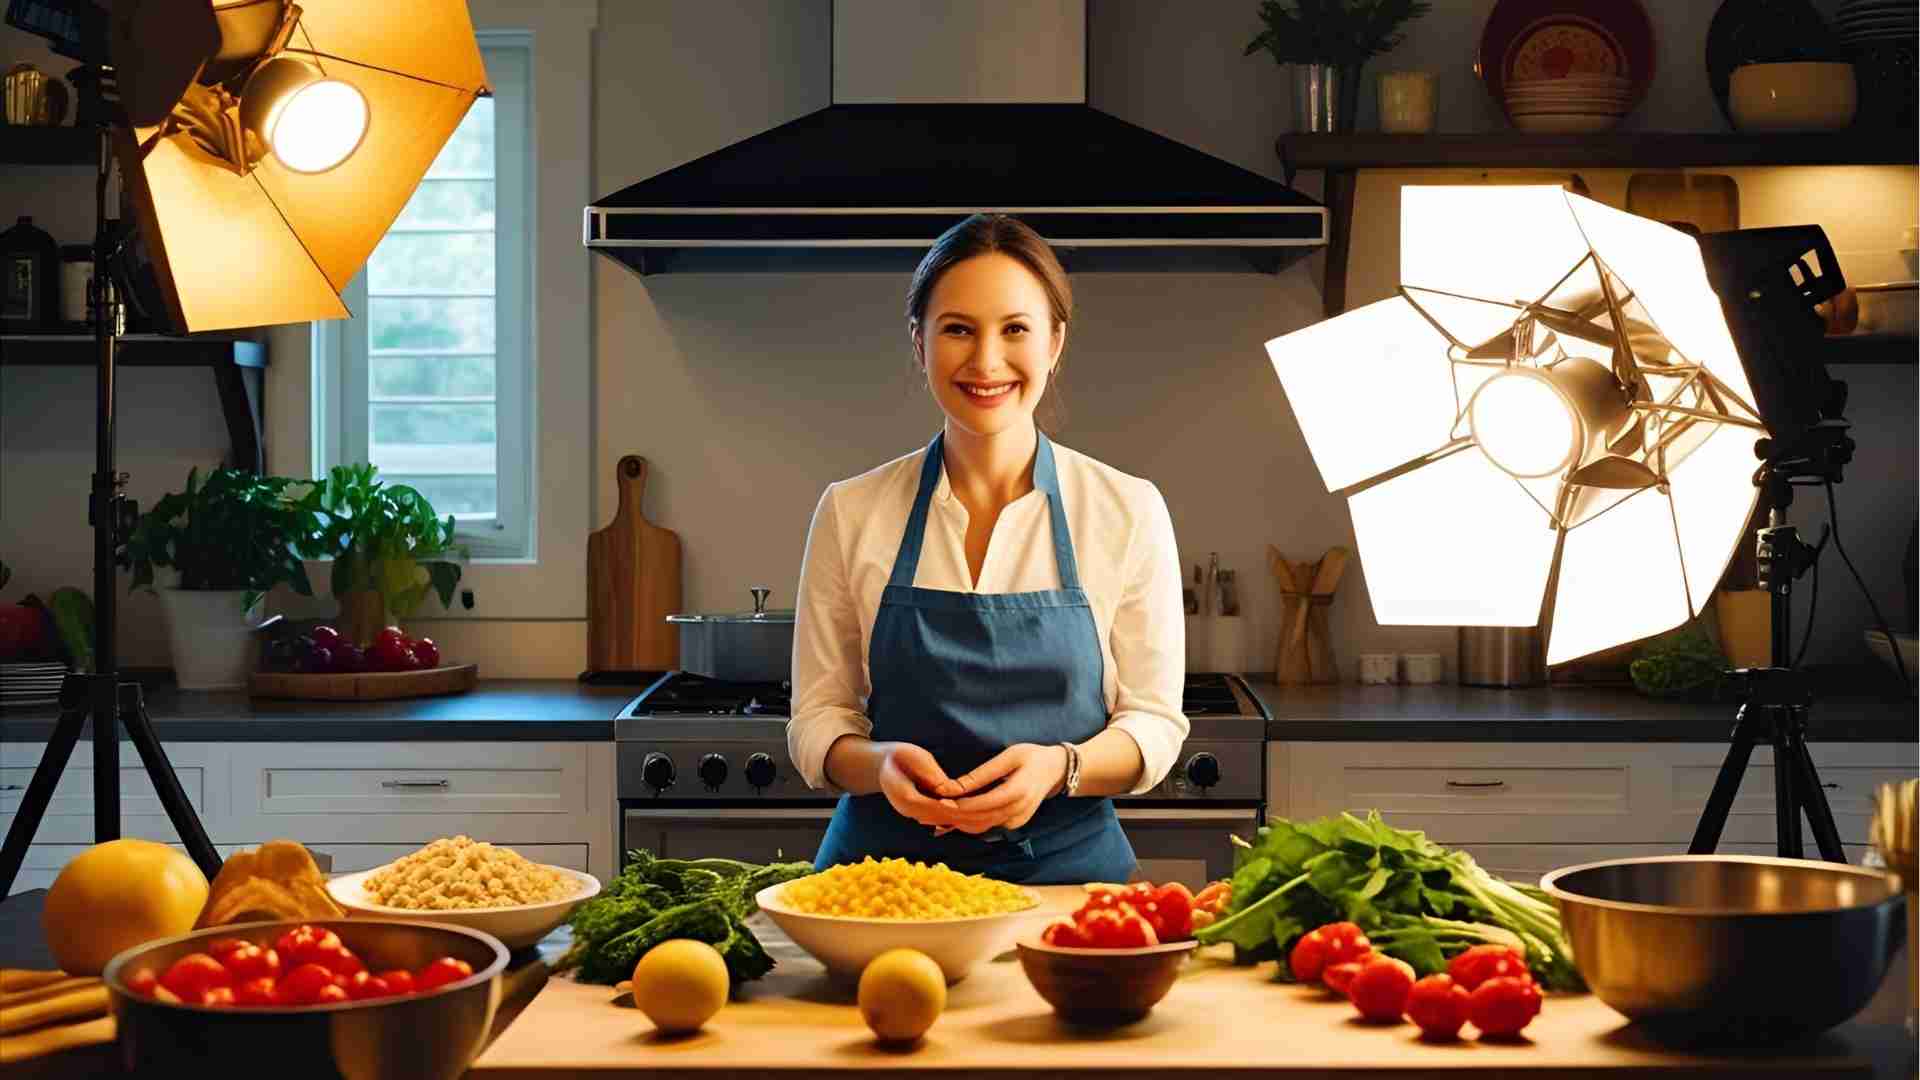
Softboxes are a staple in food videography, transforming harsh light into a soft, diffused glow that mimics natural window light. They’re ideal for highlighting the natural beauty of food without overwhelming shadows.
- How They Work: A softbox diffuses light through a fabric panel, creating even illumination that softens shadows and enhances food textures. Larger softboxes (e.g., 48 inches) produce softer light, ideal for overhead shots, while smaller ones offer more control for side angles.
- Placement: Position a softbox at a 45-degree angle to your cooking surface, slightly above and across from your workspace. For deeper cookware like pots, raise the softbox to illuminate the interior and reduce shadows.
- Recommended Model: The Octagon Softbox 48” (approx. $80-$120) offers even light dispersion and is versatile for most kitchen setups. It’s compatible with fluorescent or LED bulbs, with a power range of 100-200W for sufficient brightness.
- Price: $80-$150, depending on size and brand.
LED Panels
LED panels are versatile, energy-efficient lights with adjustable color temperatures, making them perfect for replicating natural light or setting a specific mood.
- How They Work: LED panels allow you to adjust brightness and color temperature (typically 3200K to 5600K) to match daylight or create warmer tones. They’re compact and ideal for small spaces.
- Placement: Use one LED panel as a key light at a 45-degree angle and another as a fill light on the opposite side. Pair with diffusers to soften harsh light.
- Recommended Model: The GVM 2-Pack LED Video Light with 63” Tripod Stand (approx. $200) offers adjustable color temperature (3200K-5600K) and brightness (10%-100%), with a CRI of 97+ for accurate colors.
- Price: $150-$300 for a two-pack with stands.
Ring Lights
Ring lights provide even, shadow-free illumination, making them ideal for both top-down food shots and presenter-focused videos.
- How They Work: Their circular design wraps light around the subject, reducing shadows and highlighting details. They’re particularly effective for close-up shots of food or when filming yourself cooking.
- Placement: Position a ring light directly above the food for overhead shots or in front of the presenter for face-on shots. Adjust the height to avoid reflections on shiny surfaces.
- Recommended Model: The Sensyne 10” Ring Light (approx. $30-$50) offers adjustable brightness and color temperature (3000K-6000K), with a compact design for small kitchens.
- Price: $30-$80.
Reflectors and Diffusers
Reflectors and diffusers are cost-effective tools to manipulate light and enhance your setup.
- Reflectors: Bounce light onto your subject to soften shadows and enhance colors. A WELLMAKING 32-inch Reflector ($20-$40) is a great choice, or you can use white cardboard for a DIY solution.
- Diffusers: Soften harsh light by scattering it evenly. The Photography Light Diffuser Panel ($15-$30) is ideal for controlling strong light sources.
- Placement: Place reflectors opposite your key light to fill shadows. Position diffusers between your light source and the subject to reduce contrast.
DIY Lighting Hacks for Budget-Conscious Creators
If professional lighting equipment is out of your budget, these DIY hacks can deliver impressive results:
- White Sheets or Paper: Use as diffusers to soften light or as reflectors to bounce light back onto your subject.
- Aluminum Foil: Crinkle and flatten foil to create a reflective surface for highlighting specific dish elements.
- Baking Parchment: Acts as a diffuser when placed over a light source, spreading light evenly.
- Desk Lamps: Swap bulbs for daylight-balanced LEDs (5000K-5300K) and position strategically for key or fill lighting.
- DIY Softbox: Build one using a cardboard box lined with white fabric and a daylight bulb for soft, diffused light.
| Equipment | Purpose | Recommended Model | Price Range | Key Features |
|---|---|---|---|---|
| Softbox | Soft, natural glow | Octagon Softbox 48” | $80-$150 | Even light dispersion, 100-200W |
| LED Panel | Adjustable color/brightness | GVM 2-Pack LED Video Light | $150-$300 | 3200K-5600K, CRI 97+, tripod included |
| Ring Light | Even, shadow-free light | Sensyne 10” Ring Light | $30-$80 | 3000K-6000K, compact design |
| Reflector | Softens shadows | WELLMAKING 32-inch Reflector | $20-$40 | Portable, multi-surface |
| Diffuser | Reduces harsh light | Photography Light Diffuser Panel | $15-$30 | Lightweight, versatile |
Camera Setup for Recipe Videos
The right camera placement ensures your audience sees every step of the cooking process clearly. Whether you’re using a single smartphone or multiple professional cameras, strategic positioning is key.
Overhead Shots (Tasty-Style)
Overhead shots are the hallmark of Tasty-style recipe videos, offering a clean, top-down view of the cooking process.
- Setup: Mount your camera directly above the cooking surface using an overhead stand like the Glide Gear OH 100 Overhead Stand ($100-$150). This stand supports cameras up to 10 lbs and extends to 6.5 feet, though you may need to stack it on boxes for extra height with wider lenses (e.g., 24-70mm).
- Challenges: Standard tripods like the Vanguard ALTA Pro ($130-$200) can create shadows from their legs or feel unstable when elevated. Overhead stands are more reliable but require careful positioning to avoid equipment shadows.
- Lens Choice: A 24-70mm zoom lens offers flexibility for framing, but a 35mm prime lens can work for tighter budgets.
Side-Angle Shots
Side-angle shots capture the action of stirring, chopping, or adding ingredients, adding variety to your video.
- Setup: Position a second camera (or smartphone) across from you, slightly off to the side, at a 45-degree angle to the cooking surface. If using a fixed lens, place the camera exactly where it captures the desired frame, as zooming isn’t an option.
- Alternative Placement: For close-ups or to avoid harsh lighting, set the camera on the same side as you, angled to focus on the action. Ensure no equipment (e.g., lights or stands) appears in the background.
- Recommended Camera: The Fujifilm X-T3 ($800-$1,200, body only) is excellent for beginners, with 4K video, high dynamic range, and a flip-out screen for easy monitoring.
Single-Camera Setup
If you only have one camera, prioritize the overhead shot for its versatility in recipe videos. Alternatively, use a smartphone for overhead shots and a digital camera for side angles. A smartphone tripod mount ($10-$20) can stabilize your phone for consistent framing.
Equipment Recommendations
| Equipment | Purpose | Recommended Model | Price Range | Key Features |
|---|---|---|---|---|
| Overhead Stand | Stable top-down shots | Glide Gear OH 100 | $100-$150 | Supports 10 lbs, extends to 6.5 ft |
| Tripod | Flexible camera positioning | Vanguard ALTA Pro | $130-$200 | Adjustable angles, sturdy build |
| Camera | High-quality video | Fujifilm X-T3 | $800-$1,200 | 4K video, flip-out screen, high ISO |
| Smartphone Mount | Budget-friendly camera option | Universal Smartphone Tripod Mount | $10-$20 | Compatible with most phones |
Advanced Lighting Techniques for Professional Results
To take your recipe videos to the next level, incorporate these advanced lighting techniques to enhance visual appeal and highlight your dishes.
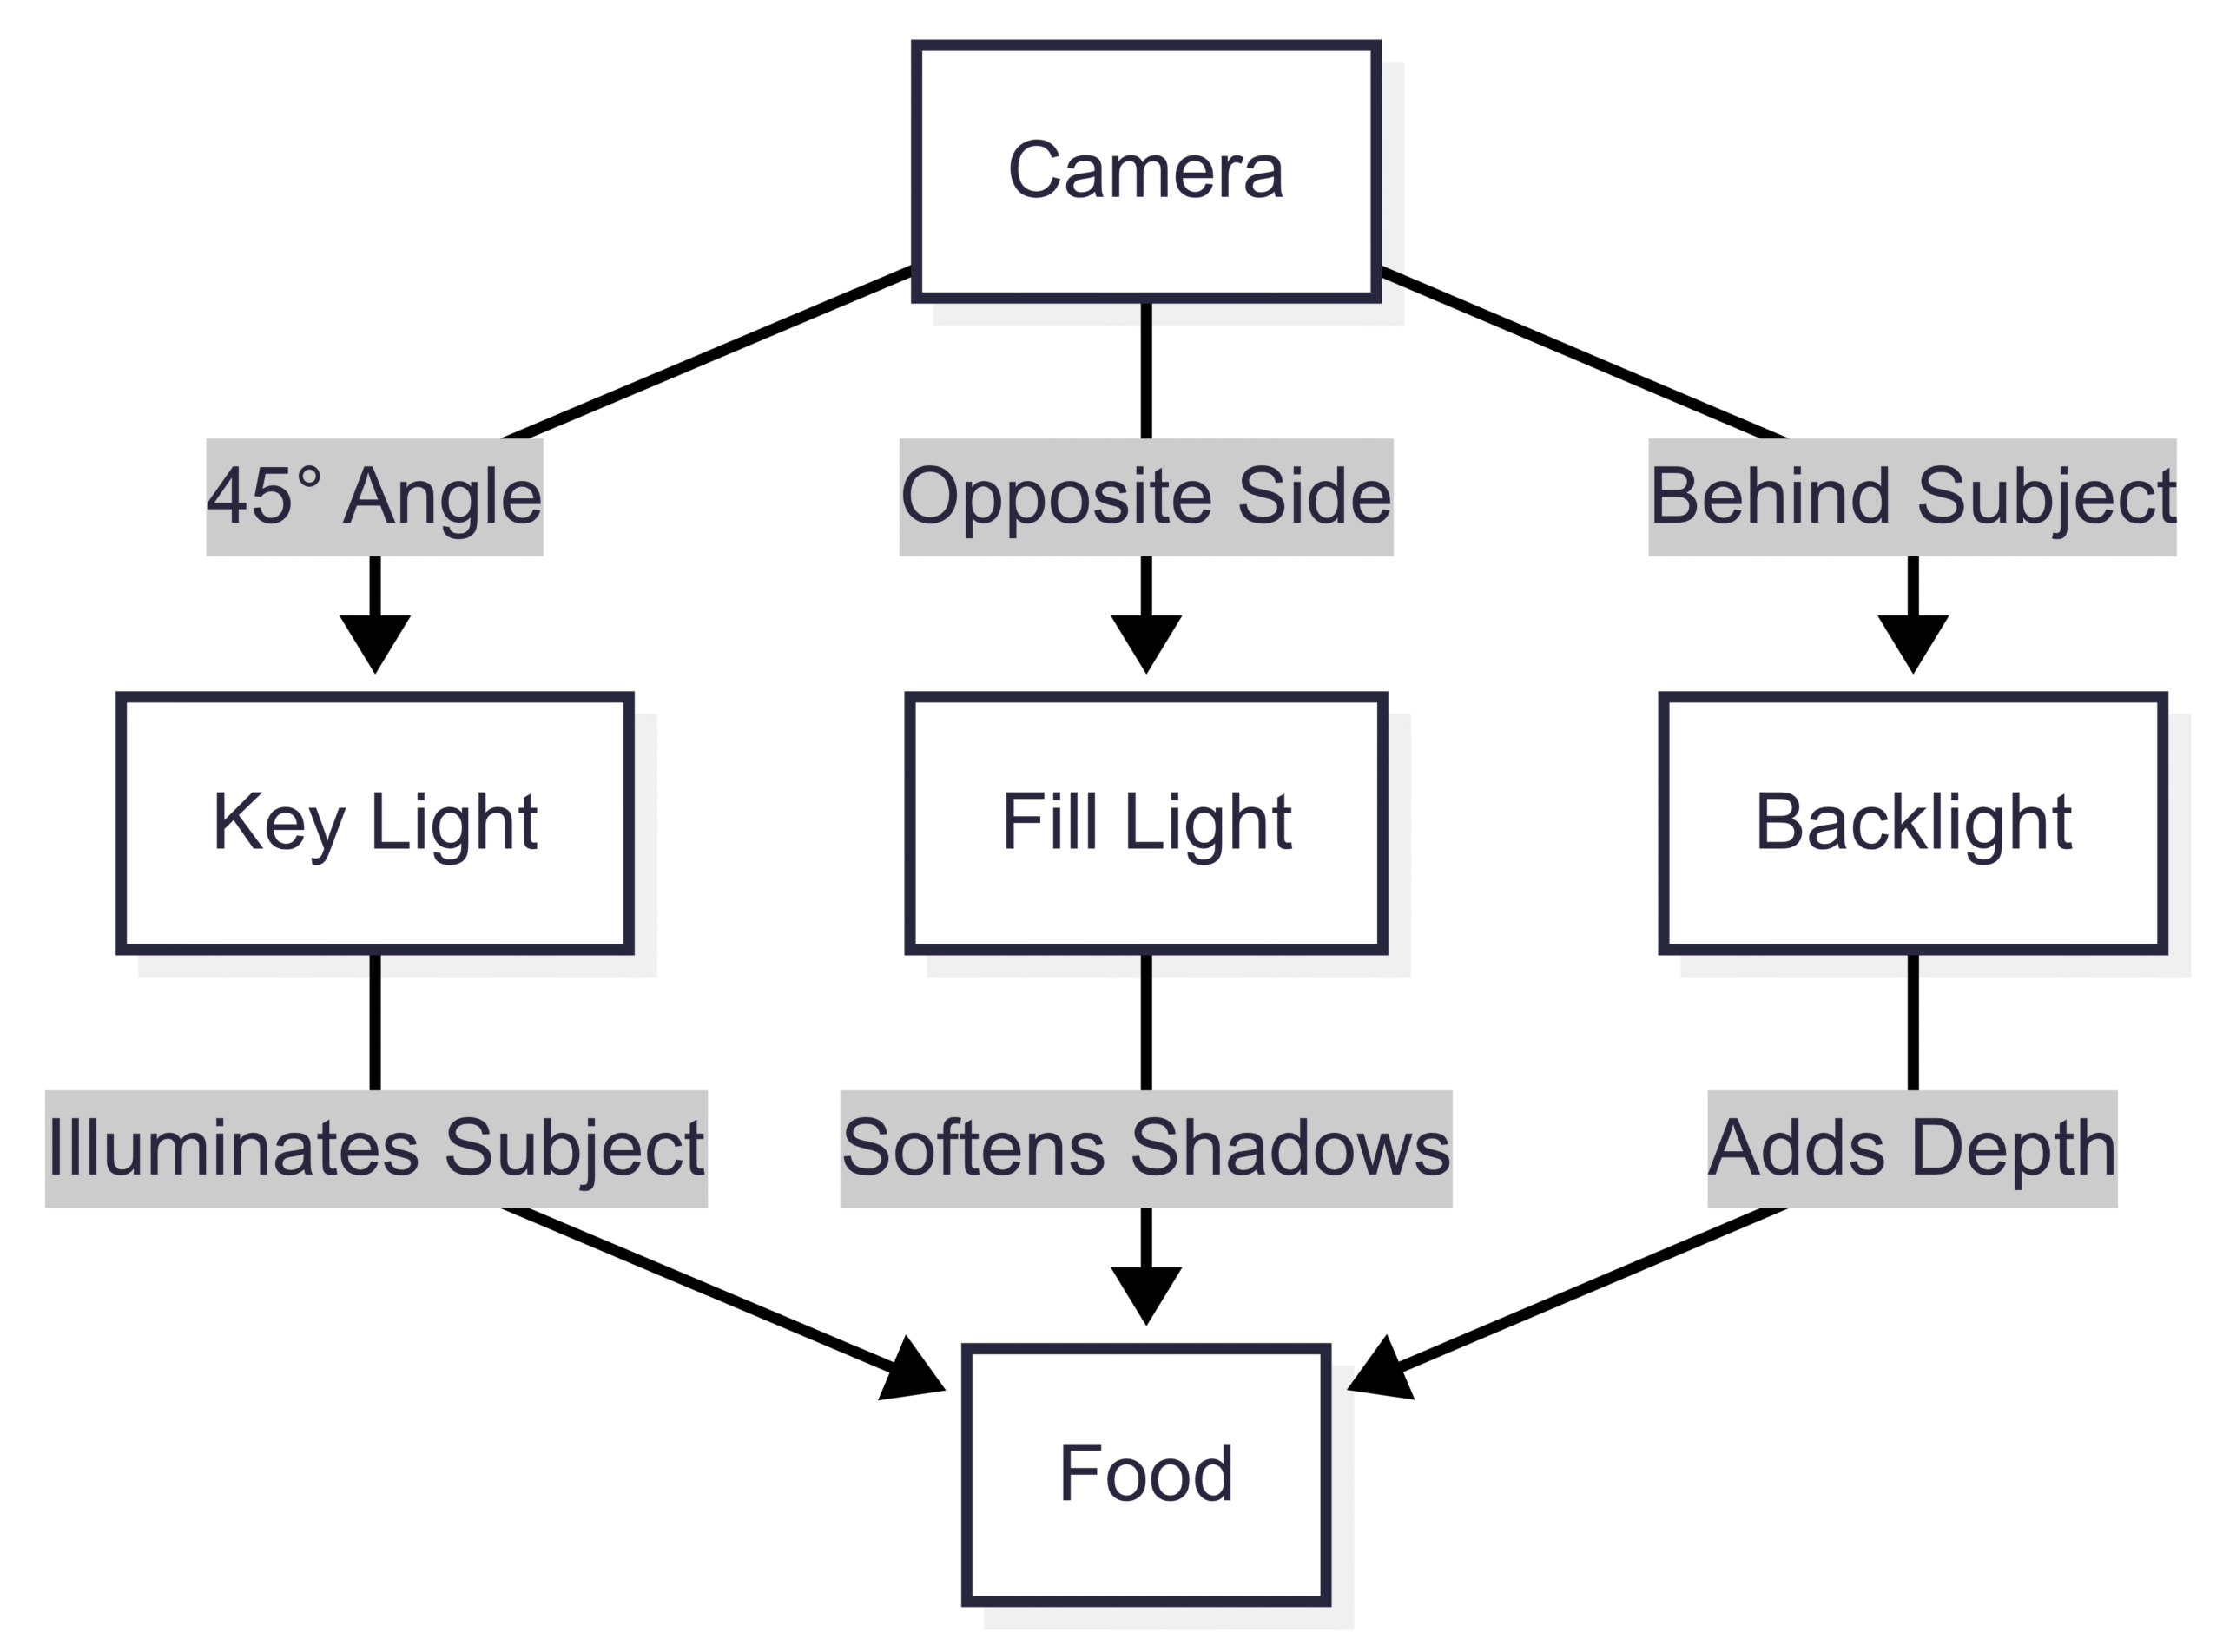
Three-Point Lighting
Three-point lighting is a classic technique that uses three light sources to create depth and dimension:
- Key Light: The primary light, placed at a 45-degree angle to the camera and 45 degrees down toward the subject. It provides the main illumination, highlighting the food’s texture and color.
- Fill Light: A softer light (often a reflector) positioned opposite the key light to reduce shadows. Adjust its intensity to maintain some contrast without flattening the image.
- Backlight: Placed behind the subject, this light separates the food from the background, adding depth. Use a low-intensity LED or reflector for subtle separation.

Diffused Lighting for Texture
Diffused lighting scatters light evenly, softening shadows while preserving food textures. Use a softbox or diffuser panel to create a natural, window-like glow. This technique is especially effective for showcasing the crust of bread, the sheen of sauces, or the vibrancy of fresh produce.
Accent Lighting for Highlights
Accent lighting draws attention to specific elements of a dish, such as the glaze on a dessert or the steam rising from a hot dish. Use a focused LED panel or spotlight at a low angle to highlight these details, creating a dramatic, appetizing effect.
Managing Reflections with Polarizing Filters
Shiny surfaces like stainless steel pots or glossy sauces can create distracting reflections. A polarizing filter ($20-$50) attaches to your camera lens and reduces glare by filtering out polarized light. Rotate the filter to adjust its effect for each shot, ensuring smooth, distraction-free visuals.
Optimizing Your Setup
Avoiding Shadows
Shadows from tripods, stands, or your body can ruin a shot. Position lights to avoid casting shadows into the frame, and use reflectors to fill in shadowed areas. If shadows persist, adjust the height or angle of your lights or camera.
Controlling Ambient Light
Ambient lights, such as overhead kitchen lights, often cast orange or green hues that disrupt color balance. Turn off all ambient lights and rely solely on your controlled lighting setup. Use bulbs with a daylight color temperature (5000K-5300K) to replicate natural light.
Choosing the Right Clothing
Your clothing can reflect light into the scene, affecting color balance. Stick to neutral colors like white, black, or brown, or wear a dark apron to minimize reflections, especially when filming near shiny cookware.
Selecting a Filming Location
Choose a spacious, clutter-free area like a kitchen counter, dining table, or open entryway. A table-height surface is ideal for comfort, but floor setups work if elevated camera stands are used. Ensure your camera has a flip-out screen or use an external monitor ($100-$200) for high-angle shots to maintain focus and exposure.
Tips for Beginners
If you’re new to videography, start simple and experiment:
- Start with a Basic Setup: Use one softbox or LED panel as a key light and a reflector as a fill light. Add more equipment as you gain experience.
- Test and Adjust: Spend time moving lights and cameras to see how they affect your shot. Small adjustments, like tilting a reflector, can make a big difference.
- Watch for Glare: Angle shiny utensils away from direct light or cover reflective surfaces when not in use.
- Experiment with Angles: Try different camera angles for each recipe to find the most flattering perspective.
Enhancing Your Videos with a Food Blog
Pairing your videos with a food blog can boost engagement and SEO. High-quality videos embedded in blog posts increase on-page time, improve retention rates, and drive social shares, leading to higher traffic and better search rankings. Create recipe posts with detailed instructions, nutritional information, and vibrant images to complement your videos.
Conclusion
Mastering camera and lighting placement for recipe videos is about understanding your equipment, controlling light, and framing shots to highlight your culinary creations. By investing in versatile tools like softboxes, LED panels, and reflectors, and applying techniques like three-point lighting and diffused lighting, you can create professional, appetizing videos that captivate your audience. Experimentation is key—test different setups, adjust angles, and refine your approach to suit your unique style and space. Whether you’re filming on a budget with DIY hacks or using high-end gear, the principles outlined here will help you produce stunning recipe videos that leave viewers hungry for more.
We will meet you on next article.
Please share this Camera and Lighting Placement for Recipe Videos with your friends and do a comment below about your feedback.
Until you can read, How to Start a Cooking Channel on YouTube: Complete Guide


