Food Photos with Leading Lines: Composition Tutorial
Introduction to Leading Lines in Food Photography
Leading lines represent one of the most powerful yet accessible composition techniques in photography, particularly when applied to food imagery. At its core, this method involves using visual lines—whether straight, curved, dotted, or implied—to direct the viewer’s gaze toward the primary subject, typically the hero dish. In food photography, where the goal is often to evoke appetite, storytelling, and aesthetic appeal, leading lines transform static images into dynamic narratives that hold attention and convey intent.
Unlike broader landscape or portrait photography, food photography operates in a controlled environment. Photographers can manipulate elements like props, ingredients, lighting, and angles to craft these lines deliberately. This comprehensive tutorial delves deeply into the mechanics of leading lines, drawing from foundational principles while integrating practical applications tailored to food scenes. By mastering this technique, you’ll create balanced, engaging photos that not only showcase the dish but also guide the viewer on a visual journey, enhancing emotional connection and professional quality.
Leading lines aren’t a new invention; they stem from classical art composition, where artists like Leonardo da Vinci used implied paths to focus attention. In modern photography, they serve as a bridge between the foreground and the subject, adding depth and movement. For food photographers, this means turning everyday kitchen elements into compositional tools that elevate ordinary shots into compelling visuals optimized for platforms like social media, blogs, or commercial use.
Understanding Leading Lines: Core Concepts
Leading lines are compositional elements that form paths guiding the viewer’s eye through the frame. These can be literal lines, such as the edge of a knife or a trail of sauce, or suggested ones, like a row of scattered seeds or the shadow cast by a spoon. Their primary function is to emphasize the main subject while adding structure, balance, and intrigue.
In technical terms, leading lines exploit human visual psychology. The eye naturally follows paths, especially those that converge or curve toward a focal point. This creates a sense of flow, preventing the viewer from scanning randomly and instead directing them efficiently to the key element—the food.
Key Characteristics of Effective Leading Lines
- Directionality: Lines should point toward the subject, not away from it.
- Variety: Straight lines convey stability; curved ones add organic flow; diagonals inject energy.
- Integration: They must blend naturally with the scene to avoid looking forced.
- Contrast: Lines stand out through color, texture, or lighting differences.
To illustrate, consider a basic setup: a plate of pasta with forks positioned to form converging lines toward the center. This not only highlights the dish but also implies readiness for consumption, enhancing narrative depth.
Advantages of Incorporating Leading Lines in Food Photos
Employing leading lines offers multiple benefits that go beyond mere aesthetics. They control viewer engagement, ensuring the image’s message—be it the freshness of ingredients or the allure of a plated meal—is delivered effectively.
- Directed Attention: In a cluttered frame, lines act as guides, reducing visual noise and focusing on the hero dish.
- Enhanced Depth and Interest: Lines add layers, making flat tabletops feel three-dimensional and encouraging prolonged viewing.
- Balance and Harmony: They counterbalance elements, creating symmetrical or asymmetrical compositions that feel pleasing.
- Narrative Strength: Lines can tell stories, such as a trail of crumbs suggesting a bite taken or utensils implying preparation.
- Versatility Across Styles: Whether minimalist or maximalist, leading lines adapt to various moods, from rustic to elegant.
Quantitatively, images with strong leading lines often see higher engagement rates on platforms like Instagram, where dwell time correlates with algorithm favor. For commercial purposes, they improve conversion in menus or ads by emphasizing desirability.
General Examples of Leading Lines in Photography
Before diving into food-specific applications, it’s useful to examine leading lines in broader photography contexts. These principles translate directly to food shots, treating the tabletop as a “miniature landscape.”
- Straight Road to a Horizon: A path drawing eyes to a distant point, akin to a knife edge pointing to a cake slice.
- Winding River: Curved flow leading to a focal area, similar to drizzled sauce guiding to the main ingredient.
- Converging Train Tracks: Parallel lines meeting at infinity, like chopsticks converging on a sushi roll.
- Tree-Lined Avenue: Rows suggesting direction, comparable to aligned herbs framing a salad.
- Fairy Lights String: Dotted illumination, mirroring scattered berries leading to a dessert.
- Planks on Ground: Linear elements, like wooden boards under a charcuterie spread.
- Beach Rocks as Stepping Stones: Implied path, such as citrus wedges directing to a cocktail.
These examples demonstrate how secondary elements support the primary subject, a concept directly applicable to food where props and ingredients play supporting roles.
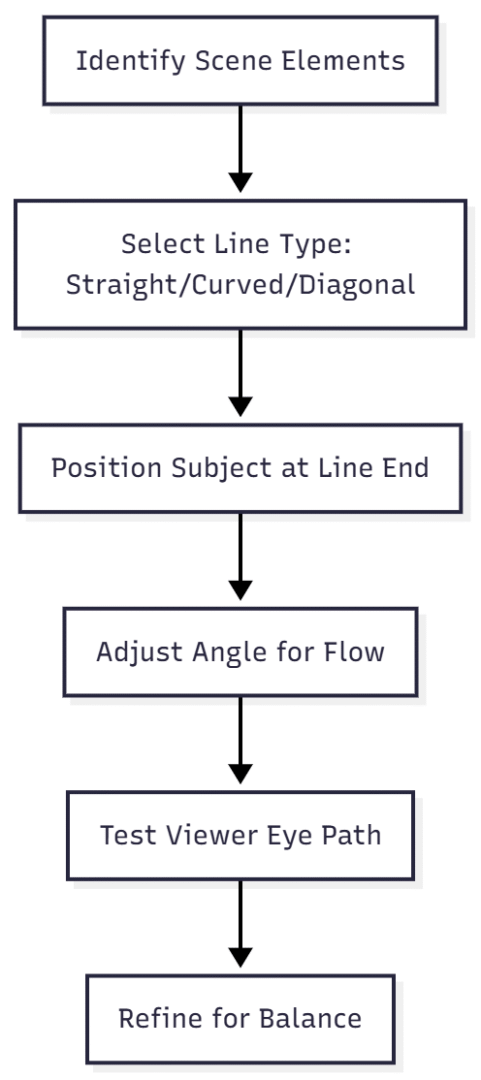
This flowchart outlines a basic process for incorporating leading lines, adaptable to food setups.
Adapting Leading Lines to Food Photography
Food photography’s advantage lies in control: unlike outdoor scenes, you dictate placement. Treat your setup as a controlled landscape, where the “terrain” is the table and the “horizon” is the dish.
Conceptual Shift: Food as Miniature Landscapes
View food photos as scaled-down vistas. A cutting board edge becomes a road; a sauce drizzle, a river. This mindset encourages creative line use, drawing from landscape examples while adapting to culinary constraints.
Practical Creation in Food Contexts
Start by planning: Sketch setups to visualize lines. Use a rule of thirds grid (downloadable overlays available for free online) to align lines with key intersections.
Key strategies:
- Foreground to Background Flow: Place lines in the foreground to pull eyes inward.
- Multiple Lines for Complexity: Combine types for richer compositions, e.g., straight cutlery with curved napkin folds.
- Natural Integration: Ensure lines feel organic, not staged.
Suggested Props for Leading Lines in Food Photos
Props are the backbone of food line creation. Select items that are long, thin, or edged for natural paths.
Table of Recommended Props
| Prop Category | Examples | Specifications | Typical Price Range (USD) |
|---|---|---|---|
| Cutlery/Silverware | Knives, forks, spoons, chopsticks | Stainless steel or bamboo; lengths 6-10 inches | $5-20 per set |
| Utensils | Spatulas, whisks, graters, rolling pins | Metal or silicone; ergonomic handles, 8-12 inches long | $10-30 |
| Decorative Items | Rolled napkins, straws, branches, dried grasses | Cotton/linen napkins (12×12 inches), metal straws (8 inches) | $2-15 |
| Ingredients | Spring onions, asparagus, spaghetti, grissini | Fresh produce; lengths vary 4-12 inches | $1-5 per bunch |
| Surfaces/Edges | Placemats, cutting boards, baking trays | Wood or fabric; sizes 12×18 to 18×24 inches | $10-40 |
This table provides practical options, focusing on accessibility and cost for beginners or pros.
Specific Examples in Use
- Cutlery: Position spoons to lead upward in a pie shot, creating bounce.
- Utensils: A palette knife alongside brownies forms lines with cuts.
- Decorative: Cocktail sticks in drinks point to focal elements.
- Ingredients: A jug spout drizzling sauce creates fluid lines.
- Edges: Multi-surface backgrounds form background lines under dishes.
Ingredients as Leading Lines
Food itself offers endless line potential. Long, thin items excel, but creative placement turns any ingredient into a guide.
- Linear Foods: Carrots, celery, herbs—align to point at the hero.
- Drizzles and Scatters: Sauces or powders form dotted or curved paths.
- Sliced Elements: Pie wedges act as arrows back to the source.
Example: In a salad, position burrata with ham folds leading inward, enhanced by a honey drizzle.
Tips for Crafting Superior Leading Lines Compositions
Execution matters as much as selection. Refine with these guidelines:
Straight vs. Curved Lines
Straight lines offer precision and stability, ideal for modern setups. Curved lines, like aubergine sweeps, provide softer, natural flow. Choose based on mood: straight for graphic impact, curved for elegance.
Dotted or Implied Lines
Not all lines need continuity. Scattered nuts or dripped sauce imply paths, like stepping stones. These subtle elements maintain potency without overwhelming.
Edges as Lines
Placemat borders or tray rims function identically to props, pulling eyes inward. Layer surfaces for background lines, positioning dishes over junctions.
Casual Placement
Avoid perfect symmetry; off-center lines feel authentic. Apply rule of thirds for natural asymmetry.
Virtual Lines via Light and Shadow
Manipulate lighting: Block sources with flags for shadow divides, or use low angles for cast shadows from tall props like bottles.
Subtle vs. Bold Approaches
Lines needn’t dominate; subtle shadows work as well as bright props. Adjust contrast ratios for desired visibility.
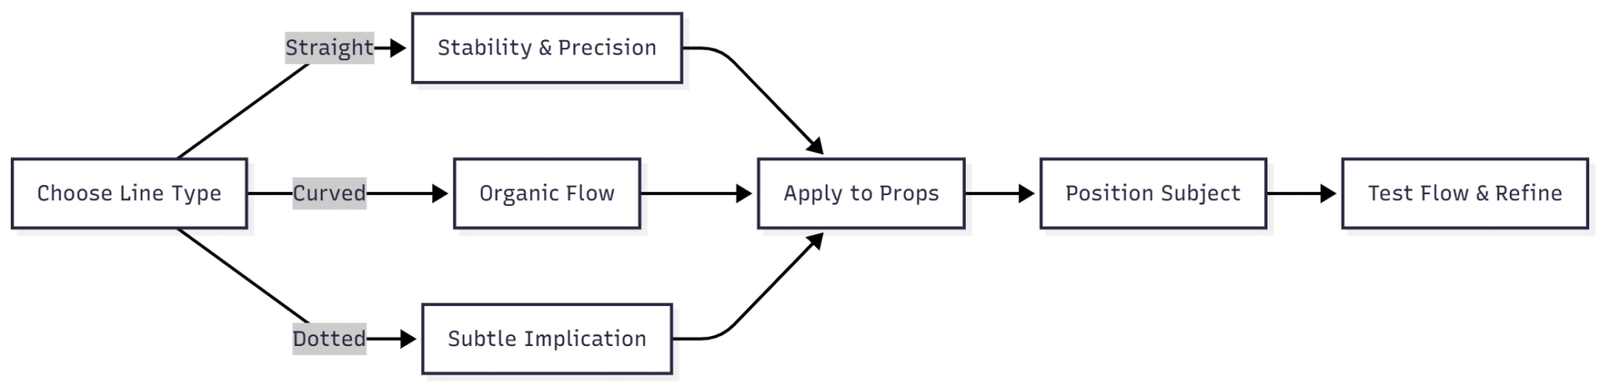
This flowchart aids in selecting and implementing line types.
Integrating Leading Lines with Other Composition Techniques
Leading lines shine when combined with rules like thirds or golden ratio, creating multifaceted compositions.
Rule of Thirds Synergy
Place line intersections on thirds grid points for balanced guidance.
Negative Space Complement
Pair lines with empty areas to amplify direction without clutter.
Layers and Depth
Use lines to connect foreground layers (e.g., ingredients) to background (e.g., props), adding dimension.
Framing and Patterns
Lines can frame subjects or form repeat patterns, like aligned utensils.
Diagonals for Movement
Diagonals inject energy, contrasting stable horizontals.
Color Theory Enhancement
Align lines with color wheels: complementary for contrast, analogous for harmony.
Camera Angles and Orientation for Leading Lines
Angles dictate line emphasis.
Optimal Angles
- 0-45°: Descriptive, shows depth; ideal for layered foods.
- 90° Overhead: Graphic, emphasizes shapes; great for patterns.
- Straight-On: Dramatic for height; lines add intimacy.
Tip: Avoid 45-90° intermediates to prevent distortion.
Orientation Choices
Vertical for mobile/social; horizontal for web/prints. Shoot both to adapt.
Table of Angle Recommendations:
| Angle | Best For | Line Type Suited |
|---|---|---|
| 0-45° | Tall dishes (cakes) | Diagonals, curves |
| 90° | Flat spreads (pizzas) | Converging, patterns |
| Straight-On | Stacked items (burgers) | Verticals, shadows |
Lighting and Technical Considerations
Lighting accentuates lines.
- Natural vs. Artificial: Natural for soft flow; artificial for control.
- Shadows as Lines: Side lighting creates implied paths.
- Depth of Field: Shallow (f/2.8-5.6) blurs distractions; deep (f/8-16) sharpens lines.
Shoot tethered for real-time adjustments.
Styling, Backdrops, and Props Integration
Style to enhance lines: Use textured backdrops (wood, linen) for implied edges. Props add authenticity; avoid overload.
Advanced Techniques and Storytelling
- Implied Human Presence: Hands or utensils suggest action.
- Seasonal/Cultural Elements: Add context via lines like herb trails.
- Dynamic Symmetry: Complex grids for multi-line balance.
Workflow for Leading Lines Shots
- Pre-visualize/sketch.
- Set camera/tripod.
- Build scene layer by layer.
- Test lines.
- Shoot/edit.
Equipment Table:
| Item | Specs | Price (USD) |
|---|---|---|
| Tripod | Aluminum, ball head, 55-70 inches | $50-150 |
| Wide-Angle Lens | 24-35mm, f/2.8 | $300-800 |
| Tether Cable | USB-C, 15ft | $20-50 |
Frequently Asked Questions
Visual paths (props, ingredients, edges, shadows) that guide the eye to the main dish. They add depth, focus, balance, and engagement, making images more dynamic and professional.
Use cutlery, utensils, napkins, or ingredients (e.g., knives pointing to cake, sauce drizzles, chopsticks converging). Position off-center with rule of thirds; add shadows via lighting.
The 0-45° angle is versatile for depth and layers, ideal for tall dishes like cakes, where diagonals or curves add movement. The 90° overhead angle emphasizes graphic patterns and shapes, perfect for flat spreads like pizzas with converging lines. Straight-on angles suit stacked items, using verticals or shadows for drama. Avoid 45-90° intermediates to prevent distortion. Shoot in both vertical (for mobile) and horizontal (for web) orientations, and use a tripod for precise alignment.
Limit to one dominant line; direct inward; avoid symmetry; integrate naturally; balance with negative space and depth of field (f/2.8-5.6).
Yes. Position side or low-angle light to cast long shadows from bottles, glasses, or utensils, forming virtual lines that guide the eye to the dish. Adjust contrast for subtle or bold effects.
Conclusion
Mastering leading lines transforms food photography from static snapshots into compelling visual stories. By strategically using props, ingredients, edges, and lighting, you guide viewers effortlessly to your hero dish, adding depth, movement, and professional polish. Whether through straight cutlery paths, curved sauce drizzles, or subtle shadow gradients, this technique enhances engagement across social media, blogs, and commercial work. Combine it with angles, negative space, and the rule of thirds for balanced, dynamic compositions. Practice consistently—sketch setups, shoot tethered, and refine in post. With leading lines, your food photos will not only look stunning but also captivate, evoke appetite, and leave lasting impressions.
Please share this Food Photos with Leading Lines: Composition Tutorial with your friends and do a comment below about your feedback.
We will meet you on next article.
Until you can read, How to Save Photos for Instagram and Other Social Media