The Best Camera Angles for Food Photography
Discover the best camera angles for food photography: overhead, straight-on, and 45-degree. Learn how to capture mouthwatering shots with expert tips.
Food photography is an art form that transforms everyday dishes into visual feasts. Whether you’re a food blogger, a restaurant owner, or an Instagram enthusiast, the right camera angle can make your dishes pop, enticing viewers to dive into the image. The three core angles—overhead (90-degree), straight-on (0-degree), and 45-degree (three-quarters)—each offer unique perspectives to showcase food in its best light. This guide dives deep into these angles, exploring their applications, best practices, and pitfalls to avoid, ensuring your food photography stands out. We’ll also include practical tips, equipment recommendations, and visual aids to elevate your skills.
Why Camera Angles Matter in Food Photography
The camera angle you choose defines what your audience sees and feels. It’s not just about pointing and shooting; it’s about storytelling. A well-chosen angle highlights the dish’s texture, layers, or context, making viewers hungry. Each angle serves a specific purpose, and understanding when to use them can transform a good photo into a great one. Poor angle choices, however, can make food look flat, unappealing, or confusing. This guide will help you make informed decisions to create mouthwatering images that resonate with your audience.
The Three Core Camera Angles
1. Overhead (90-Degree) Angle: The Flat Lay
The overhead angle, often called a flat lay, captures the dish from directly above. This perspective emphasizes the composition, arrangement, and surface details of the food, creating a clean, organized aesthetic that’s popular on social media platforms like Instagram.
When to Use the Overhead Angle
- Flat Foods: Ideal for dishes like pizzas, salads, charcuterie boards, or cookies, where the top surface holds the most visual interest.
- Multiple Elements: Perfect for capturing spreads, such as brunch tables or holiday buffets, where multiple dishes or ingredients need equal attention.
- Table Settings: Showcases the entire scene, including props like napkins, utensils, or drinks, to tell a cohesive story.
- Ingredient Shots: Arranging raw ingredients in a tidy flat lay communicates the recipe’s components clearly.
When to Avoid
- Tall Foods: Burgers, layered cakes, or stacks of pancakes lose their appeal from above, appearing flat and uninspiring.
- Overly Busy Scenes: Too many props can make the image chaotic, overwhelming the viewer.
How to Capture a Perfect Overhead Shot
- Equipment: Use a wide-angle lens (24-70mm is ideal) to capture the full scene without needing to position the camera too high. A tripod with an overhead arm or a C-stand ensures stability.
- Composition: Keep props minimal and purposeful. For example, a fork or a hand reaching for a dish adds dynamism without clutter. Use elements of varying heights to create depth.
- Depth of Field: Opt for a wider depth of field (f/5.6 or higher) to keep most elements in focus, but selective blur can add dimension.
- Distortion: Ensure the camera is level to avoid distortion, which can make food appear tilted or unnatural.
Example
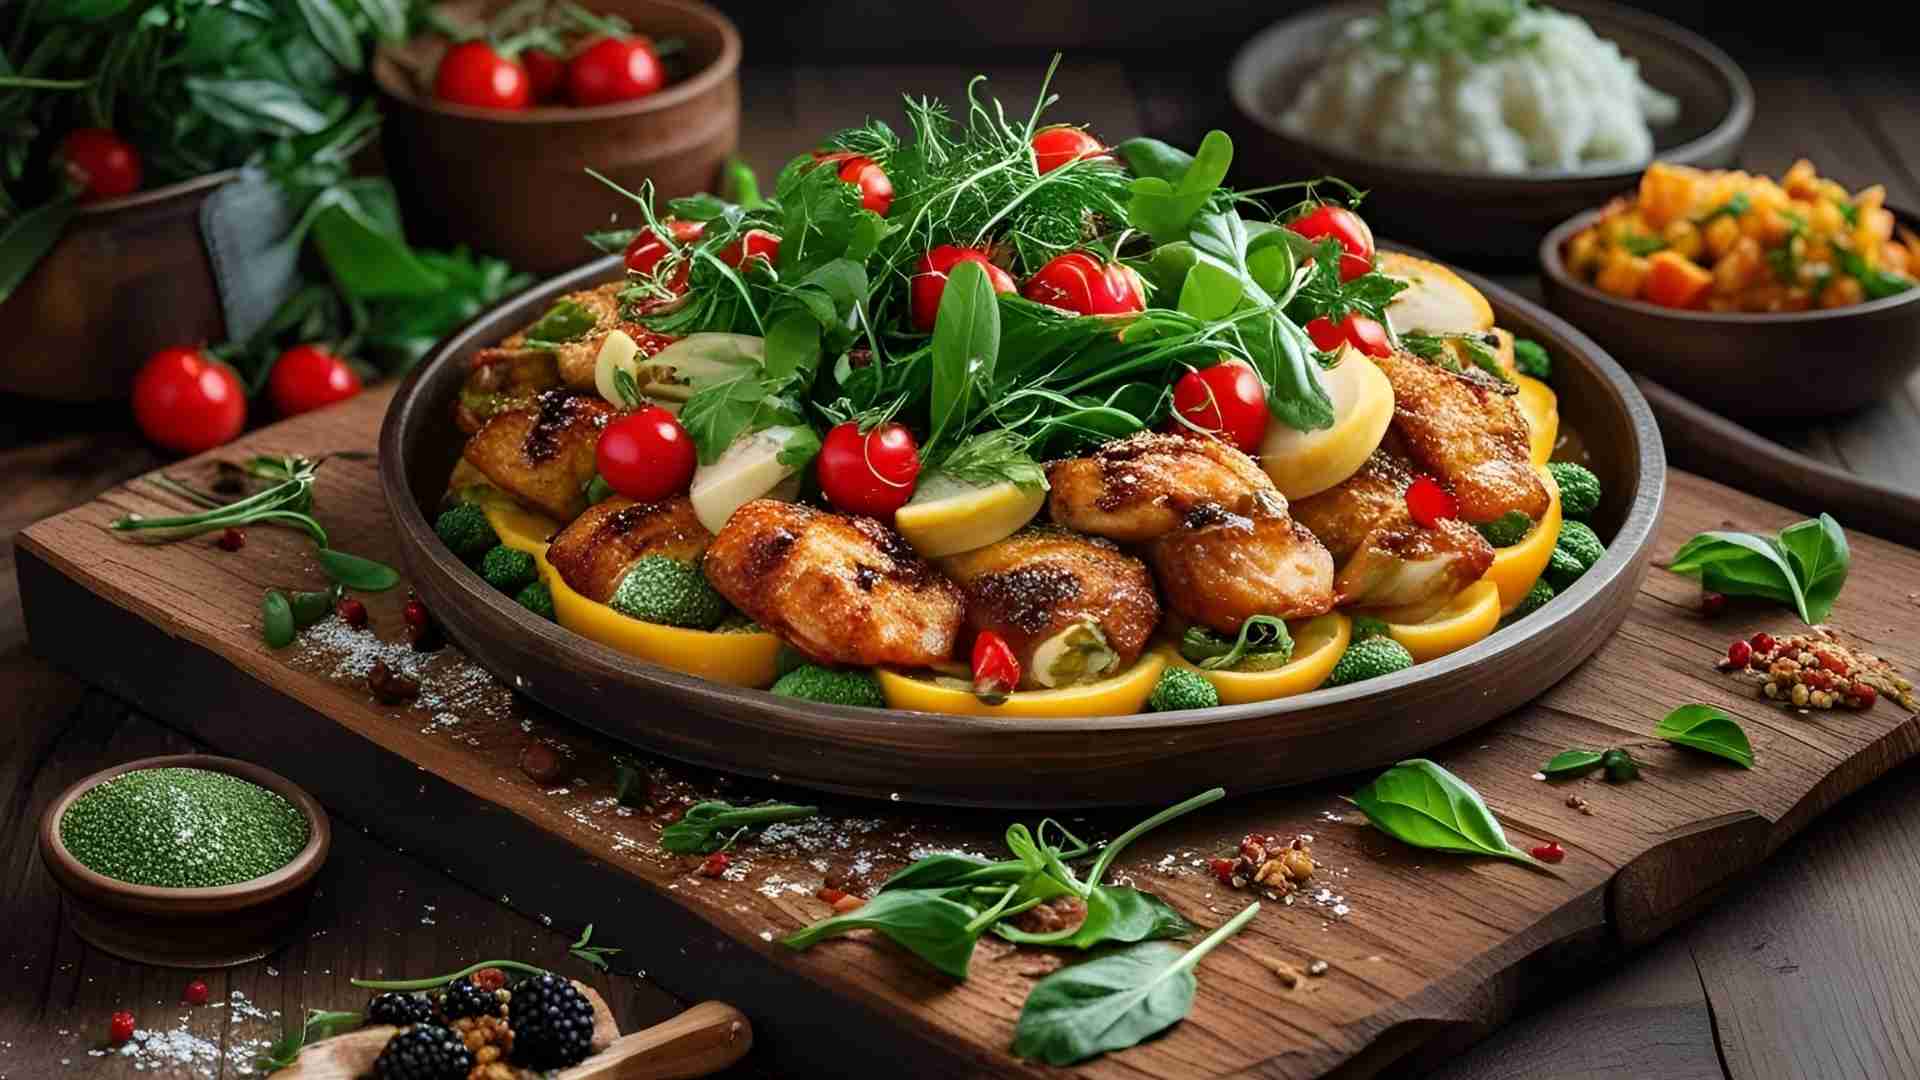
Imagine a vibrant salad with colorful ingredients arranged in a circular pattern. An overhead shot captures the symmetry and variety, making the dish visually striking. Adding a napkin and a fork at the edge of the frame enhances the storytelling without overpowering the food.
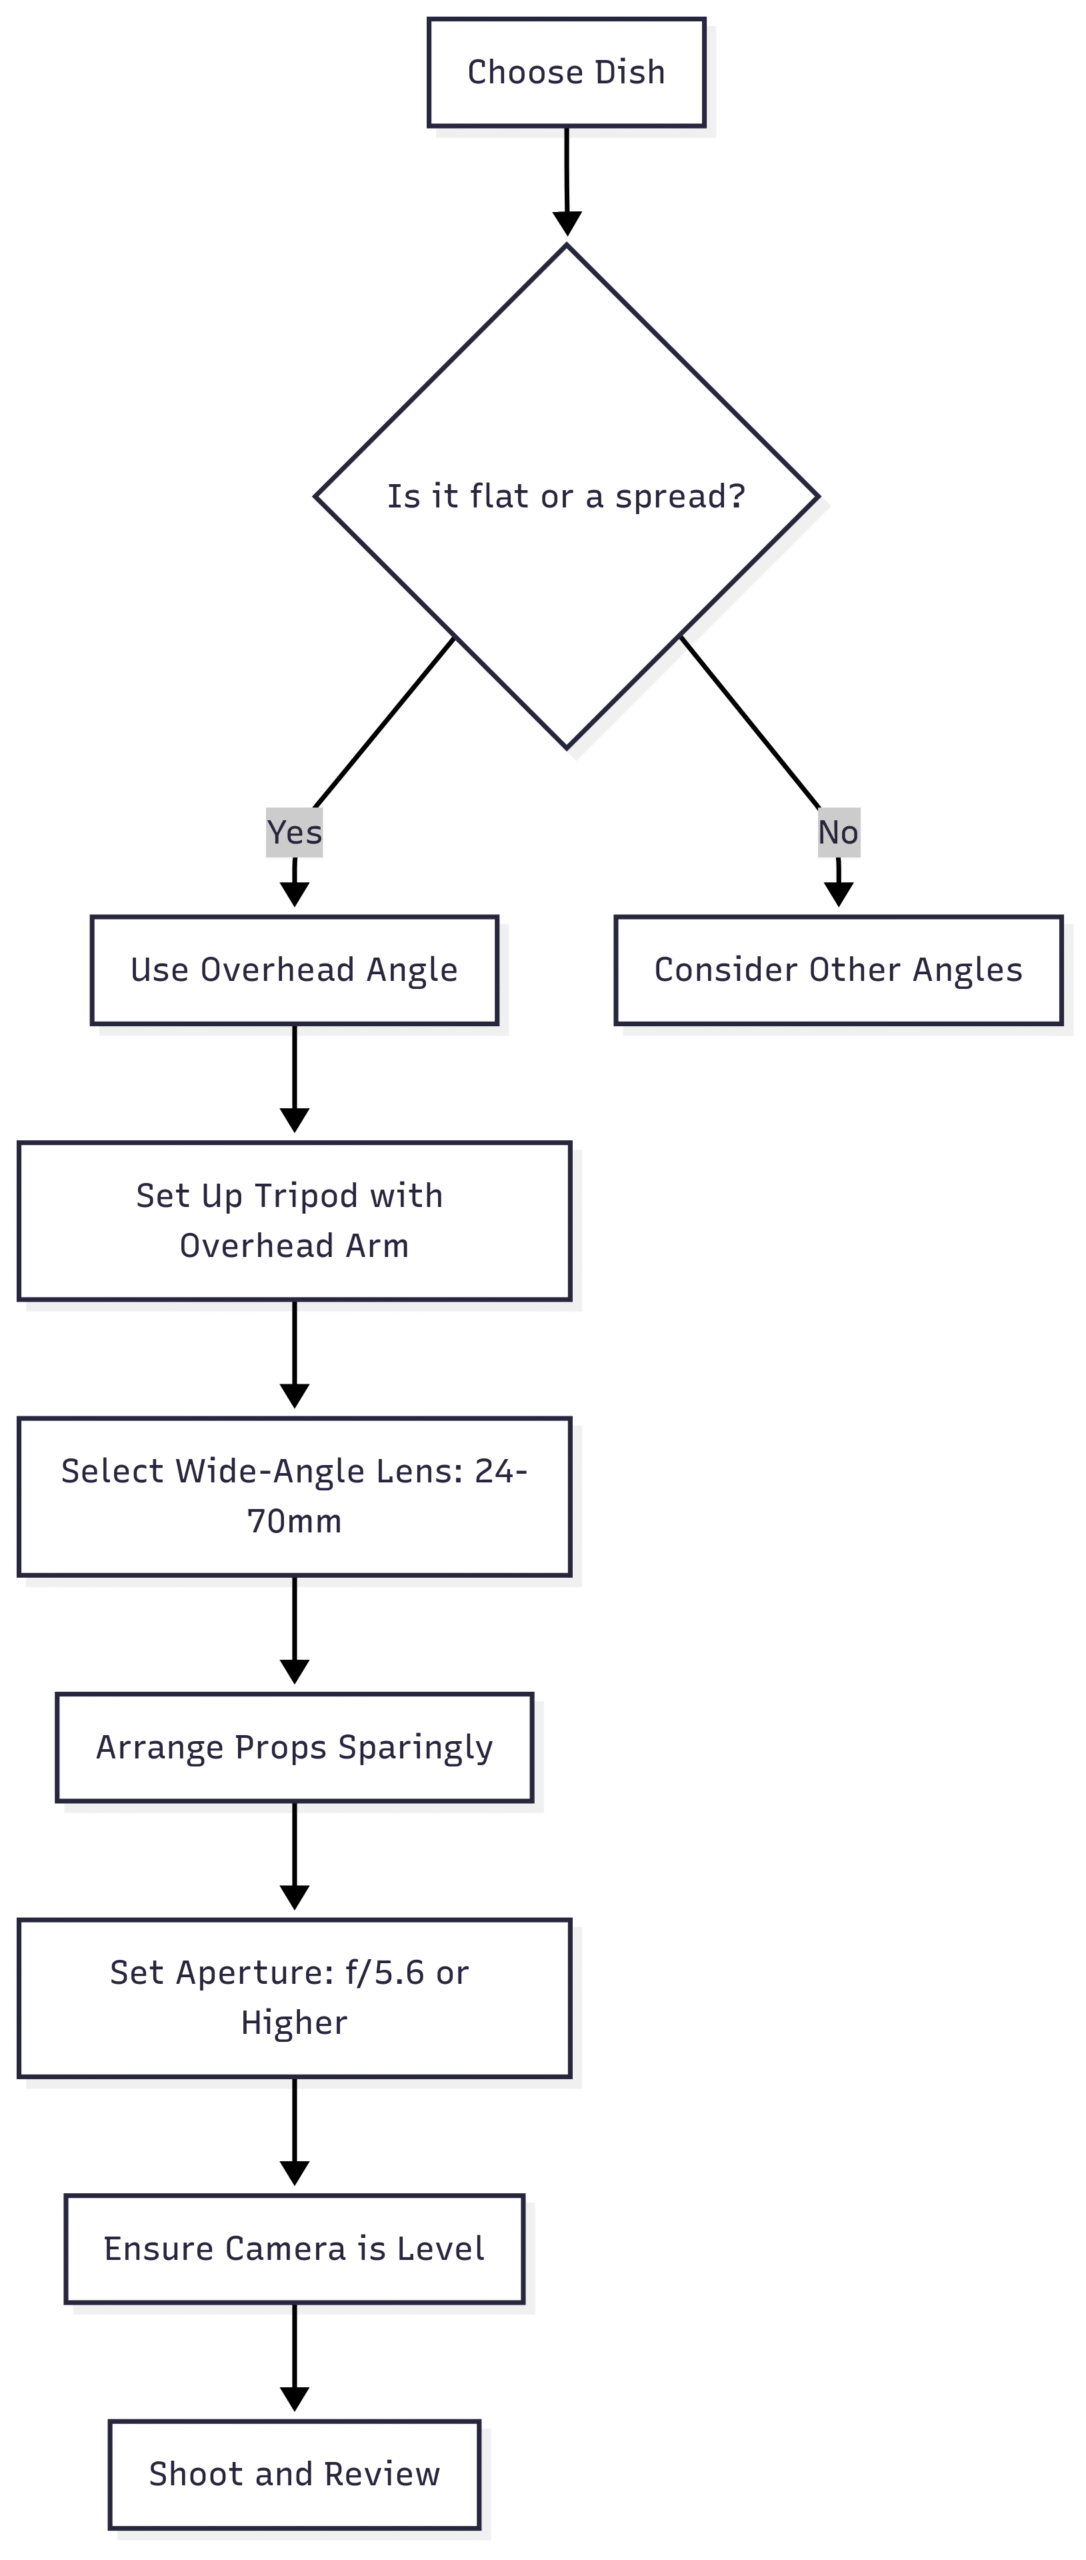
Chart: Overhead Angle Workflow
2. Straight-On (0-Degree) Angle: Eye-Level Excellence
The straight-on angle is shot at eye level, directly facing the food. This perspective highlights the height, layers, and side details of a dish, making it ideal for showcasing stacked or tall foods.
When to Use the Straight-On Angle
- Tall or Layered Foods: Perfect for burgers, sandwiches, pancake stacks, or layered cakes, where the side profile is the star.
- Action Shots: Captures dynamic moments like pouring syrup, stretching cheese, or lifting a forkful of pasta.
- Minimalist Shots: Focuses on the dish with fewer props, ideal for commercial photography or when props are limited.
When to Avoid
- Flat Foods: Pancakes or pizzas look one-dimensional and unappealing from this angle.
- Complex Tablescapes: This angle can’t capture full table settings, limiting context.
How to Capture a Perfect Straight-On Shot
- Equipment: A macro lens (60-100mm) is ideal for capturing sharp details and beautiful bokeh. A tripod with a ball head ensures precise framing.
- Background: Use neutral or blurred backgrounds (e.g., wooden tables or a restaurant kitchen) to keep the focus on the food.
- Horizon Line: Ensure the camera is level to avoid tilted images, which can make dishes appear unstable.
- Composition: Balance bold elements to avoid a lopsided image. For example, place a glass of water on the opposite side of a tall burger to create harmony.
Example
A towering stack of pancakes drizzled with honey benefits from a straight-on shot. The angle highlights the layers and the glistening syrup, while a blurred background of a cozy kitchen adds warmth without distraction.
Table: Straight-On Angle Best Practices
| Aspect | Recommendation |
|---|---|
| Lens | 60-100mm macro for sharp details and bokeh |
| Aperture | f/2.8-f/4 for selective focus on the dish |
| Tripod | Use a tripod with a ball head for precise alignment |
| Background | Neutral or blurred to emphasize the food |
| Horizon | Keep level to avoid tilted appearance |
3. 45-Degree (Three-Quarters) Angle: The Versatile Middle Ground
The 45-degree angle, ranging from 25 to 75 degrees, offers a balance between the overhead and straight-on perspectives. It mimics a diner’s viewpoint, making it inviting and versatile for most dishes.
When to Use the 45-Degree Angle
- Individual Dishes: Ideal for soups, bowls, pastas, or drinks, where both the top and sides need visibility.
- Textured Foods: Highlights details like flaky pastries, layered desserts, or creamy nut butter swirls.
- Lifestyle Shots: Incorporates hands, utensils, or complementary dishes to create a lively, relatable scene.
- Branded Shots: Showcases product packaging (e.g., a jar’s label) alongside the food’s texture.
When to Avoid
- Large Spreads: Can make wide setups look cramped or confusing.
- Extreme Close-Ups: Not ideal for intricate details like dessert toppings, where straight-on or overhead excels.
How to Capture a Perfect 45-Degree Shot
- Equipment: A 50-100mm lens (e.g., 100mm macro) captures details while maintaining context. A tripod allows for fine adjustments.
- Depth of Field: Use a shallow depth of field (f/2.8-f/4) to focus on the dish while softly blurring the background for a dreamy effect.
- Props: Include complementary items like utensils or garnishes to enhance storytelling, but keep them minimal to avoid clutter.
- Angle Variation: Adjust between 25 and 75 degrees based on the dish. Flatter foods suit higher angles (closer to 75 degrees), while taller foods work better at lower angles (closer to 25 degrees).
Example
A bowl of French onion soup with a cheesy crouton is best captured at a 45-degree angle. This perspective highlights the melted cheese and the bowl’s handles, clearly communicating the dish’s identity. A closer crop emphasizes the texture, making it mouthwatering.
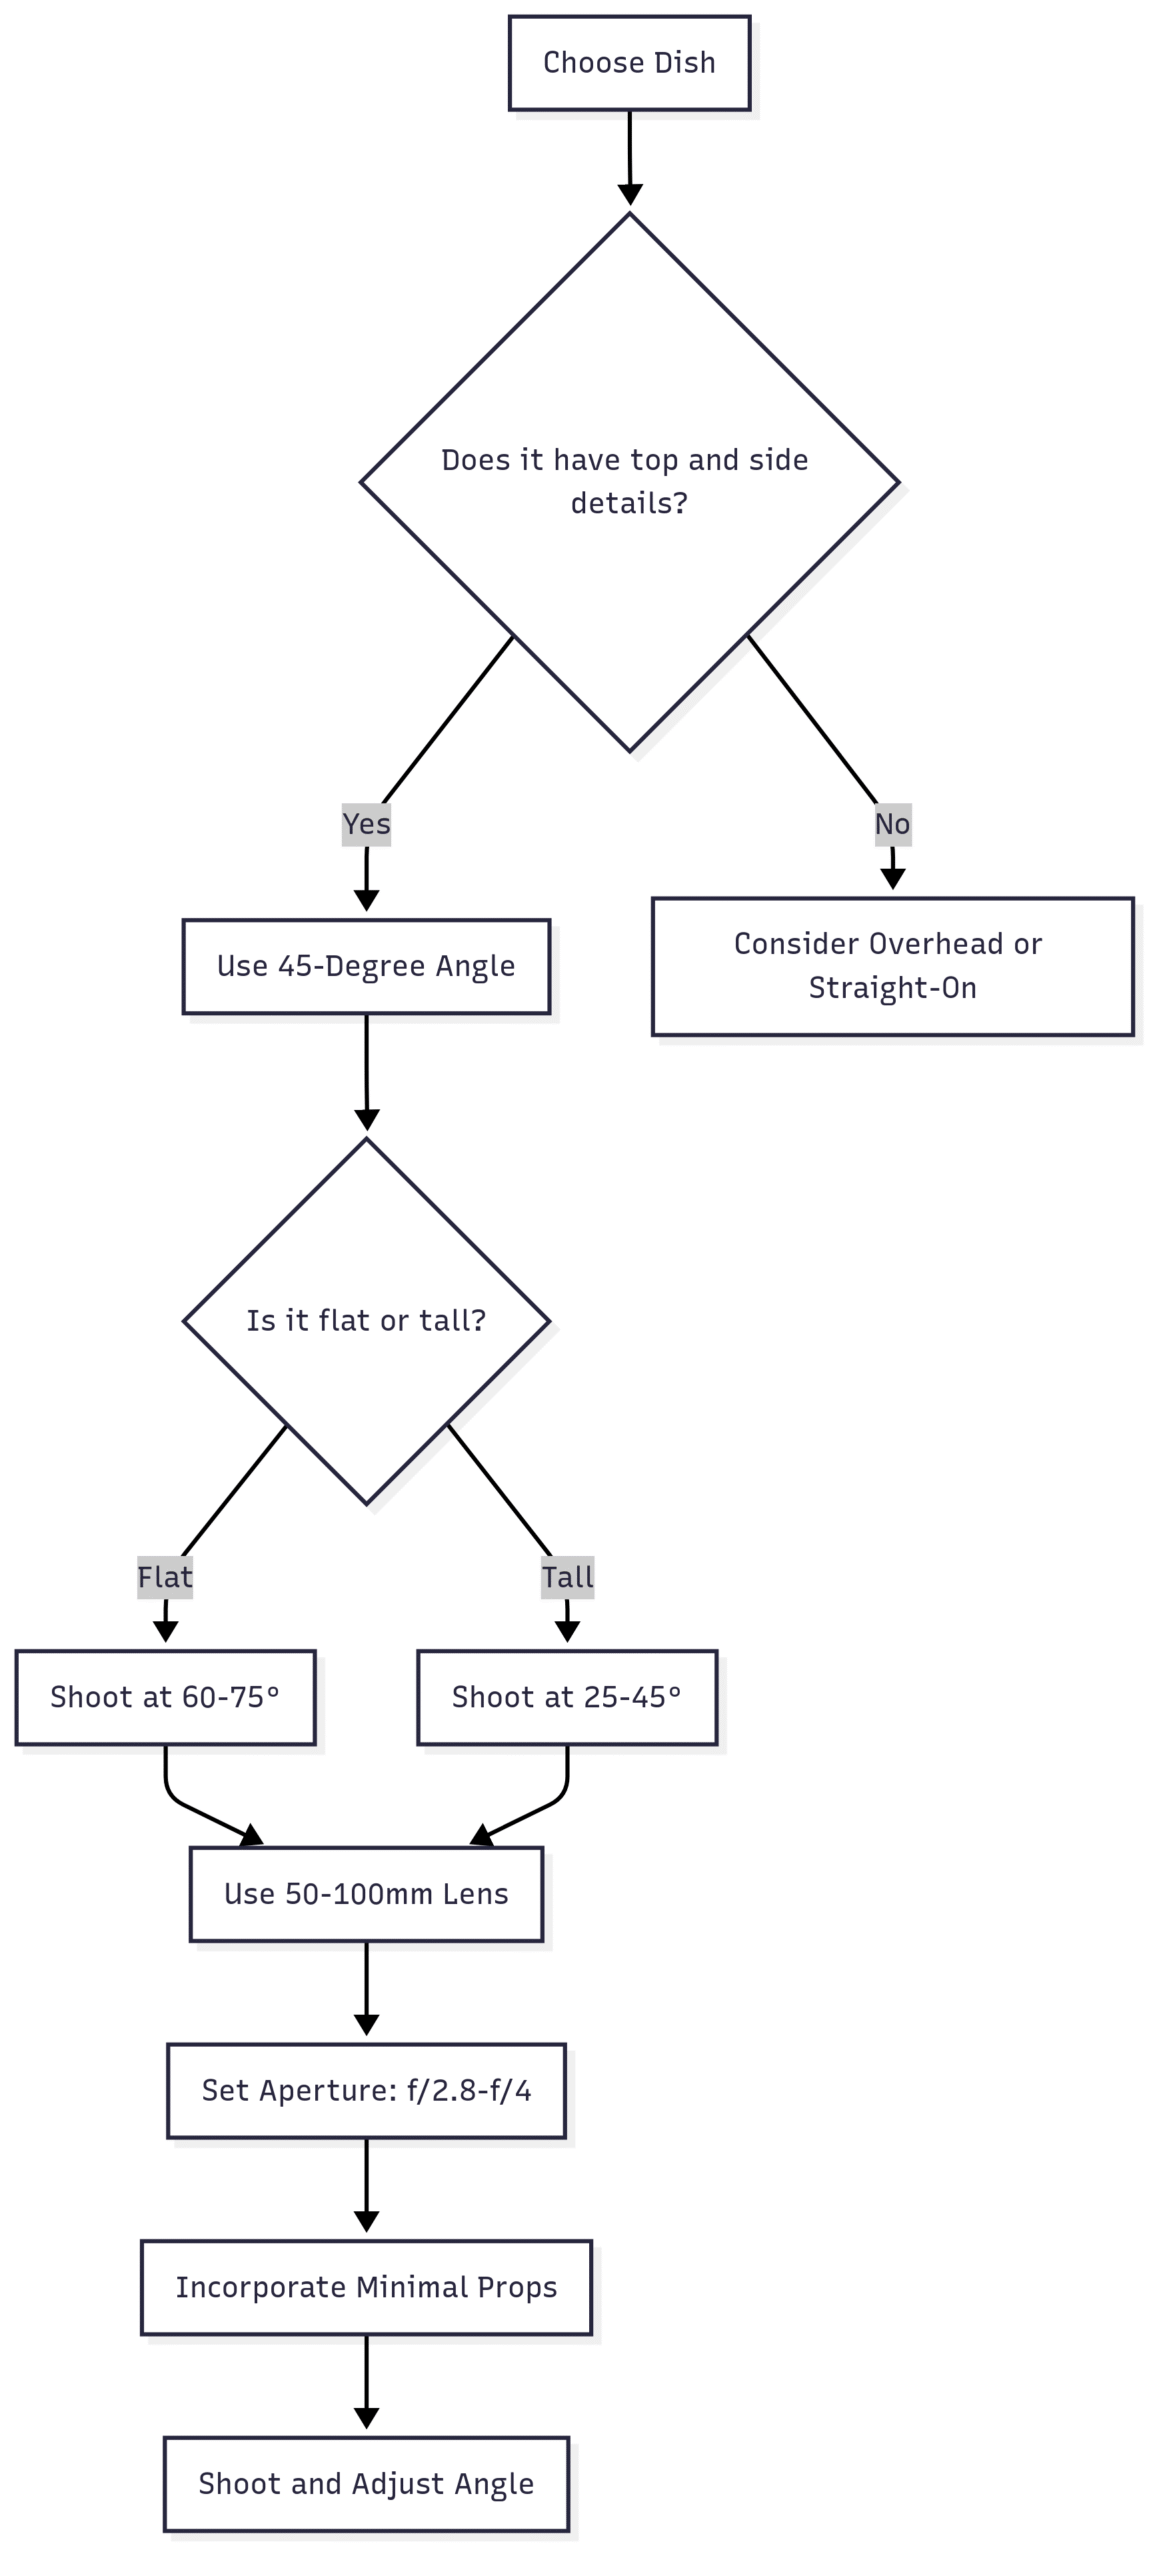
Chart: 45-Degree Angle Decision Tree
Angles to Avoid in Food Photography
While the three core angles are your go-to options, certain approaches can sabotage your shots. Here’s what to steer clear of:
- Diagonal Shots: Slanted horizons make food look like it’s sliding off the plate, disorienting viewers. Keep lines straight for a polished look.
- Overly Close Macro Shots: Extreme close-ups can obscure the dish’s identity, confusing viewers. Reserve macros for specific details, like sparkling sugar crystals, and ensure the context is clear.
- Inappropriate Focal Lengths: Wide-angle lenses (below 24mm) can distort food, making it look unnatural. Stick to 50mm or higher for most shots to maintain proportions.
Equipment Recommendations and Pricing
To execute these angles effectively, the right gear is essential. Below is a table of recommended equipment, including approximate prices (in USD, based on general market rates).
| Equipment | Recommendation | Purpose | Approx. Price |
|---|---|---|---|
| Camera | Canon EOS R6 or Nikon Z6 | High-resolution, versatile for food shots | $2,000-$2,500 |
| Lens (Overhead) | Canon EF 24-70mm f/2.8L or Sigma 24-70mm | Wide-angle for flat lays | $1,000-$1,900 |
| Lens (Straight-On/45°) | Canon EF 100mm f/2.8 Macro or Nikon 105mm | Sharp details and bokeh | $900-$1,200 |
| Tripod | Manfrotto MT055XPRO3 with Ball Head | Stability for precise angles | $250-$400 |
| C-Stand (Overhead) | Neewer C-Stand with Arm | Overhead shots | $100-$150 |
| Lighting | Godox AD200 Pro Flash | Consistent artificial lighting | $300-$350 |
| Light Diffuser | Neewer 32×32-inch Softbox | Soft, even lighting | $50-$100 |
Note: Prices vary by retailer and region. Check trusted vendors like B&H Photo or Adorama for current deals.
Practical Tips for Mastering Food Photography Angles
- Plan Your Shots: Before shooting, identify the dish’s key features and choose the angle that highlights them. Create a shot list to streamline the process and avoid re-styling for different angles.
- Lighting Matters: Natural light is ideal for a soft, organic look, but artificial lighting (e.g., flash with a softbox) offers consistency, especially in low-light conditions. Position lights to enhance textures, like the shine on a glaze.
- Composition and Props: Use props like napkins, utensils, or garnishes to add context, but ensure they complement the dish. For example, scattered herbs in a pasta shot reinforce freshness.
- Edit Thoughtfully: Use tools like Adobe Lightroom or Photoshop to adjust brightness, contrast, and sharpness. Avoid over-saturation, which can make food look unnatural.
- Experiment Freely: While rules provide a foundation, don’t be afraid to break them. Try unique angles or dynamic elements, like mid-air sprinkles, to add personality.
- Use Negative Space: Strategic empty space can make the dish stand out, especially in editorial shots where text overlay is needed.
- Analytics Insight: Review past image performance to understand what resonates with your audience. For example, 45-degree shots often perform well in digital ads due to their relatable perspective.
Case Study: A Real-World Lesson
A client once finalized a moodboard focused on flat lays for a shoot featuring flatbreads and salads. On the shoot day, they requested a shift to 45-degree angles based on analytics showing higher engagement for that perspective. This required a complete re-styling, as flat lays prioritize surface details, while 45-degree shots emphasize depth and side textures. The lesson? Discuss angles early with your photographer or team to align on the dish’s key features and intended use (e.g., social media, e-commerce, or editorial). Pre-planning saves time and ensures the best results.
Choosing the Right Angle for Your Food or Brand
To select the best angle, ask:
- What’s the Dish? Identify where the visual interest lies—top, sides, or both.
- How’s It Styled? Opaque bowls with detailed toppings suit overhead or 45-degree angles, while transparent glasses with layers favor straight-on or 45-degree shots.
- Where Will It Be Used? Editorial shots need negative space for text, while e-commerce shots should highlight key product features.
- What’s the Goal? To make viewers hungry, mimic their dining perspective with a 45-degree angle. To showcase artistry, a flat lay might be best.
Example Scenarios
- E-commerce (Nut Butter Jar): A 45-degree angle shows the creamy texture and branding on the jar, enticing buyers.
- Food Blog (Tiramisu): A 45-degree shot captures the creamy topping and glass layers, inviting readers to try the recipe.
- Restaurant Menu (Burger): A straight-on angle highlights the juicy layers, making it irresistible.
Conclusion
Food photography is about more than just snapping a picture—it’s about crafting an image that tells a story and sparks hunger. The overhead, straight-on, and 45-degree angles each offer unique ways to showcase your dish, but choosing the right one depends on the food, styling, and purpose. By planning your shots, using the right equipment, and avoiding common pitfalls, you can create images that captivate and convert. Whether you’re shooting for a blog, social media, or a menu, let the food guide your angle, and watch your photography transform from good to unforgettable.
Please share these The Best Camera Angles for Food Photography with your friends and do a comment below about your feedback.
We will meet you on next article.
Until you can read, Top 10 Strategies for a Successful Food Vlog