DIY Gobo Lighting Ideas for Food Photography
Food photography thrives on creativity, and one of the most effective ways to elevate your images is through strategic lighting. Among the many lighting techniques available, gobo lighting stands out as a powerful, yet accessible, tool for food photographers. By casting intentional shadows and patterns, gobos allow you to tell compelling visual stories, add depth, and create a sense of atmosphere that draws viewers into your frame. The best part? You don’t need expensive equipment to get started. With everyday household items and a bit of imagination, you can craft stunning gobo effects that transform your food photography from ordinary to extraordinary.
This comprehensive guide explores the art and science of DIY gobo lighting for food photography. We’ll cover what gobos are, how they work, and provide a range of practical, low-cost ideas to help you create captivating images. From foam board cutouts to natural elements like plants, we’ll dive into techniques that anyone can try, regardless of budget or experience level. Along the way, we’ll include actionable tips, visual examples, and technical insights to ensure you can master gobo lighting and take your food photography to the next level.
What Is a Gobo?
A gobo, short for “go-between optics,” is any object placed between a light source and your subject to create a pattern or shadow. In food photography, gobos are used to manipulate light, adding texture, depth, and narrative elements to your images. By partially blocking or shaping light, gobos can mimic natural phenomena—like sunlight streaming through a window or dappled shadows from tree branches—or create abstract patterns that enhance the mood of your shot.
Gobos are particularly valuable because they allow photographers to suggest a broader context or story without showing it explicitly. For instance, the shadow of a window frame can evoke a cozy café setting, while a plant’s silhouette might suggest an outdoor picnic. These subtle cues engage viewers’ imaginations, making your images more immersive and memorable.
Why Use Gobo Lighting in Food Photography?
Light is a critical compositional element in photography. It shapes how viewers perceive texture, depth, and mood. In food photography, where the goal is often to make dishes look appetizing and inviting, lighting can make or break a shot. Gobo lighting offers several benefits:
- Narrative Power: Gobos create visual cues that hint at a story or setting, such as a tropical vibe for a fruit salad or a rustic ambiance for a hearty stew.
- Depth and Dimension: Shadows add contrast and dimension, preventing flat or overly uniform lighting that can make food look unappealing.
- Creative Control: With gobos, you can craft unique lighting effects tailored to your vision, giving your portfolio a distinctive style.
- Cost-Effectiveness: Many gobo techniques use inexpensive or readily available materials, making them accessible to beginners and professionals alike.
By mastering gobo lighting, you can elevate your food photography without investing in costly equipment, relying instead on creativity and resourcefulness.
Understanding Gobo Lighting Mechanics
Before diving into specific DIY gobo ideas, it’s essential to understand how gobos work and how to control their effects. The key to successful gobo lighting lies in manipulating the sharpness and scale of the shadows you create. This process is similar to controlling depth-of-field in photography, but instead of adjusting a lens, you’re adjusting the position of the light, gobo, and subject.
How to Control Shadow Sharpness?
The sharpness of a gobo’s shadow depends on the relative distances between the light source, the gobo, and the subject:
- Gobo Close to Light Source: When the gobo is positioned near the light source and far from the subject, the shadow edges appear soft and diffused. This creates a gentle, natural effect, like sunlight filtering through leaves.
- Gobo Far from Light Source: When the gobo is closer to the subject and farther from the light source, the shadow edges become sharp and defined, ideal for bold, dramatic effects like window frames or geometric patterns.
Here’s a simple analogy: Think of the light source as a camera, the gobo as the subject, and the food as the background. Just as moving a subject closer to or farther from a camera affects background blur, adjusting the gobo’s position relative to the light source controls shadow clarity.
Choosing the Right Light Source
Gobo lighting works best with a focused, directional light source, as diffuse light (like from a softbox) can dilute the shadow effect. Here are the main types of light sources for gobo photography:
- Continuous Light: Continuous lights, such as LED panels or tungsten lamps, allow you to see the shadow effect in real-time, making it easier to adjust the gobo’s position. Popular options include the Godox SL60W ($129), a versatile continuous LED light with adjustable brightness.
- Flash or Strobe: Studio strobes, like the Godox DP400III ($199), provide powerful, controlled bursts of light, ideal for sharp shadows and high-contrast images. Many strobes include a modeling light for previewing gobo effects.
- Natural Light: Sunlight can be used as a free light source, but it’s less predictable due to weather and time-of-day variations. Window light with a gobo can create beautiful, natural effects indoors.
For most DIY setups, a continuous light or a flash with a modeling light is ideal, as it allows for real-time adjustments without guesswork.
DIY Gobo Lighting Ideas for Food Photography
Now that you understand the basics, let’s explore a range of DIY gobo lighting ideas that you can create with minimal investment. These techniques use everyday materials and simple setups to produce professional-quality results. Each idea includes practical steps and tips to help you achieve the desired effect.
1. Foam Core Cutouts: Custom Patterns on a Budget
Materials Needed: Black foam core board ($5–$10), craft knife ($3–$5), pencil, ruler, gaffer tape ($10).
Foam core is a versatile and affordable material for creating custom gobos. By cutting out shapes or patterns, you can project anything from geometric designs to natural motifs like leaves or waves.
How to Create:
- Draw your desired pattern (e.g., leaves, stars, or abstract shapes) on a black foam core board using a pencil and ruler.
- Carefully cut out the design with a craft knife, ensuring clean edges.
- Mount the foam core on a stand or tape it to a stable surface between your light source and subject.
- Adjust the distance between the light, gobo, and subject to control shadow sharpness. For soft shadows, place the gobo closer to the light; for sharp shadows, move it closer to the subject.
Example Application: For a tropical salad shoot, cut out palm leaf shapes to cast dappled shadows, suggesting a beachside setting. In a test shoot with a fruit platter, a foam core gobo with leaf cutouts created a summery, outdoor vibe when placed 2 feet from a Godox SL60W light and 4 feet from the subject.
Cost: Approximately $15–$25 for materials.
Pro Tip: Use black foam core to minimize light reflection, which can create unwanted bright spots. If you need a larger gobo, tape multiple boards together for a wider shadow area.
2. Household Objects: Everyday Items as Gobos
Materials Needed: Kitchen strainer ($5–$10), colander ($8–$15), lace fabric ($5–$10), or household plants (free or $10–$20).
You likely have items around your home that can double as gobos. Kitchen tools like strainers or colanders create intricate patterns, while fabrics like lace or mesh produce soft, textured shadows. Plants, whether real or artificial, are especially effective for natural, organic effects.
How to Create:
- Select an object with an interesting texture or pattern, such as a colander for circular shadows or lace for delicate designs.
- Position the object between your light source and the subject. Use a C-stand or tape to hold it in place.
- Experiment with the distance and angle of the light to achieve the desired shadow effect. For example, a colander held 1 foot from a continuous light creates a speckled pattern, while lace draped 3 feet away produces a softer, diffused texture.
Example Application: In a shoot featuring a cheese board, a plastic IKEA plant ($10) was used as a gobo to cast soft, leafy shadows, evoking a garden setting. The plant was placed 1.5 feet from a Godox SL60W light, with the subject 3 feet away, resulting in a gentle, summery effect.
Cost: $0–$20, depending on items used.
Pro Tip: Combine multiple household objects for layered effects. For instance, place a colander in front of a lace fabric to create a complex, multi-textured shadow pattern.
3. Window Frame Gobo: Mimicking Natural Light
Materials Needed: Foam core board ($5–$10), craft knife ($3–$5), gaffer tape ($10), or a small window frame ($20–$50).
A window frame gobo is a classic choice for food photography, as it mimics the look of light streaming through a window, creating a cozy or rustic atmosphere.
How to Create:
- Cut a square or rectangular hole in a foam core board to form the window frame. For added realism, tape thin strips of card or wood across the hole to mimic windowpanes.
- Position the gobo between the light source and the subject, ensuring no light spills around the edges (use additional foam core or flags to block stray light).
- Adjust the gobo’s distance from the light to control shadow sharpness. For a soft, natural window effect, place the gobo closer to the light; for a dramatic, defined frame, move it closer to the subject.
Example Application: In a shoot with a rustic bread loaf, a foam core window frame gobo was placed 2 feet from a Godox DP400III strobe, casting crisp windowpane shadows that suggested a countryside bakery setting.
Cost: $15–$65, depending on whether you DIY or purchase a frame.
Pro Tip: For wider shots, ensure the gobo is large enough to cover the entire light beam, preventing unrealistic light spill that could break the illusion of a real window.
4. Venetian Blinds: Retro and Dramatic Effects
Materials Needed: Venetian blinds ($15–$30), C-stand or support ($20–$50), continuous light or strobe.
Venetian blinds are a timeless gobo choice, creating striped shadows that evoke a film noir aesthetic or a modern, sleek vibe when paired with contemporary props.
How to Create:
- Hang Venetian blinds from a C-stand or other support in front of your light source.
- Adjust the angle and distance of the blinds to control the shadow pattern. Closer to the light for softer stripes, farther for sharper ones.
- Use flags or foam core to block light spill around the blinds, ensuring the shadows appear as if cast by a real window.
Example Application: For a cocktail shoot, Venetian blinds were placed 3 feet from a Godox SL60W light, casting bold, striped shadows across a marble tabletop. The effect added a sophisticated, urban feel to the image.
Cost: $35–$80 for blinds and support.
Pro Tip: Experiment with colored gels behind the blinds to add a tint to the shadows, enhancing the mood (e.g., blue for a cool, evening vibe).
5. Optical Snoot with Metal Gobos: Professional Precision
Materials Needed: Optical snoot (e.g., Godox SA-17, $149), metal gobo set ($50–$100), compatible light source (e.g., Godox SL60W, $129).
For photographers seeking precise, professional-grade gobo effects, an optical snoot is a game-changer. This device attaches to a light source and uses a lens to focus or defocus gobo patterns, offering unmatched control over shadow placement and clarity.
How to Create:
- Attach the optical snoot to a compatible light source, such as a Godox LED or strobe.
- Insert a metal gobo (e.g., window frame, leaf pattern, or abstract design) into the snoot’s slot.
- Use the snoot’s lens to focus the pattern, adjusting the beam size and sharpness. Move the light closer or farther from the subject to scale the pattern.
- Add a secondary softbox light on low power (e.g., 1/64) to fill in harsh shadows if needed.
Example Application: In a cheeseboard shoot, a Godox SA-17 optical snoot with a window frame gobo was used to project a crisp, focused shadow pattern, creating the illusion of a softly lit window. The setup cost approximately $300 but delivered professional results.
Cost: $250–$350 for snoot, gobos, and light.
Pro Tip: Use the modeling light on your strobe or LED to preview the gobo effect, making it easier to position the pattern exactly where you want it.
Visualizing Gobo Effects: A Sample Setup
To illustrate how gobos transform a food photography scene, consider the following setup for a cheeseboard shoot:
Equipment:
- Light Source: Godox SL60W continuous LED ($129).
- Gobo: Foam core cutout with leaf pattern ($5).
- Support: C-stand ($50).
- Subject: Cheeseboard on a wooden table.
- Camera: Canon EOS R5 with 50mm f/1.8 lens.
Setup Diagram:
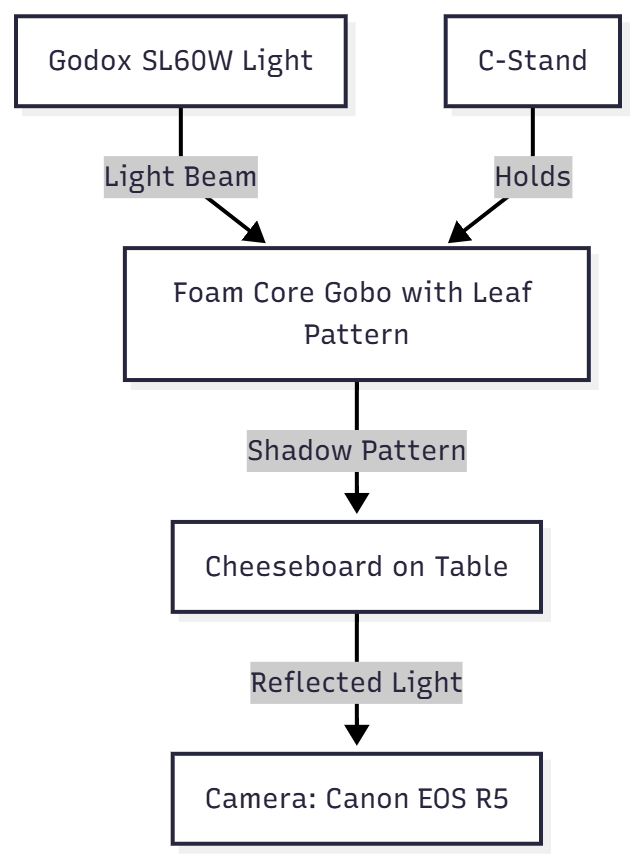
Steps:
- Position the Godox SL60W 3 feet from the gobo to create soft, diffused leaf shadows.
- Place the gobo 2 feet from the cheeseboard to ensure the pattern is prominent but not overly sharp.
- Adjust the camera settings (e.g., ISO 100, f/4, 1/125s) to capture the shadow detail and food texture.
- Shoot in live view to fine-tune the gobo’s position in real-time.
Result: The leaf shadows add a summery, outdoor feel to the cheeseboard, enhancing its visual appeal without altering the props or composition.
Tips for Success with Gobo Lighting
To maximize the impact of your DIY gobo lighting, keep these tips in mind:
- Experiment with Distance: Small changes in the gobo’s position can dramatically alter the shadow effect. Test multiple setups to find the perfect balance of sharpness and scale.
- Use Continuous Light for Real-Time Feedback: Continuous lights make it easier to see and adjust shadow patterns, especially for beginners.
- Combine Light Sources: Pair a hard light with a gobo for dramatic shadows and a softbox for subtle fill light to balance contrast.
- Focus on Narrative: Choose gobos that reinforce the story of your dish, such as tropical leaves for a fruit dessert or window frames for a cozy breakfast scene.
- Avoid Light Spill: Use flags or additional foam core to block stray light, ensuring the gobo effect looks natural and intentional.
Sample Gobo Lighting Scenarios
To help you visualize how gobos can enhance different food photography scenarios, here’s a table summarizing three setups:
| Scenario | Gobo Type | Light Source | Effect | Cost |
|---|---|---|---|---|
| Tropical Fruit Salad | Foam Core Leaf Cutout | Godox SL60W ($129) | Dappled sunlight, summery vibe | $15–$150 |
| Rustic Bread and Cheese | Window Frame (DIY) | Godox DP400III ($199) | Cozy bakery window light | $20–$220 |
| Modern Cocktail Scene | Venetian Blinds | Godox SL60W ($129) | Sleek, film noir striped shadows | $35–$200 |
Advanced Techniques: Taking Gobo Lighting Further
For photographers ready to push their gobo lighting skills, consider these advanced techniques:
- Layered Gobos: Combine multiple gobos (e.g., a colander and lace) to create complex, multi-textured shadows. This adds depth and visual interest, ideal for editorial-style shoots.
- Colored Gels: Place colored gels behind the gobo to tint the shadows, creating moodier or more vibrant effects. For example, a blue gel with a window frame gobo can evoke twilight.
- Smoke and Liquids: Use a smoke machine ($50–$100) or liquids in glassware to add atmospheric elements. Smoke highlighted by a gobo’s light can create an industrial or mysterious vibe.
- Macro Gobo Effects: Use small objects, like a dentist’s mirror ($5–$10), to direct light into specific areas of a macro food shot, highlighting textures like sugar crystals or sauce drips.
Conclusion
Gobo lighting is a versatile and accessible technique that can transform your food photography by adding depth, narrative, and visual intrigue. Whether you’re using a simple foam core cutout, a household colander, or a professional optical snoot, gobos empower you to craft unique lighting effects that tell a story. By experimenting with different materials, light sources, and shadow patterns, you can create images that stand out in a crowded digital landscape.
The beauty of DIY gobo lighting lies in its simplicity and affordability. With materials costing as little as $5 and a bit of creativity, you can achieve professional-quality results that rival high-end studio setups. So, grab some foam core, raid your kitchen for textured objects, or invest in a budget-friendly continuous light, and start playing with shadows. Your food photography will never look the same again.
Please share this DIY Gobo Lighting Ideas for Food Photography with your friends and do a comment below about your feedback.
We will meet you on next article.
Until you can read, One Light Photography; Five Awesome Ways to Shoot Food