Editing and Creating Epic Food Photography GIFs
Food photography GIFs are a game-changer in a digital landscape overflowing with static visuals. These short, looping animations breathe life into culinary creations, capturing fleeting moments like steam rising from a steaming bowl of ramen or syrup cascading over a stack of fluffy pancakes. Their ability to showcase motion and texture makes them irresistible, driving engagement on platforms like Instagram, blogs, and portfolios. Best of all, creating GIFs requires minimal additional effort alongside your existing photography projects, making them accessible to beginners and professionals alike. This guide walks you through every step, from pre-shoot planning to post-production, ensuring you produce captivating GIFs that elevate your food photography game. We’ll cover essential techniques, gear recommendations, camera settings, lighting setups, and editing workflows, all optimized to help your content rank high and resonate with audiences.
Why Food Photography GIFs Matter?
In an era where attention spans are fleeting, food photography GIFs stand out by adding a dynamic layer to static images. They tell a story whether it’s the sizzle of a steak or the sprinkle of herbs that still photos alone can’t convey. This movement captures viewers’ imaginations, encouraging likes, shares, and comments. From a technical perspective, GIFs are sequences of photographs played rapidly to mimic video, but their lo-fi charm gives them a unique edge. They’re lightweight, easy to share, and don’t demand the heavy editing of full videos.
GIFs are also versatile. You can create them during regular shoots, using the same camera, lighting, and props, with just a few tweaks to capture motion. Whether you’re a food blogger aiming to spice up your posts or a professional photographer looking to diversify your portfolio, GIFs are a low-effort, high-impact tool. This guide ensures you avoid common pitfalls like jerky motion, exposure flicker, or poor looping, delivering professional-grade results every time.
Pre-Shoot Planning: The Blueprint for Success
The foundation of an epic food photography GIF is meticulous planning. Without a clear vision, your GIF risks looking disjointed or amateurish. Here’s how to set yourself up for success.
Visualizing Movement
Movement is the heart of a GIF. It doesn’t need to be dramatic—subtle actions like a drizzle of olive oil, a puff of powdered sugar, or steam curling from a dish can be mesmerizing. The key is identifying what moves and how to capture it. Ask yourself: Should the camera stay fixed, letting the action unfold within the frame, or should it follow the motion for a cinematic effect? For example, a fixed shot works for a fork cutting into a cake, while a tracking shot suits a chef tossing ingredients in a pan.
Seamless looping is critical for a polished GIF. Plan your composition so the action begins and ends in nearly identical positions, avoiding abrupt jumps when the loop restarts. If this isn’t feasible, consider reversing the sequence in the second half to create a rewind effect. This works well for actions like pouring liquids but may look unnatural for asymmetrical movements like chopping.
Storyboarding for Precision
Storyboarding transforms your idea into a structured plan. Divide the action into segments—introduction, main movement, and resolution—and estimate the number of frames for each. For a 5-second GIF at 15 frames per second (FPS), you’ll need about 75 frames. To be safe, shoot 100-150 frames to allow editing flexibility. Here’s a sample storyboard breakdown for a GIF of syrup pouring onto pancakes:
- Segment 1: Setup (10 frames) – Show the stack of pancakes, static.
- Segment 2: Action (50 frames) – Syrup pours from a jug, pooling on the pancakes.
- Segment 3: Resolution (15 frames) – Syrup settles, slight ripples visible.
Sketch these segments, noting camera angles and frame counts. This ensures smooth pacing—too few frames make the GIF jerky, while too many slow it down unnecessarily.
Choosing Your Shooting Method
You have two primary approaches for shooting GIFs, each with distinct workflows and outcomes.
- Stop-Motion Animation: This method mimics classic stop-motion films (think Aardman’s Shaun the Sheep). Set up the scene, take a single shot, adjust the elements slightly, and shoot again. Repeat until you’ve built a sequence. This is ideal for creative movements impossible in real life, like ingredients assembling themselves on a plate. However, it’s time-consuming and requires precision to avoid unnatural motion. The lo-fi charm of slight imperfections can add character, but sloppy adjustments look amateurish.
- Real-Time Burst Shooting: Use a camera’s burst mode to capture action as it happens, producing fluid, video-like motion. This requires a camera with a high FPS rate (10-20 FPS), like the Canon EOS R6 (12 FPS, $2,299) or Sony A7 IV (10 FPS, $2,499). GIFs typically run at 10-20 FPS, lower than video’s 24-60 FPS, so burst mode provides ample frames. This method is faster but demands quick, natural action.
Adding Cinematic Flair
Elevate your GIFs with filmmaking techniques. Try a slow pan across a plated dish to reveal textures, a focus pull to shift from ingredients to the final dish, or a tracking shot following a pour. These add polish and make your GIFs feel like mini-movies. Experiment with angles—overhead for flat lays, 45-degree for depth—or use props like hands to add context.
Timing and Frame Count
Timing is make-or-break. Aim for a 3-10 second GIF, balancing engagement and file size. Too short, and it feels incomplete; too long, and it loses impact. Shoot extra frames to avoid gaps, as you can’t easily add more later. For stop-motion, each adjustment equals one frame, so plan 15-20 adjustments per second of animation. For burst shooting, a 3-second burst at 15 FPS yields 45 frames—ample for a short loop.
Essential Gear for Stunning GIFs
You don’t need a Hollywood budget, but quality gear ensures professional results. Here’s what you’ll need, with specifications and approximate pricing.
Camera
Any camera works, including smartphones, but a DSLR or mirrorless camera offers control. The Canon EOS R6 (20MP, 12 FPS, $2,299) or Nikon Z6 II (24.5MP, 14 FPS, $1,996) are excellent for burst shooting. For budget options, the Canon EOS Rebel T8i (24.1MP, 7 FPS, $749) suffices.
Stabilization
A tripod is essential for most GIFs to prevent frame misalignment. The Manfrotto MT055XPRO3 ($250) supports 19.8 lbs and extends to 66.9 inches, perfect for overhead or angled shots. For dynamic shots, a gimbal like the DJI Ronin-S Essentials ($499, 7.9 lb payload, 12-hour battery) ensures smooth motion.
Lighting
Lighting shapes the mood. Natural light from a window is free and effective, softened with a Neewer 43-inch 5-in-1 Reflector Kit ($20), which includes a diffuser. For artificial light, LED panels like the Godox SL-60W ($139, 5600K, CRI 93+) offer continuous illumination, ideal for real-time shooting. Strobes like the Profoto B10 ($1,695, 250Ws, 0.05-2.5s recycle) excel at freezing action but may struggle with rapid bursts at full power.
Software
Adobe Lightroom ($9.99/month via Creative Cloud) handles batch editing, while Photoshop ($20.99/month) assembles GIFs. Free alternatives like GIMP or Photopea work but lack some automation. A computer with at least 8GB RAM and a decent processor (e.g., Intel Core i5) ensures smooth editing.
Props and Scenes
Choose subjects with interactive potential—think drizzles, sprinkles, or cuts. Props like utensils or hands add narrative. Ensure the scene is visually appealing, with vibrant colors and textures that pop in motion.
Here’s a gear comparison table:
| Gear Type | Recommendation | Specifications | Price (USD) |
|---|---|---|---|
| Camera | Canon EOS R6 | 20MP, 12 FPS, 4K video | 2,299 |
| Tripod | Manfrotto MT055XPRO3 | Aluminum, 66.9″ max height, 19.8 lb load | 250 |
| Gimbal | DJI Ronin-S Essentials | 7.9 lb payload, 12-hour battery | 499 |
| LED Light | Godox SL-60W | 60W, 5600K, CRI 93+ | 139 |
| Strobe | Profoto B10 | 250Ws, TTL, HSS, 400 flashes per charge | 1,695 |
| Reflector Kit | Neewer 43-inch 5-in-1 | Diffuser, gold/silver/black/white | 20 |
| Software | Adobe Photoshop | Layer support, timeline animation | 20.99/mo |
Camera Settings and Shooting Techniques
Consistency is non-negotiable. Manual settings prevent variations that cause flicker in the final GIF.
Exposure
Use manual mode. Set aperture (f/5.6-f/8) for sharp depth of field, ISO (100-200) for low noise, and shutter speed to freeze motion (1/125s for static, 1/500s-1/1000s for action). Test shots and review at 100% zoom to ensure sharpness.
Focus
For fixed subjects, manual focus locks the point, avoiding autofocus drift. For moving subjects (e.g., pouring), use continuous autofocus (AI Servo on Canon) and verify sharpness across frames.
Shutter Speed
Fast shutter speeds freeze motion. Start at 1/250s for steam or drips, 1/500s for sprinkles, and 1/1000s for rapid actions like chopping. Test to confirm no blur.
Stabilization
Use a tripod for static shots to align frames perfectly. For pans or tracking, a gimbal or steady handheld grip works. Misaligned frames require tedious post-production fixes.
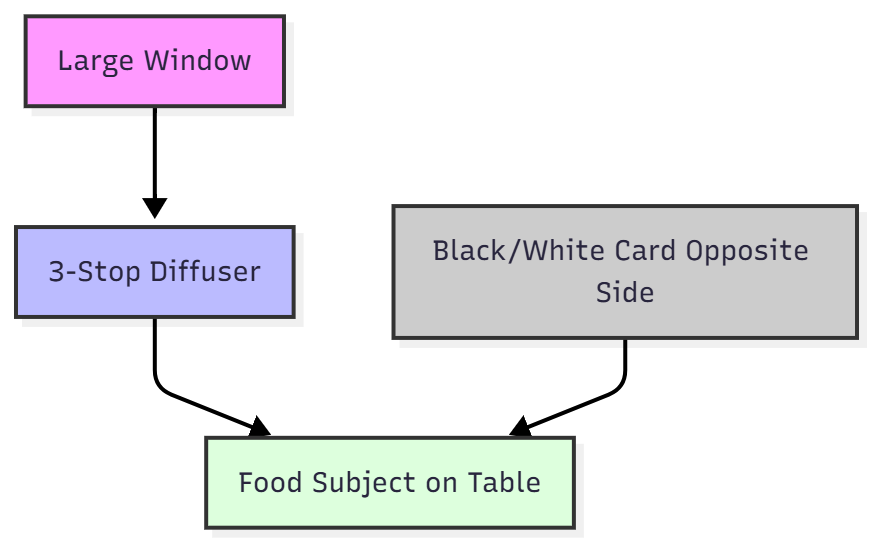
Lighting Techniques
Natural light is simplest—position near a window with a diffuser for soft, even illumination. Add black or white cards ($10 each) opposite the light to control shadows. For artificial light, mimic natural setups:
- Strobes: Ideal for sharp, deep depth-of-field shots but limited by recycle times (0.5-2s). Best for stop-motion.
- Continuous LEDs: Perfect for real-time bursts, no recycle delays. Use a 20-30 degree grid ($50) to focus light, then a diffuser ($20) for softness.
Here’s a diagram for a natural light setup:
For artificial lighting:
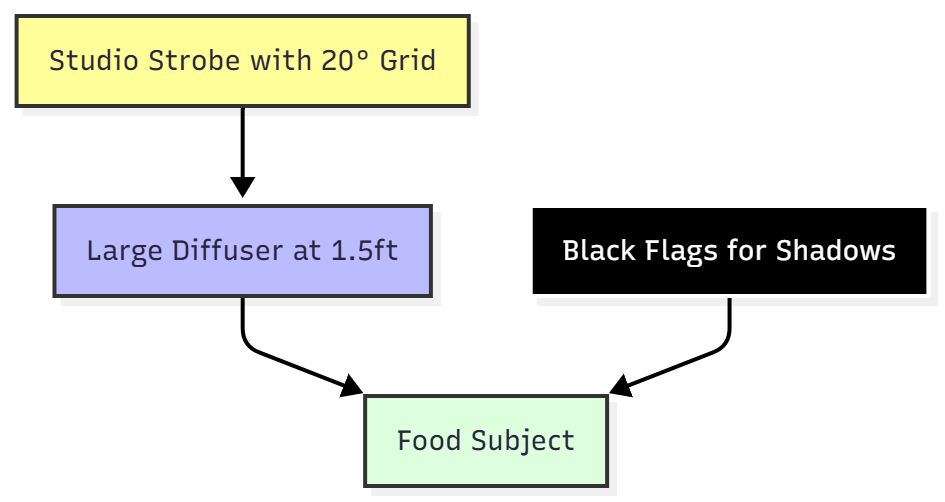
Avoid flat lighting by ensuring highlights and shadows. Use flags to block light, creating moody effects. For example, one flag shades the lower frame, guiding the viewer’s eye; two flags mimic a sunray. Adjust light distance (5ft) and diffuser proximity (1.5ft) for smooth gradients.
Here’s a table comparing lighting modifiers:
| Modifier | Effect on Light | Best For | Price (USD) |
|---|---|---|---|
| Large Softbox | Uniform soft light, minimal shadows | Even illumination | 50 |
| Reflector/Grid | Focused beam with gradients | Mimicking sunlight | 50 |
| Diffuser | Softens harsh light | Natural-looking softness | 20 |
Post-Production: From Photos to GIF
Post-production transforms your images into a cohesive animation. Start by reviewing the sequence in Preview (Mac) or Adobe Bridge, scrolling rapidly to simulate playback. Remove blurry or redundant frames.
Editing in Lightroom
Import images into Lightroom and apply global adjustments—exposure, contrast, white balance, etc. Sync settings across all frames to avoid flicker. Export as JPEGs at 1080x1350px for Instagram or 1000px long edge for web, using numbered filenames (e.g., frame001.jpg) for order.
Assembling in Photoshop
- Load Images: File > Scripts > Load Files into Stack. Select all images and import as layers.
- Open Timeline: Window > Timeline > Create Frame Animation.
- Create Frames: Hamburger menu > Make Frames from Layers. Reverse if needed.
- Set Duration: Select all frames, set 0.1-0.5s per frame (test for pacing).
- Loop: Choose “Forever” for continuous playback.
Exporting Options
- For Web: File > Export > Save for Web (Legacy), select GIF, reduce colors to 128 for smaller files (under 5MB).
- For Instagram: Convert to video timeline (bottom-left icon), ensure 3+ seconds, render as H.264 MOV via Adobe Media Encoder. Match dimensions to your images (e.g., 1080x1350px).
Troubleshooting Common Issues
- Jerky Motion: Add frames or use Photoshop’s interpolation to smooth transitions.
- Exposure Flicker: Re-edit in Lightroom, ensuring identical settings.
- File Size: Reduce colors or dimensions in Save for Web.
Advanced Techniques for Standout GIFs
Take your GIFs to the next level with these pro tips:
- Hybrid Approach: Combine stop-motion for setup (e.g., ingredients appearing) with real-time for action (e.g., pouring). This blends creativity and fluidity.
- Storytelling Props: Use hands, utensils, or ingredients to add context, like a chef’s hand slicing bread.
- SEO Optimization: Name files descriptively (e.g., chocolate-drizzle-food-gif.gif) and add alt text like “Animated GIF of chocolate drizzling over ice cream.”
- Creative Transitions: Experiment with fades or wipes in Photoshop’s timeline for unique effects.
Overcoming Challenges in Food Photography GIFs
Creating food photography GIFs can hit snags. Here’s three common issues-inconsistent lighting, alignment issues, and slow workflow with practical fixes to keep your GIFs smooth and professional.
1. Inconsistent Lighting
Problem: Variations in lighting cause flickering in GIFs, often due to slow strobe recycle times or shifting natural light. For example, strobes may not keep up with a camera’s 10-20 FPS burst, and clouds can alter daylight exposure.
Solutions:
- Test Strobe Recycle Times: Check your strobe (e.g., Profoto B10, 0.05-2.5s recycle) at low power (1/4) to match burst speed. Test a sequence and review for even exposure. Slow burst rate if needed.
- Use Continuous Light: LEDs like Godox SL-60W (5600K, $139) eliminate recycle issues. For natural light, use a diffuser (Neewer 43-inch, $20) and shoot quickly to minimize daylight shifts. Lock exposure in manual mode (e.g., ISO 100, f/5.6, 1/250s).
2. Alignment Issues
Problem: Misaligned frames from camera movement create a wobbly GIF. Handheld shooting or loose tripods cause this, complicating post-production.
Solutions:
- Use a Tripod: A sturdy tripod (e.g., Manfrotto MT055XPRO3, $250, 19.8 lb capacity) ensures consistent framing. Lock it down for stop-motion or fixed shots.
- Photoshop Auto-Align: If frames are slightly off, import them as layers in Photoshop, select all, and use Edit > Auto-Align Layers (Auto mode). This corrects minor shifts, saving manual adjustments.
3. Slow Workflow
Problem: Editing and organizing numerous frames can be time-consuming, especially without a streamlined process.
Solutions:
- Pre-Number Files: Name files sequentially during export (e.g., “food_gif_001.jpg”) to maintain order. Use Lightroom’s export settings to automate this.
- Batch Edit: In Lightroom, edit one frame (exposure, color, etc.), then sync settings across all (Sync button, select all adjustments). Export at 1080x1350px for Instagram to speed up Photoshop import.
These fixes streamline your process, ensuring consistent, aligned, and efficient GIF creation. Test setups and automate where possible to save time and enhance quality.
Frequently Asked Questions
You need a camera (DSLR, mirrorless, or even a smartphone), a tripod for stability (e.g., Manfrotto MT055XPRO3, ~$250), and editing software like Adobe Photoshop ($20.99/month) or free alternatives like GIMP. For lighting, use natural light with a diffuser or artificial options like LED panels (e.g., Godox SL-60W, ~$139) or strobes (e.g., Profoto B10, ~$1,695).
Aim for 50-150 photos, depending on the desired length and frame rate. For a 5-second GIF at 15 FPS, you need about 75 frames. Shooting extra frames (100-150) allows flexibility in editing to avoid jerky motion.
Stop-motion involves manually adjusting the scene between each shot, ideal for creative or impossible movements, but it’s time-intensive. Real-time shooting uses a camera’s burst mode (10-20 FPS) to capture live action, producing fluid, video-like results faster but requiring a high FPS camera.
Use manual mode to lock exposure settings (e.g., f/5.6, ISO 100, 1/250s). Auto modes can cause flicker due to varying exposure. Batch edit in Adobe Lightroom ($9.99/month) to sync adjustments like white balance and contrast across all images.
In Photoshop, convert the frame animation to a video timeline, ensure it’s at least 3 seconds long, and render as an H.264 MOV file. Resize to 1080x1350px for Instagram’s portrait format. Use consistent frame delays (e.g., 0.2-0.5s) and set to loop “Forever” for seamless playback.
Conclusion
Food photography GIFs are a powerful way to make your work pop. By mastering planning, shooting, and editing, you’ll create animations that captivate and engage. Start with simple subjects, refine your technique, and watch your portfolio and audience grow. Whether it’s a blog post or an Instagram story, your GIFs will leave viewers hungry for more.
Please share this Editing and Creating Epic Food Photography GIFs with your friends and do a comment below about your feedback.
We will meet you on next article.
Until you can read, DIY Gobo Lighting Ideas for Food Photography