Step Up Your Food Blogging: 7 Key Pieces of Equipment
Elevate your food blog with 7 essential tools: cameras, lighting, props, and more to create stunning content.
Food blogging is a vibrant, competitive space where captivating visuals and seamless user experiences reign supreme. With 42.8% of high-traffic blogs (over 50,000 monthly sessions) focusing on food, the niche demands excellence to stand out. Success hinges on creating mouthwatering images, engaging recipes, and a technically robust website. Yet, many bloggers struggle with professional-quality visuals, efficient content management, and reliable site performance due to the overwhelming array of equipment and tools available.
This comprehensive guide explores seven essential pieces of equipment to elevate your food blog. From cameras and lenses to lighting, props, and hosting solutions, we provide specific product recommendations, practical tips, and insights to help you create stunning content and optimize your blog’s performance. Whether you’re a beginner or a seasoned blogger, these tools will transform your food blog into a professional, audience-captivating platform.
1. Capture Stunning Images with the Right Camera
High-quality visuals are non-negotiable in food blogging. Studies show that articles with images garner 94% more views, and in a niche driven by aesthetics, your photos must entice readers instantly. Choosing the right camera—whether a smartphone or a professional-grade model—sets the foundation for breathtaking food photography.
Smartphone Photography: A Cost-Effective Start
For beginners, modern smartphones offer a budget-friendly way to produce professional-quality images without investing in dedicated cameras. Their portability, advanced features, and AI enhancements make them ideal for new bloggers.
Benefits of Smartphone Photography:
- Cost-Effective: No additional camera purchase needed.
- Convenient: Always on hand, lightweight, and easy to use.
- Advanced Features: Portrait modes, AI-driven enhancements, and editing apps simplify professional results.
Recommended Smartphones:
| Model | Camera Specs | Price (Approx.) | Key Features |
|---|---|---|---|
| iPhone 15 Pro | 48MP Main Camera | $999 | Advanced computational photography, 4K video |
| iPhone 14 Pro | 12MP Main Camera | $799 | Excellent low-light performance |
| Samsung Galaxy S23 | 50MP Wide-Angle Camera | $799 | Versatile modes, AI enhancements |
Tips for Smartphone Photography:
- Leverage Natural Light: Shoot near windows with diffused light (e.g., through sheer curtains) to enhance color accuracy. Adjust based on mood—soft light for delicate dishes, dramatic light for bold flavors.
- Use Gridlines: Enable gridlines in your camera app for balanced compositions using the rule of thirds.
- Experiment with Angles: Try overhead, 45-degree, or side angles to find the most flattering perspective.
- Invest in Accessories: Clip-on macro lenses ($10–$30) or portable LED lights ($20–$50) boost image quality.
Smartphones are a low-barrier entry point, but as your blog grows, upgrading to a dedicated camera unlocks greater control and quality.
Dedicated Cameras: From Beginner to Pro
For bloggers ready to invest, dedicated cameras offer superior image quality, lens versatility, and manual controls. Your choice depends on skill level, budget, and desired output.
Camera Recommendations:
| Level | Model | Price (Approx.) | Key Specs |
|---|---|---|---|
| Beginner | Canon EOS Rebel T8i | $749 | 24.1MP, Wi-Fi/Bluetooth, user-friendly |
| Intermediate | Sony Alpha 6700 | $1,398 | 26MP, fast autofocus, compact design |
| Professional | Canon EOS R5 | $3,899 | 45MP, 8K RAW video, ISO 100-51200 |
- Beginner: The Canon EOS Rebel T8i is intuitive, with excellent image quality and connectivity features. Bloggers like Slice of Kitchen Life rely on similar models for vibrant food shots.
- Intermediate: The Sony Alpha 6700’s mirrorless design offers portability, fast autofocus, and optical stabilization, ideal for dynamic food shoots.
- Professional: The Canon EOS R5 delivers unmatched detail with its 45MP sensor, perfect for high-end blogs or print-quality images.
Choosing a Camera:
- Budget: Start with entry-level models and upgrade as revenue grows.
- Ease of Use: Beginners benefit from user-friendly interfaces; pros need manual controls.
- Lens Compatibility: Ensure the camera supports a range of lenses for versatility.
- Support: Check for reliable after-sales service and firmware updates.
Lenses: Prime, Zoom, and Macro
Lenses dramatically impact your food photography’s quality. Each type serves a specific purpose, from dreamy bokeh to intricate close-ups.
Lens Types and Recommendations:
| Type | Example | Price (Approx.) | Best For |
|---|---|---|---|
| Prime | 50mm f/1.8 | $125 | Artistic shots, bokeh, low-light |
| Zoom | 24-70mm f/2.8 | $1,899 | Versatile compositions, dynamic shoots |
| Macro | 100mm f/2.8 | $599 | Close-ups, textures, fine details |
- Prime Lenses: Fixed focal length lenses like the 50mm f/1.8 offer sharpness and shallow depth of field, ideal for isolating dishes with creamy backgrounds.
- Zoom Lenses: The 24-70mm f/2.8 provides flexibility, allowing quick framing adjustments without swapping lenses—perfect for fast-paced shoots.
- Macro Lenses: The 100mm f/2.8 captures intricate details like bread crusts or cake textures, adding depth to your portfolio.
Lens Selection Tips:
- Compatibility: Confirm the lens fits your camera’s mount (e.g., Canon EF, Sony E).
- Aperture: Lower f-stops (e.g., f/1.8) enhance low-light performance and bokeh.
- Budget: Start with a prime lens for affordability, then expand to zoom or macro as needed.
2. Ensure Stability with Phone Stands and Tripods
Stability is critical for sharp, professional images. Phone stands and tripods eliminate camera shake, offering flexibility and precision in composition.
Phone Stands: Flexible and Affordable
Phone stands enhance smartphone photography by providing hands-free stability and creative angles.
Recommended Phone Stand:
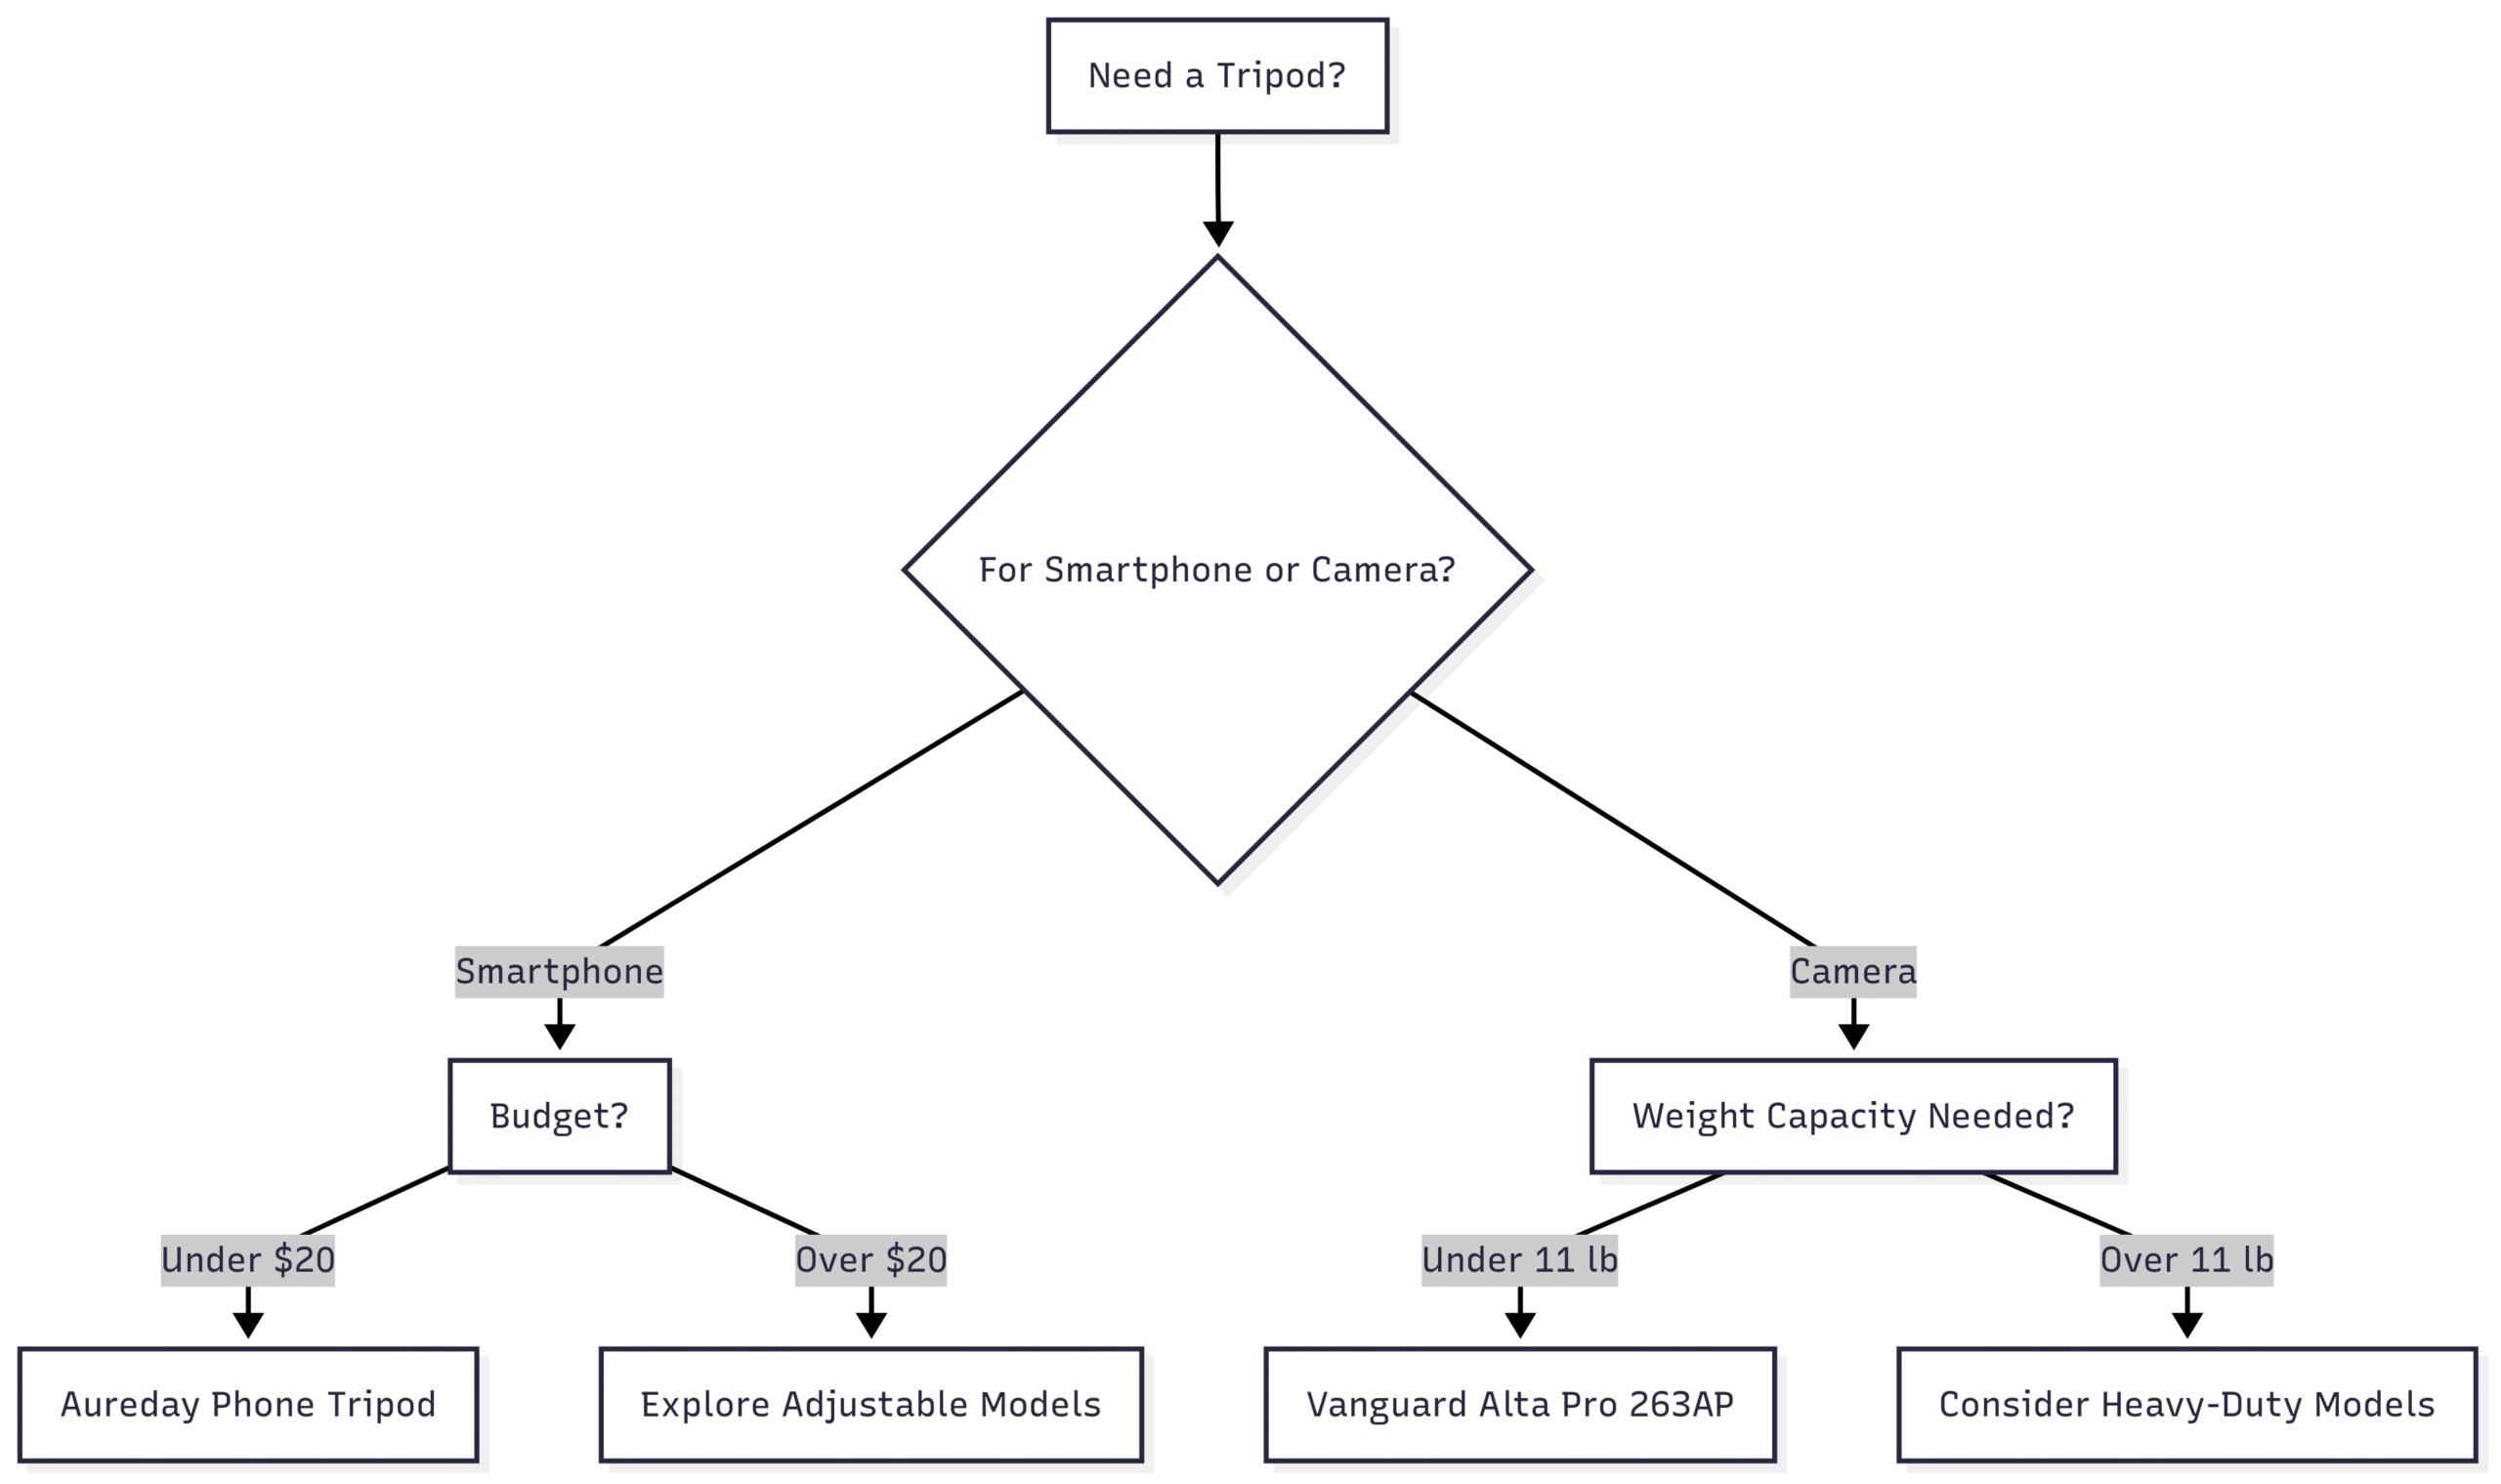
- Aureday Phone Tripod ($15)
- Features: Flexible legs, Bluetooth remote, universal smartphone compatibility.
- Benefits: Portable, supports portrait/landscape modes, ideal for small setups.
Selection Criteria:
- Adjustability: Look for flexible arms or legs for varied angles.
- Compatibility: Ensure it fits your smartphone model.
- Portability: Lightweight stands are easy to carry for on-the-go shoots.
Camera Tripods: Precision for Pros
Tripods are essential for dedicated cameras, offering robust support and fine-tuned adjustments.
Recommended Tripod:
- Vanguard Alta Pro 263AP ($150)
- Features: 11 lb capacity, adjustable legs, 90-degree center column, 360-degree rotation.
- Benefits: Sturdy, versatile for overhead or low-angle shots.
Selection Criteria:
- Weight Capacity: Must support your camera and lens combo.
- Material: Aluminum offers durability; carbon fiber is lighter but pricier.
- Adjustability: Look for tilt, rotation, and height options.
Chart: Tripod Selection Flowchart
3. Master Lighting to Make Dishes Shine
Lighting shapes the mood and appeal of your food photos. Whether natural or artificial, mastering lighting techniques elevates your visuals.
Natural Lighting: Soft and Authentic
Natural light creates inviting, true-to-life images but requires strategic use.
Benefits:
- Enhances natural colors and textures.
- Free and accessible near windows.
Best Practices:
- Shoot near windows with diffused light (use sheer curtains to soften harsh rays).
- Position food at a 45-degree angle to the light for balanced shadows.
- Avoid direct sunlight to prevent harsh contrasts.
Challenges:
- Weather-dependent.
- Limited control over intensity.
Artificial Lighting: Consistent and Controllable
Artificial lights offer flexibility, enabling shoots anytime, anywhere.
Benefits:
- Adjustable brightness and color temperature.
- Consistent results regardless of external conditions.
Best Practices:
- Use continuous LED lights for real-time adjustments.
- Place a key light at 45 degrees and a reflector opposite to fill shadows.
Challenges:
- Higher initial cost.
- Requires setup knowledge.
Lighting Equipment Recommendations:
| Type | Product | Price (Approx.) | Features |
|---|---|---|---|
| Budget Light | 2-Pack LED Video Light | $50 | Adjustable brightness, tripod included |
| Pro Light | Godox SL60IID LED | $140 | High output, color temperature control |
| Reflector | WELLMAKING 32-Inch Reflector | $30 | 5 surfaces (gold, silver, white, black, translucent) |
| Diffuser | Photography Light Diffuser Panel | $41 | Softens light, reduces shadows |
Learning Resource: Read This if You Want to Take Great Photographs by Henry Carroll offers practical lighting tips for beginners.
4. Style with Props and Backdrops
Props and backdrops add context and personality, transforming simple dishes into visual stories.
Props: Tell a Story
Props enhance aesthetics and convey mood, from rustic to elegant.
Popular Props:
- Rustic Wooden Boards: Warm, homey vibe.
- Vintage Cutlery: Adds sophistication.
- Textured Linens: Layers depth.
- Ceramic Plates: Neutral tones highlight food.
- Seasonal Elements: Herbs or flowers for freshness.
Tips:
- Simplicity: Use 2–3 props to avoid clutter.
- Color Coordination: Complement food colors.
- Storytelling: Create scenes (e.g., cozy breakfast, festive dinner).
Sourcing: Thrift stores offer affordable, unique props.
Backdrops: Set the Tone
Backdrops define your photo’s mood and professionalism.
Popular Backdrops:
- Marble Slabs: Modern, clean.
- Wooden Planks: Rustic charm.
- Light Surfaces: Soft, neutral.
- Dark Backdrops: Dramatic contrast.
- Patterned Tiles: Vibrant, eclectic.
Tips:
- Consistency: Use similar styles for brand cohesion.
- Contrast: Pair light foods with dark backdrops and vice versa.
- DIY Options: Use tiles, fabric, or wood from home stores.
Sourcing: Invest in Replica Surfaces for professional options or create DIY backdrops.
5. Edit Like a Pro with Software
Editing polishes your visuals, ensuring they’re blog-ready. Mobile and desktop tools cater to different needs.
Mobile Editing: Canva and Adobe Premiere Rush
Mobile apps offer convenience for quick edits.
Canva ($119.99/year for Pro):
- Features: Drag-and-drop, templates for social media and blogs.
- Benefits: User-friendly, ideal for non-designers.
Adobe Premiere Rush ($9.99/month):
- Features: Multi-track video editing, motion graphics.
- Benefits: Professional video edits on the go.
Desktop Editing: Adobe Lightroom and Premiere Pro
Desktop software delivers advanced control for high-quality output.
Adobe Lightroom ($9.99/month):
- Features: Color correction, RAW editing, exposure adjustments.
- Benefits: Industry-standard for photo enhancement.
Adobe Premiere Pro ($20.99/month):
- Features: Multi-cam editing, color grading, audio tools.
- Benefits: Professional video production.
6. Streamline Recipes with WP Recipe Maker
A user-friendly, SEO-optimized recipe presentation is crucial for food blogs. WP Recipe Maker, a WordPress plugin, simplifies recipe management.
Features:
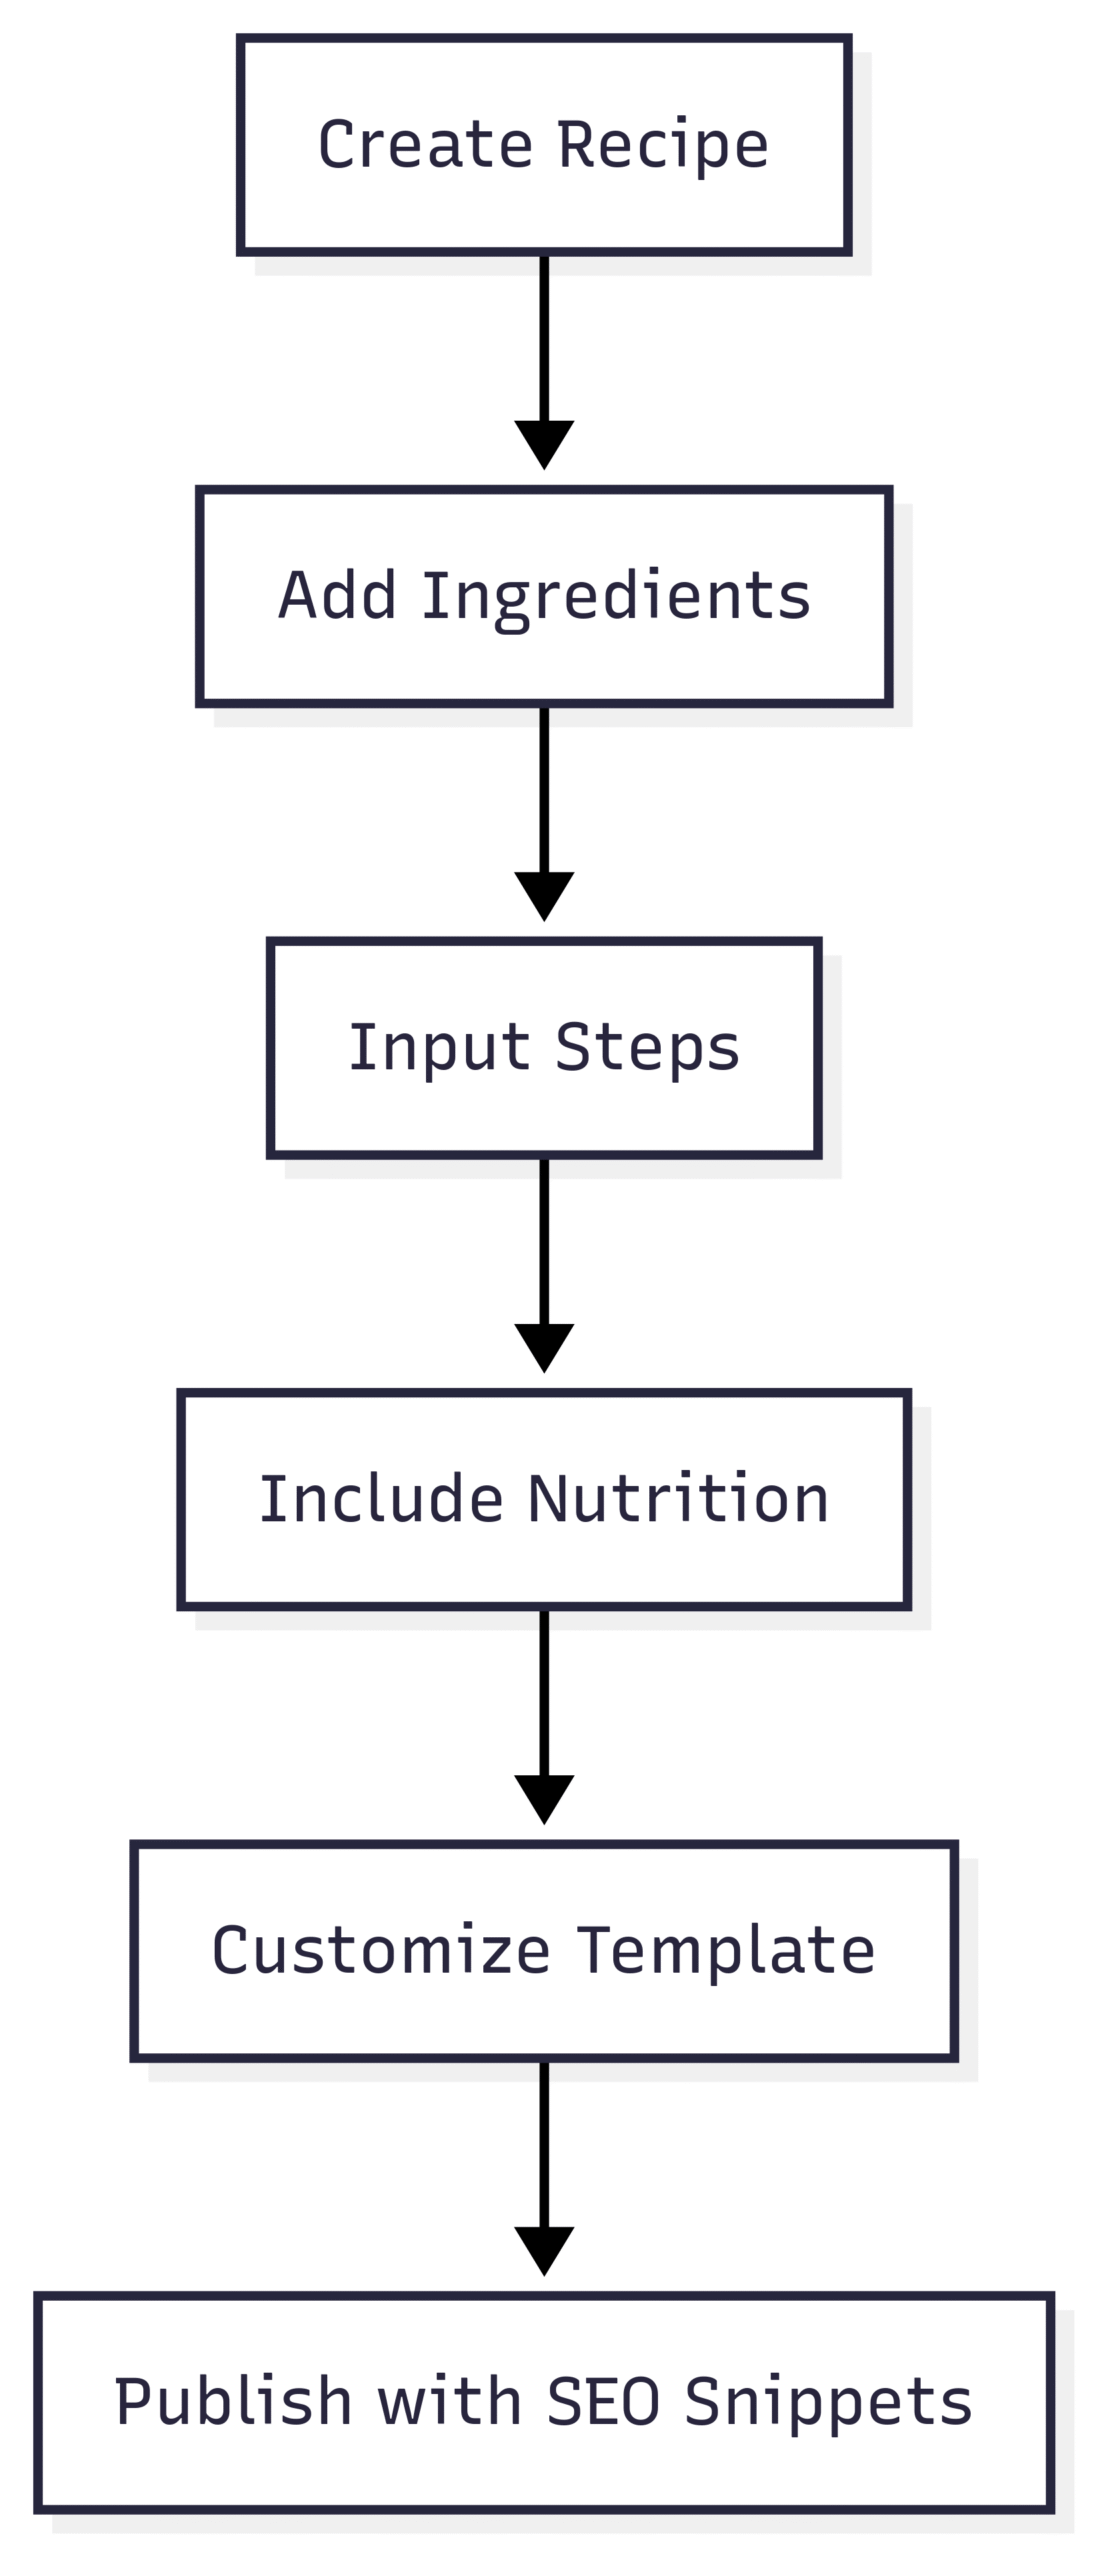
- Custom Recipe Cards: Include steps, ingredients, and nutrition.
- SEO Optimization: Rich snippets enhance search visibility.
- Nutritional Info: Appeals to health-conscious readers.
- Adjustable Servings: Auto-recalculates ingredient quantities.
- Printable Recipes: User-friendly offline access.
- Mobile-Friendly: Responsive design.
- Monetization: Add affiliate links for ingredients.
Pricing: Starts at $49/year for the Premium plan.
Benefits:
- Enhances user experience.
- Boosts SEO rankings.
- Saves time on recipe formatting.
Chart: Recipe Card Workflow
7. Optimize Performance with BigScoots Hosting
A fast, secure website is critical for retaining readers and ranking well on search engines. BigScoots offers tailored WordPress hosting for food bloggers.
Why Hosting Matters:
- Speed: Slow load times increase bounce rates.
- Traffic Handling: Manages spikes during holidays.
- Security: Protects against cyber threats.
BigScoots Managed WordPress Hosting:
- Features:
- Site maintenance and updates.
- Proactive monitoring and optimization.
- Cloudflare CDN for speed.
- 24/7 expert support.
- Pricing: Custom quotes (contact BigScoots for details).
- Benefits: Frees you to focus on content creation.
Quote:
“Managed WordPress hosting unlocks your site’s potential with expert support and optimized performance, letting you focus on your passion for food.”
— Tim Monner, CMO, BigScoots
Comparison Table: Hosting Options:
| Feature | Shared Hosting | Managed WordPress |
|---|---|---|
| Maintenance | User-managed | Provider-managed |
| Performance Monitoring | Basic | Proactive |
| CDN | Optional | Included |
| Support | Standard | 24/7 Expert |
Conclusion: Transform Your Food Blog Today
Elevating your food blog requires the right tools to create stunning visuals, engaging recipes, and a high-performing website. The seven pieces of equipment covered—cameras, lenses, tripods, lighting, props, editing software, WP Recipe Maker, and BigScoots hosting—form a comprehensive toolkit for success. Invest in these tools, apply the practical tips provided, and watch your blog’s quality and audience engagement soar.
Action Steps:
- Start with a smartphone or entry-level camera and upgrade as your blog grows.
- Experiment with lighting and props to develop your unique style.
- Use WP Recipe Maker to streamline recipes and boost SEO.
- Sign up for BigScoots Managed WordPress Hosting to ensure peak performance.
By implementing these strategies, you’ll create a food blog that captivates readers and thrives in the competitive digital landscape.
We will meet you on next article.
Please share this Mango Pomegranate Refresh Smoothie with your friends and do a comment below about your feedback.
Until you can read, Mango Protein Power Smoothie
