The Food Photography Fundamentals
Food photography combines artistry and technique to transform everyday meals into visually compelling stories. Whether you’re a beginner capturing recipes for a blog or a professional shooting for menus, understanding the core elements—creative vision, styling, props, composition, lighting, equipment, settings, and editing—elevates your work. This guide distills essential principles, drawing from proven strategies to help you create images that draw viewers in, emphasizing the food as the hero while incorporating practical tips for real-world application.
The Creative Side of Food Photography
The creative aspects form the foundation of any strong food image, guiding technical choices. Focus here first to ensure your photos align with a cohesive vision, rather than relying solely on gear.
Developing Your Creative Vision
Start by defining the mood and style of your images. Ask: Do you prefer light, airy aesthetics or dark, moody ones? Polished perfection or rustic authenticity? To refine this, curate a mood board from online sources, magazines, or cookbooks—collect images with appealing colors, textures, and compositions.
Plan ahead with a shot list outlining key angles and elements. This keeps shoots organized and focused. For instance, if aiming for a fresh, vibrant look, note bright surfaces and minimal props.
Tip: Experiment with themes like comfort (warm tones for baked goods) or freshness (cool tones for salads) to evoke emotions, making your photos more engaging.
Mastering Food Styling
Food styling ensures the subject looks appetizing. Consider the food’s “personality”—is it time-sensitive like melting ice cream or stable like bread? Highlight key features: texture in crispy edges, color in vibrant fruits, or layers in burgers.
Preparation tips:
- Test time-sensitive items last.
- Use tools like tweezers for precision placement, brushes for gloss (e.g., oil for shine), or steam for hot effects.
- Set up lighting and composition before plating to capture peak freshness.
Incorporate “hero” elements: the freshest version of the dish as the focal point, with stand-ins for setup. Scatter ingredients like herbs or crumbs for a natural, in-progress feel.
Selecting Props and Surfaces
Props (plates, linens, utensils) and surfaces (tabletops, backdrops) support the vision without distracting. Choose based on mood: neutral for bright styles, dark for moody.
Key considerations for surfaces:
- Size: At least 24×36 inches for flexibility.
- Color: Match vision (e.g., white for airy).
- Texture: Subtle wood or marble for interest.
- Material: Vinyl for easy storage and cleaning.
Recommended vendor: Best Ever Backdrops (use code REGANBARONI for 15% off; prices start at $50 for 24×36 vinyl).
Props should complement: small plates for layering, handmade ceramics for detail. Avoid overcrowding—less is more. Shop thrift stores or online for affordable options like neutral bowls ($10-20 each).
Composition Techniques
Composition arranges elements for visual flow. Key factors: orientation (vertical for social media, horizontal for websites), angles, arrangements, and colors.
Popular angles:
- Overhead (90°): For flat dishes like pizzas, showing all elements.
- 45°: For layered foods like cakes, revealing height.
- Straight-on: For depth, like stacked burgers.
Use the rule of thirds: Divide the frame into a 3×3 grid; place subjects at intersections for balance.
Color theories:
- Complementary: Opposite on wheel (e.g., red strawberries on green plate) for contrast.
- Analogous: Adjacent (e.g., blues and greens) for harmony.
- Monochromatic: Shades of one color for subtlety.
Add layers and textures: Napkins, cutlery, or ingredients for depth. Experiment with negative space for focus or patterns (e.g., repeating shapes) to trap the eye.
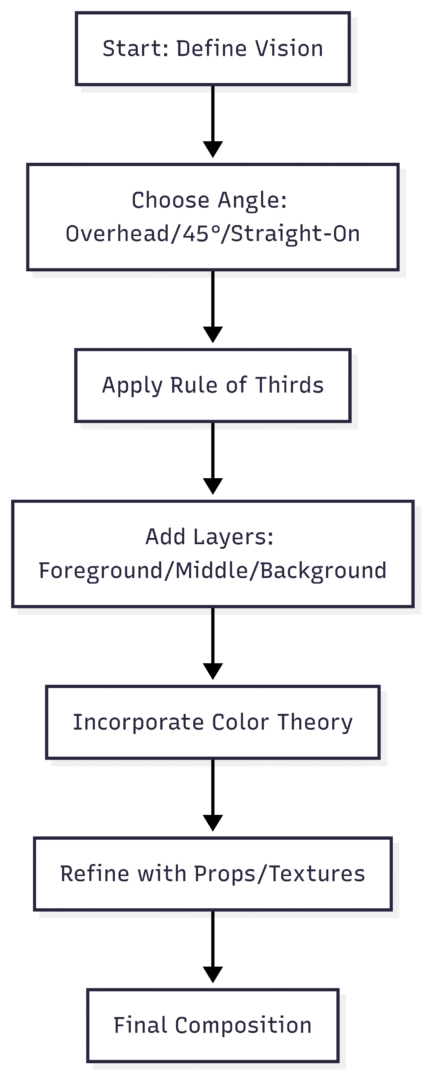
This chart outlines a basic composition workflow.
Incorporate tips like using height (e.g., cake stands) for levels or sketching setups for planning.
The Technical Side of Food Photography
Once creative elements are set, technical aspects bring the vision to life. Lighting guides most decisions, supported by equipment, settings, and editing.
Lighting Essentials
Lighting reveals texture, color, and depth. Choose natural or artificial based on control needs.
Natural Light
Use window light for soft, beautiful results. Position subjects near large windows; side or back light adds shadows for dimension. Limitations: Weather-dependent, changes throughout the day.
Modifiers:
- Diffusers: Soften harsh light (e.g., 4×6 ft panel, ~$50).
- White foam boards: Bounce light (~$5 each).
- Black foam boards: Enhance shadows (~$5 each).
Tips: Shoot during golden hour for warm tones; avoid front light to prevent flatness.
Artificial Light
Offers consistency and control. Benefits: Adjustable position/power, anytime shooting.
Options:
- Speedlights: Portable, like Godox V1-C (~$259).
- Continuous: Steady, like Godox SL60 (~$100).
- Strobes: Powerful, like Godox FV200 (~$350).
Setup: One main light (side/back) with modifiers. Use reflectors for fill.
| Lighting Type | Key Specs | Approx. Price (2025) | Best For |
|---|---|---|---|
| Natural (Window + Diffuser) | Variable intensity, soft diffusion | $50 (diffuser) | Beginners, airy styles |
| Godox V1-C Speedlight | TTL, 76Ws power, lithium battery | $259 | Portable shoots |
| Godox SL60 Continuous | 60W LED, 5600K color temp | $100 | Video/constant light |
| Godox FV200 Strobe | 200Ws, hybrid flash/continuous | $350 | Studio control |
Incorporate tips: Mimic natural light with artificial; use one source initially for natural looks.
Essential Equipment
Start simple; gear supports creativity.
Cameras:
- Entry-level: Nikon D3500 (24MP, 1080p video, ~$500).
- Canon EOS Rebel T2i (used, 18MP, ~$200).
Lenses:
- 50mm f/1.8: Sharp, low-light (Canon ~$125, Nikon ~$200).
- Kit 18-55mm: Versatile zoom (~$100 bundled).
Tripods:
- Manfrotto 055 with ball head: Sturdy, overhead arm (~$350).
- Budget: Neewer (~$50).
Other:
- Backdrops: Vinyl (e.g., marble, ~$40).
- Hard drives: Seagate Slim 2TB (~$80) for backups.
| Equipment | Specs | Approx. Price (2025) | Use Case |
|---|---|---|---|
| Canon EF 50mm f/1.8 STM Lens | 50mm focal, f/1.8-22 aperture, STM AF | $125 | Portraits, low light |
| Nikon D3500 Camera | 24MP APS-C, 5fps burst, 1080p video | $500 | Entry-level DSLR |
| Manfrotto 055 Tripod | Aluminum, 19.7 lb load, 72″ height | $350 | Stable overheads |
| Godox V1-C Flash | Round head, magnetic modifiers | $259 | On-location |
| Seagate Slim 2TB HDD | USB 3.0, portable | $80 | Backups |
Tips: Tether for real-time previews (e.g., Capture One, ~$299 perpetual); use monopods for mobility.
Camera Settings for Optimal Exposure
Control exposure via aperture, shutter speed, ISO.
- Aperture: f/2.8-5.6 for shallow depth (bokeh); f/8-16 for sharp overheads.
- Shutter: 1/200 max for flash; slower (1/60) with tripod for low light.
- ISO: 100-400 for clean images; higher in dim conditions.
Shoot manual mode. For iPhones: Use Lightroom Mobile for pro controls.
Tips: Balance depth of field with speed; edit for media-specific adjustments.
Editing for Polished Results
Editing finalizes images, adding vibrancy.
Software:
- Lightroom CC: Intuitive, ~$10/month.
- Photoshop: Advanced retouching, bundled with Lightroom.
- Capture One: Tethering/editing, ~$15/month subscription.
- Free apps: Snapseed, VSCO.
Techniques: Adjust exposure, contrast, shadows; cool tones for clean whites; sharpen details.
Tips: Edit minimally for natural looks; use presets for consistency.
| Software | Key Features | Price (2025) |
|---|---|---|
| Adobe Lightroom CC | RAW editing, presets, cloud storage | $10/month |
| Capture One | Tethering, color grading | $299 perpetual or $15/month |
| Photoshop | Layering, retouching | Bundled with Lightroom |
Integrating Tips for Professional Results
Blend creativity and technique: Use tethered capture for precision; eat before shoots to focus; experiment with angles (75°/25° for variety).
Mindset: Practice daily; embrace imperfections; study pros without copying.
For composition: Lines for movement, framing for focus, patterns for engagement.
Equipment evolution: Start basic, upgrade as skills grow (e.g., from natural to artificial light).
Conclusion
Food photography fundamentals empower you to create images that captivate. Prioritize creative vision, master lighting and composition, and invest wisely in gear. With practice, your photos will not only look professional but tell compelling stories. Experiment, refine, and watch your skills soar.
Please share this The Food Photography Fundamentals with your friends and do a comment below about your feedback.
We will meet you on next article.
Until you can read, iPhone Food Photography Lighting