How to Start a Successful Food Photography Business
Turning your passion for food photography into a profitable business requires more than just capturing stunning images. With rising demand from restaurants, brands, publishers, and bloggers for high-quality visuals, the field offers significant potential. However, success hinges on building a solid foundation, from legal structures to client workflows. This guide covers essential steps to establish and scale your business, drawing on practical insights to help you avoid common pitfalls and focus on creativity.
Legal and Administrative Foundations
The first step in starting your food photography business is establishing a legal framework. Define your niche early—whether it’s restaurant shoots, product packaging, editorial work, or recipe imagery. This focus shapes your services and marketing.
Choose a business structure: Sole proprietorship is simple but offers no liability protection. An LLC provides personal asset protection and is popular among photographers. Research local requirements; in the US, register with the IRS for an Employer Identification Number (EIN) to handle taxes and protect privacy (avoid using your Social Security Number on client forms like W-9s). Similar processes apply in Canada, Australia, and the UK—consult government resources or your bank for guidance.
Set up a dedicated business bank account to separate personal and business finances. This simplifies tracking income/expenses, gauges profitability, and sets aside funds for taxes (aim to reserve 20-30% of earnings, depending on your location—consult a tax professional). Use tools like QuickBooks, Wave, or spreadsheets for bookkeeping. Categorize expenses (gear, props, marketing) for deductions.
Insurance is non-negotiable. A Business Owner’s Policy (BOP) bundles key coverages:
- General Liability Insurance (GLI): Covers accidents or property damage on shoots.
- Business Property Insurance: Protects equipment from theft or damage.
- Business Income Insurance: Replaces lost earnings if operations halt due to covered events.
Additional options include Professional Liability (for errors in work) and Workers’ Compensation if you hire help. Shop through photography associations like PPA or online providers. Annual premiums vary but start around $500 for basic coverage.
Implement client contracts outlining deliverables, timelines, revisions, and payment terms. Use templates from resources like HoneyBook or Dubsado. Establish workflows for client intake, project management, and delivery to streamline operations.
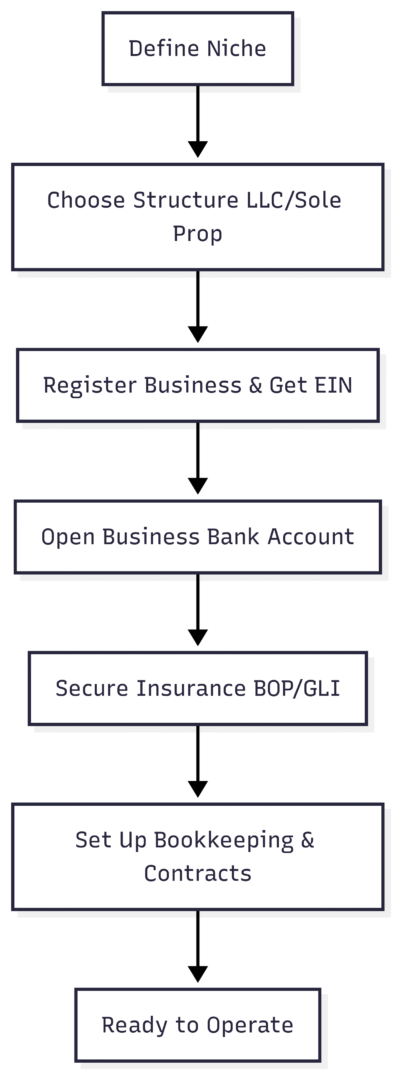
This chart outlines the setup process for clarity.
Essential Equipment and Techniques
You don’t need top-tier gear to start, but investing wisely builds quality. Begin with basics and upgrade as skills grow.
Core equipment:
- Camera: Any DSLR or mirrorless that shoots manual mode. Entry-level options like Canon EOS Rebel T7 ($450) or Nikon D3500 ($500) suffice. Focus on full-frame for better low-light performance later, e.g., Nikon D600 (used ~$600).
- Lenses: Start with a kit 18-55mm zoom. Upgrade to a “Nifty Fifty” 50mm f/1.8 (~$200) for sharp portraits. Recommended for food: 60mm macro (~$400) for details, 105mm macro (~$900) for versatility, 24-70mm f/2.8 (~$1,800) for wider shots.
- Lighting: Natural light via windows (diffuse with curtains). Artificial: Softboxes (~$100/set) or reflectors (~$20). Avoid harsh overhead lights.
- Accessories: Tripod (~$50-150) for stability, tethering cable for live view (~$20), props (thrifty whites/greys ~$5-20 each), backgrounds (wood/marble surfaces ~$30-100).
- Editing Software: Adobe Lightroom/Photoshop subscription (~$10/month) or Capture One (~$300 one-time).
Techniques emphasize practice over gear. Shoot in manual mode to control exposure. Use the rule of thirds for composition—divide the frame into a 3×3 grid, placing key elements at intersections. Experiment with angles: overhead for flatlays, 45-degree for depth.
Lighting tips: Soft, diffused light avoids harsh shadows. Backlight beverages for glow; side-light plated dishes for texture. Style simply—use fresh ingredients, avoid over-propping. For styling, employ tools like tweezers for precision, glycerin for shine.
Post-processing: Cull images, adjust exposure/white balance, enhance colors. Tethered shooting (via Lightroom) allows real-time review, reducing reshoots.
| Equipment | Specifications | Approximate Price |
|---|---|---|
| Camera (Entry-Level DSLR) | 24MP sensor, manual mode, kit lens | $450-600 |
| 50mm f/1.8 Lens | Prime lens, sharp focus, low-light | $200 |
| Macro Lens (60mm/105mm) | Close-up focus, 1:1 magnification | $400-900 |
| Softbox Lighting Kit | 2-3 lights, diffusers, stands | $100-200 |
| Tripod | Aluminum, ball head, 60″ height | $50-150 |
| Editing Software (Lightroom) | Cloud-based, non-destructive edits | $10/month |
This table summarizes starter gear with costs for budgeting.
Developing Your Unique Style
In a competitive market, a signature style differentiates you. Create a mood board on Pinterest: Collect images of lighting (moody vs. bright), colors, compositions, and props that resonate. Analyze admired photographers but innovate—blend rustic baking with modern minimalism.
Experiment: Shoot simple subjects like fruit bowls to test techniques. Embrace failure; iterate through trials to refine aesthetics. Focus on storytelling—evoke emotion through visuals, like steam rising from hot dishes or dew on fresh produce.
Avoid trends; cultivate authenticity. Your “weirdness”—unique perspectives, like abstract close-ups or cultural fusions—sets you apart. Clients value vision that aligns with their brand, so tailor pitches accordingly.
Building a Portfolio and Website
Your portfolio showcases expertise. Curate 20-30 high-quality images reflecting your niche: moody cocktails, bright breakfasts, plated entrees. Include collaborations or published work for credibility.
Choose a platform: WordPress for customization (~$5/month hosting), Squarespace/Wix for simplicity (~$12-18/month). Ensure mobile responsiveness, fast loading, and SEO optimization (alt text, keywords like “professional food photographer“).
Essential pages:
- Homepage: Hero images to captivate.
- About: Share your story and experience.
- Services: Detail offerings with pricing.
- Portfolio: Categorized galleries.
- Contact: Easy inquiry form.
- Testimonials: Client quotes for trust.
Enhance E-E-A-T (Expertise, Authoritativeness, Trustworthiness) with case studies, behind-the-scenes content, and schema markup. Integrate tools like WP Recipe Maker (~$49/year) for recipe cards, boosting SEO and monetization via affiliates.
Pricing and Structuring Packages
Pricing ensures profitability. Factor in scope (dishes, setups), usage rights (social vs. print), and costs (food, props, editing).
Models:
- Per-dish: $50-150 per item.
- Menu packages: $500-2,000 for 10-20 shots (dishes, interiors, portraits).
- Cookbook projects: $2,000-10,000 flat rate.
- Monthly subscriptions: $1,000-3,000 for ongoing content.
- Tiered: Basic ($300 half-day), Premium ($800 full-day), Enterprise (custom).
Avoid underpricing; charge for licensing and deposits (50%). Adjust based on experience—start competitive, raise with demand.
| Package Type | Inclusions | Price Range |
|---|---|---|
| Basic Shoot | 5-10 dishes, basic styling, digital files | $300-600 |
| Restaurant Menu | 10-20 images, interiors, chef portraits | $800-2,000 |
| Brand Subscription | 15 monthly images, consistent style | $1,000-3,000 |
| Cookbook | 50+ images, full project management | $5,000-10,000 |
This table provides structured options.
Finding and Attracting Clients
Target markets: Restaurants (fine vs. casual), producers, publishers, bloggers, agencies, brands.
Strategies:
- Portfolio: Build on WordPress; highlight niches.
- Outreach: Cold emails to local businesses; warm leads via networks.
- Digital: Instagram (hashtags like #foodphotography), Pinterest (boards by food type), LinkedIn (industry connections), TikTok/YouTube (BTS videos).
- Networking: Attend events, collaborate with chefs/stylists/influencers.
- Advertising: Google Ads or social campaigns (~$100-500/month budget).
- Contests: Enter awards like World Food Photography Awards for exposure.
Collect testimonials and case studies. Use SEO keywords on your site for organic traffic.
Client Workflows and Processes
Streamline for efficiency. Pre-qualify via questionnaires (project details, brand values).
Steps:
- Contract and 50% deposit; send welcome guide.
- Research competitors; create mood board and shot list.
- Plan props/groceries; sketch compositions.
- Shoot: Setup scene, light, tether, style, capture.
- Edit: Cull in Lightroom, apply presets, export.
- Deliver: Use Pixieset for galleries; final invoice upon selection.
Follow up post-delivery. Tools: Dubsado (~$20/month) for CRM, Pixieset (~$8/month) for proofs.

This chart maps the workflow.
Scaling and Monetization
Beyond client work, diversify: Blog with WP Recipe Maker for SEO/affiliates. Offer courses or stock photography. Network for referrals. Invest in education: Natural light classes, composition masterclasses (~$100-400 each).
Track growth; outsource bookkeeping as revenue rises. Focus on mastery—practice, experiment, and adapt.
In summary, starting a successful food photography business demands strategic planning, from legal basics to creative execution. With persistence, your passion can yield a thriving career.
Please share this How to Start a Successful Food Photography Business with your friends and do a comment below about your feedback.
We will meet you on next article.
Until you can read, How to Create Engaging Flat Lay Food Photos