How I Run My Food Blog – Behind the Scenes
Running a food blog is a labor of love, blending creativity, strategy, and a passion for culinary arts into a platform that inspires and connects with food enthusiasts worldwide. Whether you’re a seasoned blogger or an aspiring foodie dreaming of sharing your recipes, understanding the behind-the-scenes work of managing a food blog can demystify the process and inspire you to start or refine your own. In this comprehensive guide, I’ll walk you through every facet of running my food blog, Served With Rice (SWR), from recipe development to photography, writing, site maintenance, and self-promotion. By the end, you’ll have a clear roadmap for creating engaging content, optimizing your workflow, and growing your audience—all while keeping the joy of cooking at the heart of it all.
The Big Picture: A Labor of Passion and Strategy
Food blogging is more than just posting recipes; it’s about storytelling, problem-solving, and building a community around shared culinary experiences. My blog, now celebrating its 100th post, is a testament to persistence and creativity. What started as a hobby has grown into a platform that reaches thousands, but the journey hasn’t been without challenges. From juggling meal prep with photography to navigating SEO and social media, every step requires careful planning and execution. Below, I’ll break down the key components of running Served With Rice, offering insights, tips, and practical strategies to help you succeed in the competitive world of food blogging.
Time Breakdown: How I Spend My Week
To give you a clear sense of the effort involved, here’s a rough estimate of how I allocate my time each week or month:
| Task | Time Commitment |
|---|---|
| Recipe Development & Planning | Most waking moments |
| Cooking & Prep | 2 hours/week |
| Writing | 2 hours/week |
| Photography | Integrated with cooking |
| Site Development | 1 hour/month |
| Self-Advertising & Publicity | 2 hours/month |
This balance allows me to produce high-quality content while maintaining a sustainable workflow. Let’s dive into each component in detail.
Recipe Development and Meal Planning: The Heart of the Blog
A Constant Creative Process
Recipe development is the soul of Served With Rice. It’s a continuous process that occupies my thoughts during commutes, quiet moments, or even half-asleep mornings. Whether I’m solving a practical problem—like using up leftover ingredients—or dreaming up a new dish inspired by a spice in my pantry, this stage is where creativity thrives. My approach blends intuition, research, and experimentation, drawing on years of cooking experience and exposure to food media.
For example, let’s take my Cod with a Mayo and Old Bay Crust recipe as a case study. The idea sparked from a desire to eat more fish and a memory of affordable cod at the supermarket. I initially envisioned an oven-based meal prep with a herb-butter topping, but research led me down a different path. A quick Google search revealed a BBC Good Food recipe that involved searing the fish before baking—a step too cumbersome for my weeknight-friendly ethos. Another recipe caught my eye with its use of Old Bay seasoning, a vibrant spice mix I’d brought back from a trip. However, the dish looked bland, prompting me to explore browning techniques.
This led to a breakthrough: using mayonnaise as a glaze. Research confirmed that mayo’s sugars promote Maillard browning, creating a golden, flavorful crust without extra dishes. By pivoting from herb-butter to Old Bay and mayo, I crafted a simple yet visually stunning recipe that became a reader favorite. This iterative process—starting with an idea, refining it through research, and testing it in the kitchen—is how I develop most recipes.
Tips for Recipe Development
- Solve Real Problems: Create recipes that address common pain points, like time constraints or ingredient availability.
- Research Thoroughly: Use Google, YouTube, and trusted sources like BBC Good Food to validate and refine your ideas.
- Embrace Laziness: Simplify steps to make recipes accessible for busy cooks.
- Document Everything: Keep notes on your thought process to streamline writing later.
Cooking and Prep: Efficiency in the Kitchen
Streamlined Shopping and Prep
Cooking for the blog is a deliberate process, designed to maximize efficiency and minimize waste. I typically spend about two hours per week in the kitchen, preparing one or two recipes that yield multiple meals. My shopping is precise: I plan exactly what I need, like the cod and vegetables for the Old Bay recipe, and stick to my list. This approach saves time and ensures I have everything ready to execute my vision.
For the cod dish, I defrosted the fish overnight and soaked red rice in my rice cooker to give it a head start (red rice adds color and fiber but needs extra time to cook). The actual cooking was straightforward: mix mayo with Old Bay, slather it on the cod, and bake. The simplicity of the recipe was intentional, aligning with my goal of creating fuss-free meals.
Photography During Cooking
Photography is integrated into the cooking process, as staging shots afterward feels unnatural. I snap photos as I go, capturing key steps like seasoning the fish or arranging vegetables. I used to shoot with an aging iPhone SE, but I recently upgraded to an iPhone 15 Pro. The new camera offers sharper focus and better bokeh, though the difference isn’t transformative. Still, the upgrade was worth it for reliability, as my old phone was falling apart after nine years.
Tips for Cooking and Prep
- Plan Ahead: Shop with a clear list to avoid impulse buys.
- Batch Prep: Cook multiple components (e.g., protein and sides) in one session to save time.
- Photograph Naturally: Shoot during cooking to capture authentic moments.
- Invest in a Decent Camera: A modern smartphone is sufficient for most bloggers.
Writing: Crafting the Narrative
Writing on the Go
Writing is where recipes come to life through storytelling. I dedicate about two hours per week, mostly during my 30-minute daily train commute home. Using an iPad and Google Docs, I draft posts, starting with the preamble and ingredients, then detailing the method while referencing photos. The abstract and tagline are the trickiest parts, so I save them for last. By Wednesday, the post is 90% complete.
On Thursdays, I transfer the draft to WordPress, where hyperlinks and photos carry over seamlessly. I upload images directly from my phone to WordPress’s media library and keep backups on my 2020 MacBook Pro. Final touches, like adjusting image sizes or adding tags, are done on my laptop or tablet before hitting publish. After posting, I manually send a newsletter to subscribers, as my signup volume is low enough to manage without automation.
Maximizing Content Efficiency
To stretch my content further, I often combine related recipes or split meals into multiple posts. For example, my Korean Fried Chicken was paired with a cucumber salad in one post, but I separated the Hairy Cucumber with Glass Noodles into a standalone piece. This strategy doubles my output without extra cooking. Similarly, I might blanch edamame, okra, and spinach in one session, yielding three distinct recipes from a single afternoon.
Tips for Writing
- Write Anywhere: Use downtime (e.g., commutes) to draft posts.
- Tell a Story: Share the inspiration behind each recipe to engage readers.
- Repurpose Content: Split or combine recipes to maximize output.
- Backup Everything: Store photos and drafts securely to avoid losses.
Photography: Capturing the Dish
The Art of Food Photography
Photography is critical for food blogging, as visuals drive engagement. My setup is simple but effective, leveraging natural light and minimal props. My favorite setup involves a glass kitchen table pushed against a west-facing window, which floods the scene with soft, flattering light. I use white foam boards to bounce light and reduce shadows, and occasionally a dark foam board for dramatic contrast.
For example, my Tortellini and Brodo con Polpetti Soup was shot with this setup, using a $7 IKEA cookie sheet as a rustic platter. I vary angles—top-down, side-on, or 45 degrees—to create dynamic images. A high shutter speed can wash out the background, as seen in my Freezer-Friendly Marinara Sauce photo, giving a clean, professional look.
Learning from Others
I’ve drawn inspiration from photographers like Nagi of RecipeTin Eats for bright, summery shots and Elizabeth of Three Beans on a String for moody, comforting images. Desserts, like cakes or cookies, are trickier to style due to their one-dimensional nature, but Amanda of I Am Baker excels at making them pop with simple, elegant compositions.
Tips for Food Photography
- Chase Natural Light: Shoot near windows for the best results.
- Use Simple Props: Affordable items like cookie sheets can add depth.
- Vary Angles: Experiment with top-down, side, and angled shots.
- Learn from Pros: Study other bloggers’ techniques to refine your style.
Equipment and Costs
Here’s a breakdown of my photography setup and costs:
| Item | Description | Cost (USD) |
|---|---|---|
| iPhone 15 Pro | Primary camera for sharp, reliable shots | $999 |
| White Foam Board | Reflects light to reduce shadows | $5 |
| Dark Foam Board | Adds contrast for dramatic shots | $5 |
| IKEA Cookie Sheet | Rustic prop for plating | $7 |
| Glass Kitchen Table | Shooting surface near window | $100 |
Total cost: ~$1,116. Note that most bloggers can start with a smartphone and basic props, keeping costs under $50.
Site Development: Keeping the Blog Fresh
Periodic Updates
Site development is a low-priority task, taking about one hour per month. I use WordPress’s admin panel to reorganize categories, update tags, or streamline the user experience. For instance, I recently consolidated Japanese and Korean recipes into a single category and merged Southeast Asian recipes to declutter the homepage menu. The “Quick Edit” function makes these changes painless.
However, I’ve noticed inconsistencies in my tagging policy—some categories, like Desserts, might work better as tags. These tweaks improve navigation but require occasional bursts of focus, often squeezed into weekends or vacations.
Tips for Site Development
- Simplify Navigation: Combine redundant categories to enhance user experience.
- Use Quick Edit: Make bulk changes efficiently in WordPress.
- Schedule Maintenance: Dedicate small, regular time slots to avoid overwhelm.
- Track Changes: Document updates to maintain consistency.
Mermaid Chart: Blog Category Structure
Below is a visual representation of my blog’s category structure before and after consolidation, created using Mermaid syntax:
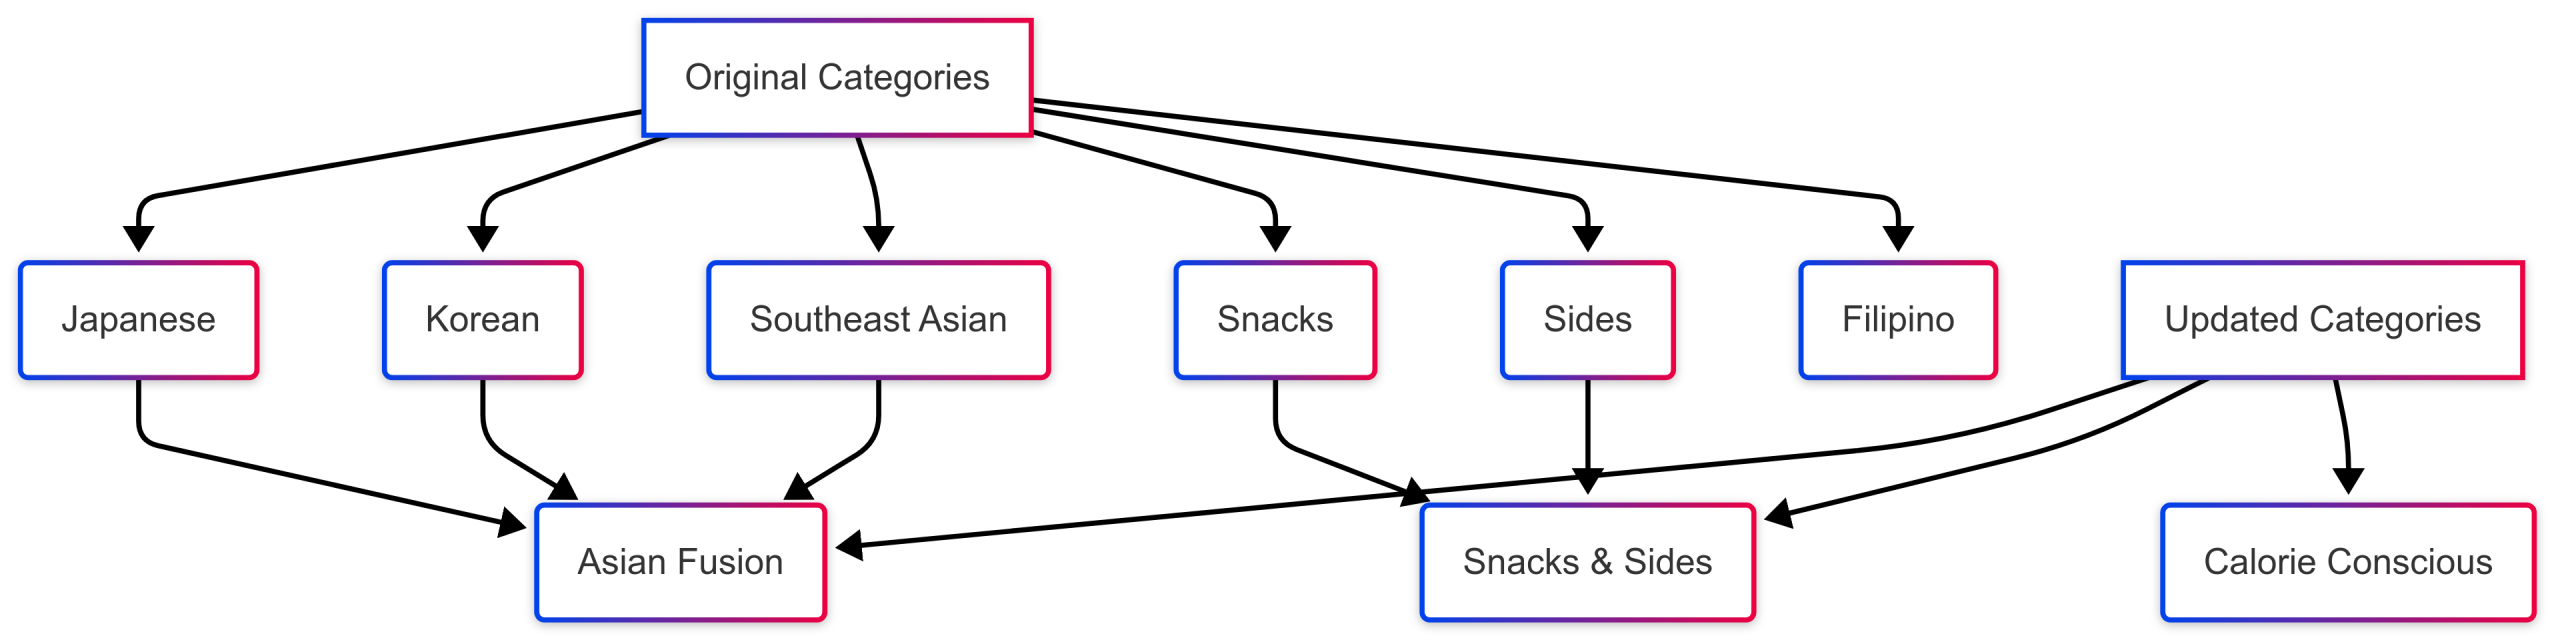
This chart shows how I reduced six categories to three, improving navigation while adding a new “Calorie Conscious” category for diet-friendly recipes.
Self-Advertising and Publicity: Growing the Audience
Social Media Strategy
Promotion is my weakest area, occupying just two hours per month. I schedule posts on Instagram, Facebook, and Pinterest using Meta Business Suite and Pinterest’s scheduling tools. For example, I share recipes in Facebook groups, adhering to each group’s rules to maximize approval chances. Pinterest requires vertical images and more effort to rank well, but it’s a powerful driver of traffic when done right.
I also plan to create eBooks, like a cheat sheet for chicken and rice variations, to entice newsletter signups. However, time constraints have delayed this project. Social media and collaborations with other bloggers are on my to-do list, but I prioritize cooking and writing over publicity.
Tips for Promotion
- Schedule Posts: Use tools like Meta Business Suite to automate sharing.
- Follow Group Rules: Tailor posts to each platform’s guidelines.
- Experiment with Pinterest: Test vertical images and keywords to boost reach.
- Plan Lead Magnets: Create eBooks or guides to grow your email list.
Maximizing Content: Work Smarter, Not Harder
Stretching Content Across Platforms
One piece of content can go a long way with strategic planning. For example, a single recipe post with five photos can be repurposed as:
- Instagram: A carousel post or Story.
- Facebook: A group post or page update.
- Pinterest: A vertical pin linking to the recipe.
- Newsletter: A featured recipe with a personal note.
- Round-Up Post: Part of a themed collection (e.g., “5 Weeknight Fish Dishes”).
- eBook: A chapter in a recipe collection.
This approach multiplies your reach without extra cooking. I also shoot behind-the-scenes content, like mixing ingredients or plating dishes, for Instagram Stories or Reels. These raw moments humanize the blog and build trust with readers.
Tips for Content Optimization
- Shoot Multiple Angles: Capture top-down, side, and close-up shots for versatility.
- Cross-Post Strategically: Tailor content to each platform’s audience.
- Share BTS Content: Post candid moments to connect with readers.
- Test and Learn: Analyze which photos or formats resonate most.
SEO: Boosting Discoverability
A Balancing Act
Search engine optimization (SEO) is crucial for driving organic traffic, but it can feel impersonal. I’m no expert, but I apply basic SEO practices to ensure Served With Rice ranks well. This includes using keywords (e.g., “easy cod recipe”), headers, lists, and concise instructions. However, I balance SEO with personality, weaving stories into posts to maintain a human connection.
For example, my Cod with a Mayo and Old Bay Crust post includes keywords like “oven-baked cod” and “quick fish recipe” in headers and text, but I also share the story of discovering the mayo glaze technique. This hybrid approach drives traffic while keeping readers engaged.
Tips for SEO
- Research Keywords: Use tools like Google Keyword Planner to find popular terms.
- Use Headers: Break up text with H2 and H3 tags for readability.
- Keep It Concise: Balance informative content with storytelling.
- Monitor Performance: Use Google Analytics to track which posts perform best.
The Role of Storytelling and Engagement
Why Storytelling Matters
Every recipe has a story, from its cultural roots to the moment of inspiration. Sharing these narratives transforms a blog from a collection of recipes into a vibrant community. For Served With Rice, stories like my Old Bay adventure or the chaos of cooking with a toddler add depth and relatability.
Engagement is equally critical. Responding to comments, running polls, or sharing reader photos fosters a two-way dialogue. I encourage followers to share their versions of my recipes, reposting their images as user-generated content (UGC). This builds loyalty and provides social proof to new visitors.
Tips for Storytelling and Engagement
- Share Origins: Explain the inspiration or history behind each dish.
- Be Authentic: Let your personality shine through in writing and visuals.
- Engage Actively: Reply to comments and messages promptly.
- Leverage UGC: Repost reader photos to build community.
Tools and Platforms: Streamlining the Process
Essential Tools
Several tools make running Served With Rice easier:
- WordPress: My blogging platform, offering flexibility and ease of use. Cost: $100/year for hosting.
- Google Docs: For drafting posts on the go. Free.
- Meta Business Suite: For scheduling Instagram and Facebook posts. Free.
- Pinterest: For scheduling pins and driving traffic. Free.
- Desygner: For creating polished graphics or eBook covers (planned). Free basic plan; premium ~$10/month.
Platform Diversification
While Instagram is my primary platform, I also use Facebook, Pinterest, and email newsletters. Each serves a different purpose: Instagram for visuals, Facebook for community engagement, Pinterest for traffic, and newsletters for direct connection. Diversifying ensures I reach varied audiences, from casual browsers to loyal subscribers.
Challenges and Lessons Learned
Common Pitfalls
- Over-Reliance on Visuals: Stunning photos are vital, but without context or story, they fall flat.
- Neglecting Engagement: Posting without interacting limits community growth.
- Inconsistent Branding: A uniform voice and aesthetic build trust.
- Ignoring SEO: Skipping optimization reduces discoverability.
- Underusing UGC: Reader content is a powerful promotional tool.
Key Lessons
- Prioritize Passion: Love for cooking keeps the blog sustainable.
- Work Hard: Success requires relentless effort and grit.
- Be Adaptable: Embrace changes in blogging trends, like video or SEO.
- Balance Priorities: Focus on what you love (e.g., cooking) and delegate or minimize the rest.
Conclusion: Building a Flavorful Community
Running Served With Rice is a delicate balance of creativity, strategy, and hard work. From dreaming up recipes to capturing mouthwatering photos, writing engaging posts, and promoting content, every step is an opportunity to connect with readers and share the joy of cooking. By optimizing workflows, leveraging tools like WordPress and Desygner, and prioritizing storytelling, I’ve built a blog that resonates with food lovers worldwide.
Whether you’re starting your own food blog or refining an existing one, remember that content is king—but strategic content is emperor. Plan recipes with purpose, shoot versatile photos, repurpose content across platforms, and engage your audience with authentic stories. With passion, grit, and a sprinkle of SEO, you can create a food blog that not only satisfies appetites but also builds a lasting community.
If you’re inspired to start your culinary journey, sign up for tools like Desygner or WordPress and dive in. The world is hungry for your recipes—go feed it!
Please share this How I Run My Food Blog – Behind the Scenes with your friends and do a comment below about your feedback.
We will meet you on next article.
Until you can read, Creating a Blog Series Around Seasonal Ingredients: Guide