How to create a WordPress cookbook: a step-by-step guide
Learn how to create a WordPress cookbook with this step-by-step guide. Set up your food blog with themes, plugins, and SEO for success.
Creating a WordPress cookbook is an exciting venture for food enthusiasts, chefs, and bloggers looking to share their culinary creations with the world. Unlike posting recipes on social media platforms like Instagram or Pinterest, a WordPress cookbook offers full control over your content, branding, and monetization opportunities. This comprehensive guide walks you through the process of building a professional WordPress cookbook, from selecting a platform to publishing recipes and monetizing your blog. Whether you’re a beginner or an experienced blogger, this step-by-step approach ensures your food blog is set up for success.
Why Choose WordPress for Your Cookbook?
WordPress is the go-to platform for food bloggers due to its flexibility, user-friendliness, and robust ecosystem. With over 40% of websites powered by WordPress, it’s a proven choice for creating professional, scalable, and SEO-friendly sites. Here’s why WordPress is ideal for your cookbook:
- Ease of Use: The drag-and-drop Gutenberg editor simplifies content creation, even for non-technical users.
- Customization: Thousands of themes and plugins allow you to tailor your site to your brand.
- SEO Benefits: Built-in SEO features and plugins like Yoast SEO help your recipes rank higher on search engines.
- Recipe Plugins: Tools like WP Recipe Maker and Tasty Recipes streamline recipe creation with structured data for better visibility.
- Monetization: WordPress supports multiple revenue streams, including affiliate marketing, ads, and sponsored content.
Unlike social media platforms, a WordPress cookbook is entirely yours. You’re not restricted by algorithms or platform policies, giving you the freedom to build a loyal audience and a sustainable business.
Step 1: Choose a Platform and Hosting
Why WordPress?
WordPress.org (the self-hosted version) is the best choice for a cookbook because it offers full control over your site’s design, functionality, and monetization. Unlike WordPress.com, which has limitations on plugins and customization, WordPress.org allows you to install custom themes and plugins to create a professional food blog.
Selecting a Domain Name
Your domain name is your website’s address (e.g., yourname.com). Choose a domain that reflects your brand without being too niche-specific. For example, avoid names like “veganbaking.com” if you might expand to other recipes later. Instead, consider using your name (e.g., janesmith.com) or a brand-related term.
Popular domain registrars include:
- Google Domains: Simple interface, reliable service.
- Namecheap: Affordable domains with free WHOIS privacy.
- GoDaddy: Wide range of domain options.
Cost: Domains typically cost $10–$20 per year, depending on the registrar and extension (.com, .co, etc.).
Choosing a Hosting Provider
Hosting stores your website’s files and makes them accessible online. For food bloggers, shared hosting is a budget-friendly starting point, while managed WordPress hosting offers hands-off maintenance.
Recommended hosting providers:
- Bluehost:
- Price: Starts at $2.95/month (shared hosting).
- Features: Free domain for the first year, one-click WordPress installation, 24/7 support.
- Best for: Beginners on a budget.
- WP Engine:
- Price: Starts at $20/month (managed WordPress hosting).
- Features: Automatic updates, enhanced security, and fast performance.
- Best for: Bloggers seeking reliability and scalability.
- SiteGround:
- Price: Starts at $3.99/month (shared hosting).
- Features: Free SSL, daily backups, and excellent customer support.
- Best for: Small to medium-sized food blogs.
Setup Process:
- Purchase a domain and hosting plan.
- Point your domain to your hosting provider’s nameservers (instructions provided by the registrar).
- Install WordPress via your hosting provider’s control panel (most offer one-click installation).
Step 2: Select a Recipe-Friendly Theme
A WordPress theme defines your cookbook’s look and feel. For a food blog, choose a theme designed for recipes, with features like recipe card templates, clean layouts, and mobile responsiveness.
Key Features to Look For
- Recipe Support: Integration with recipe plugins like WP Recipe Maker or Tasty Recipes.
- Ad Slots: Strategic placement for monetization without compromising user experience.
- Email Opt-Ins: Support for newsletter sign-up forms to build your audience.
- Search Functionality: A prominent search bar for easy recipe discovery.
- Social Media Integration: Share buttons and social feed displays to boost engagement.
- Speed and Performance: Lightweight code to ensure fast loading times.
Recommended Themes
| Theme | Price | Key Features | Plugin Compatibility |
|---|---|---|---|
| Foodie Pro | $129.95/year | Minimalist design, customizable layouts, built-in recipe card support | WP Recipe Maker |
| Cook’d Pro | $129/year | Modern design, ad-friendly, supports recipe indexes | WP Recipe Maker |
| Blossom Recipe | $59/year | Vibrant design, recipe card templates, mobile-friendly | Blossom Recipe Maker |
| Astra (Free/Pro) | Free/$47/year | Lightweight, customizable, supports multiple recipe plugins | WP Recipe Maker, Tasty Recipes |
Tips:
- Test theme demos to check loading speed and mobile responsiveness.
- Use WordPress.org’s theme repository for free options or ThemeForest for premium themes.
- Customize colors, fonts, and layouts to align with your brand.
Diagram: Theme Selection Process

Step 3: Install Essential Plugins
Plugins extend WordPress’s functionality, making it easy to create and manage a cookbook. Below are the must-have plugins for your food blog.
1. Recipe Plugin: WP Recipe Maker
WP Recipe Maker is a top choice for formatting recipes with structured data (schema markup), which improves SEO and displays rich snippets in search results (e.g., recipe cards with star ratings).
Features:
- Recipe card blocks with ingredients, instructions, and cooking times.
- Nutritional information and serving size options.
- Print-friendly recipe cards.
- Affiliate link support (Premium version).
Price:
- Free Version: Available on WordPress.org.
- Premium Version: $49/year for advanced features like affiliate links and premium templates.
Alternative: Tasty Recipes ($79/year) offers similar features with a focus on elegant designs.
2. SEO Plugin: Yoast SEO
Yoast SEO helps optimize your recipe posts for search engines by analyzing content, suggesting keywords, and generating sitemaps.
Features:
- Keyword optimization for recipe titles and descriptions.
- Readability analysis for engaging content.
- Schema markup for better search visibility.
Price:
- Free Version: Basic SEO tools.
- Premium Version: $99/year for advanced features like internal linking suggestions.
3. Performance Plugins
Food blogs rely on high-quality images, which can slow down your site. Performance plugins ensure fast loading times.
- WP Rocket:
- Price: $59/year.
- Features: Page caching, file minification, and lazy-loading for images.
- Optimole:
- Price: Free (limited) or $19.99/month (premium).
- Features: Image compression, lazy-loading, and CDN integration.
4. Optional Plugin: Formidable Forms
Allow users to submit their own recipes with Formidable Forms, fostering community engagement.
Price: $39.50/year (Basic) or $99.50/year (Plus).
Installation:
- Go to Plugins > Add New in your WordPress dashboard.
- Search for the plugin, click Install Now, and then Activate.
- Configure settings based on the plugin’s documentation.
Step 4: Create and Organize Recipe Posts
With your theme and plugins installed, it’s time to start creating recipe posts. Follow these steps to craft engaging, SEO-friendly content.
Using the Recipe Card Block
- Create a New Post: In the WordPress dashboard, go to Posts > Add New.
- Add a Recipe Card: Insert the WP Recipe Maker block and fill in details like:
- Recipe title
- Ingredients
- Step-by-step instructions
- Cooking time, prep time, and servings
- Optional: Nutritional information, difficulty level
- Preview and Publish: Ensure the recipe card is formatted correctly and mobile-friendly.
Adding High-Quality Images
Images are critical for food blogs, as they attract readers and showcase your recipes. Tips for effective visuals:
- Use high-resolution photos (at least 1200px wide).
- Optimize images with tools like Optimole to reduce file size without losing quality.
- Include alt text for SEO (e.g., “vegan chocolate cake recipe”).
- Add multiple images: a hero image, step-by-step photos, and a final dish photo.
Categorizing and Tagging Recipes
Organize your recipes to improve user experience and SEO:
- Categories: Group recipes by type (e.g., Appetizers, Main Courses, Desserts).
- Tags: Add specific descriptors (e.g., Vegan, Gluten-Free, 30-Minute Meals).
- Use the WordPress Categories and Tags sections when creating posts.
Writing Compelling Introductions
Each recipe post should start with an engaging introduction (150–300 words) that:
- Tells the story behind the recipe (e.g., family tradition, inspiration).
- Highlights key ingredients or techniques.
- Includes target keywords for SEO (e.g., “easy vegan lasagna recipe”).
Example Recipe Post Structure:
- Introduction (story, context, keywords)
- Hero image
- Recipe card (via WP Recipe Maker)
- Step-by-step instructions with images
- Tips and variations
- Call-to-action (e.g., “Share this recipe on Pinterest!”)
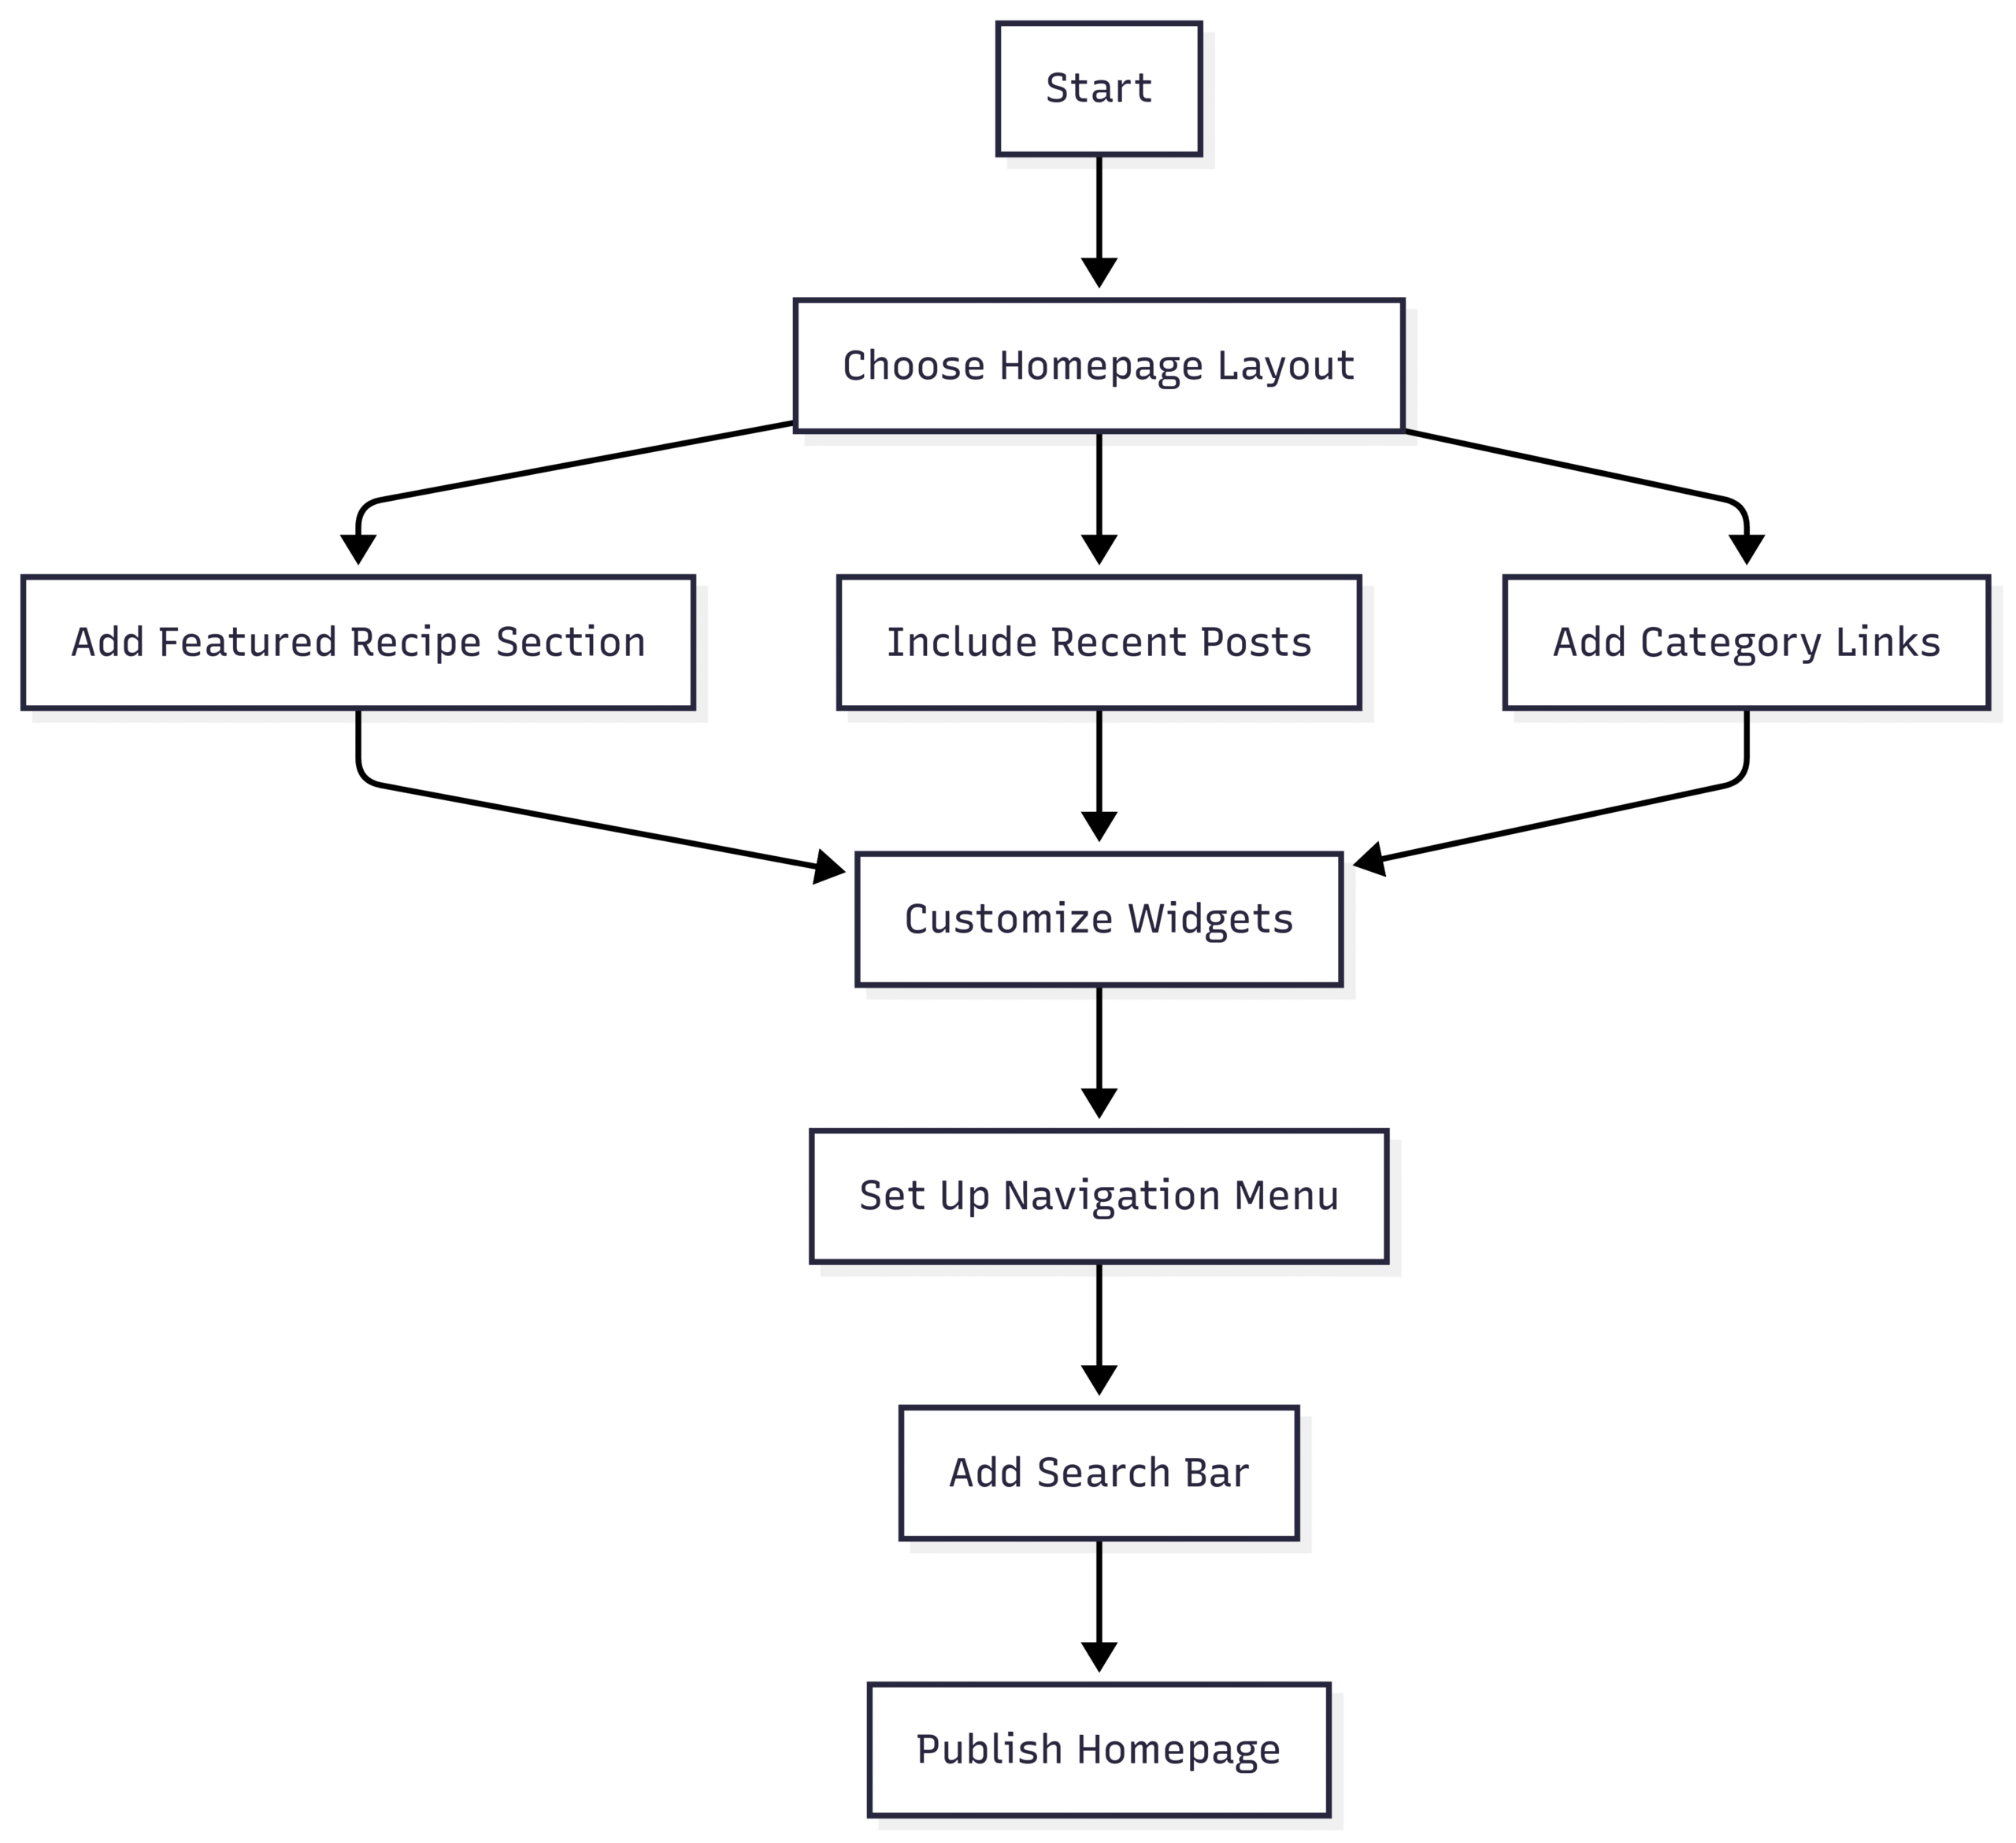
Step 5: Set Up Your Cookbook’s Homepage and Navigation
Your homepage is the first impression visitors get of your cookbook. Follow these best practices:
- Layout: Use a clean, recipe-focused design with a featured recipe section, recent posts, and category links.
- Widgets: Add footer widgets for:
- Recipe categories
- About section
- Email sign-up form
- Social media links
- Navigation Menu: Create a menu with links to:
- Home
- Recipe Categories (e.g., Breakfast, Lunch, Dinner)
- About
- Contact
- Search
Diagram: Homepage Setup Workflow
Step 6: Develop an Editorial Calendar
Consistency is key to growing your audience. An editorial calendar helps you plan and publish recipes regularly.
Key Elements
- Posting Frequency: Aim for 1–2 recipes per week to maintain engagement and SEO momentum.
- Content Themes: Plan seasonal or holiday recipes (e.g., Christmas cookies, summer salads).
- Recipe Format: Standardize recipe cards with WP Recipe Maker for consistency.
Tools
- Google Calendar: Create events for each recipe post and promotional campaign.
- Trello: Use boards to track recipe ideas, drafts, and publishing schedules.
Example Editorial Calendar
| Week | Recipe Post | Theme | Social Media Promotion |
|---|---|---|---|
| Week 1 | Vegan Chocolate Cake | Dessert | Pinterest pin, Instagram reel |
| Week 2 | Quick Chicken Stir-Fry | Weeknight Meals | Email newsletter, X post |
| Week 3 | Holiday Pumpkin Pie | Thanksgiving | Pinterest pin, Instagram story |
| Week 4 | Gluten-Free Pancakes | Breakfast | Email blast, X thread |
Step 7: Promote Your Cookbook
To grow your audience, promote your recipes across multiple channels:
- Pinterest: Create eye-catching pins with tools like Canva. Pinterest drives significant traffic to food blogs.
- Instagram: Share reels, stories, and posts showcasing your recipes.
- Email Marketing: Use tools like Mailchimp ($13/month) to send newsletters with new recipes.
- Social Media: Post on X, Facebook, and TikTok to reach a broader audience.
Tips:
- Schedule posts using tools like Buffer ($6/month per channel).
- Create a free downloadable resource (e.g., a meal planner) to grow your email list.
Step 8: Monetize Your WordPress Cookbook
Once your blog gains traction (500+ monthly visitors), explore monetization options:
1. Affiliate Marketing
Include affiliate links in your recipe posts (e.g., Amazon links for ingredients or kitchen tools). WP Recipe Maker Premium simplifies adding these links.
Popular Affiliate Programs:
- Amazon Associates: Earn 1–10% commission on kitchen products.
- ShareASale: Partner with food-related brands.
- CJ Affiliate: Connect with premium kitchenware brands.
2. Display Ads
Join ad networks like Mediavine or AdThrive once you reach 50,000 monthly sessions. Place ads strategically using your theme’s ad slots.
3. Sponsored Content
Partner with brands to create sponsored recipes or reviews. Build a media kit showcasing your traffic and audience demographics.
Step 9: Maintain and Optimize Your Cookbook
Regular maintenance ensures your cookbook remains user-friendly and performs well:
- Update Plugins and Themes: Check for updates monthly to avoid security issues.
- Monitor Performance: Use Google PageSpeed Insights to track loading times.
- Engage with Readers: Respond to comments and recipe submissions.
- Network: Connect with other food bloggers via blog comments, X, or food blogging conferences.
Wrapping Up
Creating a WordPress cookbook is a rewarding way to share your passion for food while building a sustainable online business. By choosing WordPress, securing a domain and hosting, selecting a recipe-friendly theme, and installing essential plugins like WP Recipe Maker, you can create a professional, SEO-friendly food blog. Focus on high-quality recipes, consistent posting, and strategic promotion to grow your audience. As your traffic increases, explore monetization options like affiliate marketing and ads to turn your cookbook into a profitable venture.
Start today, and let your WordPress cookbook become the go-to resource for food lovers worldwide.
Please share these How to create a WordPress cookbook: a step-by-step guide with your friends and do a comment below about your feedback.
We will meet you on next article.
Until you can read, Zesty Air Fryer Asparagus with Garlic Butter


This guide is super helpful! I’ve been meaning to turn my family recipes into a WordPress cookbook and didn’t know where to start. The step-by-step breakdown makes it so much easier. Thanks for sharing this!
This guide was exactly what I needed—super clear and easy to follow. I’ve been wanting to turn my recipe notes into something real for months. Thanks for making it seem doable!