
How to create bright and airy flat lay in Food Photography
Learn how to create stunning bright and airy flat lay food photos with expert tips on lighting, composition, props, and editing.
Flat lay food photography, where dishes are arranged on a surface and photographed from directly above, has become a staple for food bloggers, chefs, and social media creators. This technique offers a clean, organized view of the dish, making it perfect for showcasing recipes, ingredients, or culinary stories in an eye-catching way. The bright and airy aesthetic, characterized by soft lighting, neutral backgrounds, and vibrant food colors, evokes freshness and invites viewers into the scene. This comprehensive guide dives into the art and science of creating bright and airy flat lay food photos, covering food styling, lighting, composition, equipment, props, and post-processing techniques. Whether you’re a beginner or a seasoned photographer, these tips will help you craft professional, visually stunning images.
Understanding the Bright and Airy Aesthetic
The bright and airy aesthetic in food photography emphasizes light, soft tones, minimal clutter, and a fresh, inviting feel. It’s about making the food the star while creating a harmonious, visually appealing scene. Key elements include:
- Soft Lighting: Natural or diffused artificial light to avoid harsh shadows.
- Neutral Backgrounds: Subtle backdrops that highlight the food without competing for attention.
- Vibrant Food Colors: Fresh ingredients with pops of color to draw the viewer’s eye.
- Balanced Composition: Thoughtful arrangement using techniques like the rule of thirds and negative space.
- Harmonious Props: Items that complement the food and enhance the story without overwhelming the frame.
This aesthetic works well for breakfast scenes, fresh salads, or vibrant desserts, evoking a sense of lightness and approachability. Below, we’ll break down the process of creating a bright and airy flat lay, including equipment, setup, and creative choices.
Equipment for Perfect Flat Lay Food Photography
To capture professional-quality flat lay images, the right equipment is essential. Here’s a breakdown of the gear you’ll need, along with specifications and approximate pricing.
Camera and Lens Selection
A DSLR or mirrorless camera is ideal for food photography due to its high image quality and manual control options. Popular choices include:
- Canon EOS 6D Mark II: A full-frame camera with excellent color accuracy and dynamic range.
- Specifications: 26.2MP sensor, ISO 100-40000, 45-point autofocus.
- Price: ~$1,399 (body only).
- Nikon D850: Known for its sharpness and detail, perfect for capturing food textures.
- Specifications: 45.7MP sensor, ISO 64-25600, 153-point autofocus.
- Price: ~$2,499 (body only).
For lenses, consider the following:
- Prime Lenses (50mm, 85mm): Offer sharp images with beautiful bokeh, ideal for isolating the food subject.
- Example: Canon EF 50mm f/1.8 STM ($125) or Nikon AF-S 50mm f/1.8G ($216).
- Macro Lenses (100mm): Perfect for capturing fine details like food textures.
- Example: Canon EF 100mm f/2.8L Macro ($1,299) or Nikon AF-S 105mm f/2.8G ($896).
- Wide-Angle Lenses (35mm): Great for larger scenes with multiple elements.
- Example: Canon EF 35mm f/2 IS USM ($599) or Nikon AF-S 35mm f/1.8G ($526).
For crop-sensor cameras, a 35mm lens approximates the 50mm focal length on a full-frame camera due to the crop factor.
Tripod and Support Systems
A stable overhead setup is critical for flat lay photography. Options include:
- Manfrotto 055 Carbon Fiber Tripod: Lightweight and sturdy, with quick power lock levers for fast setup.
- Specifications: 4-section legs, 19.8 lbs load capacity, 67 inches max height.
- Price: ~$399.
- C-Stand with Boom Arm: Allows positioning the camera further from the scene for deeper depth of field and minimal distortion.
- Example: Neewer C-Stand (~$149).
- Accessories: Manfrotto Super Clamp (~$29) to attach the camera to the arm.
- Overhead Rig: Provides flexibility for overhead shots without tripod legs in the frame.
- Example: Glide Gear Overhead Rig (~$199).
If budget is a concern, place the setup on the floor and shoot directly above at a 90-degree angle using a standard tripod.
Camera Settings
To achieve sharp, well-exposed flat lay images, use these settings as a starting point:
| Setting | Recommendation | Purpose |
|---|---|---|
| Aperture | f/5.6 to f/8 | Keeps the entire scene in focus |
| ISO | 100-400 | Minimizes noise for clean images |
| Shutter Speed | 1/125 sec or faster | Prevents blur, especially with artificial light |
Adjust these based on lighting conditions and desired depth of field.
Mastering Lighting for Bright and Airy Flat Lays
Lighting is the cornerstone of the bright and airy aesthetic. It enhances food colors, highlights textures, and creates a fresh, inviting vibe. You can use natural or artificial light, each with its own setup considerations.
Natural Lighting
Natural light is ideal for achieving a soft, airy look. Here’s how to make the most of it:
- Best Time of Day: Shoot during morning or late afternoon for soft, warm light. Avoid midday sun, which creates harsh shadows.
- Positioning: Set up near a large window to capture diffused light. Use a sheer curtain or diffuser panel to soften direct sunlight.
- Tools:
- Diffuser: A 5-in-1 reflector kit (~$30) with a translucent panel softens light.
- Reflector: A white or silver reflector (~$15) bounces light back to fill shadows.
Artificial Lighting
When natural light isn’t available, artificial lighting can replicate the airy aesthetic:
- Softboxes and LED Panels: Create soft, even lighting that mimics daylight.
- Example: Godox FV200 Continuous Light (~$399) with a diffuser for soft light.
- Light Positioning: Place the light at a 45-degree angle to add depth and avoid flat shadows. Use a second light as a fill to balance the scene.
- Color Temperature: Use 5000K-6000K for a fresh, natural look or 3000K-4000K for a warmer, cozy vibe.
Lighting Challenges and Solutions
| Challenge | Solution |
|---|---|
| Reflections on Metal/Glass | Use a polarizer filter or adjust the light angle to minimize glare. |
| Shadows from Tall Items | Rearrange tall items or use a reflector to soften shadows. |
| Uneven Lighting for Large Scenes | Use a larger diffuser or multiple light sources for consistent illumination. |
| Flat Textures | Use side lighting to emphasize textures like bread crusts or pasta shapes. |
Food Presentation and Styling
The food is the hero of your flat lay, and its presentation sets the tone for the image. Here’s how to style your dish for maximum impact:
Making Food Photogenic
- Clean Presentation: Wipe away spills, arrange ingredients neatly, and choose dishes that complement the food’s colors and textures.
- Freshness: Use vibrant, fresh ingredients like herbs, citrus slices, or glistening oil drizzles to add life.
- Height and Layers: Stack pancakes, layer cakes, or scatter herbs to add dimension and avoid a flat appearance.
Telling a Story
Every flat lay should convey a narrative or theme. For example, a breakfast scene with croissants, fresh fruits, and tea might evoke a cozy morning. Use props and colors to reinforce this story:
- Main Subject and Supporting Cast: Identify the star (e.g., a croissant) and arrange supporting elements (e.g., fruit slices, a teacup) to enhance it without stealing focus.
- Analogous Color Scheme: Choose colors next to each other on the color wheel (e.g., purple plums, magenta grapes, orange croissants) for a harmonious, calming effect.
Example Color Palette
| Color | Source | Effect |
|---|---|---|
| Purple | Plums, Grapes | Adds richness and depth |
| Orange | Croissants, Blood Oranges | Warmth and vibrancy |
| Yellow | Tea in Transparent Glass | Energizing, bright highlights |
Backgrounds and Props
The background and props frame your food and enhance the story without overshadowing the dish.
Choosing a Background
- Neutral Backdrops: Use beige tablecloths, white marble, or light wood to keep the focus on the food.
- Example: Beige linen tablecloth (~$20) for a cozy, homey feel.
- Textures: Layer textured linen or parchment paper for depth. Avoid busy patterns that distract from the food.
- Creative Options: Vintage trays or books can add character while maintaining a neutral tone.
Selecting Props
- Complementary Props: Use plates, utensils, or glasses that match the theme. For example, pink vintage plates pair well with colorful fruits.
- Functional Props: Cutting boards, spoons, or scattered herbs add context and suggest preparation.
- Transparent Elements: Glassware (e.g., teacups, ~$15/set) creates highlights and reflections for a bright, airy feel.
Prop Styling Tips
- Avoid Overcrowding: Use props sparingly to maintain a clean, airy look.
- Odd Numbers: Arrange props in groups of three or five for a natural, balanced composition.
- Human Elements: Include a hand stirring tea or a spoon mid-use to add authenticity.
Composition Techniques
A well-composed flat lay guides the viewer’s eye and creates a harmonious scene. Here are key techniques:
Overhead Perspective
- Camera Positioning: Shoot directly above at a 90-degree angle for a true flat lay. A C-stand or horizontal-arm tripod ensures stability and precise alignment.
- Dynamic Symmetry: Place key elements along intersecting lines for a balanced, dynamic composition.
Composition Principles
- Rule of Thirds: Position the main subject along grid lines for visual interest.
- Leading Lines: Use elements like a spoon or spice trail to guide the viewer’s eye.
- Negative Space: Leave empty areas to highlight the food and allow space for text in social media or blog posts.
- C-Curve: Arrange elements in a gentle curve to create flow and harmony.
Chart: Composition Flow
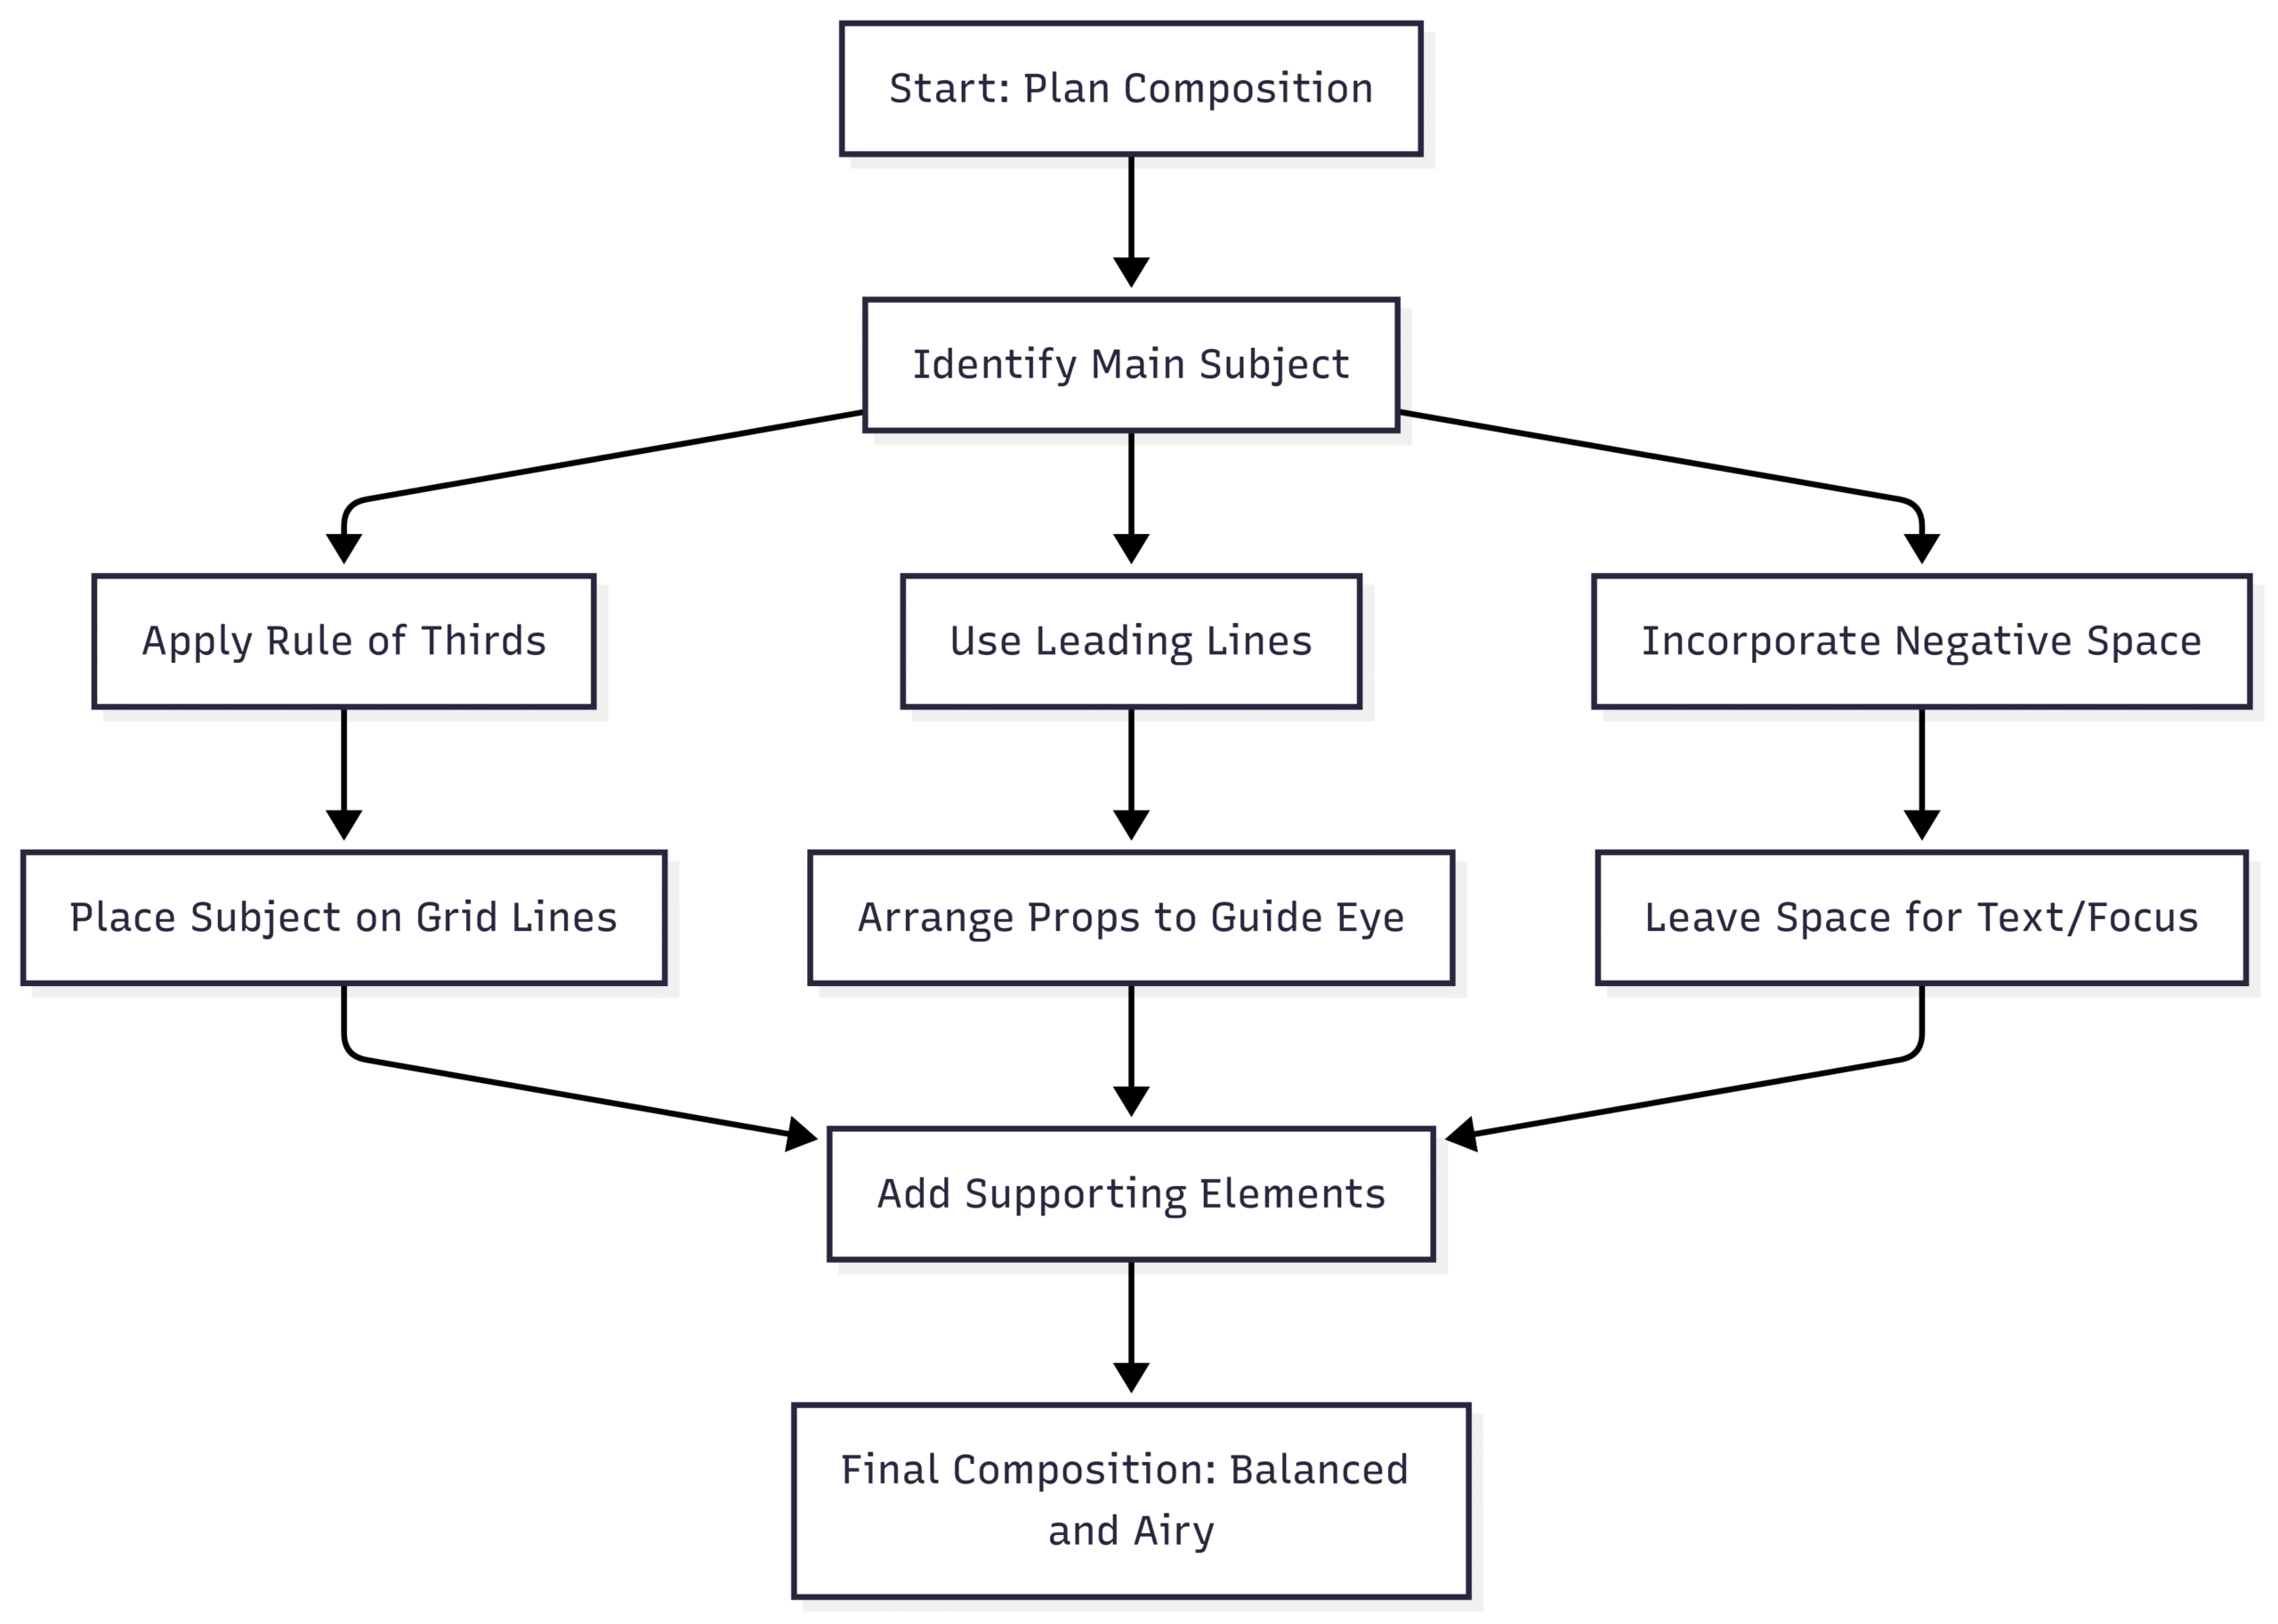
This chart illustrates the flow of creating a balanced composition, starting with the main subject and incorporating key techniques.
Post-Processing for a Polished Look
Editing enhances the bright and airy aesthetic by refining colors, exposure, and details. Use software like Adobe Lightroom or Photoshop for these adjustments:
Essential Adjustments
- Exposure and White Balance: Adjust for accurate colors and proper brightness. Aim for a neutral or slightly cool white balance (5000K-6000K) for freshness.
- Sharpening and Clarity: Enhance food textures, such as the crust of a croissant or the sheen of fruit.
- Cropping: Fine-tune the frame to remove distractions and emphasize negative space.
Presets for Food Types
| Food Type | Preset Type | Effect |
|---|---|---|
| Baked Goods | Warm | Cozy, inviting vibe |
| Frozen Desserts | Cool | Fresh, vibrant look |
| Chocolate/Sauces | Rich | Deep, indulgent textures |
Editing Challenges and Solutions
| Challenge | Solution |
|---|---|
| Glare on Ceramics/Metal | Reduce highlights in editing software or use a polarizer during shooting. |
| Uneven Surfaces | Use leveling tools to smooth out backgrounds. |
| Flat Colors | Adjust vibrance and saturation to enhance natural food colors. |
| Shadow Recovery | Lift shadows to reveal details in darker areas. |
Tips for Recreating a Bright and Airy Flat Lay
To create your own bright and airy flat lay, follow these actionable tips:
- Choose a Story: Select ingredients that fit a narrative, like a cozy breakfast with croissants, fruits, and tea.
- Use Analogous Colors: Pick colors next to each other on the color wheel for harmony (e.g., purple, orange, yellow).
- Opt for Wide-Angle Lenses: A 35mm or 50mm lens captures larger scenes with minimal distortion.
- Select Neutral Backdrops: Use light, textured surfaces like linen or marble to keep the focus on the food.
- Diffuse Light: Use a large window or diffuser with artificial light to create soft, even illumination.
- Soften Shadows: Use reflectors or white cards to fill in shadows for a fresh look.
- Combine Composition Techniques: Use dynamic symmetry, leading lines, and negative space for a balanced scene.
Conclusion
Creating a bright and airy flat lay in food photography is both an art and a science. By combining thoughtful food styling, strategic lighting, harmonious props, and balanced composition, you can craft images that are visually stunning and emotionally engaging. Invest in quality equipment like a full-frame camera, a sturdy tripod, and diffused lighting to elevate your shots. Experiment with analogous color schemes and neutral backdrops to maintain the airy aesthetic, and refine your images with subtle post-processing. Whether you’re photographing a vibrant breakfast spread or a minimalist dessert, these techniques will help you create flat lays that captivate your audience and showcase your culinary creations in the best light.
Please share these How to create bright and airy flat lay in Food Photography with your friends and do a comment below about your feedback.
We will meet you on next article.
Until you can read, 4 Essentials for Starting a Food Photography Business


![30 Best Food Bio for Your Instagram [For Foodies]](https://yumtonight.com/wp-content/uploads/2025/08/Storing-Books-1080-x-1920-px-3-768x432.jpg)
