How to Design a Media Kit for Your Food Blog
Learn how to create a standout media kit for your food blog to attract brand partnerships with expert tips, templates, and examples.
A media kit is the cornerstone of any food blogger’s pitch to brands. It’s your professional introduction, a snapshot of your blog’s value, and a visual portfolio that showcases your unique style and audience engagement. Whether you’re a seasoned recipe creator or just starting out, a well-crafted media kit can open doors to lucrative brand partnerships, sponsorships, and collaborations. This comprehensive guide will walk you through the process of designing a media kit that stands out, with practical tips, examples, and design strategies to ensure your food blog shines.
What Is a Media Kit?
A media kit is a concise, visually appealing document—typically 1–3 pages—that serves as a professional introduction to your food blog. It’s a one-stop shop for brands, providing essential information about your blog, your audience, and the collaboration opportunities you offer. Think of it as a visual elevator pitch that combines data, storytelling, and imagery to make a compelling case for why brands should partner with you.
The primary goal of a media kit is to communicate your professionalism and value quickly and effectively. It should answer key questions: Who are you? What is your blog about? Who is your audience? What can you offer brands? How can they reach you? By presenting this information in a polished, on-brand format, you make it easy for brands to evaluate your potential as a partner.
Why You Need a Media Kit
For food bloggers, a media kit is non-negotiable if you want to work with brands. Here’s why:
- Professionalism: A media kit signals that you’re serious about collaborations and prepared to handle professional partnerships. It sets you apart from hobbyists and positions you as a business-minded creator.
- Efficiency: Instead of crafting custom pitches for every inquiry, a media kit allows you to share a comprehensive overview of your blog with minimal effort. You can attach it to emails or link to it on your website.
- First Impressions: Brands often receive dozens of pitches. A well-designed media kit grabs their attention and makes a memorable first impression.
- Flexibility for All Blog Sizes: Even if your blog is new or your stats are modest, a media kit lets you highlight your niche, engagement, and vision. Brands value quality and alignment over sheer numbers, especially for niche audiences.
For example, a small food blog focusing on vegan desserts with a loyal, engaged audience can be just as appealing to a plant-based brand as a larger blog with less targeted reach. Your media kit is your chance to tell that story.
Key Components of a Food Blog Media Kit
A successful media kit is concise, visually appealing, and tailored to your brand. Below are the essential elements to include, with tips for making each section impactful.
1. Blog and Brand Overview
Start with a brief introduction to you and your blog. This section should convey your unique value proposition and set the tone for the rest of the media kit.
- Who You Are: Share a short, personal story about what inspired you to start your food blog. For example, if you specialize in gluten-free baking, mention how your dietary needs or passion for inclusive recipes drives your content.
- Your Niche: Clearly define your blog’s focus—whether it’s quick weeknight meals, global cuisine, or farm-to-table recipes. Highlight what makes your blog unique.
- Your Tone and Style: Describe your content’s vibe—rustic, modern, playful, or sophisticated—to help brands understand your brand personality.
Example: Ambitious Kitchen’s media kit introduces founder Monique Volz’s passion for wholesome, flavorful recipes, instantly aligning her blog with health-conscious brands.
Tip: Keep this section concise (100–150 words) and engaging. Avoid generic descriptions and focus on what sets you apart.
2. Your Photo and Logo
Visual consistency is key to reinforcing your brand identity. Include:
- A High-Quality Headshot: Use the same photo you feature on your blog or social media to create recognition across platforms. A professional yet approachable headshot humanizes your brand.
- Your Blog Logo: Place your logo prominently at the top of the media kit to establish your visual identity. This helps brands associate your media kit with your blog instantly.
Example: Kalejunkie’s media kit uses a clean logo and a warm headshot to create a cohesive, recognizable brand image.
Tip: Ensure your headshot and logo align with your blog’s aesthetic—use the same fonts, colors, and style.
3. Audience Insights
Brands want to know who your audience is and how they engage with your content. This section should provide a clear picture of your readers’ demographics and interests.
- Demographics: Include age range, gender, location, and interests (e.g., home cooks, health enthusiasts, or busy parents). If you have Google Analytics data, use it to provide specifics, such as “75% female, ages 25–44, primarily U.S.-based.”
- Interests and Behavior: Highlight what draws your audience to your blog. For example, “My readers are passionate about plant-based recipes and sustainable cooking practices.”
- Engagement: If you have high engagement rates (e.g., comments, shares, or email open rates), mention them to show your audience’s loyalty.
Example: The Stay At Home Chef’s media kit details her audience’s interest in family-friendly recipes, making it clear why brands targeting home cooks should partner with her.
Tip: If your audience data is limited, describe your ideal audience based on your niche and content focus. Be honest but strategic.
Table: Sample Audience Demographics
| Demographic | Description |
|---|---|
| Age Range | 25–44 |
| Gender | 70% Female, 30% Male |
| Location | 80% U.S., 10% Canada, 10% Other |
| Interests | Healthy eating, quick recipes, baking |
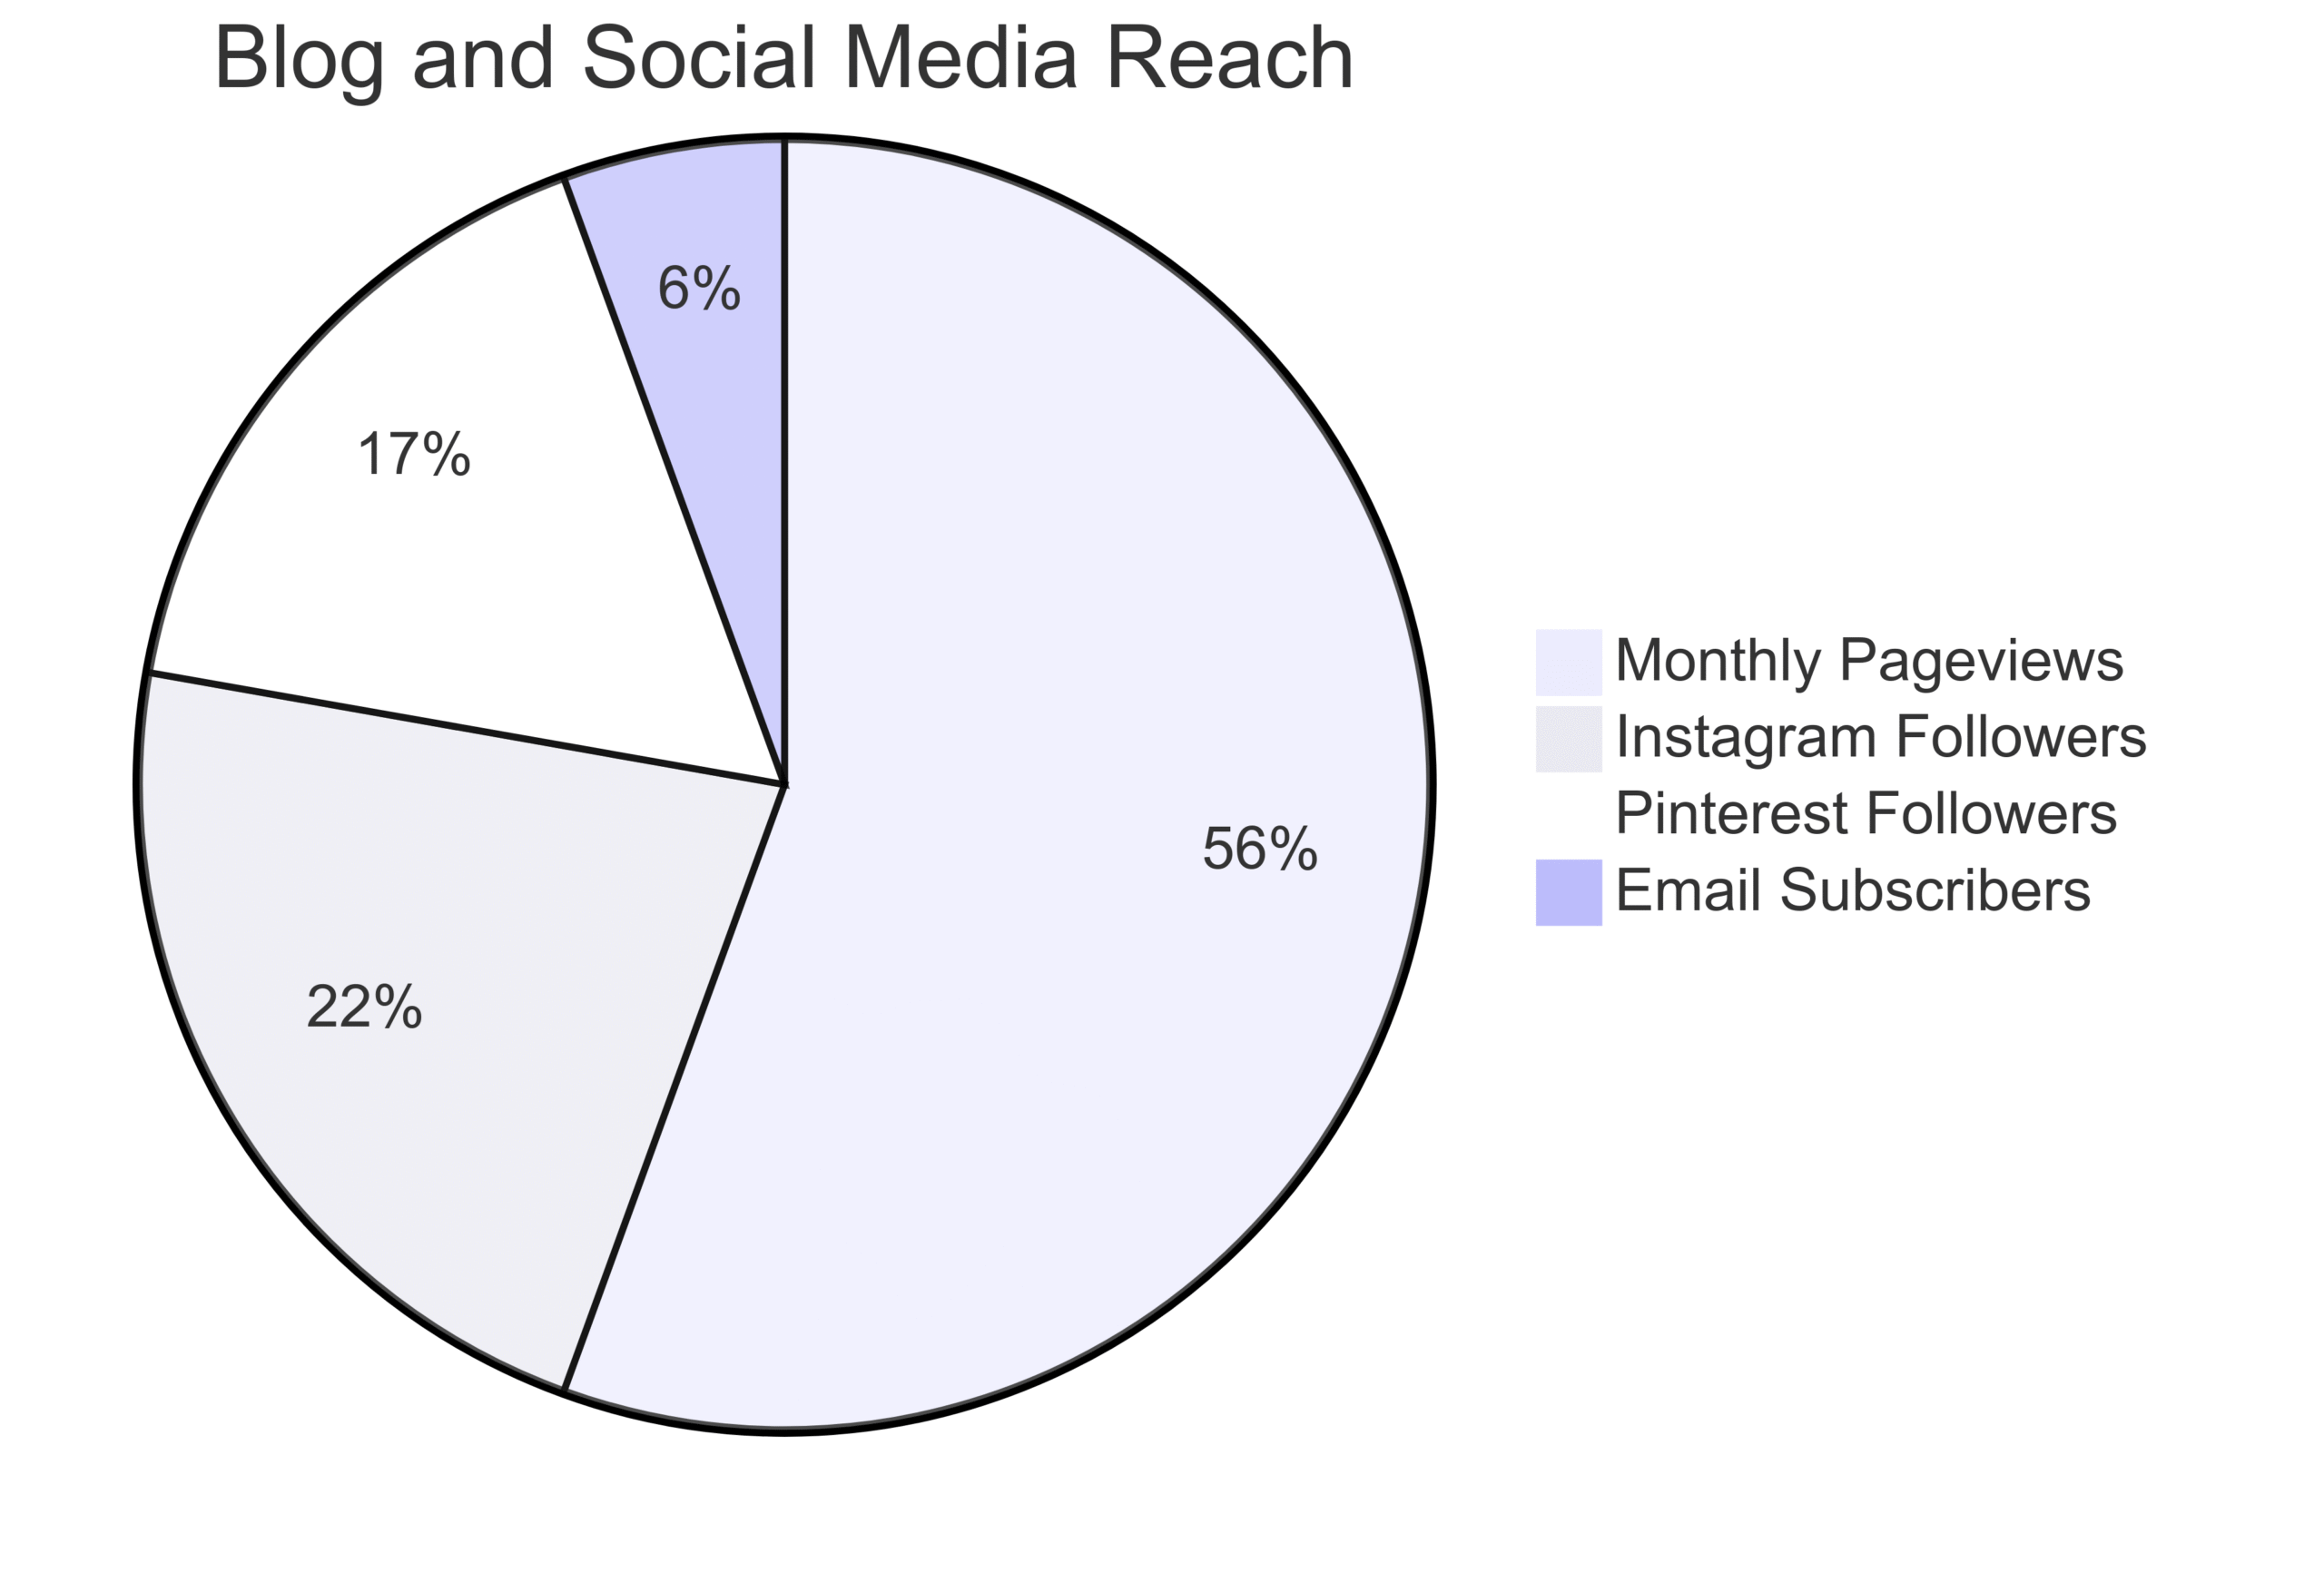
4. Blog and Social Media Stats
This section is where you back up your reach with data. Include metrics that demonstrate your blog’s influence and engagement.
- Blog Metrics: Share average monthly pageviews, unique visitors, or sessions from Google Analytics. Use a 12-month average to account for seasonal fluctuations common in food blogging.
- Social Media Stats: List your follower counts and engagement rates for active platforms (e.g., Instagram, Pinterest, TikTok). Exclude inactive or low-performing accounts.
- Email Subscribers: If you have an email list, include the number of subscribers and open rates (e.g., “5,000 subscribers with a 25% open rate”).
- Other Metrics: If relevant, mention podcast downloads, YouTube subscribers, or other platforms where you have a presence.
Example: Well Plated’s media kit highlights her blog’s monthly pageviews and Pinterest engagement, aligning with her focus on visual platforms.
Tip: Be transparent but selective. If your stats aren’t impressive yet, emphasize engagement over raw numbers. For example, “My Instagram community has a 10% engagement rate, with active comments and shares.”
Chart: Sample Blog and Social Media Stats
5. Services You Offer
Clearly outline the collaboration opportunities you provide. This helps brands understand what you can deliver and how you can meet their needs. Common services for food bloggers include:
- Sponsored Blog Posts: Writing and promoting branded content on your blog.
- Social Media Promotions: Creating Instagram posts, Reels, or Pinterest pins featuring a brand’s product.
- Recipe Development: Crafting custom recipes using a brand’s ingredients.
- Photography or Videography: Producing high-quality visuals for brand campaigns.
- Email Newsletter Features: Promoting brands to your email subscribers.
- Events or Demos: Hosting in-person or virtual cooking demos.
Example: Pinch of Yum’s media kit lists specific services like recipe development and Instagram promotions, tailored to her strengths in vibrant photography and engaging content.
Tip: Only include services you’re confident in delivering. Avoid listing every possibility—focus on what aligns with your skills and audience preferences.
Table: Sample Services Offered
| Service | Description | Deliverables |
|---|---|---|
| Sponsored Blog Post | Branded recipe post with SEO optimization | 1 blog post, 2 social shares |
| Instagram Promotion | Reel or post featuring brand product | 1 Reel, 1 feed post, 3 Stories |
| Recipe Development | Custom recipe using brand ingredients | Recipe, photos, blog post |
| Email Newsletter | Dedicated email featuring brand | 1 email to 5,000 subscribers |
6. Visual Portfolio
Your food blog’s visuals are a key selling point. Include a curated selection of your best work to showcase your photography, styling, or video skills.
- Styled Food Photos: Feature 3–5 high-quality images that reflect your blog’s aesthetic.
- Screenshots: Include thumbnails of successful blog posts or social media content.
- Video Stills: If you create videos, add a still or thumbnail from a popular Reel or YouTube video.
Example: Grilled Cheese Social’s media kit showcases vibrant sandwich photos, reinforcing her niche and visual expertise.
Tip: Choose images that align with the types of collaborations you want to attract. If you’re pivoting away from desserts, avoid showcasing dessert photos.
7. Reader Testimonials (Optional)
Social proof can strengthen your media kit. If readers have left glowing comments about your recipes or content, include 1–2 short quotes to demonstrate your impact.
Example: “Your vegan lasagna recipe was a game-changer for my family dinners!” – Sarah, loyal reader.
Tip: Only include authentic testimonials. Avoid generic or overly long quotes.
8. Past Collaborations (Optional)
If you’ve worked with brands before, list a few notable partnerships or include their logos. This builds credibility and shows you’re experienced in delivering successful campaigns.
Example: Life Made Sweeter’s media kit highlights partnerships with recognizable food brands, adding trust and appeal.
Tip: Be cautious about listing competitors of brands you’re pitching to, as this could affect their decision.
9. Contact Information
Make it easy for brands to reach you. Include:
- Email Address: Your primary contact email for business inquiries.
- Website URL: Link to your blog for easy reference.
- Social Media Handles: If consistent across platforms, include your handle (e.g., @YourBlogName).
Example: FoodByMaria’s media kit prominently displays her email and blog URL, ensuring brands can connect effortlessly.
Tip: Avoid including social media links if your handles vary across platforms, as this can cause confusion.
Designing a Media Kit That Stands Out
The design of your media kit is just as important as its content. A visually appealing, on-brand document reinforces your professionalism and creativity. Here’s how to get it right:
Keep It On-Brand
Your media kit should feel like an extension of your blog. Use the same fonts, colors, and design elements as your website and social media. For example:
- If your blog has a rustic aesthetic with earthy tones, use warm colors and textured backgrounds.
- If your brand is modern and minimal, opt for clean lines and a neutral palette.
Example: Ambitious Kitchen’s media kit mirrors her blog’s vibrant, approachable style with bold colors and clean typography.
Make It Personal, But Polished
While your media kit should be professional, it should also reflect your personality. Use a conversational tone in your bio and incorporate visuals that feel authentic to your brand. Avoid overly corporate language that feels disconnected from your blog’s voice.
Tip: If your blog is known for humor or sarcasm, sprinkle a bit of that into your media kit—but keep it professional.
Keep It Concise
A media kit should be 1–3 pages long, depending on your blog’s size and experience. Avoid cramming in unnecessary details or inflating stats. Focus on quality over quantity.
Example: A one-page media kit might include a bio, audience overview, key stats, and contact info, while a three-page kit could add a visual portfolio and past collaborations.
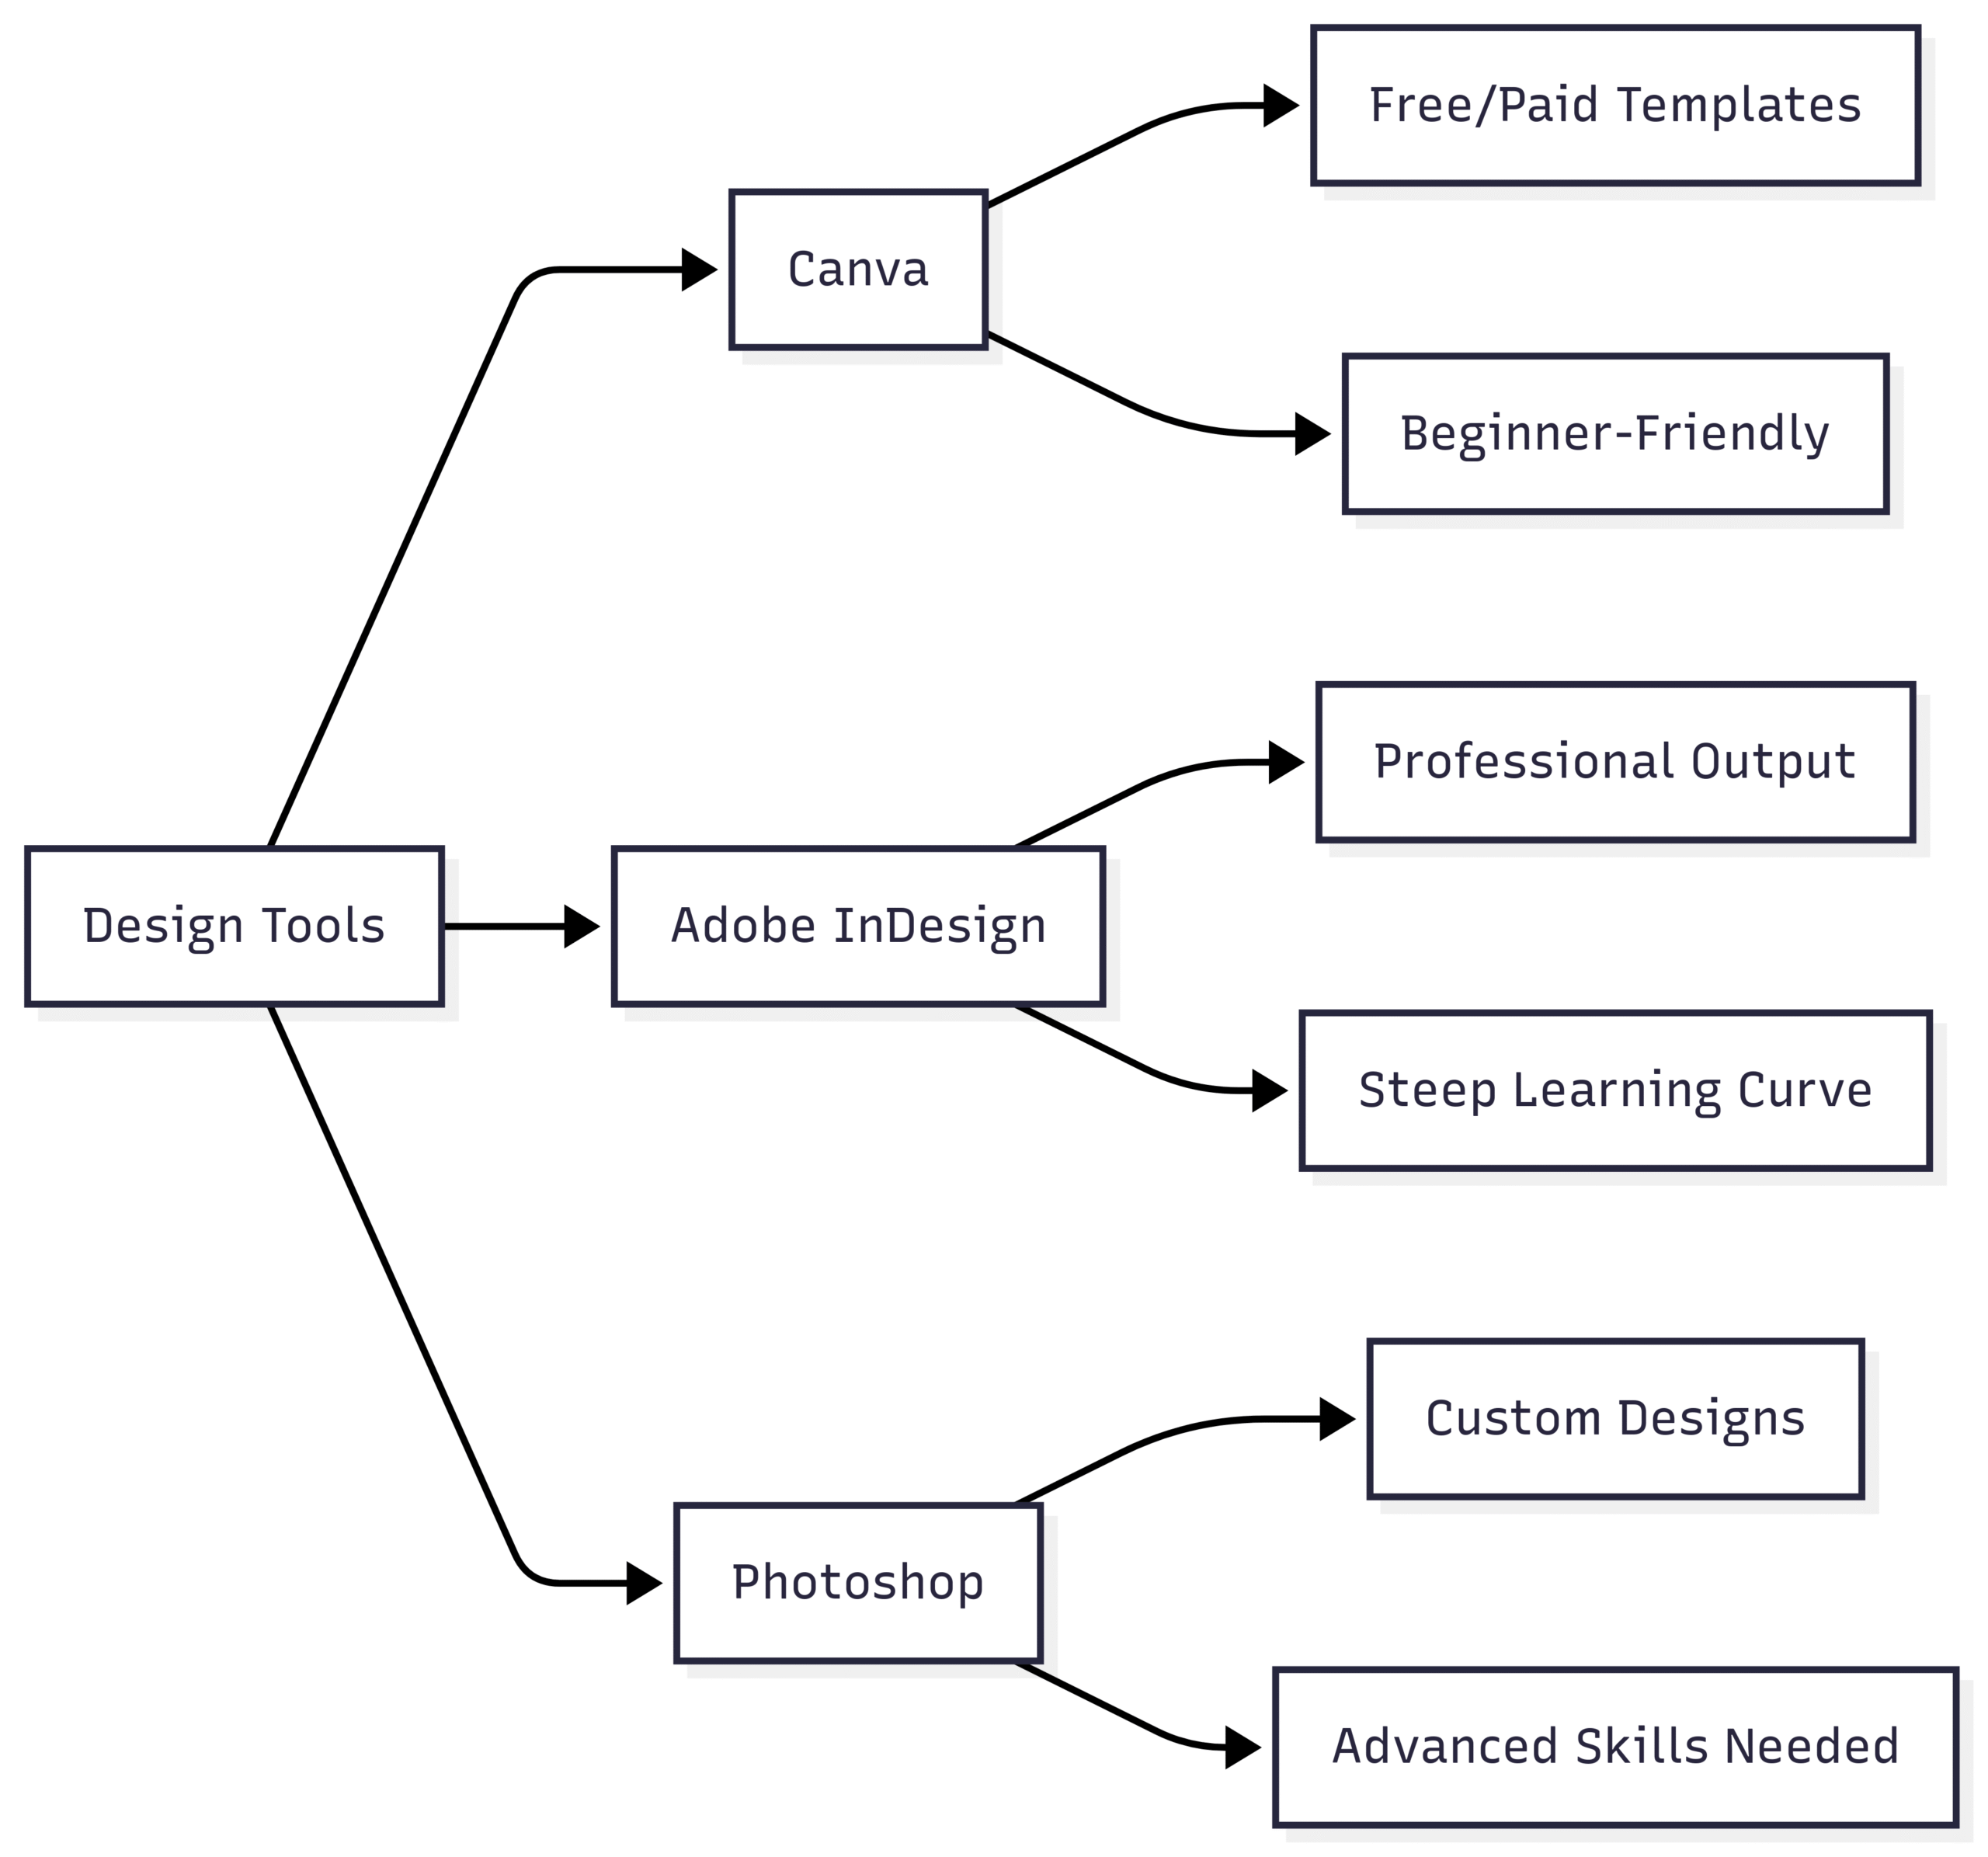
Use an Accessible Design Tool
You don’t need advanced design skills to create a stunning media kit. Popular tools include:
- Canva: Offers free and paid templates that are easy to customize. Ideal for beginners.
- Adobe InDesign: Great for professional designers but has a steeper learning curve.
- Photoshop: Useful for custom designs but less beginner-friendly.
Tip: Choose a tool you’re comfortable with. Canva is a popular choice for food bloggers due to its simplicity and flexibility. Ensure your template is editable so you can update it as your blog grows.
Chart: Design Tool Comparison
Update Regularly
Your media kit is a living document. Update it regularly to reflect your blog’s growth:
- Images: Refresh photos every 6 months to keep them current.
- Analytics: Update stats every 3 months to reflect recent performance.
- Full Review: Revise the entire media kit annually or after major achievements (e.g., a successful brand campaign).
Tip: Save time by keeping a master document with all your stats and visuals, so updates are quick and easy.
How to Use Your Media Kit
Once your media kit is ready, it’s time to put it to work. Here’s how to leverage it effectively:
Pitching Brands
Proactively reach out to brands that align with your niche. Research companies that share your audience’s interests (e.g., organic food brands for a health-focused blog). Attach your media kit to pitch emails or include a link to a downloadable PDF on your website.
Tip: Tailor your pitch to each brand, highlighting how your audience and services align with their goals. Avoid generic emails.
Responding to Inquiries
When brands reach out, send your media kit as a PDF or direct them to a dedicated media kit page on your blog. This saves time and ensures they have all the information they need to make a decision.
Hosting on Your Website
Consider creating a media kit page on your blog, as seen on sites like Kalejunkie or Pinch of Yum. This makes it easy for brands to find and download your kit. Update the page regularly to reflect your latest stats and offerings.
Tracking Partnerships
Use tools like Grocers List to organize your outreach, track responses, and manage ongoing partnerships. This keeps your collaboration process streamlined and professional.
Common Mistakes to Avoid
- Overloading with Data: Don’t include every stat or service. Focus on what’s most relevant to brands.
- Inconsistent Branding: Ensure your media kit matches your blog’s aesthetic to avoid confusion.
- Outdated Stats: Old data can mislead brands and hurt your credibility. Update regularly.
- Including Pricing: Avoid listing rates in your media kit. Discuss pricing during negotiations to maintain flexibility.
- Ignoring Competitors: Be cautious about showcasing partnerships with a brand’s competitors, as this could deter potential partners.
Inspiration from Top Food Bloggers
To spark ideas, study media kits from successful food bloggers:
- Pinch of Yum: Features a clean layout with clear stats, services, and past collaborations.
- Ambitious Kitchen: Showcases a vibrant, personal design that reflects her brand’s energy.
- Well Plated: Organizes partnership opportunities clearly, making it easy for brands to understand her offerings.
- Life Made Sweeter: Highlights press and collaborations to build credibility.
You can also explore platforms like Canva for media kit templates tailored to food bloggers. These provide a starting point that you can customize to fit your brand.
Final Thoughts
A media kit is your food blog’s most powerful asset for landing brand partnerships. It’s more than just a document—it’s a reflection of your professionalism, creativity, and potential. By crafting a media kit that’s concise, visually appealing, and tailored to your niche, you’ll make a strong first impression and open doors to exciting collaborations.
Start small, be authentic, and don’t wait until your stats are “perfect.” Brands value engagement, niche expertise, and a clear vision as much as they value numbers. With a well-designed media kit, you’re ready to pitch with confidence and build partnerships that elevate your food blog to new heights.
For additional support, tools like Grocers List can help you manage your outreach and keep your media kit organized. Take the first step today—create or refine your media kit and start connecting with your dream brands!
Please share these How to Design a Media Kit for Your Food Blog with your friends and do a comment below about your feedback.
We will meet you on next article.
Until you can read, How do you organize your desktop?