
How to Make Cooking Videos Online in 5 Easy Steps
Learn how to make cooking videos online in 5 easy steps with our guide! Create engaging, professional videos using Animoto’s tools and tips.
Cooking videos have become a global phenomenon, captivating audiences with mouthwatering dishes, clever hacks, and visually stunning content. From Tasty’s quick recipe clips to Gordon Ramsay’s detailed tutorials, food-related content dominates platforms like YouTube, Instagram, and TikTok. Google reports that food channel subscriptions have surged by 280% in a single year, reflecting the growing appetite for culinary content. Whether you’re a seasoned chef or a home cook with a passion for sharing recipes, creating cooking videos allows you to connect with a hungry audience. This comprehensive guide outlines five straightforward steps to produce professional, engaging cooking videos using tools like Animoto, a user-friendly online video editor. With the right equipment, techniques, and editing strategies, you’ll be crafting videos that rival the best in the industry.
Why Cooking Videos Are a Recipe for Success
Cooking videos resonate with audiences for several reasons. They combine education, entertainment, and aesthetic appeal, making them highly shareable and engaging. Platforms like YouTube report that how-to videos, including cooking tutorials, are among the most-watched categories. Short-form content, like Tasty’s viral clips, thrives on Instagram and TikTok, while long-form tutorials perform well on YouTube. The visual nature of cooking—vibrant ingredients, sizzling pans, and beautifully plated dishes—captures attention and triggers sensory responses. By mastering video creation, you can tap into this growing trend, build a following, and even drive traffic to your blog or business.
This guide will walk you through the process of creating compelling cooking videos, from gathering essential tools to editing and sharing your content. We’ll also provide advanced tips to elevate your videos, ensuring they stand out in a crowded digital space. Let’s get started with the tools you’ll need.
Step 1: Gather the Essential Tools for Cooking Videos
Before you start filming, you’ll need the right equipment to ensure high-quality production. While professional gear can enhance your videos, you don’t need to break the bank. Here’s a breakdown of the essential tools, along with specifications and approximate price ranges:
| Tool | Description | Specifications | Approx. Price Range |
|---|---|---|---|
| Camera | A smartphone (e.g., iPhone 13 or later) or DSLR/mirrorless camera for crisp visuals. | 4K video capability, 30fps minimum. Recommended: iPhone 13, Canon EOS M50. | $300–$1,200 |
| Tripod | Stabilizes your camera for steady shots, especially during hands-on cooking. | Adjustable height, lightweight. Recommended: Manfrotto Compact Action Tripod. | $30–$150 |
| Lighting Kit | Enhances visibility and makes food look appetizing with soft, even lighting. | 2–3 softbox lights, 5500K color temperature. Recommended: Neewer 660 LED Kit. | $50–$200 |
| Microphone | Captures clear audio for voiceovers or ambient kitchen sounds. | USB or lavalier mic. Recommended: Rode VideoMicro or Blue Yeti USB. | $50–$150 |
| Video Editor | Software to edit and polish your footage. Animoto is beginner-friendly. | Cloud-based, templates included. Subscription: Animoto Professional Plan. | $15–$33/month |
Choosing the Right Camera
Your camera is the backbone of your video. A modern smartphone, like an iPhone or high-end Android, can produce excellent 4K footage, making it a budget-friendly option. For a more professional setup, a DSLR or mirrorless camera offers superior control over focus and depth of field. Ensure your camera supports at least 1080p resolution at 30 frames per second for smooth, high-quality visuals.
Importance of a Tripod
Since cooking requires both hands, a tripod is non-negotiable. It ensures steady shots, whether you’re filming overhead or at an angle. Look for a tripod with adjustable height and a sturdy base to handle kitchen vibrations.
Lighting for Appetizing Shots
Good lighting makes food look vibrant and appealing. A basic lighting kit with two softbox lights and a color temperature of 5500K (daylight) is ideal for most kitchens. Position lights at 45-degree angles to avoid harsh shadows.
Audio Matters
Clear audio enhances the viewer’s experience, especially for voiceovers or capturing the sizzle of ingredients. A lavalier mic clipped to your clothing or a USB condenser mic for voiceovers works well. If you’re on a budget, your smartphone’s built-in mic can suffice for short clips.
Video Editing with Animoto
Animoto is a cloud-based video editor designed for beginners and professionals alike. Its drag-and-drop interface, customizable templates, and stock media library make it easy to create polished videos. The Professional Plan, priced at $33/month, offers 1080p exports, advanced customization, and access to Getty Images stock footage, which is perfect for supplementing your content.
With these tools in hand, you’re ready to start filming. Let’s move on to the recording process.
Step 2: Plan and Film Your Cooking Video
Creating a cooking video requires careful planning to ensure a smooth shoot and engaging final product. Follow these five steps to capture footage that captivates your audience:
1. Choose Your Platform and Format
Different platforms favor different video formats. Long-form content (5–15 minutes) performs best on YouTube, where viewers expect detailed tutorials. Short-form videos (15–60 seconds) thrive on Instagram, TikTok, and Facebook, where quick, eye-catching clips dominate. Animoto allows you to adjust your video’s aspect ratio (square, landscape, or vertical) to suit your chosen platform. For example:
- YouTube: 16:9 (landscape)
- Instagram/TikTok: 9:16 (vertical) or 1:1 (square)
- Facebook: 1:1 (square) for maximum feed visibility
Plan your video length and dimensions before filming to streamline editing later.
2. Film a Compelling Introduction
Your introduction sets the tone and hooks viewers within the first three seconds. Start with a mouthwatering shot of the finished dish, followed by a quick overview of the ingredients, tools, and any pre-prepped items. For example, show a sizzling steak on a plate, then cut to a neatly arranged mise en place. This approach, popularized by channels like Tasty, keeps viewers engaged.
3. Capture Every Step of the Recipe
Film each step of the cooking process, even if you plan to edit out some footage later. Use multiple angles—overhead, side, and close-up—to showcase techniques and ingredients. For instance, Gordon Ramsay’s “How to Finely Chop an Onion” video, with over 24 million views, uses close-ups to highlight knife skills. Include tips and tricks, like how to peel garlic quickly or prevent onions from burning, to add value.
4. Record the Serving Process
The transition from cooking to serving is a key moment. Show how you plate the dish, whether it’s slicing a pizza, drizzling sauce, or garnishing with herbs. This step builds anticipation and makes the final reveal more satisfying.
5. Showcase the Finished Product
The “money shot” is your chance to make the dish irresistible. Style the plate with colorful garnishes, use natural light if possible, and experiment with angles to highlight textures. For example, a close-up of a creamy dessert with a slow-motion spoon scoop can trigger sensory appeal. These shots also make excellent thumbnails or promotional stills.
Filming Workflow (Chart)
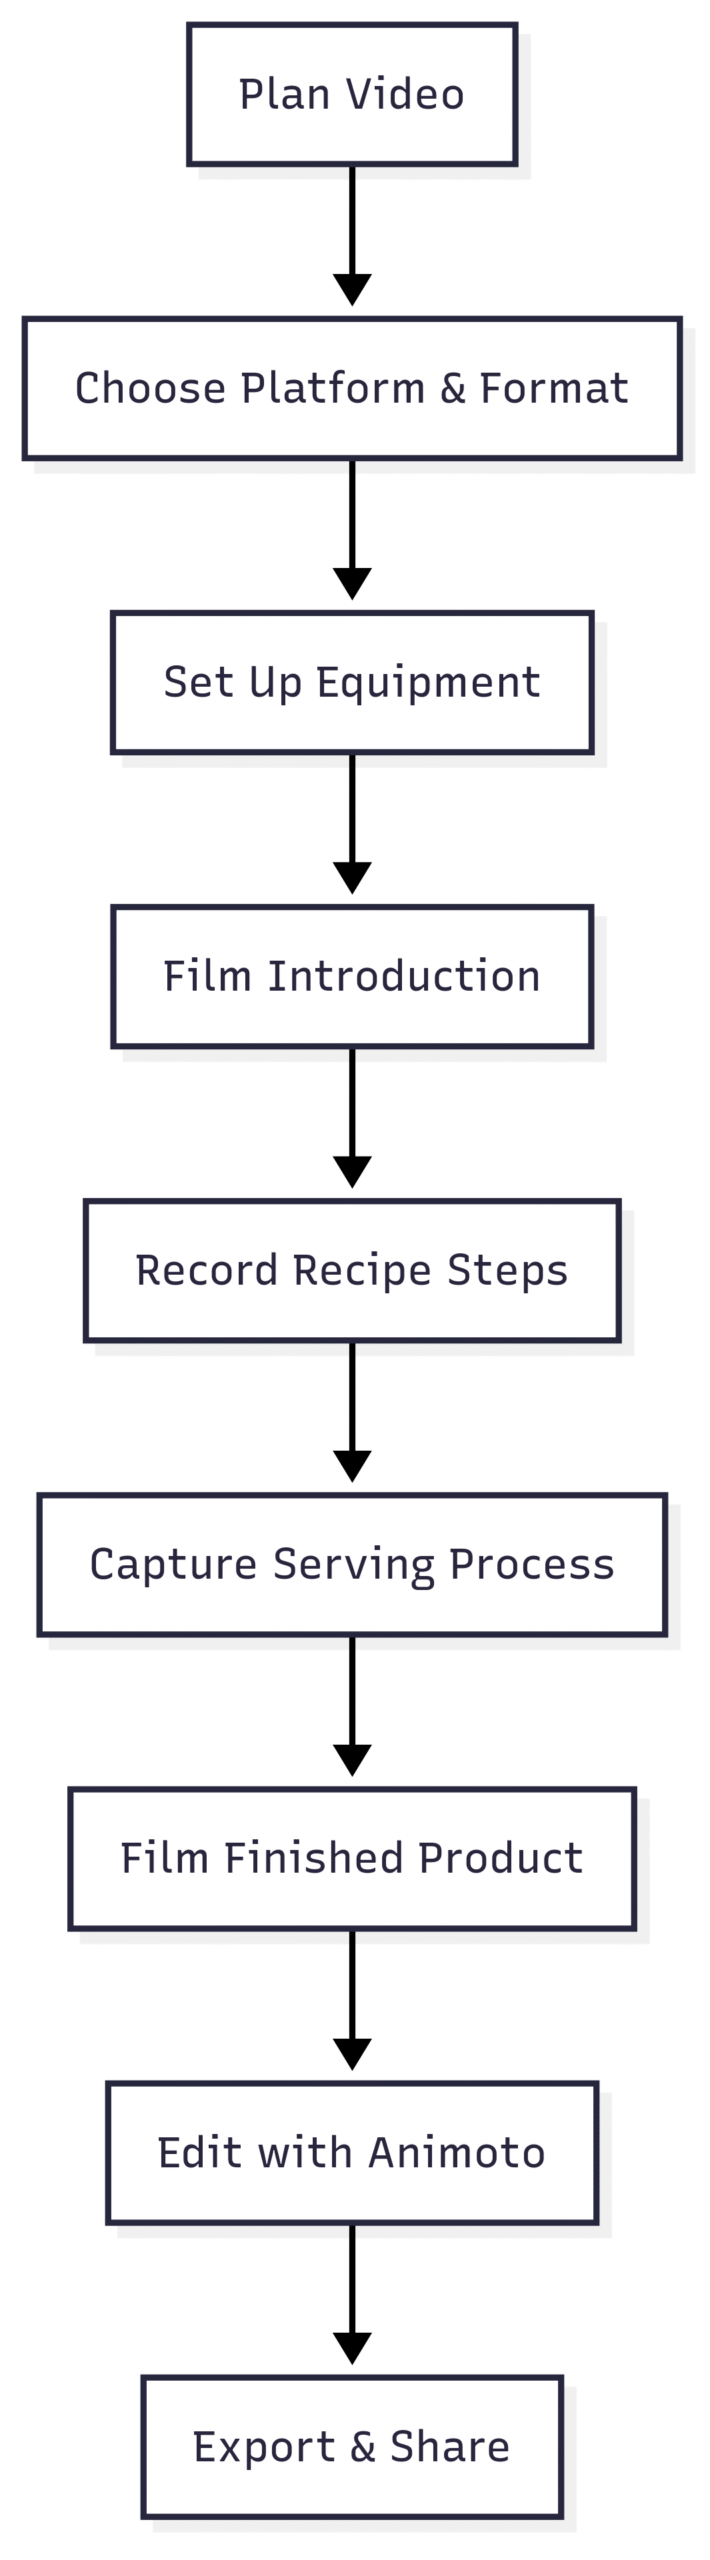
This workflow ensures you cover all necessary footage systematically.
3: Elevate Your Cooking Videos with Tasty Tips
To stand out in the crowded world of cooking content, focus on visual appeal and storytelling. Here are advanced tips to make your videos irresistible:
Focus on Visually Pleasing Shots
Use vibrant ingredients (e.g., bright vegetables, fresh herbs) and colorful cookware to enhance aesthetics. Experiment with unique angles, like an overhead shot of a bubbling sauce or a slow pan across a plated dish. Channels like Tasty excel at this, using close-ups of melting butter or sizzling garlic to engage viewers’ senses.
Craft an Exciting Introduction
Your intro should sell the dish. For example, start with a quick montage of the cooking process, ending with the finished product. Add text overlays like “Easy 10-Minute Pasta” to clarify the video’s value. This keeps viewers hooked beyond the critical first three seconds.
Trigger the Senses
Close-up shots of sensory moments—like steam rising from a hot dish or a knife cutting through a crispy crust—make viewers feel immersed. Use slow-motion or zoom-ins to emphasize textures and sounds, such as the crunch of fresh vegetables.
Cook with Precision and Care
Your cooking process should look as appealing as the final dish. Maintain a clean workspace, use deliberate movements, and avoid rushed or sloppy techniques. Viewers appreciate a polished, professional approach.
Keep the Conclusion Active
End with a dynamic final shot, such as sprinkling parsley, squeezing a lemon, or slicing a cake. This provides a sense of closure and leaves viewers hungry for more. Use these shots for thumbnails or cross-platform promotion.
Step 4: Edit Your Cooking Video with Animoto
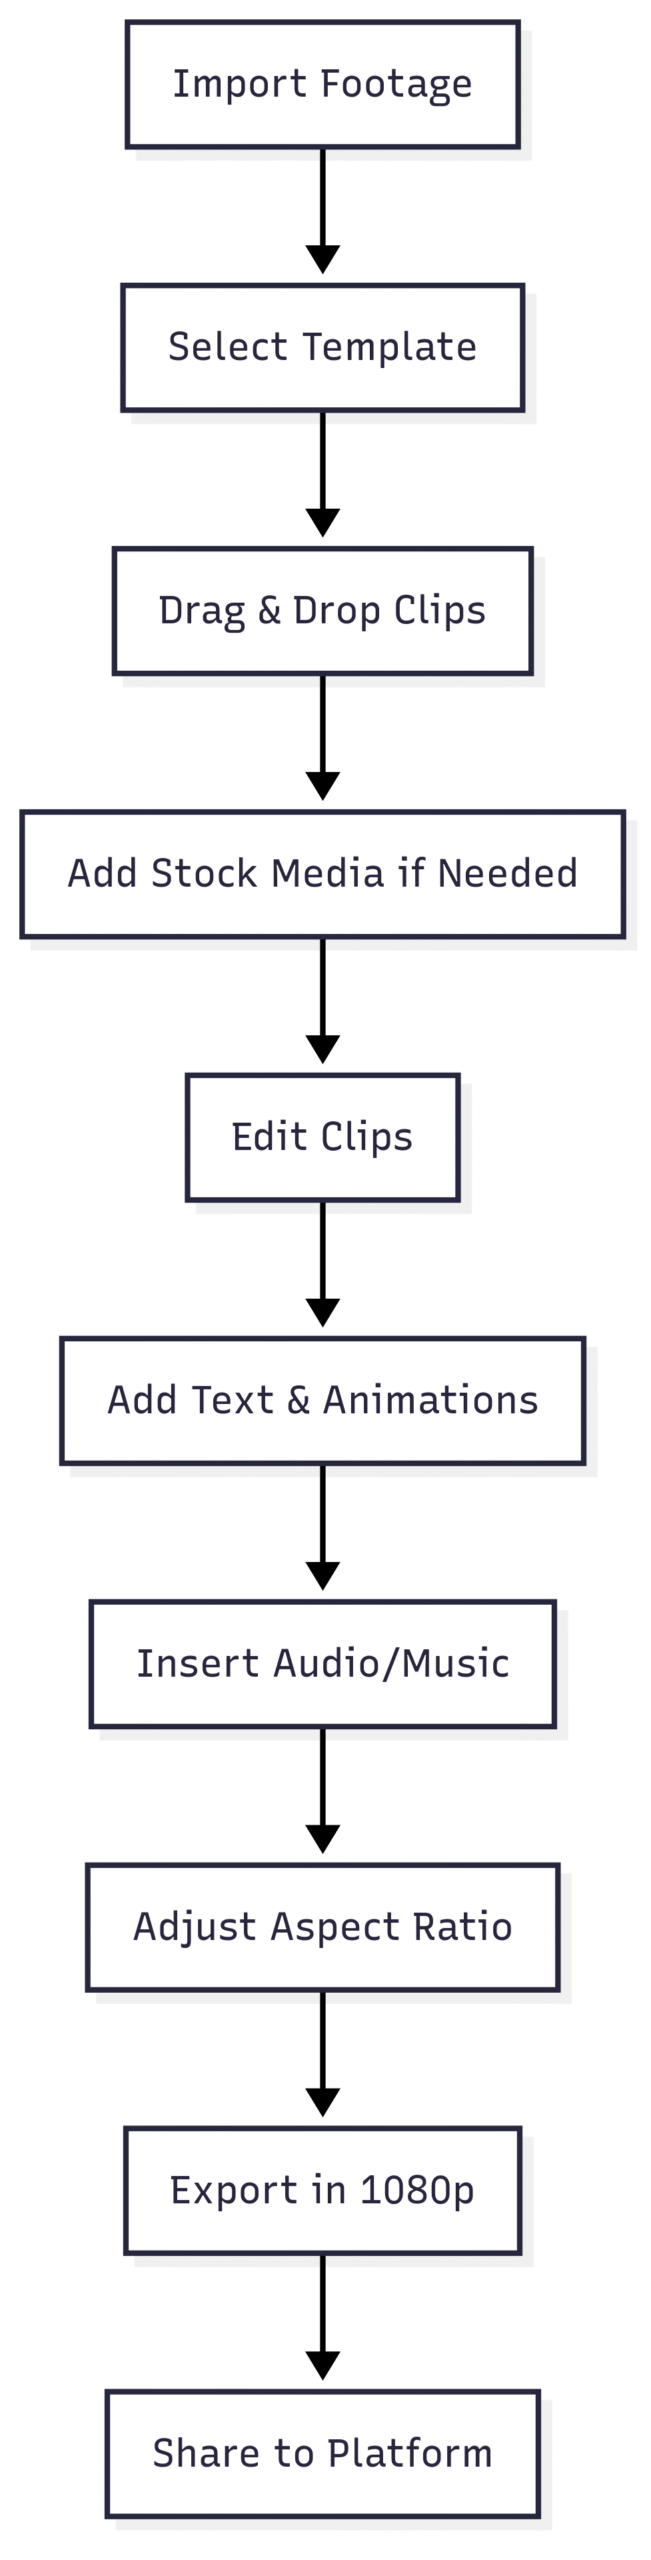
Editing transforms raw footage into a polished, engaging video. Animoto’s intuitive platform simplifies this process, even for beginners. Here’s how to edit your cooking video:
Choose a Template
Animoto offers a library of customizable templates tailored for cooking videos. Examples include:
- Vertical Recipe Template: Ideal for TikTok and Instagram Stories, with bold text and animations.
- How-To Guide Template: Clean, easy-to-follow layout for YouTube tutorials.
- Split-Screen Recipe Template: Eye-catching design to showcase multiple steps simultaneously.
Select a template or start from scratch for a unique look.
Upload and Organize Media
Drag and drop your video clips and photos into Animoto’s video builder. If环2: Organize and Label Clips
Label your video files clearly (e.g., “Intro_Shot.mp4” or “Step1_Cutting.mp4”) to streamline editing. If you’re missing footage, supplement with stock media from Animoto’s Getty Images library.
Customize Your Video
Edit clips to remove unnecessary pauses or mistakes. Adjust the aspect ratio to suit your platform. Add text overlays to list ingredients or steps, and use Animoto’s animated text effects for flair. Upload a voiceover or select music from Animoto’s library of thousands of tracks to enhance the mood.
Export and Share
Export your video in 1080p HD for crisp quality. Animoto allows direct sharing to platforms like YouTube, Instagram, or Facebook, or you can download the file for manual upload.
Editing Workflow (Chart)
Step 5: Share Your Cooking Video Strategically
Where and how you share your video impacts its reach and engagement. Tailor your approach to each platform’s strengths:
YouTube: Detailed Tutorials
YouTube is ideal for long-form content. Use horizontal (16:9) videos and prioritize clear audio, as viewers expect high-quality tutorials. Add a call to action (e.g., “Visit my blog for the full recipe”) in the video or description to drive traffic. Optimize your title and thumbnail with keywords like “Easy Chicken Stir-Fry Recipe” for searchability.
Facebook: Teaser Content
Facebook videos should be short (1–2 minutes) and square (1:1) to maximize feed visibility. Use clear text overlays, as many viewers watch without sound. Link to your website or blog to boost traffic.
Instagram: Brand Building
Instagram favors short, visually consistent videos (15 seconds for Stories, 60 seconds for feed posts). Use square or vertical formats and add animated text for engagement. Maintain a cohesive aesthetic to strengthen your brand.
Best Practices for Sharing
- Clear Text: Include easy-to-read instructions or ingredient lists in the video.
- Video Clips: Start with a short clip of the finished dish to hook viewers.
- Call to Action: Direct viewers to your website, product page, or next video.
- Branding: Add a logo watermark to reinforce your brand identity.
Success Story: Mezzetta Foods
Mezzetta Foods used Animoto to create viral cooking videos, reducing production time and costs while boosting engagement on social platforms. According to Deborah Harkins, Creative Director at Mezzetta, “Animoto has helped us publish videos more often and achieve higher engagement in key social channels.” Their success highlights the power of accessible editing tools for creating professional content.
Visual Inspiration: Tasty’s Approach
Tasty’s Loaded Cheese-Stuffed Mashed Potato Balls video is a masterclass in cooking content. Its simple yet dynamic shots, clear text overlays, and close-up visuals make it accessible to creators at any level. Tasty’s editing emphasizes sensory details—like the crunch of fried potato balls—while maintaining a fast-paced, engaging flow. Use their videos as a benchmark for balancing information and entertainment.
Conclusion
Creating cooking videos is an exciting way to share your culinary passion with a global audience. By gathering essential tools (camera, tripod, lighting, mic, and Animoto), planning your shoot, filming strategically, editing with care, and sharing on the right platforms, you can produce videos that captivate and inspire. Animoto’s user-friendly features, from templates to stock media, make it easy to craft professional content, even as a beginner. Start filming today, and watch your cooking videos sizzle online.
Sign up for a free Animoto account to begin creating irresistible cooking videos that leave your audience hungry for more.
Please share these How to Make Cooking Videos Online in 5 Easy Steps with your friends and do a comment below about your feedback.
We will meet you on next article.
Until you can read, Free Outro Maker: Create YouTube Video Outros – Canva


Great tips! I’ve been wanting to start my own cooking channel, and this makes it seem so doable. Love the step-by-step breakdown!
This guide really breaks it down nicely! I’ve been wanting to start a cooking channel, and these 5 steps make it feel way more achievable. Thanks for sharing such practical tips — especially loved the part about lighting and keeping it simple. Can’t wait to try this out!