
How to Set Up GA4: A Complete Step-by-Step Guide
Learn how to set up Google Analytics 4 (GA4) with our step-by-step guide. Track website performance, events, and conversions effectively.
Google Analytics 4 (GA4) is a powerful, free tool designed to track and analyze user interactions across websites and apps. Unlike its predecessor, Universal Analytics (UA), GA4 offers a more flexible, event-based tracking system, providing deeper insights into user behavior, demographics, and website performance. With UA no longer processing data, transitioning to GA4 is essential for businesses aiming to monitor traffic, optimize conversions, and understand their audience. This comprehensive guide walks you through every step of setting up GA4, from account creation to tracking events and importing data, ensuring you can leverage its full potential to drive data-informed decisions.
Why GA4 Matters for Your Business
GA4 is a robust analytics platform that provides actionable insights into your website or app’s performance. It tracks critical metrics such as:
- User Traffic: Monitor the number of visitors and spot trends over time.
- Demographics: Understand your audience’s location, gender, interests, and language.
- Popular Pages: Identify high-performing pages and their role in driving conversions.
- Events and Conversions: Track user interactions like form submissions or purchases.
- Traffic Sources: Analyze where users come from, including organic search, referrals, or direct visits.
- Device Insights: Learn which devices and browsers your audience uses.
- Purchase Journeys: Map the customer journey from first visit to checkout, identifying drop-off points.
Unlike UA, which relied on “hits” for tracking, GA4 uses an event-based model, treating all interactions—page views, clicks, or form submissions—as events. This shift allows for more granular tracking and cross-platform analysis, as GA4 supports multiple data streams from websites and apps within a single property. With no cost to use, GA4 is accessible to businesses of all sizes, making it an indispensable tool for optimizing digital performance.
GA4 vs. Universal Analytics: Key Differences
Understanding how GA4 differs from UA is crucial for a smooth transition:
| Feature | Universal Analytics (UA) | Google Analytics 4 (GA4) |
|---|---|---|
| Tracking Model | Hit-based (page views, events, etc.) | Event-based (all interactions are events) |
| Account Structure | Multiple properties with views | Multiple properties, no views, multiple streams |
| Data Streams | Single source (website or app) | Multiple sources (website and app) |
| Data Processing | Stopped on July 1, 2023 | Ongoing, with advanced reporting capabilities |
| Event Tracking | Specific hit types for events | All interactions are events |
GA4’s ability to handle multiple data streams and its focus on events make it more adaptable for modern, multi-platform businesses. If you’re still using UA, Google’s GA4 Setup Assistant can streamline migration, but this guide assumes a fresh GA4 setup.
Step-by-Step Guide to Setting Up GA4
Setting up GA4 involves creating an account, configuring a property, adding a data stream, installing tracking code, and verifying the setup. Below is a detailed walkthrough of each step.
Step 1: Create a Google Analytics Account
A Google Analytics account is the foundation for using GA4. If you don’t have one, follow these steps:
- Visit Google Analytics: Go to analytics.google.com and sign in with your Google account. If you don’t have a Google account, click “Create account” on the login screen.
- Access Admin Settings: Click the gear icon in the left sidebar to open the Admin dashboard.
- Create a New Account: Click “+ Create” > “Account.” Provide an account name (e.g., your business name) and configure data-sharing settings to control how your data is shared with Google.
- Proceed: Click “Next” to move to property creation.
If you already have a Google Analytics account, skip to creating a GA4 property.
Step 2: Create a GA4 Property
A GA4 property collects data from your website or app. Here’s how to set it up:
- Navigate to Property Creation: In the Admin dashboard, click “Create” > “Property.”
- Enter Property Details: Provide a property name (minimum four characters, e.g., “My Website”). Select your reporting time zone and currency. Note that changing the time zone affects only future data and may cause temporary data discrepancies.
- Specify Industry and Business Size: Choose your industry category (e.g., Retail, Technology) and business size (e.g., Small, Medium).
- Define Business Objectives: Select at least one objective (e.g., “Generate more leads” or “Get baseline reports”). GA4 tailors default reports based on these selections.
- Accept Terms: Review and accept the Google Analytics Terms of Service and, if applicable, the Data Processing Terms for GDPR compliance.
- Create Property: Click “Create” to finalize.
Step 3: Set Up a Data Stream
A data stream sends data from your website or app to your GA4 property. For websites, follow these steps:
- Access Data Streams: In the Admin dashboard, under “Property settings,” select “Data collection and modification” > “Data Streams.”
- Add a Web Stream: Click “Add stream” and select “Web.”
- Enter Website Details: Input your website’s URL (e.g., https://example.com) and a stream name (e.g., “Main Website Stream”).
- Enable Enhanced Measurement: Check the box for Enhanced Measurement to automatically track common interactions like page views, scrolls, and clicks.
- Create Stream: Click “Create stream” and note the measurement ID (e.g., G-XXXXXXXXXX) displayed in the “Web stream details” window.
Step 4: Install the GA4 Tracking Code
To collect data, you must install the GA4 tracking code on your website. There are three methods: using Google Tag Manager (GTM), a website builder integration, or manual installation.
Method 1: Install GA4 with Google Tag Manager
GTM simplifies adding tracking codes without editing your website’s code directly. If GTM isn’t set up, create a GTM account and container at tagmanager.google.com. Then:
- Create a New Tag: In GTM, select your website’s container and click “Add a new tag.” Name it (e.g., “GA4 Setup”).
- Configure Tag: Click “Tag Configuration” and select “Google Tag.” Enter your GA4 measurement ID.
- Set Trigger: Click “Triggering” and choose “Initialization – All Pages” to load the tag on every page.
- Test the Tag: Click “Preview” to open Google Tag Assistant. Enter your website URL, click “Connect,” and verify the GA4 tag appears under “Tags Fired.”
- Publish Changes: Click “Submit,” name the version (e.g., “GA4 Installed”), and click “Publish.”
Method 2: Install GA4 Using a Website Builder Integration
Website builders like Squarespace, Wix, or WordPress (via plugins) offer native GA4 integration:
- Squarespace/Wix: Access your site’s analytics settings, paste your GA4 measurement ID, and save. Refer to platform-specific guides for detailed steps.
- WordPress with Site Kit:
- Log in to your WordPress admin dashboard.
- Go to “Plugins” > “Add New Plugin” and search for “Site Kit by Google.”
- Install and activate the plugin.
- Follow the setup wizard, sign in with Google, and select your GA4 account, property, and data stream.
- Click “Configure Analytics” to complete the integration.
Method 3: Install GA4 Manually
For websites without GTM or integrations, manually add the GA4 tracking code:
- Access the Code: In GA4’s Admin dashboard, go to “Data Streams,” select your web stream, and click “View tag instructions” > “Install manually.”
- Copy the Code: Copy the provided global site tag (gtag.js snippet).
- Paste the Code: Insert the snippet immediately after the opening
<head>tag on every page of your website. If your site uses a CMS with a header.php file, add it there for site-wide implementation. - Save Changes: Update your website’s code.
Pro Tip: If coding isn’t your strength, consult a developer to avoid errors.
Step 5: Verify Your GA4 Setup
Ensure GA4 is tracking data correctly:
- Use DebugView: In GA4, navigate to “Reports” > “DebugView” to monitor real-time event collection.
- Check with Google Tag Assistant: Visit tagassistant.google.com, enter your website URL, and confirm the GA4 tag is firing correctly.
Tracking Events and Conversions in GA4
GA4’s event-based model tracks all user interactions as events, including page views, form submissions, and purchases. Enhanced Measurement automatically captures common events, but you can configure custom events for specific actions.
Viewing Events
- Access Event Reports: In GA4, go to “Reports” > “Engagement” > “Events.”
- Analyze Metrics: For a selected date range, view:
- Event count (total triggers)
- Total users (unique users triggering the event)
- Event count per user (average triggers)
- Total revenue (if applicable)
- Drill Down: Click an event (e.g.,
user_engagement) for detailed metrics like event count by country or gender. - Create Explorations: Use GA4’s “Explorations” for custom event reports tailored to your needs.
Setting Up and Tracking Conversions
Conversions are events tied to business goals, such as bookings or downloads. To track them:
- Mark Events as Conversions: In GA4, go to “Events,” select an event, and toggle “Mark as conversion.”
- View Conversion Reports: Navigate to “Reports” > “Engagement” > “Conversions” to see:
- Conversion count
- Total users
- Total revenue
- Analyze by Attribute: Use other GA4 reports (e.g., Pages and screens) to track conversions by page or traffic source.
Importing Data into GA4
GA4 allows you to import external data (e.g., from CRM tools) to centralize analytics. Supported data types include ad cost, item data, user IDs, and offline events. Here’s how:
- Access Data Import: In the Admin dashboard, go to “Data collection and modification” > “Data import.”
- Create Data Source: Click “Create data source,” name it, and select the data type (e.g., “User ID data”).
- Choose Import Method:
- Manual CSV Upload: Upload a CSV file and map its fields to GA4’s fields.
- SFTP Import: Enter SFTP server details, set an import schedule, and add GA4’s public key to your server.
- Start Import: Click “Import” to process the data.
Imported data integrates with GA4’s reports, enabling comprehensive analysis.
Types of GA4 Analyses
GA4 provides a wide range of analytical capabilities to optimize your website or app:
| Analysis Type | Description |
|---|---|
| User Traffic | Tracks total visitors and trends over time. |
| Demographics | Details audience attributes like country, gender, and interests. |
| Popular Pages | Identifies high-traffic pages and their conversion performance. |
| Events | Monitors all user interactions, from clicks to form submissions. |
| Conversions | Tracks goal-oriented events like purchases or sign-ups. |
| Traffic Sources | Analyzes sources like organic search, referrals, or email campaigns. |
| Device Usage | Distinguishes between desktop, mobile, browsers, and operating systems. |
| Purchase Journeys | Maps the customer journey, highlighting drop-off points in the funnel. |
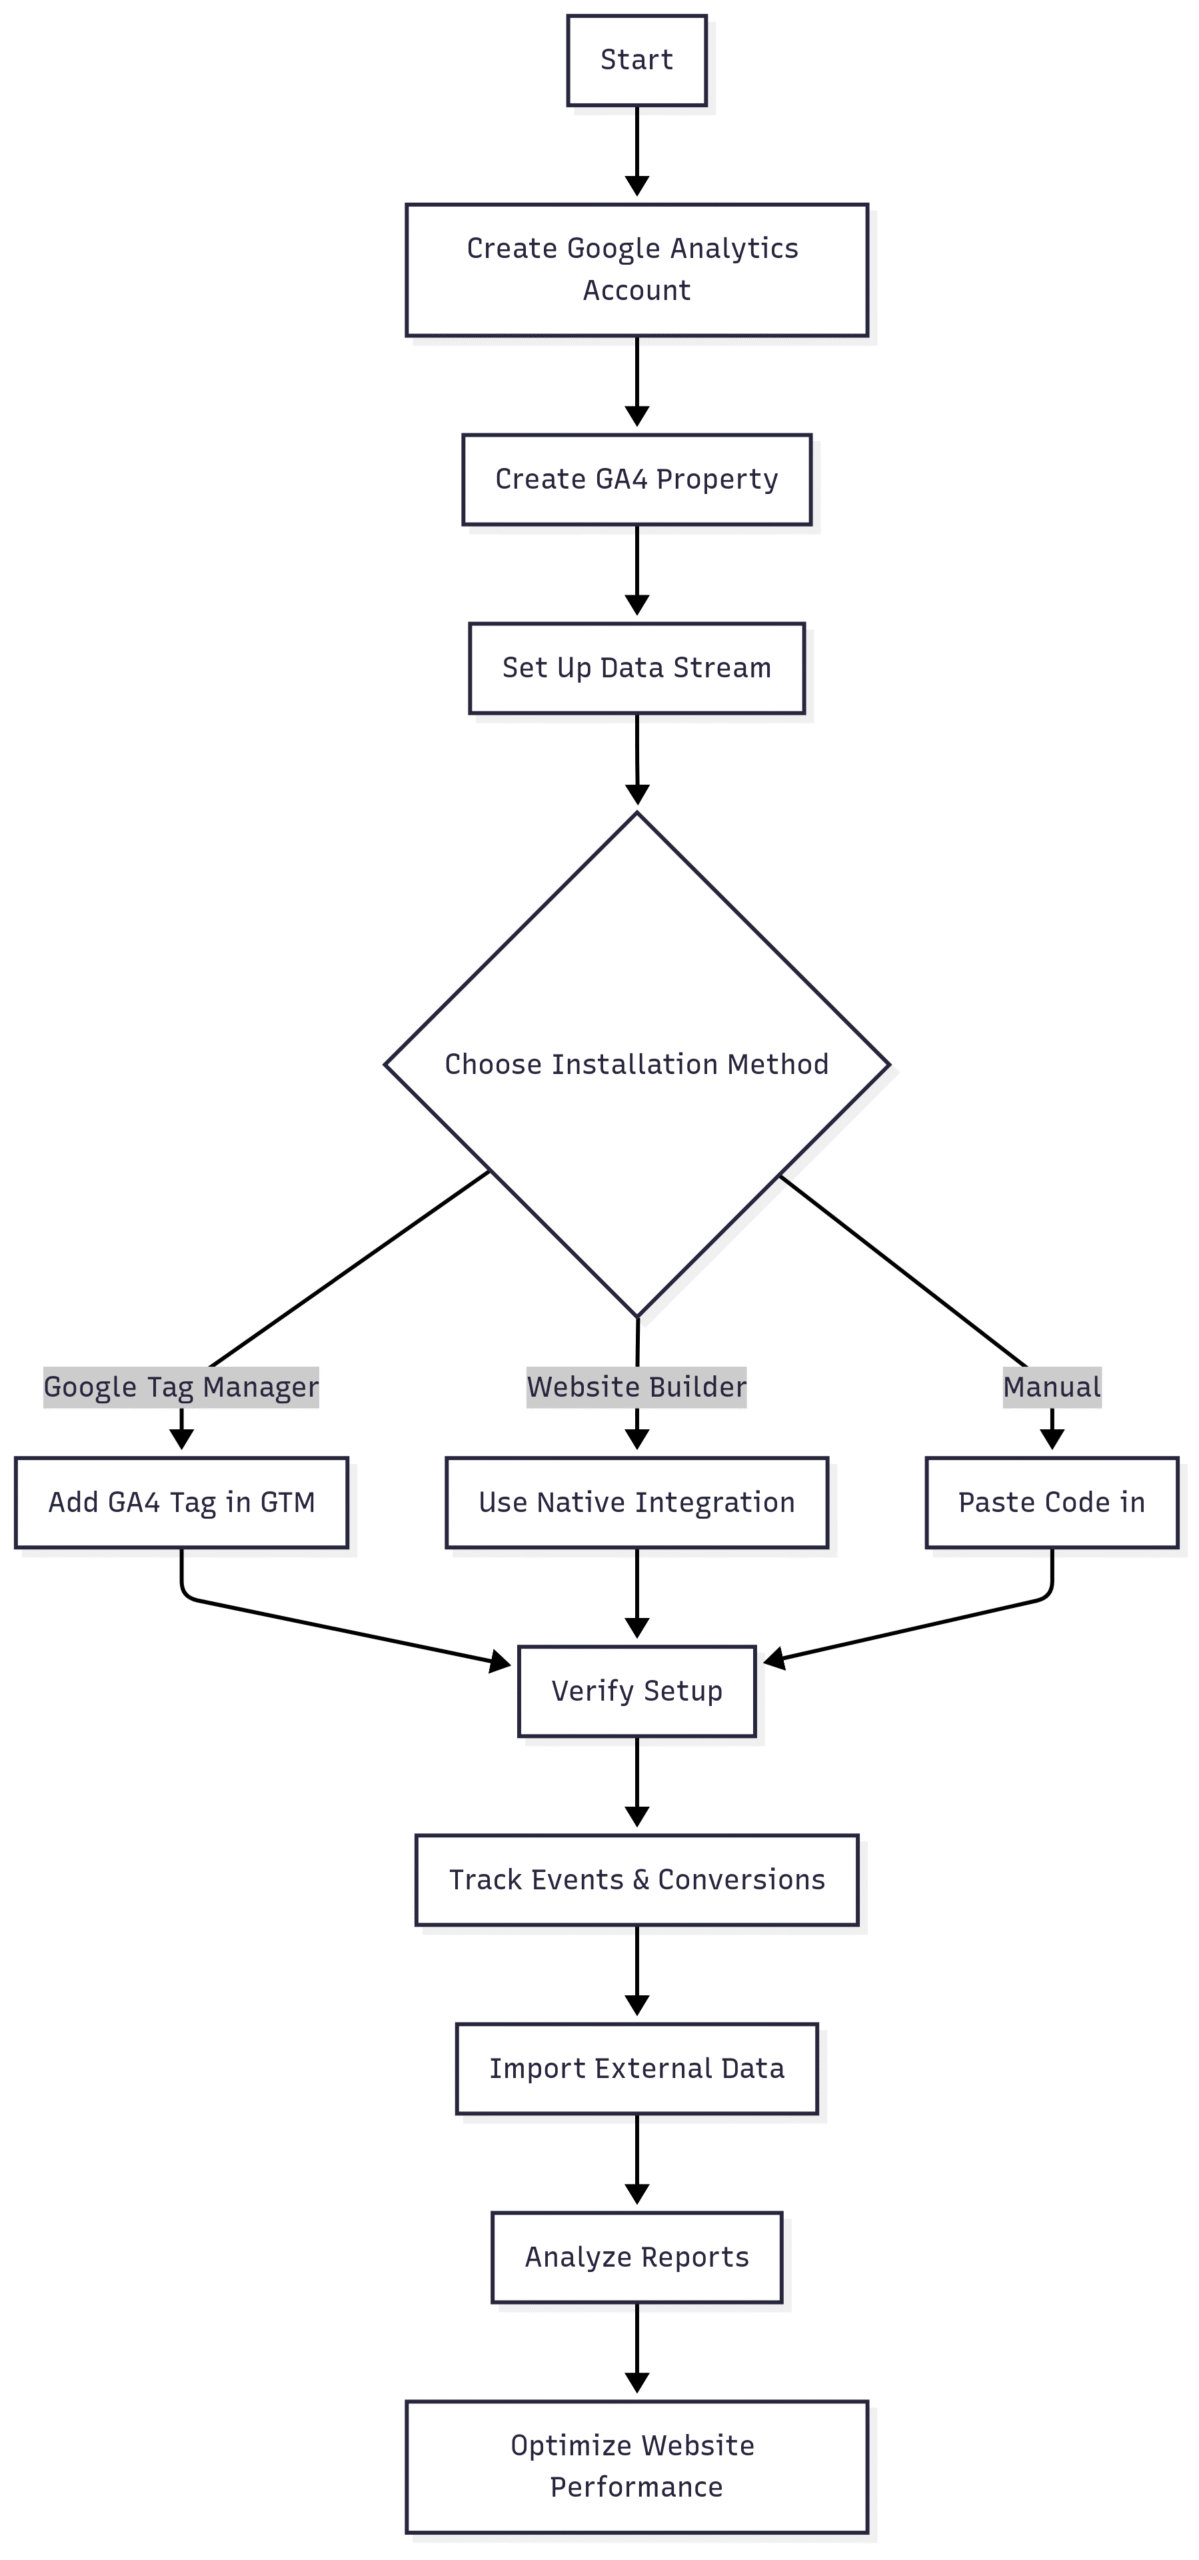
Visualizing GA4 Data with Mermaid
To illustrate the GA4 setup process, here’s a flowchart:
Enhancing GA4 with Third-Party Tools
To maximize GA4’s value, integrate it with tools like:
- AI Narratives for GA4: Generates easy-to-read reports with actionable recommendations for improving page views, conversions, and revenue.
- Semrush Organic Traffic Insights: Combines GA4, Google Search Console, and Semrush data to reveal keyword performance, ranking positions, and traffic share.
Both tools offer free trials with a Semrush account, enhancing GA4’s default reports.
Best Practices for GA4 Success
- Regularly Review Reports: Monitor traffic, events, and conversions to identify trends.
- Leverage Enhanced Measurement: Enable it to capture common interactions without custom coding.
- Set Clear Objectives: Align GA4’s reports with your business goals for relevant insights.
- Test Your Setup: Use DebugView and Google Tag Assistant to ensure accurate data collection.
- Integrate External Data: Combine GA4 with CRM or ad data for a holistic view.
Pricing and Specifications
GA4 is free, with no usage limits for standard features. You can create up to 2,000 properties per account (contact Google support to increase this limit).
| Feature | Specification |
|---|---|
| Cost | Free |
| Properties per Account | Up to 2,000 (expandable via support) |
| Data Streams | Multiple (website and app) |
| Event Tracking | Unlimited, with Enhanced Measurement |
| Integration Tools | GTM, Squarespace, Wix, WordPress (via plugins) |
Conclusion
Setting up Google Analytics 4 is a straightforward process that unlocks powerful insights into your website or app’s performance. By creating an account, configuring a property, adding a data stream, and installing the tracking code, you can start tracking user behavior, events, and conversions. GA4’s event-based model and multi-stream capabilities make it a significant upgrade over Universal Analytics, offering flexibility for modern digital businesses. Enhance your setup with tools like AI Narratives and Semrush for deeper insights and actionable recommendations. With no cost and robust features, GA4 is a must-have for optimizing your online presence and driving business growth.
Please share these How to Set Up GA4: A Complete Step-by-Step Guide with your friends and do a comment below about your feedback.
We will meet you on next article.
Until you can read, How to Design a Media Kit for Your Food Blog