Learning to Shoot in Manual Mode: Comprehensive Guide
Photography is an art form that thrives on control and creativity. While auto and semi-automatic modes like Aperture Priority (A/Av) or Shutter Priority (S/Tv) can produce decent results, they often limit your ability to fully express your vision. Manual mode, denoted as “M” on your camera’s dial, hands you the reins, allowing precise adjustments to ISO, aperture, and shutter speed—the core components of the exposure triangle. Mastering these settings empowers you to craft images with intentional exposure, depth of field, and motion effects, whether you’re shooting portraits, action, landscapes, or low-light scenes.
This guide is designed for amateur photographers ready to push beyond auto settings and for intermediates seeking to refine their skills. We’ll explore the exposure triangle in depth, provide a step-by-step process for shooting in manual mode, offer scenario-specific settings, debunk myths about manual mode, and include troubleshooting tips to address common issues. Tables, charts, and diagrams will clarify concepts, and gear recommendations with specifications and pricing will help you choose the right tools. By the end, you’ll have the knowledge and confidence to shoot in manual mode like a pro, unlocking your creative potential.
Why Shoot in Manual Mode?
Manual mode is the gold standard for photographers who crave full control. Unlike auto mode, which lets the camera dictate settings, or semi-automatic modes, which split control between you and the camera, manual mode lets you adjust every parameter. This flexibility is crucial for:
- Creative Control: Want a dreamy portrait with a blurry background? Or a tack-sharp landscape? Manual mode lets you prioritize aperture or shutter speed to achieve your vision.
- Consistency: In stable lighting, manual mode ensures consistent exposure across shots, unlike auto modes that may shift settings unpredictably.
- Learning Exposure: Adjusting ISO, aperture, and shutter speed manually deepens your understanding of light and camera mechanics, making you a better photographer.
- Special Scenarios: Night photography, studio work, or intentional over/underexposure for artistic effects demand manual control.
However, manual mode isn’t always ideal. It’s slower to adjust, making it less suited for fast-paced scenarios like wildlife or sports photography, where semi-automatic modes like Shutter Priority can react faster to changing light or motion. Understanding when to use manual mode—and when to switch to alternatives—is part of mastering photography.
The Exposure Triangle: The Foundation of Manual Mode
The exposure triangle—ISO, aperture, and shutter speed—determines how bright or dark your image is (exposure) and influences creative aspects like depth of field and motion blur. Balancing these settings is the essence of manual mode. Let’s break each component down, including practical applications, gear considerations, and visual aids.
ISO: Controlling Light Sensitivity
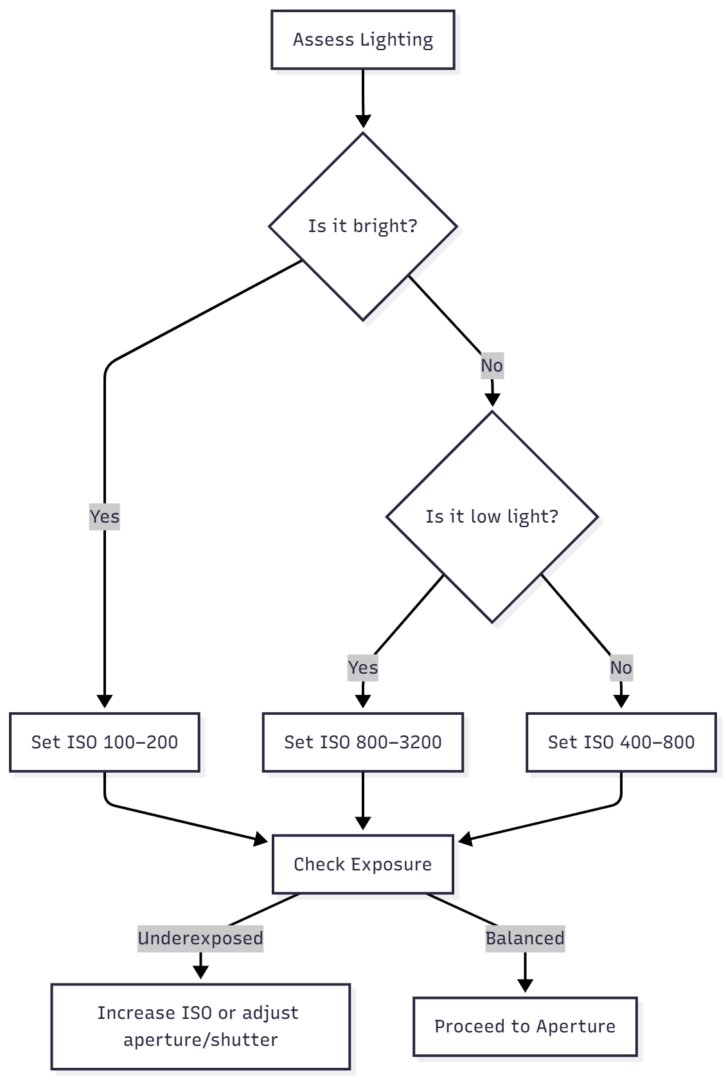
ISO governs your camera sensor’s sensitivity to light. A low ISO (e.g., 100) produces clean, noise-free images but requires ample light. A high ISO (e.g., 3200) boosts sensitivity for low-light conditions but introduces grainy noise, which can degrade image quality.
- Base ISO: Most cameras offer a base ISO of 100 or 200, ideal for bright daylight. For example, the Canon EOS Rebel T8i ($750) has a base ISO of 100, while the Sony A7 IV ($2,500) extends to ISO 50 for cleaner images.
- High ISO Use Cases: In dim settings like indoor events or night street photography, ISO 800–6400 is common. High-end cameras like the Nikon Z9 ($5,500) handle ISO 25600 with minimal noise, but budget models struggle beyond 6400.
- Practical Tip: Start at the lowest ISO possible to minimize noise. Increase only when you can’t compensate with a slower shutter speed or wider aperture without compromising your creative intent.
ISO Settings Table:
| Lighting Condition | ISO Range | Noise Level | Example Use Case | Recommended Gear |
|---|---|---|---|---|
| Bright Sunlight | 100–200 | Minimal | Outdoor portraits, landscapes | Entry-level DSLR (e.g., Nikon D3500, $500) |
| Overcast/Shade | 200–400 | Low | Street photography, cloudy days | Mid-range mirrorless (e.g., Fujifilm X-T5, $1,700) |
| Indoor, Moderate Light | 400–800 | Moderate | Indoor events, portrait sessions | Full-frame (e.g., Canon EOS R6, $2,000) |
| Low Light/Night | 800–3200 | Noticeable | Night streets, evening events | Pro camera (e.g., Sony A1, $6,500) |
| Extreme Low Light | 3200–12800+ | High | Astrophotography, dark interiors | High-ISO capable (e.g., Nikon Z6 II, $2,000) |
To illustrate ISO’s role in the exposure process, here’s a flowchart:
Aperture: Depth of Field and Light Intake
Aperture is the opening in your lens, measured in f-stops. A low f-stop (e.g., f/1.4) means a wide opening, letting in more light and creating a shallow depth of field (blurry background). A high f-stop (e.g., f/16) narrows the opening, reducing light but increasing depth of field for sharper foreground-to-background focus.
- Wide Apertures (f/1.4–f/2.8): Ideal for portraits or low-light shooting. Lenses like the Sigma 35mm f/1.4 Art ($900) deliver stunning bokeh.
- Narrow Apertures (f/8–f/16): Best for landscapes or group shots requiring deep focus. Use a tripod like the Manfrotto BeFree Advanced ($190) for stability in low light.
- Lens Considerations: Prime lenses offer wider apertures than zooms. The Canon RF 50mm f/1.2L ($2,300) is a premium choice for shallow depth of field, while the Tamron 28-75mm f/2.8 ($900) is a versatile zoom.
Aperture Cheat Sheet:
| f-Stop Range | Light Intake | Depth of Field | Best For | Lens Example |
|---|---|---|---|---|
| f/1.4–f/2.8 | High | Shallow | Portraits, low-light | Sony FE 85mm f/1.4 GM ($1,800) |
| f/4–f/5.6 | Medium | Moderate | Group shots, street | Nikon AF-S 24-70mm f/2.8E ($2,100) |
| f/8–f/11 | Low | Deep | Landscapes, interiors | Canon EF 16-35mm f/4L ($1,100) |
| f/16–f/22 | Very Low | Very Deep | Macro, architecture | Sigma 105mm f/2.8 Macro ($800) |
Shutter Speed: Motion Control and Exposure
Shutter speed determines how long the sensor is exposed to light. Fast speeds (e.g., 1/1000s) freeze action but reduce light, while slow speeds (e.g., 1/30s) allow more light but risk motion blur or camera shake without stabilization.
- Fast Shutter Speeds (1/500s+): Essential for sports, wildlife, or street photography. Pair with higher ISO in low light.
- Slow Shutter Speeds (1/60s or slower): Create artistic blur (e.g., silky waterfalls) or enable low-light shooting. Use a tripod like the Vanguard Alta Pro 2+ ($200) for stability.
- Handheld Rule: To avoid camera shake, use a shutter speed of 1/(focal length). For a 50mm lens, shoot at 1/50s or faster.
Shutter Speed Guidelines:
| Scenario | Shutter Speed Range | Effect | Equipment Needed |
|---|---|---|---|
| Freezing Action | 1/500s–1/8000s | Sharp motion freeze | None (if light sufficient) |
| General Photography | 1/125s–1/250s | Balanced sharpness | Handheld OK |
| Motion Blur | 1/30s–1s | Artistic blur | Tripod recommended |
| Long Exposure | 1s–30s+ | Star trails, light painting | Tripod essential (e.g., Gitzo Mountaineer, $1,000) |
Additional Settings: White Balance and Metering
- White Balance (WB): Adjusts color temperature to match the light source (e.g., 5200K for daylight, 3200K for tungsten). Use presets (e.g., Daylight, Shade) or manual Kelvin settings for accuracy. Incorrect WB can cause unwanted color casts, like yellowish indoor shots.
- Metering Mode: Determines how the camera evaluates light. Matrix/Evaluative metering is versatile for most scenes, while Spot metering is precise for subjects like faces in portraits. Set to Matrix for beginners, switching to Spot for advanced control.
White Balance Cheat Sheet:
| Light Source | Kelvin Range | Preset | Use Case |
|---|---|---|---|
| Daylight | 5000–5500K | Daylight | Outdoor sunny shots |
| Cloudy | 6000–7000K | Cloudy | Overcast days |
| Tungsten | 3000–3500K | Tungsten | Indoor lighting |
| Fluorescent | 4000–4500K | Fluorescent | Office or commercial spaces |
Step-by-Step Process for Shooting in Manual Mode
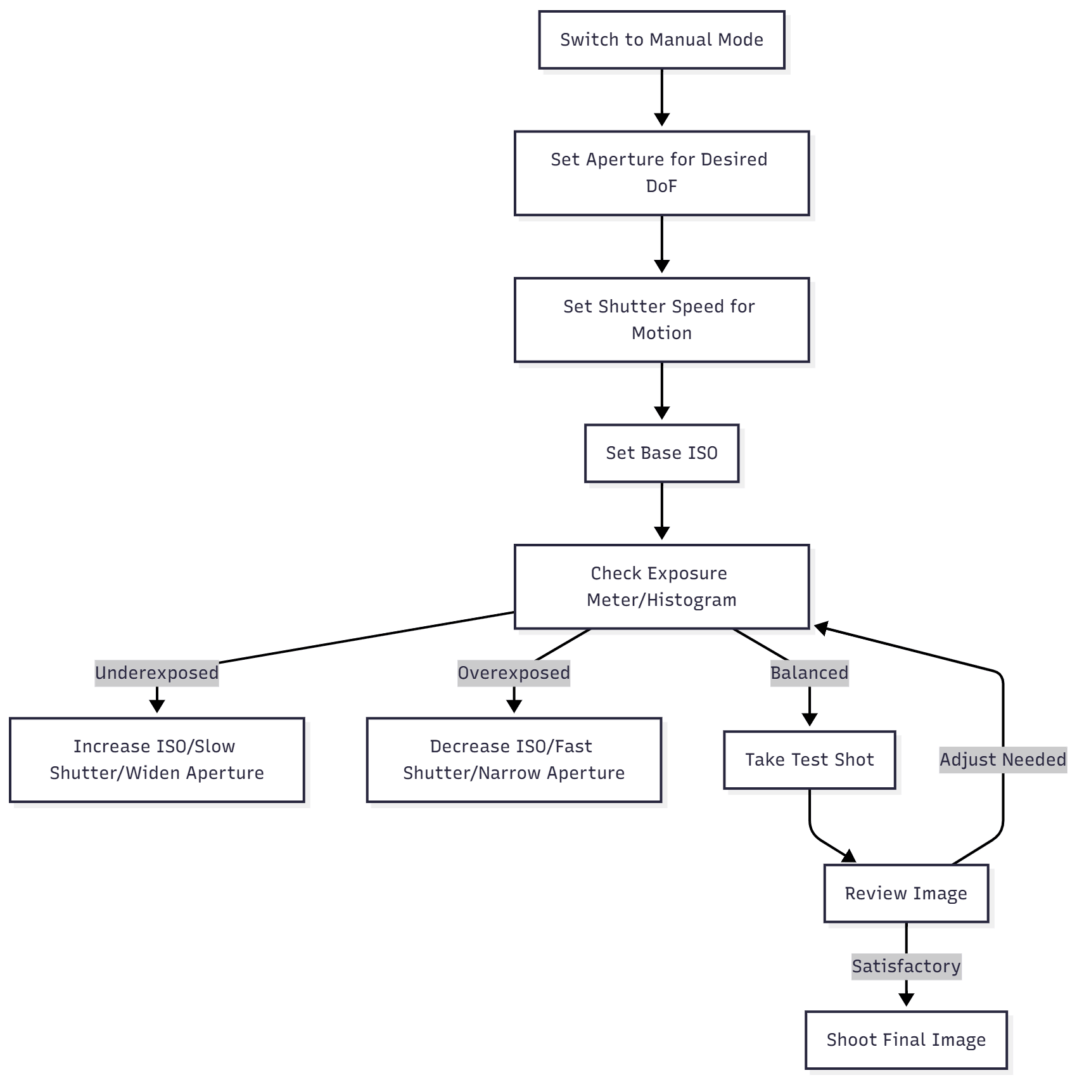
Switching to manual mode is simple—set your camera dial to “M.” The challenge lies in balancing the exposure triangle for your desired outcome. Follow this three-step process, adaptable to various scenarios:
- Set Aperture for Depth of Field:
- Choose based on creative intent: f/2.8 for shallow DoF (portraits), f/11 for deep DoF (landscapes).
- Ignore exposure initially; focus on the aesthetic effect.
- Set Shutter Speed for Motion Control:
- For stationary subjects, use 1/125s or faster (adjust for focal length to avoid shake).
- For action, start at 1/500s. For artistic blur, try 1/30s with a tripod.
- Set ISO and Fine-Tune Exposure:
- Start at base ISO (100–200). Check the camera’s exposure meter (viewfinder bar) or histogram.
- If underexposed, increase ISO, slow shutter, or widen aperture. If overexposed, decrease ISO, speed up shutter, or narrow aperture.
- Take a test shot, review on LCD, and zoom in to check sharpness and exposure.
Chart for Manual Mode Process:
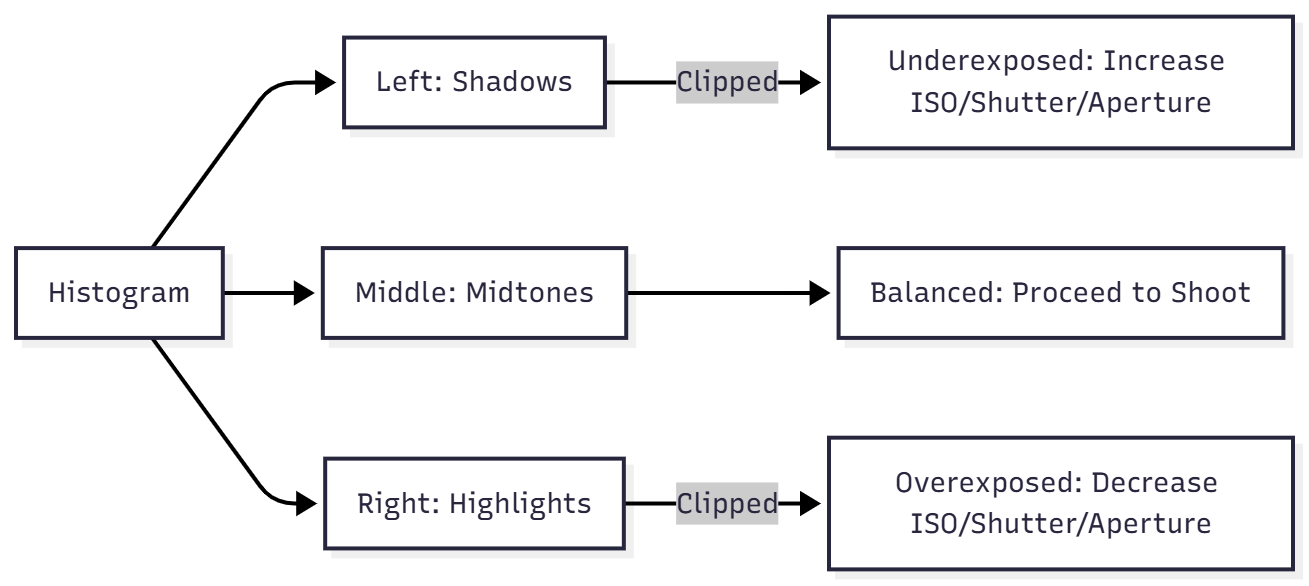
Using the Histogram for Exposure
The histogram is a graph showing light distribution in your image:
- Left Side: Shadows (underexposure if clipped).
- Right Side: Highlights (overexposure if clipped).
- Middle: Midtones (ideal for balanced exposure).
Aim for a histogram that spreads across the graph without peaks pushed against the edges. Clipped shadows or highlights mean lost detail, unrecoverable in post-processing.
Histogram Example Diagram:
Applying Manual Mode in Real-World Scenarios
Manual mode shines in controlled or deliberate settings. Below are tailored settings and tips for common photography genres, with gear recommendations and pricing.
1. Portrait Photography
Goal: Isolate the subject with a blurry background (bokeh).
- Aperture: f/1.8–f/4 for shallow DoF.
- Shutter Speed: 1/125s+ to avoid shake.
- ISO: 100–400 for clean images.
- Metering: Spot metering on the subject’s face.
- Gear: Sony FE 85mm f/1.4 GM ($1,800) for creamy bokeh; Canon EOS R8 ($1,500) for budget full-frame.
Example Settings:
- f/2.8, 1/200s, ISO 200 (daylight portrait).
- Use a reflector ($30–$50) to bounce light onto the face.
2. Action and Sports Photography
Goal: Freeze fast motion.
- Aperture: f/5.6 for moderate DoF, ensuring multiple subjects are sharp.
- Shutter Speed: 1/500s–1/2000s.
- ISO: 400–1600, depending on light.
- Metering: Matrix for varied scenes.
- Gear: Nikon Z 70-200mm f/2.8 ($2,600); Nikon Z6 II ($2,000) for fast autofocus.
Example Settings:
- f/5.6, 1/1000s, ISO 800 (outdoor sports).
- Use burst mode and continuous autofocus.
3. Landscape Photography
Goal: Achieve deep focus across the scene.
- Aperture: f/8–f/16 for maximum sharpness.
- Shutter Speed: 1/60s or slower with a tripod.
- ISO: 100 for clean images.
- Metering: Matrix for balanced exposure.
- Gear: Canon EF 16-35mm f/4L ($1,100); Manfrotto Element Traveller Tripod ($150).
Example Settings:
- f/11, 1/60s, ISO 100 (daylight landscape).
- Use hyperfocal distance focusing for optimal sharpness.
Landscape Settings Table:
| Element | Setting Range | Reason | Recommended Gear |
|---|---|---|---|
| Aperture | f/8–f/16 | Deep focus | Wide-angle lens (e.g., Sigma 14-24mm f/2.8, $1,300) |
| Shutter Speed | 1/60s–30s | Balance light, possible blur | Tripod (e.g., Gitzo Traveler, $600) |
| ISO | 100–200 | Clean images | Full-frame camera (e.g., Sony A7C, $1,600) |
4. Street Photography
Goal: Capture candid moments with flexibility.
- Aperture: f/5.6–f/11 for moderate DoF in daylight; f/2.8–f/5.6 at night.
- Shutter Speed: 1/250s+ for sharpness; 1/125s for night.
- ISO: 100–400 (day); 1600–6400 (night).
- Metering: Matrix or Spot for subjects.
- Gear: Fujifilm X100V ($1,400) for compact versatility; 35mm lens like Fujifilm XF 35mm f/2 ($400).
Example Settings:
- Day: f/8, 1/400s, ISO 400.
- Night: f/2.8, 1/125s, ISO 3200.
5. Night and Low-Light Photography
Goal: Capture detail in dark conditions.
- Aperture: f/1.4–f/2.8 for maximum light.
- Shutter Speed: 1/30s+ with tripod; 1/125s handheld.
- ISO: 1600–6400+.
- Metering: Spot for key elements like stars or lights.
- Gear: Nikon Z 50mm f/1.8S ($600); tripod like Vanguard VEO 3+ ($250).
Example Settings:
- Astrophotography: f/2.8, 15s, ISO 3200.
- Night street: f/2.8, 1/125s, ISO 6400.
6. Urban Landscapes with Tripod
Goal: Long exposures for light trails or smooth effects.
- Aperture: f/8–f/16 for deep DoF.
- Shutter Speed: 1s–30s for artistic effects.
- ISO: 100 for clean images.
- Gear: Sony A7R V ($3,900); ND filter like B+W 10-stop ($100).
Example Settings:
- f/11, 10s, ISO 100 (cityscape with light trails).
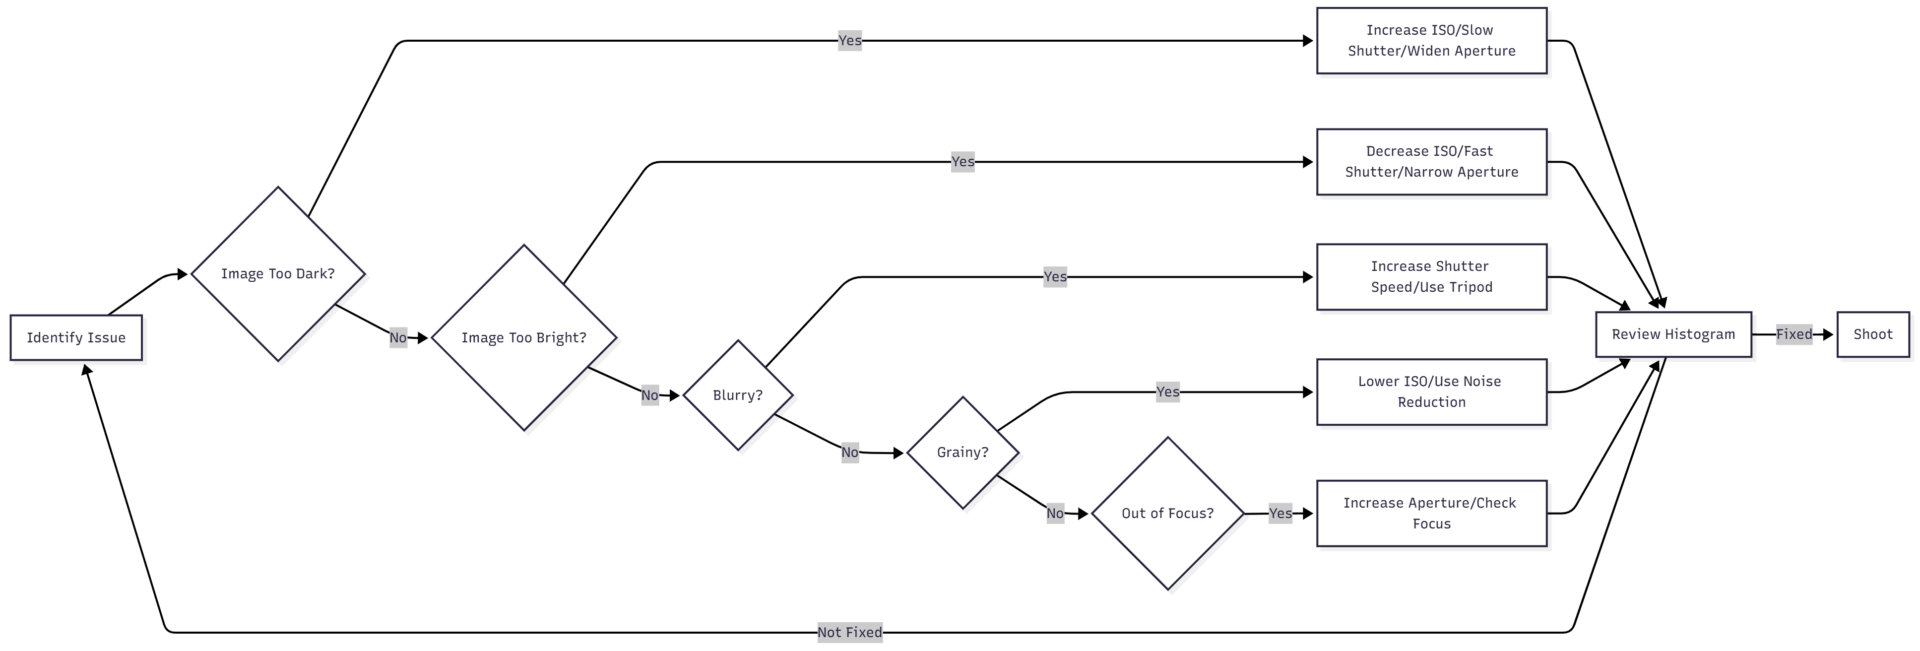
Troubleshooting Common Manual Mode Issues
Manual mode can be challenging, especially for beginners. Here are solutions to frequent problems:
- Image Too Dark:
- Increase ISO (e.g., from 100 to 400).
- Slow shutter speed (e.g., 1/125s to 1/60s).
- Widen aperture (e.g., f/5.6 to f/2.8).
- Image Too Bright:
- Decrease ISO (e.g., from 800 to 200).
- Speed up shutter (e.g., 1/250s to 1/1000s).
- Narrow aperture (e.g., f/4 to f/8).
- Blurry Subject:
- Increase shutter speed (e.g., 1/125s to 1/500s).
- Use a tripod or image stabilization.
- Grainy Image:
- Lower ISO (stay below 6400).
- Use noise reduction in post-processing (e.g., Adobe Lightroom, $10/month).
- Out-of-Focus Areas:
- Increase aperture (e.g., f/2.8 to f/8) for deeper DoF.
- Check focus distance and use manual focus if needed.
Troubleshooting Flowchart:
Debunking the Manual Mode Myth
A common misconception is that professional photographers only shoot in manual mode. This is false. Pros use all camera modes—Auto, Program, Aperture Priority, Shutter Priority, and Manual—depending on the situation:
- Manual Mode is Ideal When:
- Lighting is consistent (e.g., studio, controlled outdoor settings).
- You need full creative control (e.g., intentional overexposure for high-key portraits).
- Shooting slow, deliberate genres like landscapes or macro.
- Manual Mode is Less Ideal When:
- Light changes rapidly (e.g., birds moving between shade and sun).
- Speed is critical (e.g., sports or wildlife).
- You’re a beginner still learning exposure basics.
For fast-paced scenarios, Aperture Priority (control aperture, camera sets shutter) or Shutter Priority (control shutter, camera sets aperture) can be more efficient. Program mode is a good bridge for beginners moving from Auto.
Practice and Experimentation: Building Confidence
Mastering manual mode requires practice. Start in controlled environments (e.g., your backyard in daylight) to get comfortable with settings. Follow these tips:
- Take Test Shots: Shoot, review, and adjust. Zoom in on the LCD to check sharpness and exposure.
- Use RAW Format: RAW files offer more flexibility in post-processing for fixing exposure or white balance errors. Software like Adobe Lightroom ($10/month) or Capture One ($24/month) is ideal.
- Experiment with Priorities: Try aperture-first for portraits, shutter-first for action. Compare results to understand each setting’s impact.
- Study the Histogram: Ensure no clipping in shadows or highlights. Practice balancing the graph through adjustments.
Beginner’s Cheat Sheet:
| Scenario | Aperture | Shutter Speed | ISO | Notes |
|---|---|---|---|---|
| Portrait | f/2.8 | 1/200s | 100 | Spot meter on face |
| Action | f/5.6 | 1/1000s | 400 | Use burst mode |
| Landscape | f/11 | 1/60s | 100 | Tripod for slow shutter |
| Night Street | f/2.8 | 1/125s | 3200 | Wide aperture for light |
Advanced Tips and Gear Recommendations
- Invest in Quality Lenses: Prime lenses like the Nikon AF-S 50mm f/1.8G ($220) are affordable and versatile. For pros, the Sony FE 24mm f/1.4 GM ($1,400) excels in low light.
- Use a Tripod: Essential for landscapes and long exposures. The Manfrotto MT190XPRO4 ($250) is durable and portable.
- ND Filters: For long exposures in daylight (e.g., B+W 6-stop ND, $80).
- Post-Processing: Adobe Lightroom ($10/month) for exposure and color corrections; DxO PhotoLab ($219) for advanced noise reduction.
- Learn Hyperfocal Distance: Maximize landscape sharpness by focusing at the hyperfocal distance (use apps like PhotoPills, $10).
Recommended Gear Table:
| Gear Type | Model | Price | Best For |
|---|---|---|---|
| Entry-Level DSLR | Nikon D3500 | $500 | Beginners |
| Mid-Range Mirrorless | Fujifilm X-T5 | $1,700 | Street, portraits |
| Pro Full-Frame | Canon EOS R5 | $3,500 | All genres |
| Portrait Lens | Sony FE 85mm f/1.4 GM | $1,800 | Portraits, low-light |
| Landscape Lens | Canon EF 16-35mm f/4L IS USM | $1,100 | Landscapes, architecture |
| Tripod | Manfrotto BeFree Advanced | $190 | Travel, landscapes |
Conclusion
Learning to shoot in manual mode is a game-changer for photographers. By mastering ISO, aperture, and shutter speed, you gain the ability to craft images that reflect your creative vision, from shallow-depth portraits to expansive landscapes. This comprehensive guide has equipped you with the knowledge to navigate the exposure triangle, apply manual mode in diverse scenarios, troubleshoot issues, and select the right gear. Practice diligently, experiment fearlessly, and review your histograms to refine your skills. Grab your camera—whether a $500 Nikon D3500 or a $6,500 Sony A1—and start shooting in manual mode today. The journey to photographic mastery begins with that first deliberate click.
Please share this Learning to Shoot in Manual Mode with your friends and do a comment below about your feedback.
We will meet you on next article.
Until you can read, Best Camera for Food Photography