Master Food Photography Techniques with These Expert Tips
Master food photography with expert tips on lighting, composition, and camera settings for stunning overhead shots.
Food photography has become a cultural phenomenon, captivating audiences on social media platforms like Instagram, where vibrant, mouth-watering images inspire cravings and connections. Among the various styles, overhead food photography, often referred to as flat-lay or 90-degree shots, stands out for its ability to showcase the texture, color, and arrangement of dishes in a visually compelling way. This article dives deep into expert techniques to master overhead food photography, offering practical advice, gear recommendations, and creative strategies to elevate your images to a professional level. Whether you’re a food blogger, a small business owner, or an aspiring photographer, these tips will help you create images that stand out in a crowded digital landscape.
The Power of Overhead Food Photography
Overhead shots provide a unique perspective that highlights the composition and details of a dish, making it ideal for showcasing everything from simple ingredients to elaborate meals. Professional food photographer Rachel Korinek emphasizes that this technique can transform even the most basic dishes into bright, clean, and uplifting images that celebrate the beauty of food. However, achieving professional-quality overhead shots requires mastering lighting, composition, camera settings, and styling, while overcoming common challenges like blurry images or poor lighting.
This guide draws from insights by industry experts, including Canon Europe, Food Blogger Pro, Piquant Post, and professional photographers like Yasmin Albatoul and Nisha of Rainbow Plant Life. We’ll also incorporate practical advice from online communities, such as Reddit discussions, to address real-world challenges faced by photographers.
Essential Gear for Overhead Food Photography
To create stunning overhead shots, the right equipment is crucial. Below, we explore the essential gear, their specifications, and approximate costs to help you build a setup that suits your budget and skill level.
Tripods and Camera Rigs
A stable camera is the foundation of sharp, professional overhead shots. Without proper stabilization, images can appear blurry or inconsistent, undermining the polished look you’re aiming for.
- Smartphone Mounts: For beginners, phone mounts like the iBOLT AMPS Mount ($29.95) offer a cost-effective solution. These mounts attach to tripods or clamps, providing stability for smartphone photography. While affordable, they lack the precision and flexibility of professional setups, and image quality is limited by the phone’s camera capabilities.
- Standard Tripods: A step up, standard tripods like the Manfrotto Element MII ($149.99) provide durability and versatility. They support both smartphones and cameras but may require additional weights to prevent tipping during overhead shots. Their legs can also interfere with the frame, and height adjustments may be limited unless placed on a raised surface.
- Overhead Camera Rigs: For professional results, overhead rigs like the Glide Gear OH 50 ($199) or Proaim Overhead Rig ($325) are ideal. These rigs offer unmatched stability, allowing precise camera adjustments and eliminating shake. They accommodate multiple devices, making them perfect for complex shoots. Their robust design ensures steady shots over tables, addressing common issues like camera shake or awkward angles.
| Equipment | Model | Price (USD) | Key Features |
|---|---|---|---|
| Smartphone Mount | iBOLT AMPS Mount | $29.95 | Affordable, easy to use, limited precision |
| Standard Tripod | Manfrotto Element MII | $149.99 | Durable, versatile, limited for overhead |
| Overhead Camera Rig | Glide Gear OH 50 | $199 | Stable, adjustable, ideal for professionals |
Cameras and Lenses
While smartphones can produce decent results, a DSLR or mirrorless camera offers superior control and image quality. Popular choices include:
- Canon EOS R5: A professional-grade mirrorless camera ($3,399) with a 45MP sensor, ideal for capturing fine details. Paired with a Canon EF 100mm f/2.8L Macro IS USM lens ($1,299), it’s perfect for close-up food shots with minimal distortion.
- Sony A7 IV: A versatile mirrorless camera ($2,498) with a 33MP sensor, offering excellent dynamic range for food photography. Pair it with a Sony FE 90mm f/2.8 Macro G OSS lens ($1,098) for sharp, detailed images.
For macro photography, lenses like the Canon EF 100mm f/2.8L or Sony FE 90mm f/2.8 are preferred for their ability to capture intricate textures without distortion. However, macro lenses can suffer from focus breathing, which affects focus stacking. A linear rail or software like Capture One can mitigate this issue, as discussed in online forums.
Backgrounds and Props
The choice of background and props significantly impacts the aesthetic of your photos. Neutral backgrounds like wooden boards, vinyl sheets, or fabric from brands like Club Backdrops ($30–$100) complement food without overpowering it. Props such as napkins, cutlery, or fresh herbs add context and visual interest. For example, Nisha of Rainbow Plant Life uses garnishes like limes and flowers to enhance her Mexican Shrimp Ceviche, creating a vibrant, inviting composition.
| Background Type | Material | Price Range (USD) | Best For |
|---|---|---|---|
| Wooden Boards | Wood | $20–$50 | Rustic, natural aesthetic |
| Vinyl Sheets | Vinyl | $15–$40 | Easy to clean, versatile |
| Fabric | Linen/Cotton | $10–$30 | Soft, textured look |
Lighting Equipment
Lighting is critical in food photography, with natural light being the preferred choice for its soft, flattering effect. However, artificial lighting offers consistency, especially for indoor or nighttime shoots.
- Natural Light Setup: Position your setup near a window and use diffusers (e.g., Neewer 43-inch Diffuser, $25) to soften harsh light. Reflectors ($15–$30) can fill in shadows for balanced illumination.
- Artificial Lighting: Continuous LED lights like the Godox SL-60W ($129) or softboxes like the Neewer 700W Softbox Kit ($99) mimic natural light, providing consistent illumination. Professional studios often use Profoto lighting systems ($1,000+), but budget-friendly options can achieve similar results with proper setup.
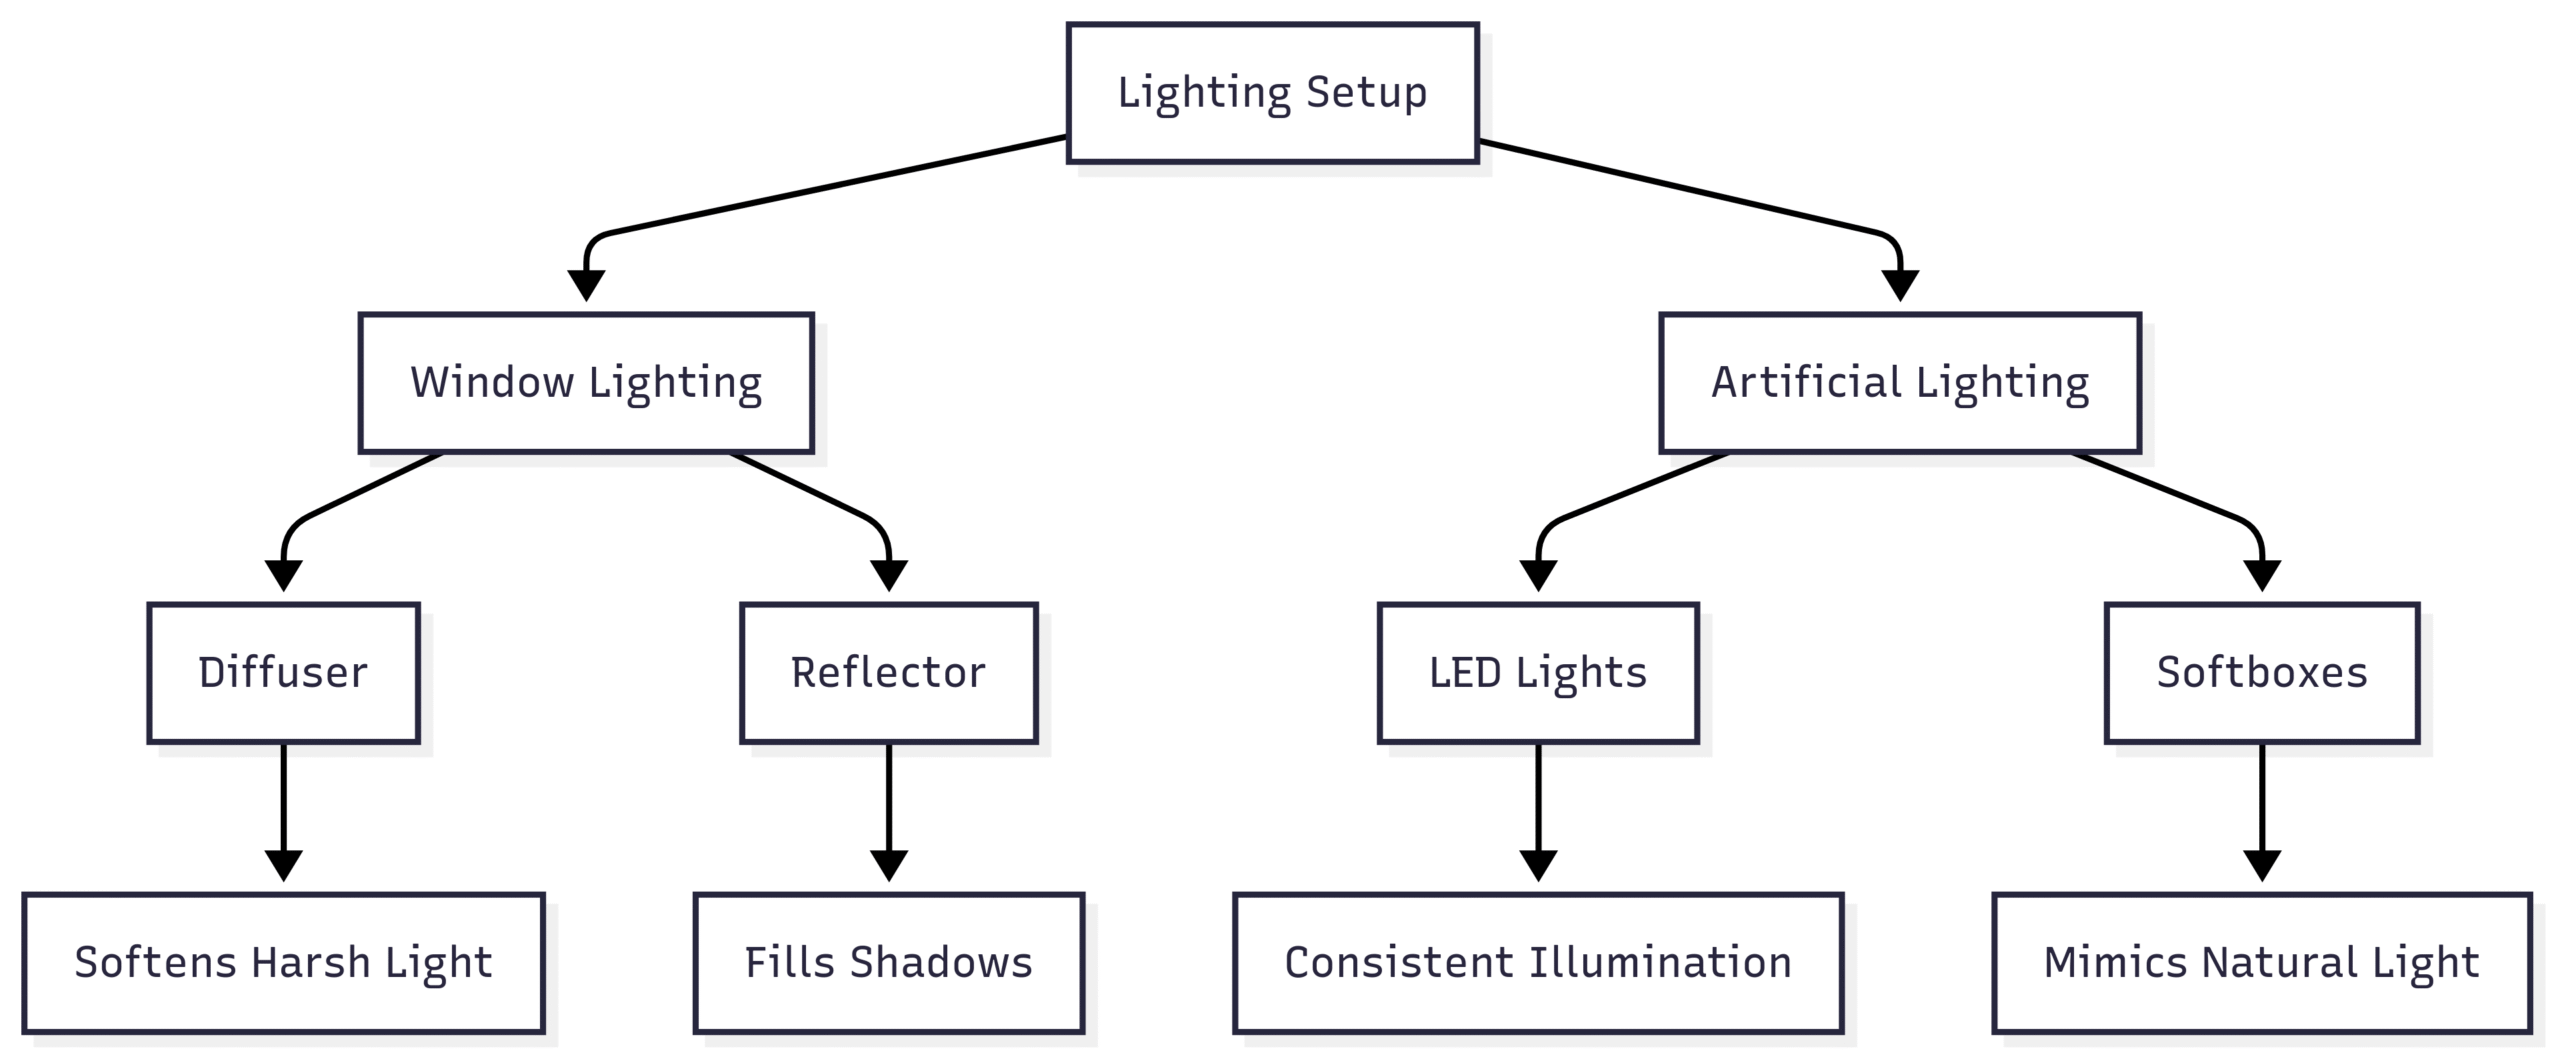
Mastering Lighting for Overhead Shots
Lighting is often cited as the most critical aspect of food photography, with professionals like Reddit user bleach1969 attributing 50% of a shot’s success to it. Here’s how to optimize lighting for overhead food photography:
Natural Light Techniques
- Window Lighting: Place your food near a window to harness soft, natural light. Avoid direct sunlight to prevent harsh shadows. A north-facing window provides consistent, diffused light ideal for food photography.
- Backlighting: Position the light source opposite the camera to create a three-dimensional effect, making textures pop. For example, backlighting a salad can highlight the crispness of lettuce leaves.
- Diffusers and Reflectors: Use a diffuser to soften light and a reflector to bounce light back onto the subject, reducing shadows. A simple white foam board ($5–$10) can serve as an effective reflector.
Artificial Lighting Alternatives
When natural light isn’t available, continuous LED lights or softboxes provide control and consistency. Set up lights at 45-degree angles to mimic natural light, and use diffusers to soften the output. Reddit user CRUMBBLONDE emphasizes that artificial light is essential for professional results, as it allows you to shoot at any time without relying on daylight.
Maintaining Consistency
Consistency is key for a cohesive portfolio. Keep detailed notes on your lighting setup, including light positions, diffuser types, and camera settings. This ensures uniformity across shoots, especially for blog or social media content.
Composition and Styling Techniques
Composition and styling transform a good photo into a great one. Here’s how to craft visually appealing overhead shots:
Rule of Thirds
Imagine a 3×3 grid overlaying your frame. Place key elements along the grid lines or at their intersections to create balance and draw the viewer’s eye. This technique, endorsed by Canon Europe, ensures a dynamic yet harmonious composition.
Negative Space
Incorporate negative space—empty areas around the subject—to emphasize the dish’s details. This creates a clean, professional look, as seen in Nisha’s Dal Palak recipe, where minimalistic styling keeps the focus on the food.
Color Theory
Use the color wheel to create harmonious or contrasting palettes. Professional photographer Yasmin Albatoul suggests pairing colors like blue and orange (e.g., blue backgrounds with seafood) to evoke specific moods and enhance visual impact. For example, a vibrant orange dish against a cool blue background creates a striking contrast.
Props and Textures
Props like utensils, napkins, or garnishes add context without overshadowing the food. Yasmin uses unconventional props like oil or wooden sticks to create shine or motion, adding a dynamic element to her shots. Layering textures, such as a wooden board with a linen napkin, adds depth to flat-lay compositions.
Planning Your Layout
Sketch your composition before shooting to visualize the final image. Experiment with prop placement and spacing to ensure a balanced layout. This preparation saves time and results in polished images.
Camera Settings for Optimal Results
The right camera settings enhance clarity and focus, crucial for overhead shots. Here’s a breakdown:
- Aperture: Use a wide aperture (f/1.8–f/3.2) for a shallow depth of field, blurring the background to highlight the food. For detailed shots, a narrower aperture (f/8–f/16) ensures everything is in focus, as recommended by Reddit user PhotographEtherArts.
- ISO: Keep ISO low (100–400) to minimize noise and grain, ensuring clean images.
- Focus: Ensure the main subject is sharp, especially with a shallow depth of field. For macro shots, consider focus stacking to capture intricate details, as suggested by Reddit user ChestDue.
- Zoom: Avoid excessive zoom to prevent distortion. Use a macro lens or move closer to the subject for better quality.
For smartphone users, enable Apple ProRAW (if available) for maximum detail and use the grid overlay for composition. Portrait mode can mimic a shallow depth of field, ideal for food photography.
Creative Styling and Movement
Styling food for the camera requires intention and creativity. Yasmin Albatoul’s approach highlights the importance of styling the entire shot, not just the food. Here are advanced techniques:
- Surprising Props: Yasmin uses unconventional items like motor oil for pancake shine or dishwashing liquid for coffee foam to maintain a fresh look under lights. These tricks ensure the food looks appetizing for longer.
- Adding Motion: To make static food dynamic, Yasmin employs wooden sticks or string to create the illusion of movement, such as cookies appearing to float. These elements are removed in post-processing for a seamless effect.
- Layering Elements: Combine textures and props to add depth. For example, a marble slab paired with fresh herbs can evoke sophistication and freshness.
Overcoming Common Challenges
Beginners often face issues like blurry shots, inconsistent lighting, or lackluster compositions. Here’s how to address them:
Achieving Stable Shots
Use a tripod or overhead rig to eliminate camera shake. A shutter remote or voice-activated shooting (available on many smartphones) further reduces movement, as recommended by Food Blogger Pro.
Managing Lighting Consistency
Natural light varies, so artificial lighting or detailed notes on your setup ensure uniformity. Reddit user bleach1969 stresses the importance of controlled lighting for professional results.
Creating a Cohesive Style
Develop a signature style by maintaining a consistent color palette and composition patterns. Use post-processing tools like Adobe Lightroom presets to apply uniform edits across your portfolio. Subtle branding, like incorporating logo colors, enhances recognition without being overt.
Protecting Your Equipment
Food photography poses risks like spills or drops. Secure your camera with straps or protective covers, and consider insurance for expensive gear. Overhead rigs minimize the risk of cameras falling onto food.
Post-Processing for a Polished Look
Post-processing is the final step to achieving magazine-quality images. Tools like Adobe Lightroom ($9.99/month) or Photoshop ($20.99/month) allow you to:
- Adjust exposure and contrast for balanced lighting.
- Remove imperfections or props (e.g., wooden sticks) for a clean finish.
- Apply presets for consistent styling across multiple images.
Reddit user Tv_land_man highlights the importance of layers, clipping paths, and artificial highlights in post-production to achieve a flawless look. For beginners, free tools like GIMP can be a starting point, though they lack the advanced features of paid software.
Real-World Inspiration: Rainbow Plant Life and Yasmin Albatoul
Nisha of Rainbow Plant Life exemplifies effective overhead photography. Her Dal Palak recipe uses a wide-angle flat lay to showcase ingredients, with garnishes and cutlery framing the dish for visual interest. Her minimalistic approach ensures the food remains the focal point, enhanced by WP Recipe Maker’s customizable templates for professional blog presentation.
Yasmin Albatoul, an Algeria-based photographer, brings a surreal, dynamic flair to her work. Using a Canon EOS R5 and macro lenses, she creates vibrant, colorful compositions that stand out on Instagram. Her use of props like oil and string adds movement, making her images unforgettable. Her behind-the-scenes content, shared on social media, inspires aspiring photographers by revealing the creative process.
Integrating Photography with Food Blogging
For food bloggers, tools like WP Recipe Maker ($49/year) enhance recipe presentation. Features like customizable templates, inline ingredients, and SEO optimization increase engagement and search visibility. High-quality photos within recipe steps clarify instructions, make recipes more appealing, and encourage sharing, as noted by Birthe Vandermeeren of Bootstrapped Ventures.
Budget Considerations
Building a food photography setup can range from budget-friendly to professional-grade:
- Beginner Setup: Smartphone + iBOLT Mount + Diffuser ($75–$100)
- Intermediate Setup: Manfrotto Tripod + LED Lights + Vinyl Backgrounds ($300–$500)
- Professional Setup: Canon EOS R5 + Overhead Rig + Profoto Lighting ($5,000+)
Invest in durable, versatile equipment to avoid frequent replacements. Look for deals on platforms like Amazon or B&H Photo to save costs.
Tips for Aspiring Food Photographers
- Practice Regularly: As Reddit user Marokiii suggests, take hundreds of shots to refine your skills. Only a fraction will be portfolio-worthy, but each attempt improves your technique.
- Study Lighting: Resources like “Light: Science and Magic” or YouTube channels (e.g., Tin House Studio, The Bite Shot) offer in-depth lighting tutorials.
- Experiment Creatively: Try unconventional props or angles to develop a unique style, as Yasmin does with her dynamic compositions.
- Share Your Process: Behind-the-scenes content, as practiced by Yasmin, engages audiences and builds a community around your work.
The Social Impact of Food Photography
Food photography transcends aesthetics, fostering connections through shared culinary experiences. A study cited in the original article found that photographing food before eating enhances its perceived taste, reinforcing the communal aspect of sharing images online. Platforms like Instagram amplify this, making food photography a powerful tool for engagement and storytelling.
Conclusion
Mastering overhead food photography requires a blend of technical skill, creative vision, and the right equipment. By optimizing lighting, composition, camera settings, and styling, you can create images that captivate and inspire. Invest in quality gear within your budget, practice consistently, and draw inspiration from professionals like Nisha and Yasmin. Whether you’re enhancing a food blog or building a social media presence, these expert techniques will elevate your photography, making your dishes as irresistible in photos as they are in person.
We will meet you on next article.
Please share this Master Food Photography Techniques with These Expert Tips with your friends and do a comment below about your feedback.
Until you can read, Step Up Your Food Blogging: 7 Key Pieces of Equipment