Natural Light Food Photography Tips
Natural light food photography transforms dishes into captivating, appetizing images by harnessing the beauty of sunlight. Unlike artificial lighting, natural light offers a soft, authentic glow that enhances textures and colors, making food look irresistible. Whether you’re a beginner using a smartphone or a seasoned photographer with a DSLR, mastering natural light can elevate your food photography to professional levels. From setting up near a window to editing for impact, these techniques will help you craft mouthwatering photos that stand out on Google, Instagram, or client portfolios.
Why Natural Light Matters in Food Photography
Lighting is the cornerstone of food photography. It shapes the mood, highlights textures, and defines your unique style. Natural light, with its soft and dynamic qualities, is ideal for creating images that feel fresh and inviting. Unlike artificial light, which requires expensive gear, natural light is free and accessible, making it perfect for beginners and pros alike. However, it’s unpredictable—changing with the time of day, weather, and seasons. Understanding how to control and manipulate natural light is key to achieving consistent, professional results. This guide covers essential tools, camera settings, styling tips, and editing techniques to help you master natural light food photography.
Essential Tools for Natural Light Food Photography
To create soft, glowing light for food photography, you need just a few affordable tools. These essentials allow you to manipulate sunlight effectively, ensuring your images have the desired mood and clarity.
| Tool | Price Range | Where to Buy | Purpose |
|---|---|---|---|
| Muslin Cloth/Baking Paper | $5-$15 | Amazon, Walmart | Diffuses light for a soft effect |
| White Foam Core (40″x60″) | $5-$10 | Michaels, Office Depot | Reflects light to fill shadows |
| Black Foam Core (40″x60″) | $5-$10 | Michaels, Office Depot | Absorbs light for deeper shadows |
| Neewer Tripod (e.g., 66″ Aluminum) | $30-$60 | Amazon, Neewer | Stabilizes camera for sharp images |
| Metal iPhone Tripod Mount | $10-$20 | Amazon | Secures smartphone to tripod |
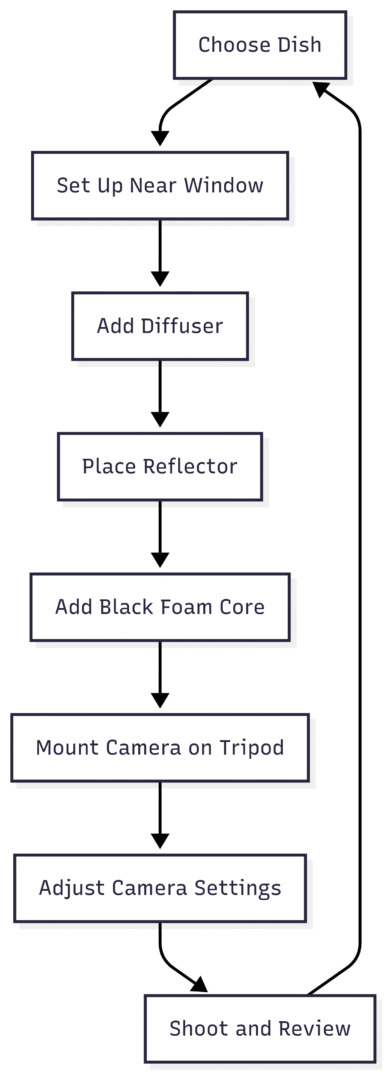
Chart: Natural Light Setup Workflow
Key Techniques for Natural Light Food Photography
Below are nine essential tips to master natural light food photography, covering setup, lighting, camera settings, and post-processing. These techniques are designed to be accessible and effective for both DSLR and smartphone users.
Tip 1: Set Up Next to a Window
Position your food setup within 1-2 meters of a window to maximize natural light. The window acts as your primary light source, providing soft, directional illumination. North- or south-facing windows are ideal as they offer consistent, indirect light throughout the day, avoiding harsh shadows from direct sunlight.
- Why It Works: Proximity to the window ensures bright, even lighting that highlights food textures.
- Pro Tip: If direct sunlight streams through, use a diffuser to soften it (see Tip 2). For example, a north-facing window in Jo Anderson’s studio provides steady, indirect light, perfect for food photography.
Tip 2: Use a Diffuser to Soften Light
Direct sunlight creates harsh shadows that can overwhelm food details. A diffuser, such as muslin cloth or baking paper, scatters light to create a soft, glowing effect.
- How to Use: Tape muslin cloth ($5-$10, Amazon) or baking paper ($3-$5, Walmart) over the window. For a portable option, use a Neewer 40″x60″ diffuser ($20-$30, Amazon).
- Example: Diffusing sunlight through a frosted glass door, as Jo Anderson does, creates a glowing effect that enhances the texture of dishes like flatbread or cakes.
| Diffuser Type | Price Range | Where to Buy | Key Feature |
|---|---|---|---|
| Muslin Cloth | $5-$10 | Amazon | Lightweight, easy to clamp |
| Baking Paper | $3-$5 | Walmart | Budget-friendly, disposable |
| Neewer 40″x60″ Diffuser | $20-$30 | Amazon | Portable, professional-grade |
Tip 3: Use White Foam Core to Reflect Light
White foam core reflects light back onto the food, filling in shadows on the side opposite the window. This creates a balanced, well-lit image without harsh contrasts.
- How to Use: Place a 40″x60″ white foam core board ($5-$10, Michaels) opposite the window, angled toward the food. Adjust its distance to control shadow softness.
- Example: In a shot of raspberries, a white foam core reflector softens shadows, making the berries pop without overexposing the scene.
Tip 4: Use Black Foam Core for Negative Fill
For a moodier, high-contrast look, use black foam core to absorb light and deepen shadows. This technique is ideal for dramatic dishes like chocolate desserts or rustic breads.
- How to Use: Position a 40″x60″ black foam core board ($5-$10, Office Depot) on the shadow side to enhance contrast. For example, Jo Anderson uses black foam core to add depth to mandarin shots.
- Comparison: A mandarin shot with black foam core has richer shadows compared to one with a white reflector, creating a more dramatic story.
| Foam Core Type | Price Range | Where to Buy | Purpose |
|---|---|---|---|
| White Foam Core | $5-$10 | Michaels | Fills shadows for brighter look |
| Black Foam Core | $5-$10 | Office Depot | Deepens shadows for contrast |
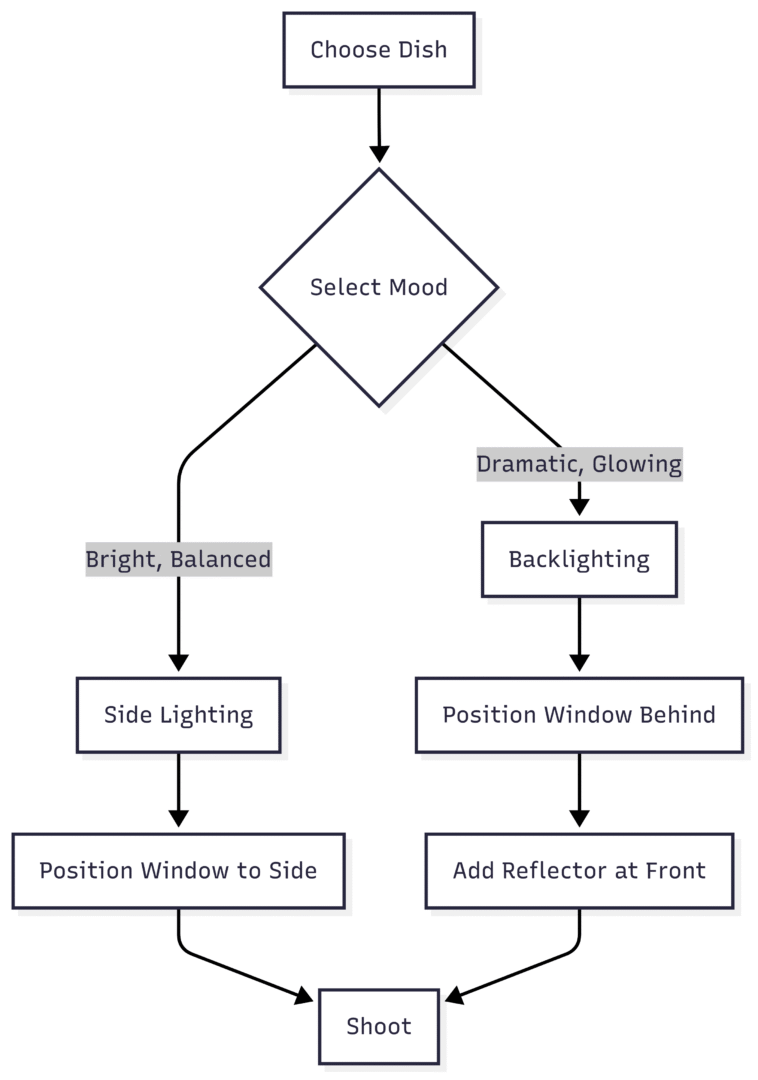
Tip 5: Master Lighting Direction
The direction of light shapes the mood and texture of your food photos. Side lighting and backlighting are the most effective for food photography.
- Side Lighting: Position the window to the side of the food for a balanced look with soft shadows. Ideal for most dishes, it highlights textures without flattening the image.
- Backlighting: Place the window behind the food to create a glowing halo effect, emphasizing specular highlights on shiny surfaces like oils or syrups. Use a reflector to avoid silhouetting.
- Example: Backlighting olives with a softbox behind the set creates a glowing rim, while a reflector ensures the front remains well-lit.
Chart: Lighting Direction Decision
Tip 6: Use a Tripod for Stability
A tripod ensures sharp images, especially in low-light conditions where slower shutter speeds are needed. It also frees your hands for styling and adjustments.
- DSLR/Mirrorless: Use a Neewer 66″ Aluminum Tripod ($30-$60, Amazon) for stability across angles (overhead, 45-degree, straight-on).
- Smartphone: Pair the same tripod with a Metal iPhone Tripod Mount ($10-$20, Amazon) for secure positioning.
- Example: Shooting a cake at 1/30s shutter speed with a tripod prevents blur, allowing precise composition.
| Tripod Type | Price Range | Where to Buy | Key Feature |
|---|---|---|---|
| Neewer 66″ Aluminum | $30-$60 | Amazon | Versatile, sturdy |
| Metal iPhone Mount | $10-$20 | Amazon | Secures smartphone |
Tip 7: Adjust Camera Settings in Manual Mode
Manual mode gives you control over exposure, ensuring consistent results in varying natural light conditions.
- DSLR/Mirrorless Settings:
- Aperture: Use f/4-f/9 for a balanced depth of field, keeping the food in focus while softening the background.
- Shutter Speed: Adjust to 1/30s-1/200s based on light intensity. Use a tripod for slower speeds.
- ISO: Keep at 100-1000 to minimize noise. For example, Jo Anderson uses ISO 1000 on a Nikon Z7 for clean images.
- White Balance: Set to “Daylight” (5500K) or custom adjust to avoid color casts.
- Smartphone Settings:
- Use Lightroom Mobile (Free, $4.99/month for premium, App Store) in Professional Mode to adjust exposure, ISO, and white balance.
- Tap the iPhone Camera app screen to adjust brightness via the sunshine icon.
- Example: A pasta dish shot at f/4, 1/60s, ISO 400 with a daylight white balance ensures vibrant colors and sharp details.
| Camera Type | Tool/App | Price | Key Feature |
|---|---|---|---|
| DSLR/Mirrorless | Manual Mode | Free (Camera Feature) | Full exposure control |
| Smartphone | Lightroom Mobile | Free/$4.99/month | Advanced settings, editing |
| Smartphone | iPhone Camera App | Free | Quick exposure adjustments |
Tip 8: Enhance with Food Styling
Food styling complements lighting to create compelling images. Collaborate with a stylist like Brendan McCaskey or use these DIY tips:
- Keep It Simple: Use 3-5 props (e.g., a dark plate, napkin, and ingredient) to avoid clutter.
- Add Texture: Scatter crumbs, herbs, or drizzle syrup for a lived-in feel. For example, Brendan’s harissa chicken kabobs use saffron rice and green sauce for color pops.
- Preserve Freshness: Spray pancakes with Scotchgard ($8-$12, Amazon) to prevent syrup absorption, or use Poligrip ($5-$10, Amazon) to secure berries.
- Use Contrasting Colors: Pair vibrant foods (e.g., red harissa) with muted props (e.g., off-white platter) for visual impact.
| Styling Tool | Price Range | Where to Buy | Purpose |
|---|---|---|---|
| Scotchgard | $8-$12 | Amazon | Prevents syrup absorption |
| Poligrip | $5-$10 | Amazon | Secures food elements |
| Piping Gel | $5 | Michaels | Controlled syrup drips |
Tip 9: Edit for a Polished Look
Post-processing enhances the natural light effect, bringing out colors and refining mood.
- DSLR/Mirrorless:
- Lightroom ($9.99/month, Adobe): Adjust exposure, contrast, and vibrancy. Use masking for targeted edits.
- Capture One ($24/month): Offers precise color control for professional results.
- Photoshop ($9.99/month, Adobe): Ideal for compositing or retouching.
- Smartphone:
- Use Lightroom Mobile (Free, $4.99/month) for advanced tools like masking and healing.
- Adjust vibrancy and clarity to counter washed-out colors from strong light.
- Example: Editing a kabob image in Lightroom by boosting vibrancy and adding a subtle vignette makes colors pop and draws focus to the food.
| Editing Software | Price | Key Feature | Best For |
|---|---|---|---|
| Lightroom | $9.99/month | Masking, vibrancy sliders | Versatile editing |
| Capture One | $24/month | Precise color control | Professionals |
| Lightroom Mobile | Free/$4.99/month | Mobile editing | Smartphone users |
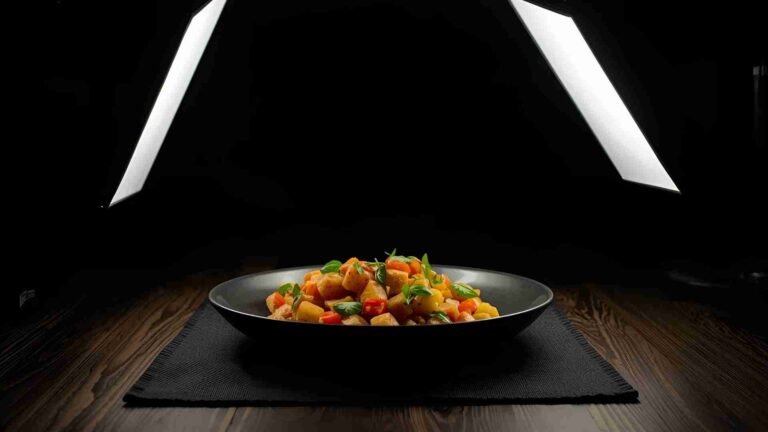
Creating a Dark and Moody Look with Natural Light
Dark and moody food photography, while challenging with natural light, is achievable with careful planning. Here’s how to adapt the above tips for a dramatic aesthetic:
- Use Dark Props: Choose gray or black plates, napkins, and surfaces ($10-$30, Target or Etsy) to absorb light. For example, Jo Anderson’s pancake composite uses a dark surface for a moody vibe.
- Control Light Source: Block all but one window using blinds or black foam core ($5-$10, Office Depot) to create a single, directional light source.
- Avoid Over-Underexposure: Underexpose by no more than half a stop to maintain detail. Heavy underexposure in editing creates muddy images.
- Highlight the Food: Ensure the food is the brightest element. For example, vibrant berries on a dark plate draw the eye.
Example Setup: For a pancake stack, Alise used Scotchgard ($8-$12) to protect pancakes, Poligrip ($5-$10) for berry placement, and piping gel ($5) for controlled syrup drips, all on a dark surface with a single window light.
Understanding Your Lighting Style
To develop your signature style, identify the natural light looks you love:
- Soft Light: Subtle transitions, ideal for bright, airy images (e.g., cloudy Pacific Northwest days).
- High-Contrast Light: Sharp shadows, perfect for dramatic shots (e.g., sunny Italian afternoons).
- Long Shadows: Evokes sunset vibes, adding warmth and depth.
Exercise: Create a Pinterest board and pin 50+ food photos that inspire you. Analyze their lighting patterns (e.g., shadow softness, direction) to define your preferences. This helps you choose the right window, diffuser, and reflector setup for your vision.
Practical Exercise: Observe Natural Light
To master natural light, observe how it changes in your space:
- Set an hourly alarm for a full day.
- Visit each room with a window and note:
- Light strength and direction.
- Shadow quality (soft or hard).
- Color temperature (warm or cool).
- Window orientation (north, south, etc.).
- Repeat over two days to account for weather changes.
This exercise, recommended by Jo Anderson, helps you identify the best windows and times for shooting, ensuring consistent results.
Artificial Light as a Backup
If natural light is unavailable (e.g., no direct sunlight windows), artificial light can mimic its effects. Jo Anderson uses a PixaPro LED200D mk II ($150-$200, Amazon) or Godox SL-150W ($120-$150, B&H) with a 120cm octagonal softbox ($30-$50, Neewer) to replicate soft window light. Position the light like a window, use a diffuser for softness, and add reflectors or black cards for control.
| Artificial Light Tool | Price Range | Where to Buy | Key Feature |
|---|---|---|---|
| Godox SL-150W | $120-$150 | B&H, Amazon | Mimics natural light |
| 120cm Softbox | $30-$50 | Neewer, Amazon | Softens artificial light |
| 5-in-1 Reflector (150cmx100cm) | $20-$40 | Amazon | Versatile light shaping |
Composition Tips for Enhanced Storytelling
Composition complements lighting to create engaging food stories. Use these techniques:
- Leading Lines: Arrange props or food to guide the viewer’s eye to the dish.
- Layers: Add foreground and background elements (e.g., napkins, herbs) for depth, ensuring they don’t block the food.
- Framing: Use props to frame the dish, like a rustic tray around kabobs.
- Shapes: Create imaginary shapes (e.g., triangular compositions) to keep viewers engaged.
Example: Brendan’s kabob setup uses a green backdrop, yellow rice, and red harissa sauce to create vibrant layers and a triangular composition, guiding the eye to the chicken.
Conclusion
Natural light food photography is a powerful way to create stunning, appetizing images with minimal gear. By setting up near a window, using diffusers and reflectors, and mastering camera settings, you can achieve soft, glowing light that enhances food textures and colors. Styling and editing further elevate your photos, while understanding your lighting style ensures a unique aesthetic. Practice regularly, observe light changes in your space, and experiment with angles and props to develop your skills. With these tips, you’ll create mouthwatering images that captivate viewers and boost your online presence.
Please share this Natural Light Food Photography Tips with your friends and do a comment below about your feedback.
We will meet you on next article.
Until you can read, Dark Food Photography Tips To Improve Your Food Images
![30 Best Food Bio for Your Instagram [For Foodies]](https://yumtonight.com/wp-content/uploads/2025/08/Storing-Books-1080-x-1920-px-3-768x432.jpg)