Natural Looking Artificial Light Setup for Food Photography
Learn to create natural-looking artificial light setups for stunning food photography with expert tips, gear recommendations, and step-by-step guidance.
Food photography thrives on light. It shapes the mood, highlights textures, and makes dishes look irresistible. While natural light is a go-to for many photographers due to its soft, organic feel, it’s unpredictable and limited by time and weather. Artificial light, when mastered, offers unmatched control and consistency, allowing you to replicate the beauty of natural light on demand. This comprehensive guide dives into creating natural-looking artificial light setups for food photography, offering practical techniques, gear recommendations, and creative insights to elevate your work.
Why Artificial Light for Food Photography?
Artificial light gives photographers the power to craft their desired aesthetic regardless of external conditions. Unlike natural light, which shifts with the time of day or cloud cover, artificial light is consistent, adjustable, and repeatable. Whether you’re aiming for the soft glow of an overcast morning or the dramatic shadows of a golden-hour sunset, artificial light lets you shape the scene to match your vision. This control is especially valuable for professional food photographers working on tight schedules or in controlled studio environments.
The key to making artificial light look natural lies in understanding how light behaves in real-world settings and replicating those qualities. By manipulating light size, direction, and diffusion, you can mimic the softness of a cloudy day or the intensity of direct sunlight. This guide breaks down the process, from selecting the right equipment to fine-tuning your setup for stunning results.
Defining Your Lighting Style
Before diving into equipment and setups, it’s crucial to identify the lighting style that resonates with you. Natural light varies widely—think of the gentle, diffused glow of a Pacific Northwest overcast day versus the harsh, high-contrast sunlight of a Mediterranean afternoon. Your personal style will guide your artificial light choices.
Exercise: Discover Your Lighting Preferences
To pinpoint your preferred lighting aesthetic, try this simple exercise:
- Create a Pinterest Board: Start a digital mood board to collect food photography images that inspire you. Look for shots that make you think, “I want my photos to look like that!” Pin at least 50 images over a few days or weeks to ensure a thoughtful collection.
- Analyze the Lighting: Review your pinned images and ask:
- What do the shadows look like? Are they soft and subtle or sharp and dramatic?
- How does the light interact with the food’s texture and colors?
- Are there consistent patterns in light direction (side, back, or top)?
- Do you prefer high-contrast or low-contrast lighting?
- Identify Patterns: Group similar images to uncover your preferences. For example, you might gravitate toward soft, even lighting for delicate desserts or bold, dramatic lighting for rustic dishes.
This exercise helps you define your creative vision, which you can then translate into artificial light setups. Whether you love the ethereal softness of diffused light or the striking contrast of directional light, artificial lighting tools can bring your vision to life.
Essential Equipment for Natural-Looking Artificial Light
Creating natural-looking artificial light requires the right tools. Below is a curated list of essential equipment, along with specifications and approximate prices, to help you build a versatile setup.
| Equipment | Description | Specifications | Approx. Price (USD) |
|---|---|---|---|
| Godox SL-150W LED Light | A powerful, continuous LED light with adjustable brightness for food photography. | 150W, 5600K color temp, CRI 93+ | $250–$300 |
| 5-in-1 Reflector (150x100cm) | A versatile tool for bouncing or diffusing light, with white, silver, gold, black, and translucent surfaces. | Collapsible, multi-surface | $30–$50 |
| Light Stands (2) | Sturdy stands to hold lights and reflectors securely. | Adjustable height, max 6–8 ft | $20–$40 each |
| A-Clamps or C-Stand | For securing reflectors or diffusers in place. | Heavy-duty, adjustable | $10–$50 (A-Clamp), $100–$200 (C-Stand) |
| 7-Inch Reflector | Focuses light into a narrower beam for increased contrast. | Compatible with Godox SL-150W | $15–$30 |
| Diffusion Material | Softens light to mimic natural diffusion (e.g., sheer fabric or professional diffuser). | Translucent, heat-resistant | $10–$30 |
Why This Setup?
- Godox SL-150W: This LED light offers a daylight-balanced 5600K color temperature, closely mimicking natural sunlight. Its high CRI (Color Rendering Index) ensures accurate color reproduction, critical for food photography.
- 5-in-1 Reflector: Affordable and versatile, this reflector allows you to bounce light (white/silver), add warmth (gold), create dramatic shadows (black), or diffuse light (translucent).
- Light Stands and Clamps: These provide stability and flexibility for positioning lights and reflectors precisely.
- 7-Inch Reflector: By narrowing the light beam, this modifier increases contrast, replicating the effect of direct sunlight.
This setup is beginner-friendly, budget-conscious, and adaptable to various lighting styles, making it ideal for replicating natural light.
Setting Up Your Artificial Light to Mimic Natural Light
To make artificial light look natural, think of your setup as a staged version of the sun and a window. The light source (e.g., Godox SL-150W) acts as the sun, while a diffuser or reflector mimics the window’s softening effect. Here’s a step-by-step guide to creating a natural-looking setup with a dramatic, high-contrast aesthetic inspired by a sunny day.
Step 1: Prepare the Environment
- Eliminate Ambient Light: Turn off room lights and cover windows to prevent unwanted light from interfering. Ambient light can introduce color casts, as its color temperature may differ from your artificial light (e.g., 5600K for daylight-balanced LEDs vs. 3200K for tungsten room lights).
- Position the Light: Place the Godox SL-150W on a light stand, angled toward your subject. Imagine it as the sun outside a window.
Step 2: Add Diffusion
- Use a Diffuser: Position the translucent panel of your 5-in-1 reflector between the light and the subject. This softens the light, mimicking the effect of a sheer curtain or overcast sky. Secure the reflector with A-clamps or a C-stand.
- Adjust Distance: Place the diffuser closer to the subject for softer light or farther for slightly harder light. For a natural look, keep the diffuser 2–3 feet from the subject.
Step 3: Shape the Light
- Add a Reflector Head: Attach the 7-inch reflector to the Godox SL-150W to focus the light into a narrower beam. This increases contrast, creating sharper shadows reminiscent of direct sunlight.
- Test and Assess: Take a test shot and evaluate the shadows. If they’re too soft, move the light closer to the diffuser or reduce the diffuser’s size to harden the light.
Step 4: Manage Shadows
- Bounce Light: Use the white or silver side of the 5-in-1 reflector to bounce light back onto the subject, filling in shadows for a balanced look. Position it opposite the light source.
- Negative Fill: For more dramatic shadows, use the black side of the reflector to absorb light and deepen shadows, ideal for moody, high-contrast shots.
Step 5: Fine-Tune the Setup
- Adjust Light Direction: Experiment with side lighting (to highlight texture, e.g., for salads) or backlighting (to showcase translucency, e.g., for beverages). Avoid front lighting, as it flattens the image.
- Check Background: Ensure the background complements the lighting. A neutral or textured backdrop (e.g., wood or fabric) enhances the natural feel without distracting from the food.
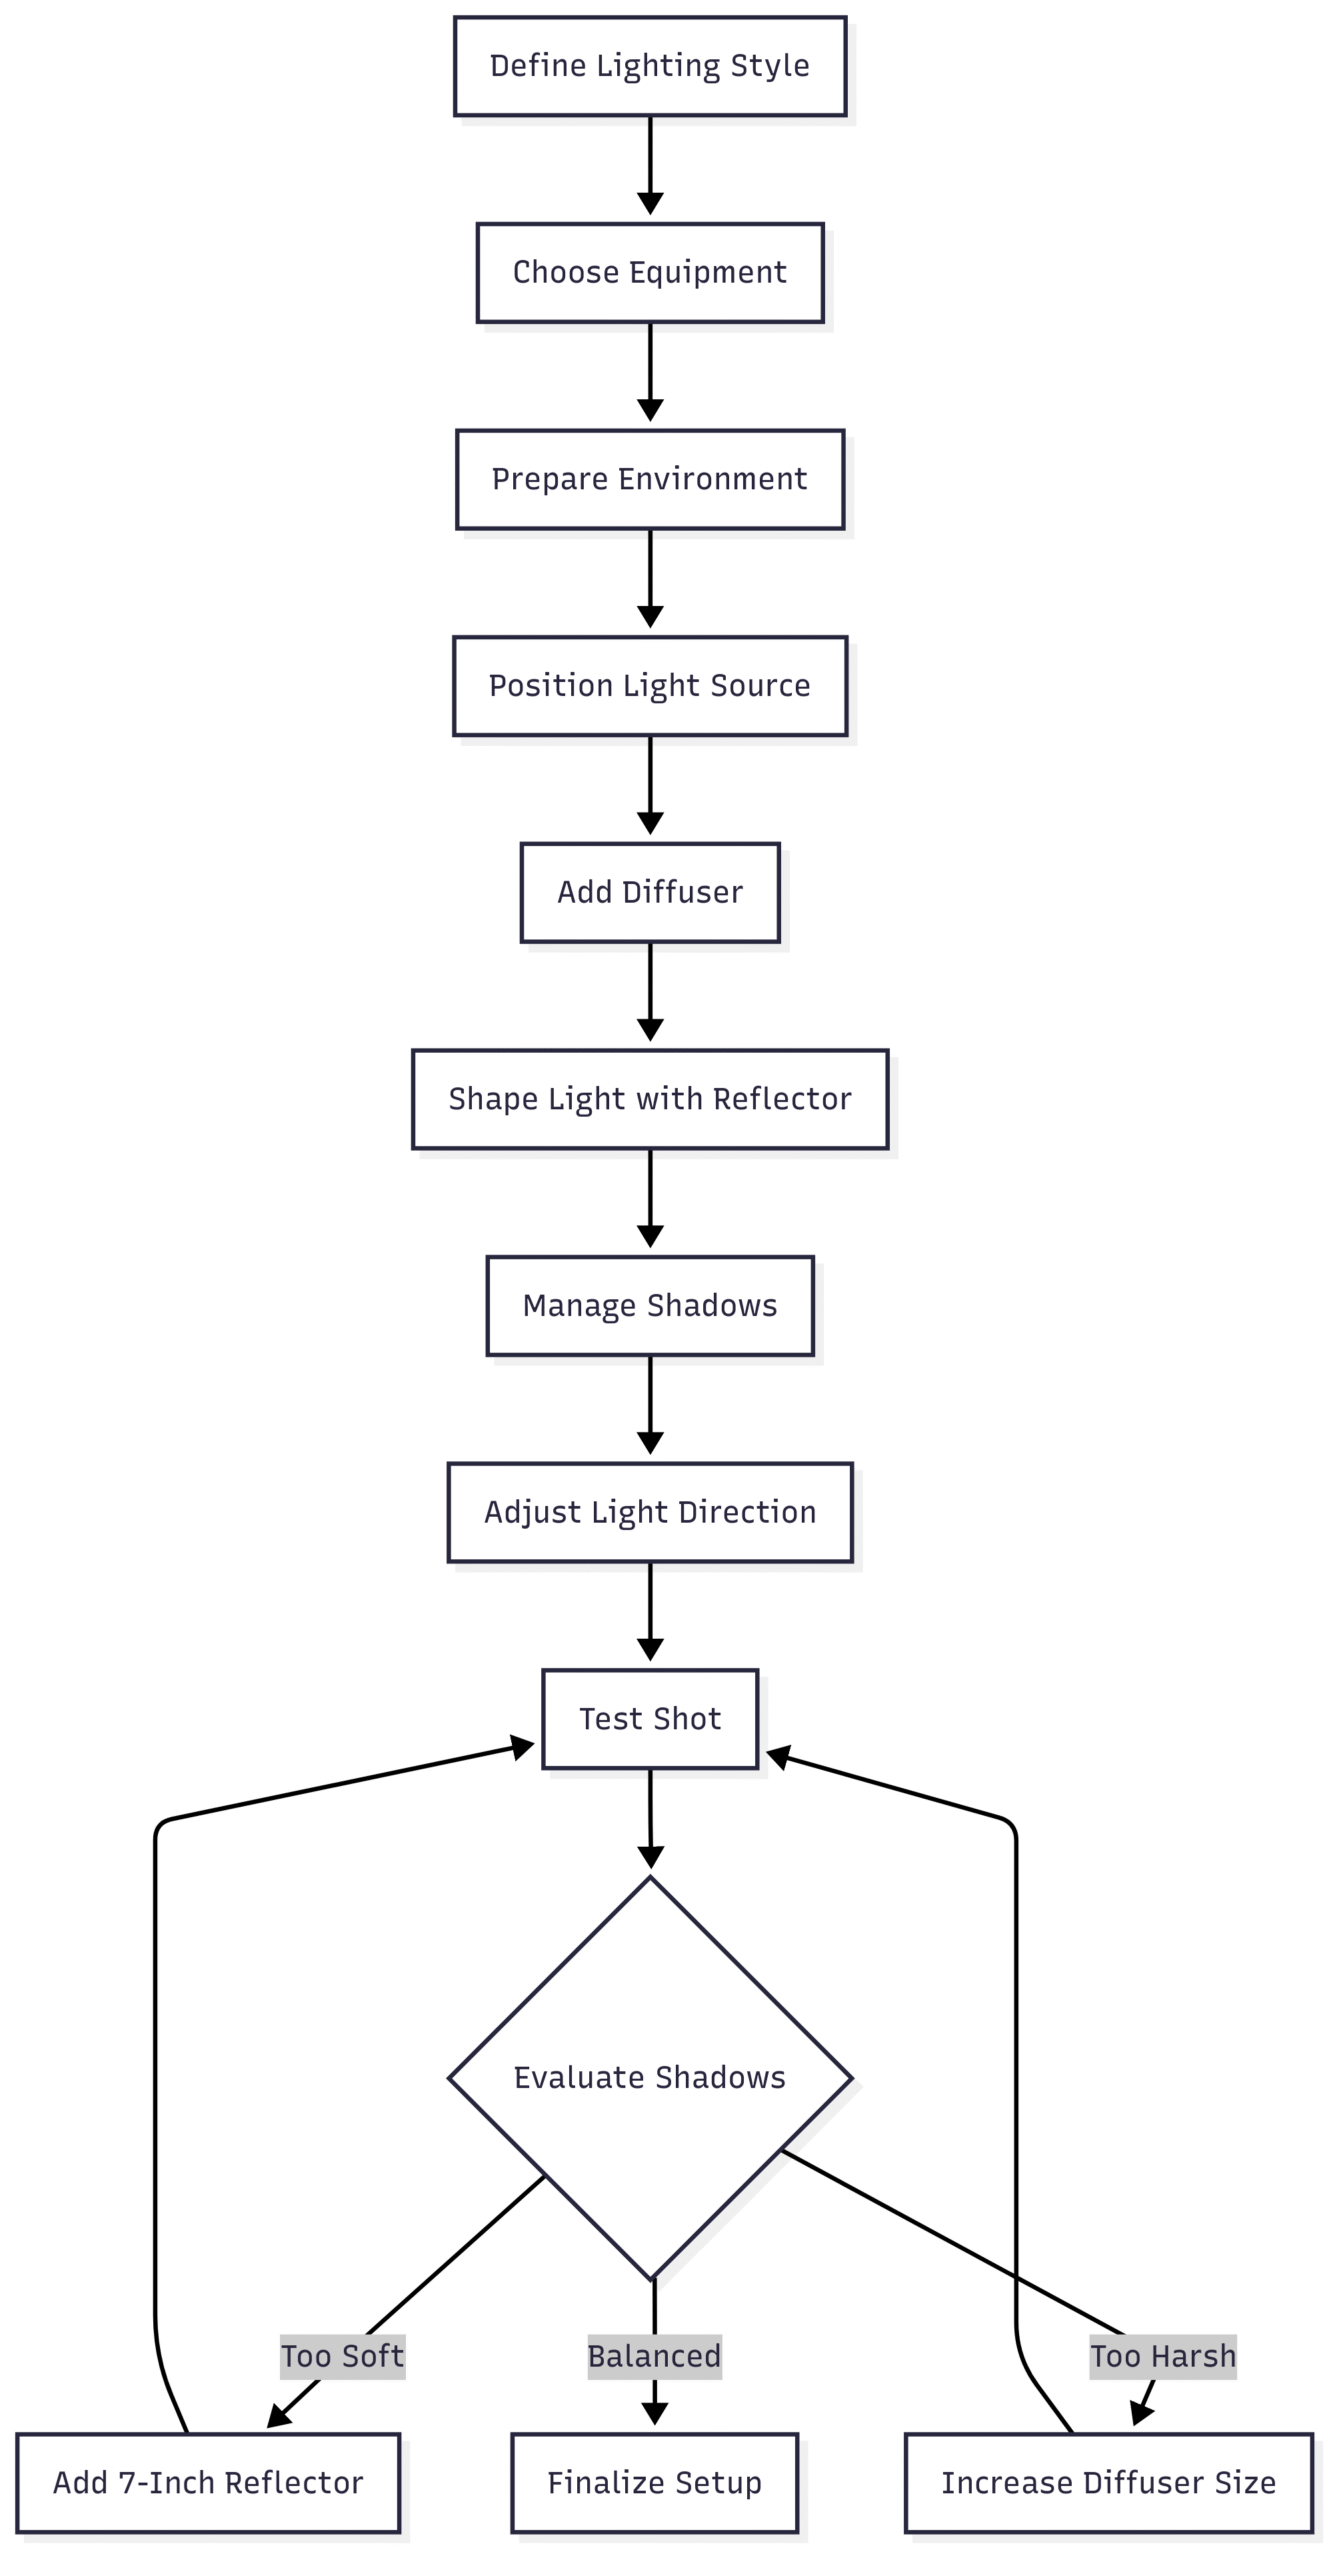
Chart: Lighting Setup Workflow
Below is a flowchart illustrating the process of setting up artificial light for a natural look, created using Mermaid syntax.

This workflow ensures a systematic approach to achieving your desired lighting style.
Comparing Natural vs. Artificial Light
To highlight the advantages of artificial light, let’s compare it to natural light in food photography.
| Aspect | Natural Light | Artificial Light |
|---|---|---|
| Consistency | Varies with time, weather, and location | Fully controllable, consistent |
| Color Temperature | Shifts throughout the day (e.g., 5500K–6500K) | Fixed (e.g., 5600K for daylight-balanced LEDs) |
| Setup Time | Minimal, relies on window placement | Requires setup but offers flexibility |
| Creative Control | Limited by external conditions | High, with adjustable intensity and modifiers |
| Cost | Free (if shooting near a window) | $300–$600 for a beginner-friendly setup |
Artificial light excels in controlled environments, making it ideal for professional shoots or when natural light is unavailable.
Tips for Refining Your Artificial Light Setup
- Experiment with Light Size: Smaller light sources (e.g., with a 7-inch reflector) create harder, more dramatic shadows, while larger sources (e.g., a diffused 5-in-1 reflector) produce softer, more even light.
- Control Color Temperature: Use daylight-balanced lights (5600K) to mimic natural light. If shooting in mixed lighting, use gels to match the artificial light to ambient conditions.
- Vary Light Distance: Moving the light closer to the subject increases intensity and softens shadows, while moving it farther creates harder, more defined shadows.
- Use Backgrounds Strategically: Choose backgrounds that enhance the natural feel, such as wooden boards, linen napkins, or neutral-colored fabrics. Avoid overly busy backgrounds that distract from the food.
- Practice and Iterate: Take multiple test shots, adjusting the light, diffuser, and reflectors to fine-tune the look. Compare each shot to your inspiration images to ensure alignment with your vision.
Common Mistakes to Avoid
- Ignoring Ambient Light: Failing to block room lights or windows can introduce color casts and reduce control over your setup.
- Overusing Front Lighting: This flattens the image, reducing texture and depth. Stick to side or backlighting for dimension.
- Skipping Test Shots: Always take test shots to assess light quality before finalizing your composition.
- Using Low-Quality Diffusers: Cheap or uneven diffusers can create hot spots or inconsistent light. Invest in professional-grade diffusion material.
Advanced Techniques: Creating Specific Natural Light Looks
Once you’re comfortable with the basics, experiment with these advanced techniques to replicate specific natural light aesthetics:
- Soft, Overcast Light:
- Use a large diffuser (e.g., 150x100cm translucent reflector) close to the subject.
- Position the light source farther back to spread light evenly.
- Use a white reflector to fill in shadows gently.
- Harsh, Sunny Light:
- Remove the diffuser and use the 7-inch reflector to create a focused beam.
- Position the light at a higher angle to mimic the sun’s position.
- Use a black reflector for negative fill to deepen shadows.
- Golden Hour Glow:
- Use the gold side of the 5-in-1 reflector to add warmth to the light.
- Angle the light low to create long, dramatic shadows.
- Slightly underexpose the image for a moody, sunset-like effect.
Recommended Resources
- Free Pick the Perfect Light Mini Course: Explore this online resource to learn more about choosing the right artificial lights for your photography style. Available at various photography education platforms.
- Artificial Academy: Join this community for in-depth tutorials on shaping and manipulating artificial light for food photography.
- YouTube Tutorials:
- “The Bite Shot” (YouTube): Demonstrates natural light and reflector techniques.
- “Two Loves Studio” (YouTube): Shows how to use negative fill for dramatic effects.
Conclusion
Mastering natural-looking artificial light setups for food photography opens up endless creative possibilities. By understanding your lighting style, investing in versatile equipment like the Godox SL-150W and 5-in-1 reflectors, and following a systematic setup process, you can achieve professional results that rival natural light. Experiment with diffusion, reflectors, and light direction to craft the perfect mood for your dishes, whether it’s soft and airy or bold and dramatic. With practice and the right tools, artificial light becomes your creative superpower, giving you the freedom to shoot stunning food photos anytime, anywhere.
We will meet you on next article.
Please share this Natural Looking Artificial Light Setup for Food Photography with your friends and do a comment below about your feedback.
Until you can read, How to shoot food like a pro just using a smartphone


