Quick Tip for new bloggers: Block yourself from Analytics!
Learn how to block your own visits from Google Analytics with IP filtering, browser extensions, and more for accurate website data.
Google Analytics is a powerful tool for website owners, offering insights into visitor behavior, traffic sources, and performance metrics. However, for new bloggers and website administrators, a common issue arises when their own visits skew the analytics data, leading to inaccurate reports. This can be particularly frustrating for those just starting out, as it distorts metrics like page views, session duration, and bounce rates, which are critical for understanding audience engagement. Fortunately, there are several methods to block your own visits from being tracked by Google Analytics, ensuring cleaner and more reliable data.
This comprehensive guide explores why blocking your own visits is essential, details multiple methods to achieve this, and provides step-by-step instructions tailored for beginners and advanced users alike. From IP address filtering to browser extensions and advanced techniques, we cover everything you need to know to optimize your Google Analytics setup. We’ll also address privacy concerns, include practical examples, and provide visual aids like flowcharts to simplify the process.
Why Block Yourself from Google Analytics?
When you visit your own website—whether to test functionality, update content, or preview changes—Google Analytics records these interactions as visitor activity. For new bloggers with low traffic, these self-visits can significantly inflate metrics, making it difficult to gauge true audience behavior. For example, a user on a social platform shared their frustration: “I just started a week ago, and my analytics are skewed for the first week because it was counting my own page views.” This sentiment is echoed by many new website owners who want accurate data to inform content strategies and marketing efforts.
Beyond accuracy, blocking your own visits can streamline your workflow. As one commenter advised, “If your blog is getting an amount of traffic that your own pageviews skew it that much, I’d actually just ignore your analytics entirely for now and focus on creating more content.” While content creation is critical, clean analytics data helps you measure the impact of that content without distortion. Additionally, for privacy-conscious users, opting out of tracking aligns with broader concerns about data collection, even if it’s your own website.
Google Analytics collects data such as:
- Time spent on the website and individual pages
- Search queries leading to your content
- User actions (e.g., clicks, form submissions)
- IP addresses and browser information
While this data is valuable for optimization, including your own visits can muddy the waters. The methods below—ranging from simple browser extensions to technical configurations—offer solutions for excluding your activity while preserving the integrity of visitor data.
Method 1: Filtering Your IP Address in Google Analytics
One of the most reliable ways to block your own visits is by filtering your IP address directly in Google Analytics. This method is ideal for users with a static IP address, as it prevents Google Analytics from recording any traffic originating from that IP.
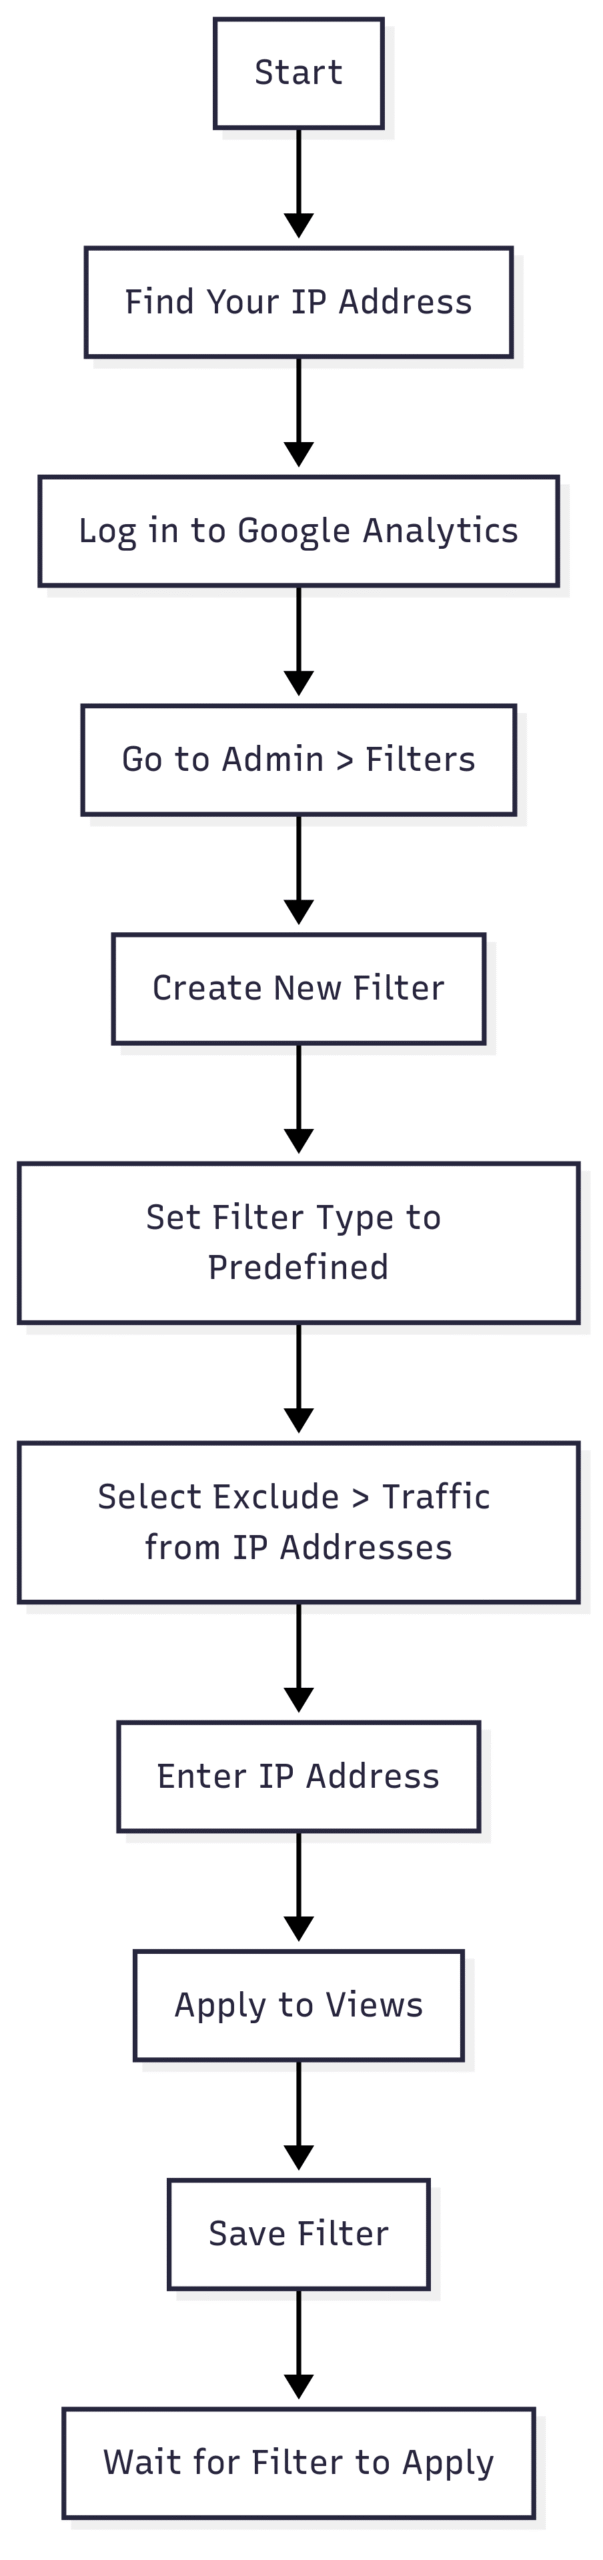
Step-by-Step Guide to IP Filtering
- Find Your IP Address:
Your public IP address is a unique identifier assigned by your internet service provider. To find it, search “what is my IP address” on Google, or visit websites like whatismyipaddress.com or whatismyip.com. Your IP will appear as a string of numbers, e.g.,192.168.1.1. Note it down. - Access Google Analytics Admin:
Log in to your Google Analytics account. From the dashboard, click the Admin icon (gear symbol) in the bottom-left corner to access the administrative settings. - Navigate to Filters:
In the Admin panel, locate the View column (or Property column in Universal Analytics). Select Filters or All Filters, depending on your interface. Click + Add Filter to create a new filter. - Configure the Filter:
- Filter Name: Enter a descriptive name, e.g., “Exclude My IP.”
- Filter Type: Choose Predefined.
- Select Filter Type: Choose Exclude.
- Select Source or Destination: Choose traffic from the IP addresses.
- Select Expression: Choose that are equal to.
- IP Address: Enter the IP address you noted earlier.
- Apply to Views: Select the views (e.g., All Web Site Data) where you want the filter applied.
- Save and Apply:
Click Save to activate the filter. It may take up to 24 hours for the filter to take effect.
Considerations for IP Filtering
- Static vs. Dynamic IP: This method works best for static IP addresses. If your ISP assigns a dynamic IP (which changes periodically), you’ll need to update the filter whenever your IP changes. Check your IP regularly or consider alternative methods.
- Multiple Devices: If you use multiple devices (e.g., laptop, phone) on the same network, a single IP filter should cover all devices, as they share the same public IP.
- Accuracy: IP filtering is highly effective for home or office networks but may not work for users on public Wi-Fi or VPNs, where IPs vary.
Flowchart: IP Filtering Process
Method 2: Using the “Block Yourself from Analytics” Chrome Extension
For users seeking a simpler, non-technical solution, the “Block Yourself from Analytics” Chrome extension is an excellent choice. This browser-based tool allows you to block Google Analytics tracking for specific websites without modifying server-side code or analytics settings.
Step-by-Step Guide to Using the Extension
- Install the Extension:
Open the Chrome browser and visit the Chrome Web Store. Search for “Block Yourself from Analytics” and click Add to Chrome. Confirm by clicking Add Extension in the popup. - Access Extension Settings:
Once installed, an orange icon will appear in your browser’s toolbar. Click the icon to open the extension’s settings. - Add Website URLs:
- Navigate to the website you want to exclude from tracking, then click the extension icon and select Block Analytics for this website.
- Alternatively, go to the Options menu, manually enter the website’s URL (e.g.,
everythingitaly.org), and click Add. Save your changes.
- Verify Blocking:
Visit your website and confirm that your visits are not recorded in Google Analytics’ real-time reports.
Advantages and Limitations
- Advantages: Easy to set up, no need for Google Analytics access, and ideal for users who manage multiple websites. You can block tracking on a per-site basis.
- Limitations: Only works in Chrome. If you use other browsers (e.g., Firefox, Safari), you’ll need alternative extensions or methods. Also, it doesn’t block tracking for other users on your network unless they install the extension.
Method 3: Using Google Analytics Opt-Out Extension
Google offers an official Google Analytics Opt-Out extension for all major browsers (Chrome, Firefox, Safari, Edge, Opera). This extension prevents Google Analytics from collecting data from your browser across all websites, not just your own.
Steps to Install Google Analytics Opt-Out
- Find the Extension:
Visit the official Google Analytics Opt-Out page or search for “Google Analytics Opt-Out” in your browser’s extension store. - Install the Extension:
Click Add to [Browser] and confirm the installation. - Activate and Test:
No configuration is needed. The extension automatically blocks Google Analytics scripts from running. Check your website’s real-time analytics to ensure your visits are excluded.
Pros and Cons
- Pros: Official Google solution, works across multiple browsers, and requires no setup.
- Cons: Blocks tracking for all websites, not just your own, which may not be ideal if you only want to exclude specific sites. Installing additional software may also feel counterintuitive for some users.
Method 4: Conditional PHP Statements for WordPress Users
For WordPress users, a server-side solution involves wrapping the Google Analytics tracking code in a conditional PHP statement to prevent it from loading when you’re logged in as an administrator. This method is particularly useful for developers or those comfortable editing theme files.
Steps to Implement Conditional PHP
- Locate the Tracking Code:
In your WordPress thememini-site.php file or wherever your Google Analytics code is embedded (commonly inheader.php). - Edit the Theme File:
Access your theme folder via FTP or the WordPress theme editor. Open the file containing the Google Analytics script (e.g.,header.php). - Wrap the Script in a Conditional Statement:
Modify the code as follows:
   if ( ! is_user_logged_in() ) {
       // Google Analytics tracking code here
}- Save and Test:
Save the file and test your website while logged in to ensure your visits are not tracked.
Benefits and Drawbacks
- Benefits: No reliance on IP addresses or extensions, works across all browsers, and is ideal for WordPress administrators.
- Drawbacks: Requires coding knowledge and access to theme files. Incorrect edits can break your site, so back up files before proceeding.
Method 5: Using Site Kit by Google (WordPress Plugin)
Google’s official Site Kit plugin for WordPress offers a built-in option to exclude logged-in users from Google Analytics tracking. This is a seamless solution for WordPress users who want minimal configuration.
Steps to Configure Site Kit
- Install Site Kit:
In your WordPress dashboard, go to Plugins > Add New, search for “Site Kit by Google,” and install/activate it. - Connect Google Analytics:
Follow the setup wizard to connect your Google Analytics property. - Verify Default Settings:
By default, Site Kit excludes logged-in users (administrators, editors, etc.) from tracking. Ensure you’re logged in when visiting your site to avoid being tracked.
Pros and Cons
- Pros: No manual coding required, official Google integration, and automatic exclusion of logged-in users.
- Cons: Limited to WordPress sites and requires plugin installation.
Method 6: Using a Firewall or Hosts File
Advanced users can block Google Analytics at the network level by configuring a firewall or editing the hosts file to redirect google-analytics.com to a non-existent IP address (e.g., 0.0.0.0).
Firewall Configuration
- Add rules to block
google-analytics.comandwww.google-analytics.comdomains or their associated IP ranges. - Note: IP addresses may change, requiring periodic updates.
Hosts File Configuration (Windows Example)
- Open Command Prompt as administrator.
- Type:
notepad "C:\Windows\System32\drivers\etc\hosts" - Add lines:
   0.0.0.0 google-analytics.com
0.0.0.0 www.google-analytics.com- Save and restart your browser or computer.
Considerations
- Advantages: Blocks tracking network-wide, no browser dependency.
- Disadvantages: Complex setup, potential for IP changes, and may affect other Google services.
Method 7: Using Ad Blockers or Brave Browser
Ad blockers like uBlock Origin or Adblock Plus can block Google Analytics scripts by default or with configuration (e.g., enabling the EasyList filter in Adblock Plus). Similarly, the Brave browser blocks trackers, including Google Analytics, by default.
Ad Blocker Setup (Adblock Plus Example)
- Install Adblock Plus from the Chrome Web Store.
- Open the extension’s settings and enable the EasyList filter under the Advanced tab.
Brave Browser Setup
- Download and install Brave from its official website.
- Use Brave as your default browser; no further configuration is needed.
Pros and Cons
- Pros: Ad blockers and Brave offer broad privacy protection beyond Google Analytics.
- Cons: May block ads or trackers on other sites, potentially affecting user experience.
Comparison of Methods
| Method | Ease of Use | Browser Dependency | Scope | Technical Skill Required |
|---|---|---|---|---|
| IP Filtering | Moderate | None | Specific IP | Low |
| Block Yourself Extension | Easy | Chrome Only | Specific Websites | None |
| Google Analytics Opt-Out | Easy | All Major Browsers | All Websites | None |
| PHP Conditional (WordPress) | Hard | None | Logged-in Users | High |
| Site Kit (WordPress) | Easy | None | Logged-in Users | Low |
| Firewall/Hosts File | Hard | None | Network-Wide | High |
| Ad Blockers/Brave Browser | Easy | Browser-Specific | All Websites | None |
Pricing and Accessibility
Most methods are free:
- IP Filtering, Site Kit, PHP Conditional, Firewall/Hosts File: No cost, included with Google Analytics or WordPress.
- Browser Extensions (Block Yourself, Google Analytics Opt-Out, Ad Blockers): Free via Chrome Web Store or other extension stores.
- Brave Browser: Free to download and use.
- WordPress Hosting Example: As shared by a blogger, a yearly plan on Hostinger costs approximately $40 (converted from €35), with a domain name at around $11 (€10).
Privacy Considerations
Blocking your own visits not only ensures accurate analytics but also aligns with privacy concerns. Google Analytics collects extensive data, which can feel intrusive when shared across platforms. For users prioritizing privacy, methods like the Brave browser or ad blockers offer broader protection, while IP filtering and WordPress-specific solutions are more targeted.
Final Thoughts
Blocking yourself from Google Analytics is a critical step for new bloggers and website owners to ensure accurate traffic data. Whether you choose the simplicity of a browser extension, the precision of IP filtering, or the robustness of server-side solutions, each method offers unique benefits tailored to different skill levels and needs. By implementing one or more of these techniques, you can focus on creating content and growing your audience with confidence in your analytics.
For new bloggers, starting with tools like the “Block Yourself from Analytics” extension or Site Kit for WordPress offers a quick fix, while advanced users may prefer firewall or PHP-based solutions for greater control. Whichever method you choose, the result is cleaner data, better insights, and a stronger foundation for your website’s success.
Please share these Quick Tip for new bloggers: Block yourself from Analytics! with your friends and do a comment below about your feedback.
We will meet you on next article.
Until you can read, The Food Photographer’s Guide To Better Composition