The Best Overhead Setup For Food Photography
Introduction to Overhead Food Photography
Overhead food photography, commonly known as flatlay or 90-degree shooting, has revolutionized culinary imagery by offering a unique, top-down perspective that emphasizes composition, color, and texture. This technique flattens the scene into a two-dimensional canvas, making it perfect for showcasing ingredient spreads, plated dishes, or minimalist arrangements without the clutter of background distractions. It’s a favorite among food bloggers, Instagram influencers, and commercial photographers, providing a versatile style that adapts to social media posts, cookbook layouts, or restaurant marketing materials.
The appeal lies in its simplicity and visual impact—overhead shots turn a humble bowl of soup or a vibrant salad into a work of art, leveraging symmetry and negative space. However, achieving consistent, professional results requires more than just pointing a camera downward. Challenges like camera shake, uneven angles, and equipment visibility can derail your efforts. A well-designed overhead rig addresses these issues, offering stability, adjustable height, and precision to let you focus on creativity rather than technical struggles.
This guide dives deep into the best overhead setups, drawing from professional practices, budget-friendly alternatives, and real-world applications. We’ll cover popular methods, equipment with detailed specs and pricing, step-by-step assembly, lighting techniques, and practical shooting advice. Whether you’re a beginner with a smartphone or a seasoned pro with a DSLR, this resource will help you craft the perfect overhead rig for flawless food photos. The technique’s roots trace back to traditional still-life photography, but its modern resurgence—fueled by digital platforms—demands a tailored approach, which we’ll explore fully here.
Why Overhead Shots Matter in Food Photography
Overhead photography transforms food into a graphic masterpiece, highlighting patterns, colors, and textures in a way that 45-degree or eye-level shots can’t. Imagine a spread of fresh herbs and citrus slices on a rustic board—overhead, it becomes a vibrant patchwork that draws the viewer’s eye. This angle excels at storytelling: it’s ideal for recipe blogs displaying ingredients step-by-step, commercial shoots showcasing menu items, or editorial work where clean layouts enhance readability.
The benefits are numerous:
- Visual Impact: The flattened perspective creates bold, shareable images.
- Adaptability: Works for tight close-ups or expansive table settings.
- Styling Efficiency: Allows real-time prop adjustments with a clear top-down view.
- Marketability: Perfect for social media grids or print, with space for text overlays.
That said, it has limitations. Layered dishes like multi-tiered cakes lose depth, and the setup requires vertical clearance, which can be tricky in small spaces. Pairing overhead shots with 45-degree angles in your portfolio balances these drawbacks, offering a fuller narrative. A reliable rig ensures you can execute this style consistently, avoiding common pitfalls like tilted frames or blurry results.
Popular Overhead Setups: Pros, Cons, and Comparisons
Let’s explore the most common overhead photography methods, ranging from basic to advanced, to understand their strengths and weaknesses. This comparison will guide you toward the best fit for your needs.
1. Handheld Shooting
The simplest method: hold your camera or phone above the food and shoot downward.
- Pros: No equipment needed; fast for spontaneous shots; highly portable.
- Cons: Inconsistent angles lead to skewed compositions; prone to blur from shaky hands; causes physical strain (e.g., back or arm fatigue); lacks precision for repeated shots.
- Best For: Casual photographers or beginners testing the style.
- Tip: Use a step stool for height, but stabilize with a surface if possible—handheld alone won’t cut it for pro work.
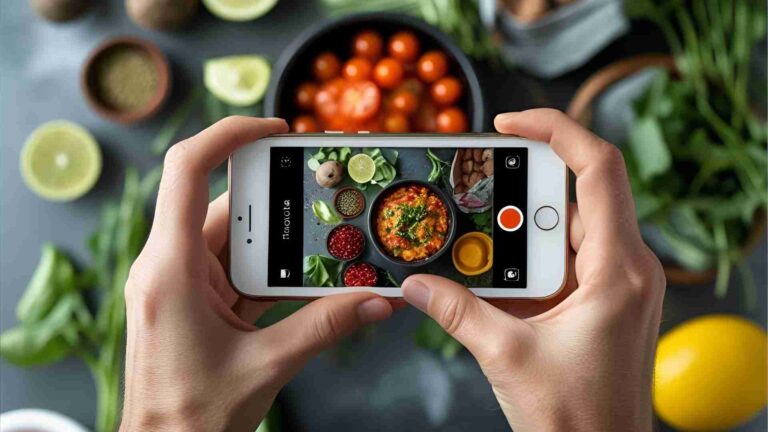
For smartphone users, handheld is tempting but risky. Blurry images or graininess from low light are common without stabilization. Transitioning to a tripod or mount is a quick upgrade.
2. Standard Tripods
A popular starting point, using a tripod with legs flipped upward or a center column extended.
- Examples:
- Oben CT-3581: Lightweight (3 lbs), compact, flips for overhead without extra arms.
- Manfrotto 055: Robust (7 lbs), includes a lateral arm option for extended reach.
- Pros: Affordable; easy to transport; versatile for multiple angles with adjustments.
- Cons: Tripod legs often intrude into the frame, requiring post-editing; floor-based setup limits height flexibility; frequent readjustments slow workflow.
- Best For: Small spaces or travel, though it’s a stepping stone for serious photographers.
Table: Standard Tripod Comparison
| Model | Weight | Key Features | Price (USD, approx.) | Pros | Cons |
|---|---|---|---|---|---|
| Oben CT-3581 | 3 lbs | Lightweight, flips upside down | ~$150 | Portable, no arm needed | Legs in frame, limited height |
| Manfrotto 055 | 7 lbs | Sturdy, center column arm | ~$250 | Secure, multi-angle support | Needs longer arm, bulky |
3. Lateral Extension Arms
Add-on arms for tripods to extend the camera outward.
- Examples: Manfrotto side arm (~$150); Tarion arm with hook (~$50).
- Pros: Extends reach over the set; hook allows sandbag counterweights.
- Cons: Requires a compatible tripod head; limited length for large spreads; needs careful balancing.
- Best For: Enhancing an existing tripod without a full rig investment.
4. C-Stands or Dual Light Stand Rigs
Professional options for maximum stability.
- Pros: Highly adjustable height; rock-solid for large setups; expandable with additional arms.
- Cons: Bulky and space-intensive; higher cost; tethering recommended for safety at height.
- Best For: Studio environments or frequent commercial shoots.
C-stands spark debate—some avoid them for cameras due to tip-over risks when extended, favoring dual light stands instead. Always use two support points for heavy gear.
The Best Overhead Setup: Dual Light Stand Rig
After evaluating options, the dual light stand rig with an extension arm emerges as the best overhead setup. This configuration offers unmatched stability, level control, and versatility, avoiding issues like leg interference or floor-based limitations. It adjusts easily for height and orientation, pairs with a separate tripod for other angles, and scales for larger scenes.
Why This Setup Wins
- Stability: Two stands and sandbags prevent tipping.
- Flexibility: Adjustable for table width and camera height.
- Efficiency: Quick to set up and break down.
- Scalability: Longer arms accommodate bigger spreads.
- Cons: Requires more space; initial cost (~$400–$600); tethering needed for high shots.
Compared to tripods, it keeps gear out of the frame. Against C-stands, it’s safer with dual support. This rig is the gold standard for consistent, professional overhead shots.
Chart: Setup Assembly Flow
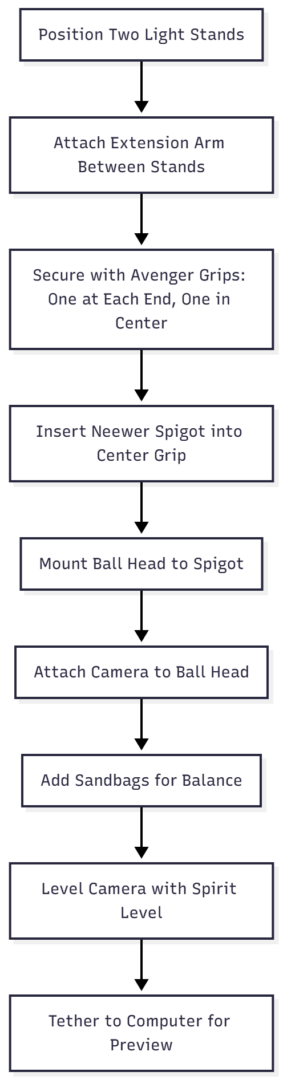
This flowchart outlines the assembly process for a balanced rig.
Essential Equipment for the Best Overhead Setup
Here’s the core gear list, with detailed specs and approximate prices (based on October 2025 market trends; verify with retailers). Invest in durable items to ensure longevity.
Table: Equipment List with Specs and Prices
| Item | Description/Specs | Price (USD, approx.) | Why Essential |
|---|---|---|---|
| Two Light Stands | Neewer Pro 9ft: Aluminum, 9ft max height, air-cushioned | ~$50 each ($100 total) | Provides adjustable base support. |
| Extension Arm | Kupo 40in Grip Arm: 40in length, includes one grip | ~$80 | Extends camera over the scene. |
| Three Avenger Grips | Avenger D200: 2.5in jaw, 5/8in pin | ~$30 each ($90 total) | Secures arm to stands and camera. |
| Neewer 1/4 to 3/8 Spigot | Brass adapter: 1/4in to 3/8in thread | ~$10 (pack of 2) | Connects grip to ball head. |
| Ball Head | Manfrotto XPRO: 22lb load, quick release | ~$150 | Enables precise camera positioning. |
| Sandbags | Neewer 2-Pack: Empty, fillable to 11lbs | ~$20 | Ensures stability with weight. |
| Spirit Level | Kapro Hotshoe: Bubble level for camera | ~$15 | Guarantees perfect alignment. |
| Tethering Cable | Tether Tools 15ft USB: High-speed, orange | ~$30 | Links camera to computer for previews. |
Total Estimated Cost: $465 (budget) to $650 (with premium options).
Assembly Guide
- Position light stands to match arm length.
- Attach arm with grips at both ends.
- Add center grip and insert spigot.
- Mount ball head and camera.
- Secure with sandbags.
- Level using spirit level and tether for monitoring.
For phone users: Pair with an iBOLT overhead mount (~$40) and wireless remote (~$10) to minimize shake.
Advanced Tips for Overhead Shooting
Lighting and Composition
Natural light from a north-facing window is ideal, softened with diffusers like sheer curtains or a 5-in-1 reflector. For controlled shoots, add LED panels (e.g., Godox SL-60W, ~$350) or softboxes to mimic daylight. Position lights at 45-degree angles to reduce harsh shadows, and use a reflector underneath for fill light.
Compositionally, apply the rule of thirds, leaving negative space for text or branding. Layer textures—felt under fabric prevents wrinkles during ironing. Experiment with shapes: round plates on square boards create dynamic contrast. Props like linen napkins or wooden spoons add depth without clutter.
Tethered Shooting Essentials
Tethering to a computer (via Capture One or Lightroom) lets you spot fine details—crumbs, uneven lighting, or prop placement—on a larger screen. Essential tools include Tether Tools cables, dummy batteries for long shoots, and a laptop stand for ergonomics. This setup is a game-changer for client approvals or batch editing.
Phone-Specific Tips
For iPhones or Androids: Use a tripod or mount for stability. Apps like Filmic Pro or ProCam offer manual controls (ISO, shutter speed). Enable voice commands (“Hey Siri, take a photo”) or use a Bluetooth remote for hands-free shooting. Avoid zoom—crop in post for clarity.
Cost Breakdown and Budget Alternatives
Full rig cost: ~$500. Budget option: Use a tripod with a lateral arm (~$200 total). Long-term, durable gear saves on replacements. Renting equipment (e.g., via LensRentals) is another cost-effective start.
Table: Budget vs. Pro Cost Comparison
| Setup Type | Total Cost | Key Differences |
|---|---|---|
| Budget (Tripod + Arm) | ~$250 | Basic stability; more manual adjustments. |
| Pro (Dual Stands) | ~$500 | Superior balance; streamlined workflow. |
Real-World Examples and Case Studies
- Rainbow Plant Life: Uses overhead for ingredient flatlays, pairing with captions for Instagram engagement. Tools: Canon EOS R5, natural light.
- Nisha’s Dal Palak: Wide-angle overhead shots with WP Recipe Maker enhance SEO and readability on blogs.
- Commercial Shoots: Lobster boil spreads use Glide Gear rigs (~$150) to avoid crashes, ensuring consistent results.
Common Problems and Solutions
- Instability: Add sandbags; use dual stands instead of single supports.
- Level Issues: Check with a spirit level; tether for real-time feedback.
- Lighting Inconsistency: Keep notes on setups; invest in LED alternatives.
- Camera Protection: Use straps and consider gear insurance.
- Cohesive Style: Develop a color palette; use editing presets (e.g., VSCO).
FAQ
A basic tripod like the Oben CT-3581 (~$150) can be flipped for overhead shots, ideal for beginners on a budget. Legs may intrude, and height is limited, so adding a lateral arm (e.g., Tarion, ~$50) extends reach and improves framing. Total: under $200. Check for sales to save more.
A macro lens captures detailed close-ups (e.g., herb textures), with the Canon RF 35mm (~$500) being a good option. For broader flatlays, a 50mm prime lens is versatile and often sufficient, especially with DSLRs or mirrorless cameras.
Phone shots blur from hand shake. Use a tripod or overhead mount (e.g., iBOLT, ~$40) for stability. Add a Bluetooth remote (~$10) or enable voice commands (e.g., “Hey Siri, take a photo”) to avoid touching the device, ensuring sharp images.
Tethering (connecting to a computer via a cable like Tether Tools, ~$30) lets you preview shots on a larger screen, perfect for spotting flaws. Beginners can skip it, but pros rely on it for precision and client feedback during shoots.
For big setups (e.g., buffet spreads), a custom 80-inch conduit pipe (~$20) paired with three Avenger grips (~$90 total) extends your rig. Attach it to light stands for a stable, wide-reach solution, ideal for professional or large-scale shoots.
Low light causes grainy shots. The Godox SLB60Y LED (~$350) provides steady, adjustable light, mimicking daylight. Position it at 45 degrees with a diffuser for soft, even lighting, especially useful indoors or at night.
Conclusion
The dual light stand rig emerges as the best overhead food photography setup, offering stability and versatility for about $500 with gear like Neewer stands, a Kupo arm, and a Manfrotto ball head. This configuration tackles issues like shake and angle inconsistencies, perfect for bloggers, commercial shoots, or home recipes. Start with a budget tripod (~$150) or add an arm (~$200) to test the waters before scaling up, adapting to close-ups or wide spreads.
Pair it with lighting—diffusers for natural light or Godox SLB60Y LEDs—and techniques like tethering or phone mounts for precision. Examples like Rainbow Plant Life’s flatlays show its impact on engagement. Use soft afternoon light to begin. Overcome challenges like low light or blur with the right tools, crafting a cohesive style with presets. This setup isn’t just gear—it’s a creative process that connects you with your audience, turning every shot into a culinary story. Practice, refine, and watch your photography thrive.
Please share this The Best Overhead Setup For Food Photography with your friends and do a comment below about your feedback.
We will meet you on next article.
Until you can read, Food Photography Behind The Scenes