How To Shoot Splash Photography By Yourself
Splash photography is a captivating genre that freezes the fleeting moment when liquids—water, paint, milk, or even coffee—collide, erupt, or cascade over objects, producing images that pulse with energy, color, and creativity. This technique transforms ordinary scenes into extraordinary visual stories, making it a favorite for food photographers, product advertisers, and fine art creators alike. Whether you’re a beginner eager to build a standout portfolio or a seasoned photographer pushing creative boundaries, mastering splash photography solo in a home studio is entirely achievable. With minimal equipment, strategic planning, and a willingness to embrace the mess, you can produce professional-grade images that rival studio productions. This comprehensive guide—spanning equipment selection, setup, lighting, capture techniques, and post-processing—offers a roadmap to creating images that not only dazzle but also rank highly on platforms like Google, where detailed, high-quality content drives visibility. Expect to dive deep into the technical, creative, and practical aspects, with charts, diagrams, and actionable insights to ensure success.
Understanding Splash Photography: The Art and Science
Splash photography is about capturing the ephemeral beauty of liquid in motion, using high-speed flash to freeze details invisible to the human eye. A strawberry plunging into a glass of water, paint exploding from a can, or milk swirling around a coffee cup—these moments, lasting milliseconds, become timeless when photographed correctly. The genre blends technical precision with artistic flair, requiring mastery of timing, lighting, and composition to craft images that tell a story or evoke emotion.
Why Splash Photography Captivates
The allure of splash photography lies in its dynamic energy. Unlike static product shots, splash images convey movement, making them ideal for portfolios, social media, or commercial work. They showcase technical prowess—controlling variables like liquid viscosity, flash duration, and camera settings is no small feat. For Google optimization, splash images perform exceptionally in visual searches, driving traffic to tutorials, portfolios, or services. Their vibrant, eye-catching nature makes them shareable, increasing engagement on platforms like Pinterest or Instagram. Beginners can start with water for its simplicity, but advancing to thicker liquids like milk or paint yields more sculptural, dramatic results, elevating the visual impact.
Types of Splash Photography
Splash photography encompasses a variety of styles, each with unique challenges and creative opportunities:
- Water Splash Photography: The entry point for most, involving objects like fruit or ice dropped into water. It produces clean, transparent splashes, perfect for food and beverage photography.
- Paint Splash Photography: Uses viscous paint for bold, colorful explosions. Ideal for abstract art, it’s messier but creates striking, high-impact visuals.
- Milk or Opaque Liquid Splashes: Offers creamy, opaque textures, often used in coffee or dessert shots to emphasize richness.
- Product-Integrated Splashes: Liquids interacting with items like bottles, glasses, or cosmetics, common in advertising to highlight freshness or luxury.
- Colored or Glowing Splashes: Incorporates food dyes, gels, or glowing additives for vibrant, surreal effects, often used in fine art or experimental photography.
Each style demands specific adjustments. Water splashes require ultra-fast flash durations (1/10,000th second or quicker) to capture fine droplets, while thicker liquids like paint allow slightly slower speeds due to their slower dispersal.
The Physics of Freezing Motion
At its core, splash photography hinges on physics. Gravity accelerates falling objects at 9.8 m/s², and liquids disperse based on surface tension and viscosity. For example, water has lower viscosity, creating delicate, fast-moving splashes, while milk or paint forms thicker, slower patterns. The key to freezing these moments isn’t shutter speed but flash duration. A flash firing at 1/20,000th second captures details a camera’s maximum shutter (1/8000th second) can’t in low light. Understanding flash duration measurements—t0.1 (full burst) and t0.5 (partial burst)—is critical. T0.1 provides a more accurate reading, ensuring sharp, crisp results. For instance, a t0.1 duration of 1/5000th second is equivalent to a t0.5 of 1/15,000th, making it ideal for water splashes.
Building Your Splash Photography Kit
Creating stunning splash photos doesn’t require a Hollywood budget. A well-curated kit with versatile, durable gear prioritizes safety, control, and affordability. Below, we detail essential equipment with specifications and approximate prices (sourced from retailers like Amazon, B&H Photo, or Adorama, reflecting current market averages).
Core Camera Gear
- DSLR or Mirrorless Camera: Choose a full-frame or APS-C model with manual mode and bulb exposure for precise control in dark setups. Examples include the Nikon D750 (24.3MP full-frame sensor, ISO 100-12,800, 6.5fps) or Canon EOS R6 (20.1MP, ISO 100-102,400, 12fps). Price: $1,200-$2,500. These cameras offer robust dynamic range and low-light performance, essential for controlled exposures.
- Macro Lens: A 100mm or 105mm f/2.8 lens captures intricate splash details without distortion. Specs: Nikon AF-S VR Micro-NIKKOR 105mm f/2.8G IF-ED (1:1 reproduction ratio, vibration reduction, 62mm filter thread). Price: $800-$1,000. Budget alternative: Sigma 105mm f/2.8 EX DG OS HSM ($500, 1:1 ratio, optical stabilization). Macro lenses allow close-ups from a safe distance, protecting gear from splashes.
- Tripod: A sturdy tripod like the Manfrotto MT055XPRO3 (aluminum, 9kg load capacity, 170cm max height, 360° panning) ensures stability for pre-focused shots. Price: $250. Essential for consistent framing across multiple takes.
Lighting and Modifiers
Lighting is the backbone of splash photography, freezing motion and shaping mood.
- Speedlights or Strobes: Opt for units with fast flash durations. Canon Speedlite 600EX II-RT (guide number 197’ at ISO 100, recycle time 0.1-5.5s, 1/20,000s at low power) or Godox AD200Pro (200Ws, 1/13,000s max duration, TTL support). Price: $300-$500. Low power settings (1/32-1/128) achieve speeds over 1/4000s, critical for sharp splashes.
- Softboxes or Diffusers: Godox 24×24″ softbox (collapsible, silver interior, Bowens mount) softens light for even illumination. Price: $50. Double diffusion (softbox + acrylic sheet) creates smooth gradients, reducing harsh shadows.
- Triggers: PocketWizard Plus III (32 channels, 1600ft range, 1/250s sync) syncs camera and lights wirelessly, eliminating cables. Price: $150. Alternatives: Godox XPro trigger ($70).
Surfaces and Props
- Backdrops and Surfaces: Vinyl or acrylic sheets, like Texturit stone surfaces (24×36″, waterproof, textured). Price: $100. Black or neutral backdrops enhance contrast, while textured surfaces add realism.
- Containers: A 20-gallon acrylic aquarium (24x12x16″, clear sides) contains splashes without distorting reflections. Price: $50. Alternatives: shallow trays ($20).
- Liquids and Additives: Water, food coloring, guar gum (1/8 tsp per 2 cups for thicker splashes). Price: $10 total. Guar gum enhances splash height without clouding water.
Safety and Cleaning Tools
- Protective Plastic: Clear polythene sheets (10x12ft, 4mm thick). Price: $20. Shields camera and electronics.
- Cleaning Supplies: Pack of 12 microfiber cloths (lint-free), squeegee, and wet-dry vacuum (Shop-Vac 5-gallon, 4.5HP). Price: $50. Essential for quick cleanup between shots.
Table: Essential Equipment List with Specs and Prices
| Item | Specifications | Approximate Price (USD) | Why Essential? |
|---|---|---|---|
| Nikon D750 Camera | 24.3MP full-frame, ISO 100-12,800, 6.5fps | 1,200 | Manual control for dark setups |
| 105mm Macro Lens | f/2.8, 1:1 ratio, VR stabilization | 900 | Close-up detail without proximity |
| Manfrotto Tripod | Aluminum, 9kg load, 170cm height | 250 | Stability for pre-focusing |
| Godox AD200Pro Strobe | 200Ws, 1/13,000s duration, TTL | 300 | Fast flash to freeze motion |
| Softbox (24×24″) | Collapsible, Bowens mount | 50 | Even diffusion |
| PocketWizard Trigger | 32 channels, 1600ft range, 1/250s sync | 150 | Wireless sync |
| Acrylic Aquarium | 20-gallon, 24x12x16″, clear | 50 | Splash containment |
| Polythene Sheets | 10x12ft, waterproof, 4mm thick | 20 | Camera protection |
| Microfiber Cloths | Pack of 12, lint-free | 10 | Quick cleanup |
Total Estimated Cost: $2,930. Beginners can start with a used camera ($800) and single speedlight ($200) to lower costs to ~$1,500.
Optional Advanced Tools
- Time Machine Controller: Mumford Time Machine (programmable drops, 0.001-9.999s intervals, USB interface). Price: $300. Automates multi-drop collisions for complex shapes like umbrellas or mushrooms.
- Drip Kit: Three-valve system for precise drop timing. Price: $200. Ideal for water drop photography.
Setting Up Your Home Studio for Splash Photography
Turning a home space into a splash photography studio requires careful planning to manage mess, ensure safety, and optimize workflow. A room with tile or linoleum floors—like a garage, bathroom, or kitchen—is ideal, as carpets absorb liquids and complicate cleanup. Aim for a 10x10ft space to accommodate gear and movement.
Prioritizing Safety
Liquids and electronics are a risky combination, so safety is paramount:
- Floor Protection: Cover floors with plastic tarps (10x12ft, $20) to prevent slips and water damage.
- Electrical Safety: Use Ground Fault Circuit Interrupter (GFCI) outlets for lights and triggers to avoid shocks.
- Camera Protection: Wrap camera in polythene, keeping it 3-5 feet from the splash zone. Use a UV filter ($20) to protect the lens.
- Personal Safety: Wear non-slip shoes and gloves, especially with paint or chemicals. Ventilate the area for paint fumes.
- Fire Hazards: Avoid overloading circuits; use surge protectors ($15).
Basic Setup Steps
- Position the Tripod and Camera: Set at eye level or slightly above (4-5ft height) for dynamic angles. Pre-focus manually on the splash zone using a stand-in object (e.g., a pen).
- Prepare the Surface: Place a waterproof vinyl backdrop (black or neutral, 24×36″) on a table or stand. Use a shallow tray (12×18″, $20) or aquarium to contain splashes.
- Arrange Props: For a beginner shot, use a wine glass with water and a strawberry. Secure props with a hot glue gun ($10) if flipping for anti-gravity effects.
- Test for Mess: Pour water slowly to gauge splash radius. Adjust camera distance if splashes exceed 2-3 feet.
Advanced Setup: Anti-Gravity Technique
To create rising splashes that defy gravity:
- Glue props (e.g., limes, acrylic ice) to a lightweight wooden board (24×18″, $15).
- Flip the board upside down, securing it on supports (e.g., wooden frames or crates).
- Shoot the splash, then rotate the image 180° in post-processing for an anti-gravity effect.
This technique adds a surreal twist, ideal for fine art or creative portfolios.
Chart: Basic Studio Setup Diagram
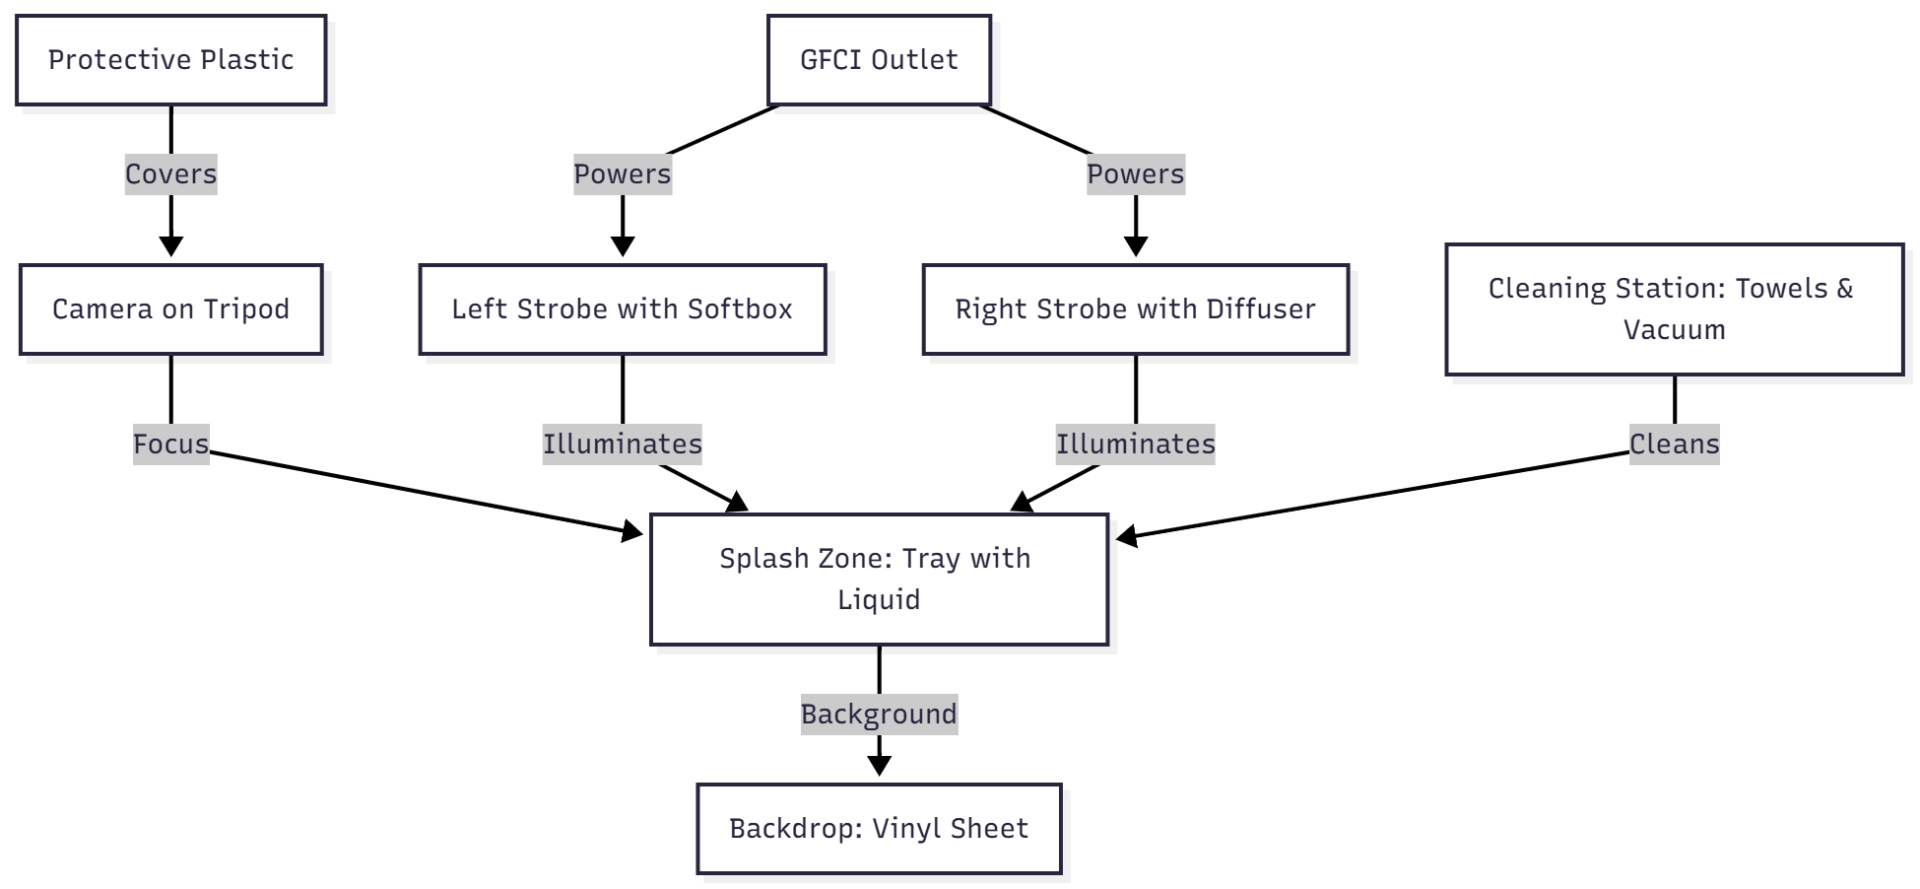
This diagram maps the flow from camera setup to cleanup, emphasizing safety and containment.
Testing the Setup
Take test shots to ensure no ambient light leaks (image should be black without flash). Adjust camera distance if props shift or splashes hit gear. Clean the container after every 5-10 shots to avoid watermarks.
Lighting Techniques for Perfect Splashes
Lighting is the heart of splash photography, as it freezes motion and shapes the image’s mood. The goal is to balance fast flash durations with even illumination to highlight liquid textures and reflections.
Key Lighting Principles
- Flash Duration vs. Shutter Speed: Flash duration (e.g., 1/4000s-1/20,000s) freezes motion, not shutter speed. Set shutter to sync speed (1/200-1/250s) to block ambient light.
- Diffusion for Evenness: Double diffusers (softbox + acrylic sheet) soften shadows, creating smooth gradients across glass or liquid surfaces.
- Backlighting for Translucency: Position strobes behind subjects to make ice or water glow, enhancing visual depth.
Standard Lighting Setup
- Key Light: Place a strobe with a softbox (24×24″) behind the subject, 2-3 feet away, to create a glowing background.
- Fill Light: Position a side strobe with a diffuser (e.g., 5-in-1 reflector, $30) to lift shadows and add volume.
- Rim Light: Add an optional back strobe with a grid or snoot ($20) for edge highlights, especially on glass or fruit.
For bokeh effects:
- Place crumpled aluminum foil (15×15″, $5) 12-18″ behind the tray.
- Attach colored gels ($10 pack) to flashes for vibrant, multi-hued reflections.
Chart: Lighting Setup Diagram

This diagram illustrates light paths for balanced, dynamic illumination.
Testing and Adjusting Light
- Take a black frame without flash to confirm no ambient light (image should be pure black).
- Adjust flash power to achieve proper exposure at f/8-14, ISO 100-200. Start at 1/32 power and increase if underexposed.
- Test bokeh by shooting foil alone; adjust gel colors for desired vibrancy.
Capturing the Splash: Step-by-Step Guide
With your studio and lighting ready, capturing the perfect splash requires precision and patience. Here’s a detailed breakdown.
Step 1: Pre-Visualize and Test
- Sketch the Vision: Draw the desired splash shape (e.g., crown, arc, or umbrella). For example, a strawberry dropped from 2 feet creates a crown splash, while pouring water forms an arch.
- Test with Water: Use water before colored liquids or paint to minimize mess. Test drop heights (1-3 feet) to gauge splash patterns.
Step 2: Camera Settings
- Mode: Manual for full control.
- Shutter Speed: 1/200s (or camera’s sync speed) to eliminate ambient light.
- Aperture: f/8-14 for sufficient depth of field, keeping the entire splash in focus.
- ISO: 100-200 for clean images with minimal noise.
- Focus: Manual, pre-focused on the splash zone (use a stand-in object like a ruler).
- Burst Mode: Enable continuous high mode (5-12fps) if flash recycle time is under 1 second.
Step 3: Trigger the Action
- Manual Drops: Drop objects (e.g., fruit) by hand or pour liquid from a container (e.g., cylindrical glass for elongated splashes).
- Triggers: Use a PocketWizard or sound trigger ($50) for precise timing. Sound triggers activate on the splash’s impact noise.
- Drip Kits: For advanced setups, use a Mumford Time Machine with a drip kit to control drop count (1-3 drops), interval (0.001-9.999s), and size.
Continuous vs. Single Shot
- Burst Mode: Ideal if your strobe recycles in under 1 second (e.g., Godox AD200Pro at 0.1s). Captures multiple frames per splash, increasing success rates.
- Single Shot: Necessary for slower-recycling flashes (e.g., 3-5s). Practice timing by dropping objects and triggering simultaneously.
Examples and Variations
- Fruit in Water: Drop strawberries from 2 feet into a glass for crown-shaped splashes. Use guar gum to enhance splash height.
- Paint Explosions: Drop billiard balls into paint cans for dramatic bursts. Build a trapdoor (plywood + hinges, $30) for controlled drops.
- Milk Splashes: Pour milk over coffee beans for creamy textures, using yellow food dye for warmth.
- Portrait Splashes: Throw water or colored powder at a model, using two assistants for dual-direction splashes.
Shoot 50-100 frames per session, reviewing tethered on a laptop ($15 tether cable) to adjust timing or lighting.
Editing Splash Photography: Compositing Mastery
Post-processing is where splash photography transforms from raw captures to polished masterpieces. Compositing—combining multiple images—is the cornerstone of professional results.
What is Image Compositing?
Compositing blends a clean base image (e.g., an empty glass) with one or more splash images to create a seamless final shot. This technique corrects imperfections like watermarks or misaligned splashes.
Step-by-Step in Photoshop
- Import Layers: Open the clean image (e.g., dry glass on backdrop) as the top layer, with 2-3 splash images below in Photoshop ($10/month subscription).
- Duplicate and Group: Duplicate all layers and group originals in a folder to preserve them.
- Layer Masks: Add a layer mask to the clean image (Layer > Layer Mask > Reveal All). Use a soft brush (opacity 50-70%) to paint black, revealing splashes from lower layers. White erases mistakes.
- Refine Details: Use dodge (lighten) and burn (darken) tools to enhance highlights and shadows. Adjust levels (Image > Adjustments > Levels) for contrast.
- Color Correction: Use HSL panel (Image > Adjustments > Hue/Saturation) to boost vibrancy or correct color casts. Apply frequency separation (Filter > Frequency Separation) for smooth gradients without losing texture.
Advanced Editing Techniques
- Frequency Separation: Separate high-frequency (detail) and low-frequency (color/luminosity) layers for non-destructive cleanup of smudges or uneven lighting.
- Manual Shadows and Reflections: Add shadows with a soft brush (opacity 20%) on a new layer, following light direction. Blend in reflections for realism.
- Bokeh Enhancement: Apply a slight Gaussian blur (Filter > Blur > Gaussian Blur, 2-5px) to the background for dreamy bokeh effects.
Save the PSD file to retain layers; export a high-resolution JPEG (300dpi) for sharing.
Table: Common Photoshop Tools for Splash Editing
| Tool | Purpose | Settings Tips |
|---|---|---|
| Layer Mask | Reveal/hide splashes | Black reveals, white conceals |
| Dodge/Burn | Enhance highlights/shadows | Exposure 10-20%, soft brush |
| Levels Adjustment | Boost contrast | Adjust midtones for balance |
| HSL Panel | Correct colors, boost vibrancy | Saturation +10-20, selective hues |
| Frequency Separation | Smooth gradients without losing detail | 8-bit, radius 4-8px |
Advanced Tips and Creative Ideas
Take your splash photography to the next level with these techniques and inspirations.
Experimenting with Liquids
- Thicken Water: Add guar gum (1/8 tsp per 2 cups water, $5) or xanthan gum for taller, more defined splashes without clouding.
- Milk and Dye: Use fat-free milk with a drop of cream and food dye (yellow or red, $3) for rich, opaque effects in coffee or dessert shots.
- Paint Variations: Mix acrylic paint ($10 per bottle) with water for smoother splashes; use neon colors for vibrant abstracts.
Creative Variations
- Bokeh Splashes: Place crumpled foil 12-18″ behind the tray, using colored gels on flashes for sparkling, multi-hued backgrounds.
- Anti-Gravity Effects: Flip setups upside down, as described earlier, for surreal rising splashes.
- Multi-Drop Collisions: Use a Time Machine to program 2-3 drops with 0.05s intervals for complex shapes like umbrellas or mushrooms.
- Portrait Splashes: Involve a model, throwing water or colored powder from both sides (two assistants recommended). Use lukewarm water for comfort.
Troubleshooting Common Issues
- Blurry Splashes: Increase flash speed (lower power to 1/64) or use a faster strobe (e.g., Godox AD400Pro, $600).
- Uneven Lighting: Add a second diffuser or adjust softbox angles for uniformity.
- Excessive Mess: Use larger trays or buckets ($15) to catch splashes; clean glass after every 5 shots to avoid watermarks.
- Inconsistent Colors: Test dyes in small batches; strain guar gum mixtures with a coffee filter ($5) to prevent lumps.
Portfolio Integration
Incorporate splashes into product photography for beverages, cosmetics, or food. For example, a splash around a soda bottle conveys refreshment, while paint on a sneaker suggests creativity. These images attract clients in advertising, as they appear complex yet achievable with practice.
Common Mistakes and How to Avoid Them
Avoid these pitfalls to streamline your workflow and improve results:
- Ignoring Safety: Risk of electrical shock or slips. Solution: Use GFCI outlets, cover floors, and protect gear with polythene.
- Poor Timing: Missing the splash peak. Solution: Practice with sound triggers or burst mode; review tethered shots.
- Ambient Light Leaks: Causes exposure issues. Solution: Shoot in a dark room; test black frames without flash.
- Over-Editing: Flat, unnatural images. Solution: Keep adjustments subtle; preserve liquid textures.
- Inconsistent Focus: Blurry splashes. Solution: Pre-focus manually on the splash zone; use a stand-in object.
Chart: Sample Splash Photography Workflow
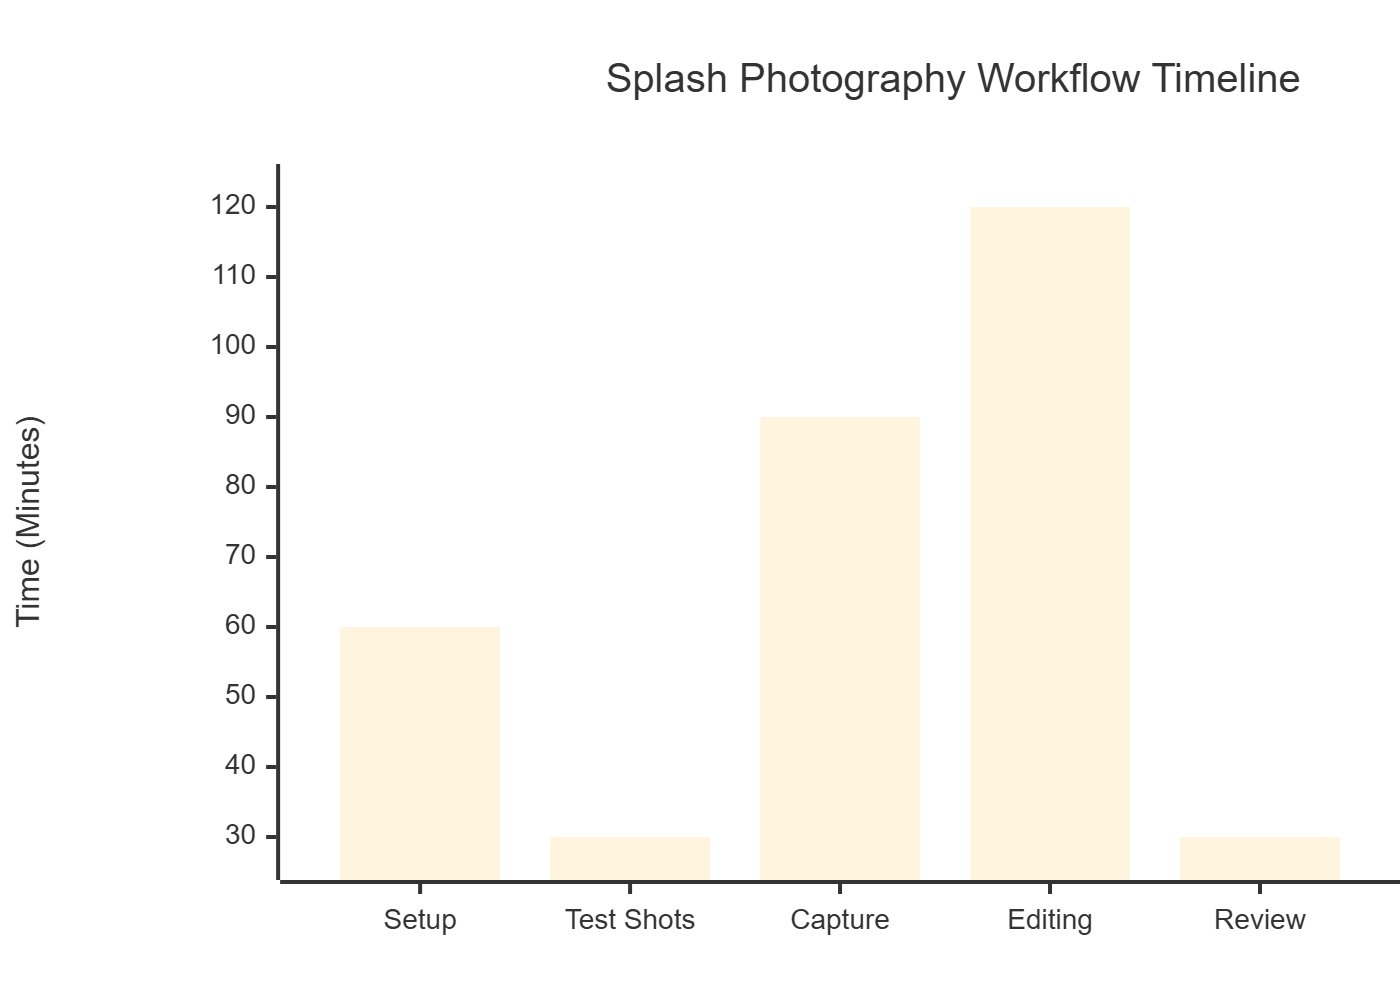
This chart visualizes time allocation across stages, highlighting editing as the most time-intensive.
Conclusion
Mastering splash photography solo is a transformative journey that blends technical skill, creative experimentation, and relentless practice. From assembling a budget-friendly kit—starting at ~$1,500 with used gear—to capturing dynamic splashes and refining them in Photoshop, this guide provides a comprehensive blueprint for success. Start with simple water splashes, progress to paint or milk, and experiment with advanced techniques like anti-gravity setups or bokeh effects. Prioritize safety, test rigorously, and embrace the mess as part of the creative process. The resulting images—vibrant, dynamic, and technically impressive—will elevate your portfolio, attract clients, and perform strongly in visual searches, boosting your online presence. With patience and persistence, you’ll create splash photos that not only captivate but also redefine your photographic potential. Dive in, get messy, and let your creativity make a splash.
Please share this How To Shoot Splash Photography By Yourself with your friends and do a comment below about your feedback.
We will meet you on next article.
Until you can read, iPhone Photography Tips