Setting Up your Business as a Food Photographer
Food photography is a captivating blend of artistry, technical skill, and entrepreneurship, offering a rewarding career for those passionate about capturing the essence of culinary creations. The demand for high-quality food images is surging, driven by restaurants, food brands, cookbooks, and the ever-growing influence of social media platforms like Instagram, Pinterest, and TikTok. According to industry insights, the average base salary for food photographers is around $62,000 annually, with top professionals earning over $100,000. This niche’s resilience, even in challenging economic climates, makes it an appealing choice for creative individuals looking to turn their passion into a thriving business.
Starting a food photography business doesn’t require a fortune or a culinary degree, but it does demand a strategic approach to equipment, skills, and business operations. This comprehensive guide will walk you through every step of launching a successful food photography business, from selecting the right gear and mastering techniques to establishing a legal framework, setting competitive pricing, and attracting clients. With practical advice, detailed recommendations, and visual aids like charts and flowcharts, you’ll gain the knowledge to build a sustainable, profitable venture that stands out in a competitive market.
Why Choose Food Photography?
Food photography is more than just snapping pictures of dishes—it’s about storytelling, evoking emotions, and making viewers crave the food they see. The industry’s growth is fueled by the rise of digital marketing, where visually stunning images are essential for engaging audiences. Restaurants need mouthwatering photos for menus and social media, food brands require high-quality product shots, and bloggers seek styled images to elevate their content. The niche’s versatility allows photographers to work with diverse clients, from fine dining establishments to artisanal producers and cookbook publishers.
The financial potential is significant. Data from ZipRecruiter indicates that food photographers earn an average of $62,000 per year, with freelancers having the flexibility to take on multiple projects and potentially surpass this figure. The industry’s resilience was evident during the COVID-19 pandemic, as food photography remained in demand for online menus, delivery apps, and social media campaigns. For those with a passion for food and photography, this career offers both creative fulfillment and financial opportunity.
To succeed, you’ll need to balance creativity with business acumen. This guide provides a step-by-step roadmap, focusing on practical investments in gear, skills, and marketing while avoiding common pitfalls like overspending on unnecessary equipment or underpricing your services. Whether you’re a hobbyist with a basic camera or an aspiring professional, this article will help you build a food photography business that thrives.
Essential Equipment for Food Photography
The right equipment is crucial for producing professional-grade food images, but you don’t need to break the bank to start. Focus on quality tools that align with your budget and skill level. Below is a detailed breakdown of essential gear, including specifications, prices, and tips for maximizing their use.
Camera
A reliable camera is the cornerstone of your food photography setup. You don’t need a top-tier model to create stunning images—entry-level DSLRs or mirrorless cameras that shoot in RAW format and support manual mode are sufficient for beginners. RAW files preserve image data, allowing extensive editing without quality loss. Crop sensor cameras are budget-friendly but may limit you in tight spaces due to focal length magnification. Full-frame cameras offer superior image quality, dynamic range, and low-light performance, making them ideal for professional work.
Recommended Cameras:
- Entry-Level:
- Canon EOS Rebel T7: 24.1MP APS-C sensor, ISO 100–6400, $479
- Nikon D3500: 24.2MP APS-C sensor, ISO 100–25600, $499
- Mid-Range:
- Canon EOS 90D: 32.5MP APS-C sensor, ISO 100–25600, $1,199
- Sony A7 III: 24.2MP full-frame sensor, ISO 100–51200, $1,998
- High-End:
- Nikon Z6 II: 24.5MP full-frame sensor, ISO 100–51200, $1,996
- Canon R5: 45MP full-frame sensor, ISO 100–51200, $3,899
For beginners, a used or refurbished camera can save hundreds of dollars. Prioritize models with multiple focus points for precise shots and high ISO capabilities for low-light environments, such as dimly lit restaurants. As your skills grow, you can upgrade to a full-frame camera for enhanced clarity and versatility.
Lenses
Lenses are more critical than the camera body because they determine image quality, perspective, and depth of field. A 50mm prime lens (f/1.8), often called the “nifty fifty,” is a versatile, affordable choice, offering a natural field of view similar to the human eye and a wide aperture for a creamy bokeh effect. A 24-70mm zoom lens provides flexibility for wide-angle to short telephoto shots, ideal for varied compositions like flatlays or close-ups. Macro lenses, such as a 60mm or 105mm, excel at capturing intricate details, like the texture of a pastry or the sheen on a sauce.
Recommended Lenses:
- Canon EF 50mm f/1.8 STM: $125, ideal for beginners
- Nikon AF-S 50mm f/1.8G: $216, sharp and reliable
- Sigma 24-70mm f/2.8 DG OS HSM Art: $1,299, versatile zoom
- Canon EF 100mm f/2.8L Macro IS USM: $1,299, perfect for detailed shots
- Nikon AF-S 105mm f/2.8G VR Micro: $896, excellent for macro work
Start with a kit lens (18-55mm) if budget is a concern, and rent lenses to test options before investing. For example, renting a 24-70mm f/2.8 lens costs about $50–$100 per week, helping you determine if it suits your style.
Lighting
Lighting shapes the mood and highlights textures in food photography. Natural light from a window is ideal for beginners, offering a soft, flattering effect. Use diffusers (e.g., sheer curtains or white fabric) to soften harsh sunlight and reflectors to bounce light into shadows. For controlled setups, artificial lighting like softboxes or strobes provides consistency. Backlighting creates a glowing effect on food, such as the sparkle on a beverage, while side lighting emphasizes clarity and shape, ideal for plated dishes.
Lighting Equipment:
- Neewer 600W Studio Strobe Kit: $199, powerful for studio work
- Godox SL-60W LED Light: $139, continuous light for beginners
- Westcott 5-in-1 Reflector (40-inch): $39, versatile for natural light
- Neewer 24×24-inch Softbox: $49, diffuses light evenly
Experiment with lighting angles to suit your subject. For example, warm lighting enhances desserts like cakes, while cooler tones complement seafood or salads. A light meter ($99–$299) can help measure exposure accurately.
Tripod
A sturdy tripod ensures consistent framing, especially for long exposures or overhead shots common in food photography. It’s essential for restaurant menu photography, where uniformity across images is critical. Choose a tripod with adjustable height and a stable base to handle heavy cameras.
Recommended Tripods:
- Manfrotto Befree Advanced: $189, lightweight and portable
- Vanguard Alta Pro 263AB: $149, versatile for overhead shots
- Gitzo Series 2 Traveler: $399, durable for professional use
Props
Props add context, texture, and personality to your images. Start with affordable, neutral items from thrift stores, such as white plates, wooden boards, and linen napkins. Over time, invest in unique, handmade pieces like ceramic bowls or vintage cutlery to reflect your style. Common props include:
- Marble or wood cutting boards
- Vintage teacups or utensils
- Linen napkins or burlap
- Acrylic ice cubes for beverage shots
- Fresh herbs or garnishes
Prop Budgeting:
- Thrift store finds: $5–$20 per item
- Handmade ceramics: $30–$100 per piece
- Specialty props (e.g., acrylic ice): $10–$50
Thrift shopping allows you to experiment with sizes, colors, and textures without breaking the bank. Donate props that don’t suit your style to refine your collection sustainably.
Filters
Filters enhance control over exposure and glare. A polarizing filter ($25–$50) reduces reflections on shiny surfaces like glassware or oily foods, common in beverage or salad photography. A neutral density filter ($30–$60) allows longer exposures in bright conditions, useful for capturing motion, like pouring syrup or steaming dishes.
Recommended Filters:
- Tiffen 58mm Circular Polarizer: $25
- Hoya 58mm Neutral Density Filter: $30
- B+W 77mm XS-Pro Polarizer: $50
Editing Software
Post-processing is essential for refining images. Adobe Lightroom ($9.99/month) adjusts exposure, color balance, and sharpness, while Capture One ($24/month) offers advanced color grading. Photoshop ($22.99/month) is ideal for retouching, such as removing blemishes or compositing images.
Equipment Cost Table
| Item | Entry-Level Price | Mid-Range Price | High-End Price |
|---|---|---|---|
| Camera | $479 | $1,199 | $3,899 |
| 50mm Lens | $125 | $216 | $1,299 |
| Macro Lens | – | $896 | $1,299 |
| Lighting (Strobe/Softbox) | $49 | $199 | $600 |
| Tripod | $149 | $189 | $399 |
| Props (Per Item) | $5 | $30 | $100 |
| Filters | $25 | $30 | $50 |
| Editing Software (Annual) | $120 (Lightroom) | $288 (Capture One) | $360 (Photoshop) |
Total Entry-Level Setup: ~$952
Total Mid-Range Setup: ~$3,047
Total High-End Setup: ~$8,006
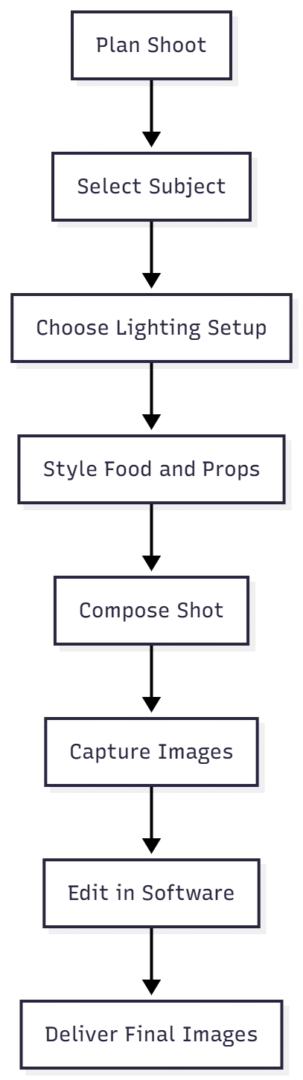
Mastering Food Photography Techniques
Technical proficiency is the backbone of stunning food photography. While gear matters, techniques like composition, lighting, and styling bring your images to life. Start with simple subjects, like a bowl of fruit, to practice these skills before tackling complex dishes.
Composition
Effective composition guides the viewer’s eye. Use the rule of thirds to place the main subject off-center, creating balance and interest. Leading lines, such as a fork pointing toward the dish, draw attention to the food. Negative space adds elegance, especially for minimalist shots. Experiment with angles:
- Overhead (90 degrees): Ideal for flatlays, like pizza or charcuterie boards.
- 45-Degree Angle: Mimics a diner’s perspective, perfect for plated dishes.
- Eye-Level: Creates intimacy, great for beverages or desserts.
Lighting
Lighting defines mood and texture. Natural light from a window is forgiving for beginners—use diffusers to soften harsh shadows and reflectors to fill in dark areas. For artificial lighting, softboxes create even illumination, while strobes add drama for bold shots. Key lighting techniques include:
- Backlighting: Highlights textures, like the shine on a burger bun.
- Side Lighting: Emphasizes clarity, ideal for salads or layered dishes.
- Top Lighting: Uniform for flatlays, common in menu photography.
Test lighting setups with a light meter to ensure consistent exposure. For example, warm lighting (3000K) enhances desserts, while cooler tones (5000K) suit seafood.
Food Styling
Food styling makes dishes visually irresistible. Use tools like tweezers for precise placement, spray bottles for a fresh look, or glycerin for glossy beverages. Understand food behavior—ice cream melts quickly, so work fast or use substitutes like mashed potatoes for test shots. Add garnishes, like herbs or sauce drizzles, to enhance appeal without overwhelming the dish.
Editing
Post-processing polishes your images. Use Lightroom to adjust exposure, contrast, and white balance. Capture One excels at color grading for vibrant food tones. Photoshop handles advanced retouching, like removing crumbs or enhancing textures. Common edits include:
- Brightening highlights to make food pop
- Adjusting saturation for natural colors
- Sharpening details for crispness
Specialized Shots
Different food types require tailored approaches:
- Beverages: Use backlighting and specialized glassware to capture bubbles or condensation. A polarizing filter reduces glare on glass.
- Plated Dishes: Employ overhead lighting and textured surfaces, like wood or marble, for elegance.
- Packaged Foods: Use light tents ($50–$150) for clean, distraction-free images, ideal for product photography.
Technique Workflow
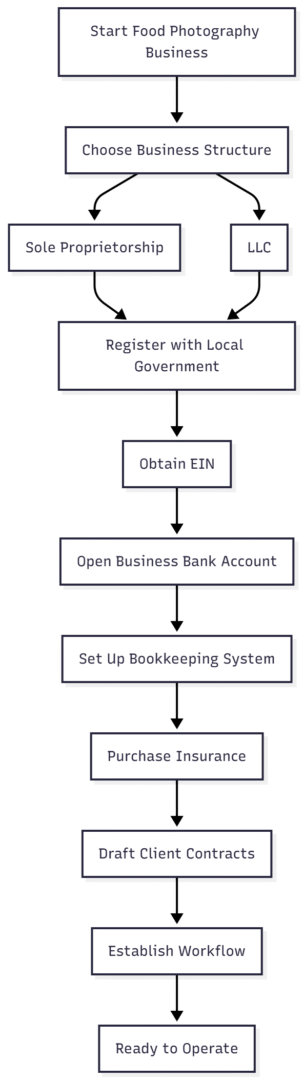
Legal Foundations for Your Business
A solid legal framework protects your business and ensures smooth operations. Here’s how to set up the essentials.
Register Your Business
Choose a business structure, such as a sole proprietorship or LLC. An LLC provides personal liability protection, separating your personal and business assets. Register with your local government to obtain an Employer Identification Number (EIN) for tax purposes. In the U.S., visit IRS.gov for free EIN registration. Check local requirements, as some jurisdictions require a business license or a “Doing Business As” (DBA) for sole proprietors using a trade name.
Steps to Register:
- Choose a business name (e.g., “Jane Doe Photography, LLC”).
- File with your state (LLC fees: $50–$500, depending on location).
- Obtain an EIN from the IRS.
- Consult your bank for additional local requirements.
Business Bank Account
A dedicated business bank account simplifies bookkeeping, tax filing, and expense tracking. It also signals professionalism to clients. Set up both checking and savings accounts to manage cash flow and save for taxes (e.g., transfer 20–30% of client payments to savings). Research banks for low fees or minimum balance requirements.
Insurance
Protect your gear and business with appropriate coverage:
- General Liability Insurance: Covers accidents or property damage during shoots (~$500/year).
- Business Property Insurance: Replaces stolen or damaged equipment, like cameras or lenses (~$300–$500/year).
- Business Income Insurance: Compensates for lost income due to covered damages (~$200/year).
- Professional Liability Insurance: Protects against claims of negligence (~$400/year).
Resources like the Professional Photographers of America (PPA) or PetaPixel offer tailored insurance options for photographers.
Bookkeeping
Track income, expenses, and profits with software like QuickBooks ($25/month), Wave (free for basic features), or HoneyBook ($19–$79/month). Categorize expenses, such as gear, software, utilities, and travel, for tax deductions. Hiring a bookkeeper ($200–$500/month) saves time as your business grows. Schedule regular bookkeeping sessions to avoid last-minute tax stress.
Contracts
Legal contracts clarify deliverables, timelines, usage rights, and payment terms. Use templates from Legalpreneur or The Law Tog ($50–$150) to protect your work and ensure payment. Key contract elements include:
- Scope of work (e.g., number of images, styling responsibilities)
- Usage rights (e.g., social media vs. commercial use)
- Payment schedule (e.g., 50% deposit, 50% on delivery)
- Revision limits and reshoot policies
Business Setup Flowchart
Setting Competitive Pricing
Pricing your services correctly ensures profitability and reflects your value. Food photography pricing varies based on project scope, usage rights, and expenses. Here’s a detailed look at pricing models and considerations.
Pricing Models
- Per-Dish Rates: $50–$150 per dish for small projects, ideal for single-menu items.
- Menu Packages: $500–$2,000 for 10–20 dishes, including restaurant interiors or chef portraits.
- Cookbook Projects: $2,000–$10,000 for 50–100 images, depending on styling and complexity.
- Monthly Content Subscriptions: $1,000–$3,000/month for 15–30 images, tailored for bloggers or brands.
- Tiered Pricing:
- Basic: $300 (5 images, basic styling)
- Premium: $800 (15 images, advanced styling)
- Full-Day: $1,500–$5,000 (30+ images, comprehensive setup)
Factors to Consider
- Project Scope: Complex dishes, multiple setups, or custom styling increase costs.
- Usage Rights: Charge higher for commercial use (e.g., national campaigns) vs. social media or menus.
- Expenses: Include food, props, travel, assistants, and editing time.
- Creative Fee: Reflects your expertise and time ($100–$300/hour).
- Team Fees: Add costs for food stylists ($50–$150/hour) or assistants ($20–$50/hour).
Sample Pricing Structure:
- Creative Fee: $100/hour
- Usage Fees: $50–$500/image based on distribution (e.g., $50 for social media, $500 for national ads)
- Expenses: $100–$500 per shoot (props, food, travel)
- Total for a 10-dish restaurant shoot: ~$1,200–$2,500
Pricing Tips
- Research competitors in your area to set competitive rates.
- Avoid underpricing to cover costs and reflect your value.
- Require a 50% deposit to secure bookings and protect against cancellations.
- Adjust rates as demand grows, using industry benchmarks from resources like PPA or ZipRecruiter.
Pricing Table
| Service | Price Range | Includes |
|---|---|---|
| Per-Dish Rate | $50–$150 | Single dish, basic styling |
| Menu Package | $500–$2,000 | 10–20 dishes, interior shots |
| Cookbook Project | $2,000–$10,000 | 50–100 images, advanced styling |
| Monthly Subscription | $1,000–$3,000 | 15–30 images/month, consistent style |
| Full-Day Shoot | $1,500–$5,000 | 30+ images, comprehensive setup |
Building a Portfolio and Attracting Clients
A compelling portfolio and strategic marketing are essential for landing clients and building a reputation. Here’s how to showcase your work and connect with your target audience.
Portfolio Development
Your portfolio is your primary marketing tool, showcasing your skills and style. Use platforms like WordPress ($4–$45/month), Squarespace ($16–$23/month), or Wix ($16–$59/month) to create a visually appealing, mobile-friendly website. Key elements include:
- High-Quality Images: Showcase 10–20 of your best shots, reflecting your niche (e.g., moody cocktails, bright breakfasts, rustic baking).
- Niche-Specific Work: Tailor to your target market, such as restaurants, bloggers, or food brands.
- Collaborations: Highlight published work or partnerships with chefs or brands.
- About Page: Share your story and experience to build trust.
- Testimonials: Include client feedback to enhance credibility.
- Services Page: Clearly outline offerings and pricing.
- Contact Page: Make it easy for clients to reach you.
Optimize images with descriptive alt text (e.g., “professional food photography for restaurants”) and keywords to improve SEO. Tools like WP Recipe Maker ($49/year) enhance recipe displays, boosting searchability and engagement for food blog clients.
Client Acquisition Strategies
- Cold Outreach: Email local restaurants, bakeries, or food brands with tailored proposals highlighting how your photography aligns with their brand.
- Warm Leads: Leverage referrals from industry contacts, such as chefs or food stylists.
- Social Media:
- Instagram: Use food-specific hashtags (#foodphotography, #foodstyling) and post behind-the-scenes content to engage followers.
- Pinterest: Create boards categorized by food type (e.g., desserts, beverages) for discoverability.
- LinkedIn: Connect with food industry professionals, like marketing managers or PR agencies.
- TikTok/YouTube: Share short videos of your process to attract a broader audience.
- Networking: Attend food festivals, collaborate with local chefs, or join photography organizations like PPA.
- Contests: Enter competitions like the World Food Photography Awards to gain exposure and credibility.
Marketing Investments
- Paid Ads: Invest in Google Ads ($100–$500/month) or Instagram/Facebook campaigns to reach ideal clients. Target keywords like “food photographer near me” or “restaurant photography.”
- Content Creation: Write blog posts about food photography tips or recipes using WP Recipe Maker to drive traffic and establish authority.
- Collaborations: Partner with food bloggers or influencers for mutual exposure.
- Email Marketing: Use tools like Mailchimp ($13–$299/month) to nurture leads with newsletters showcasing your work.
Client Acquisition Workflow

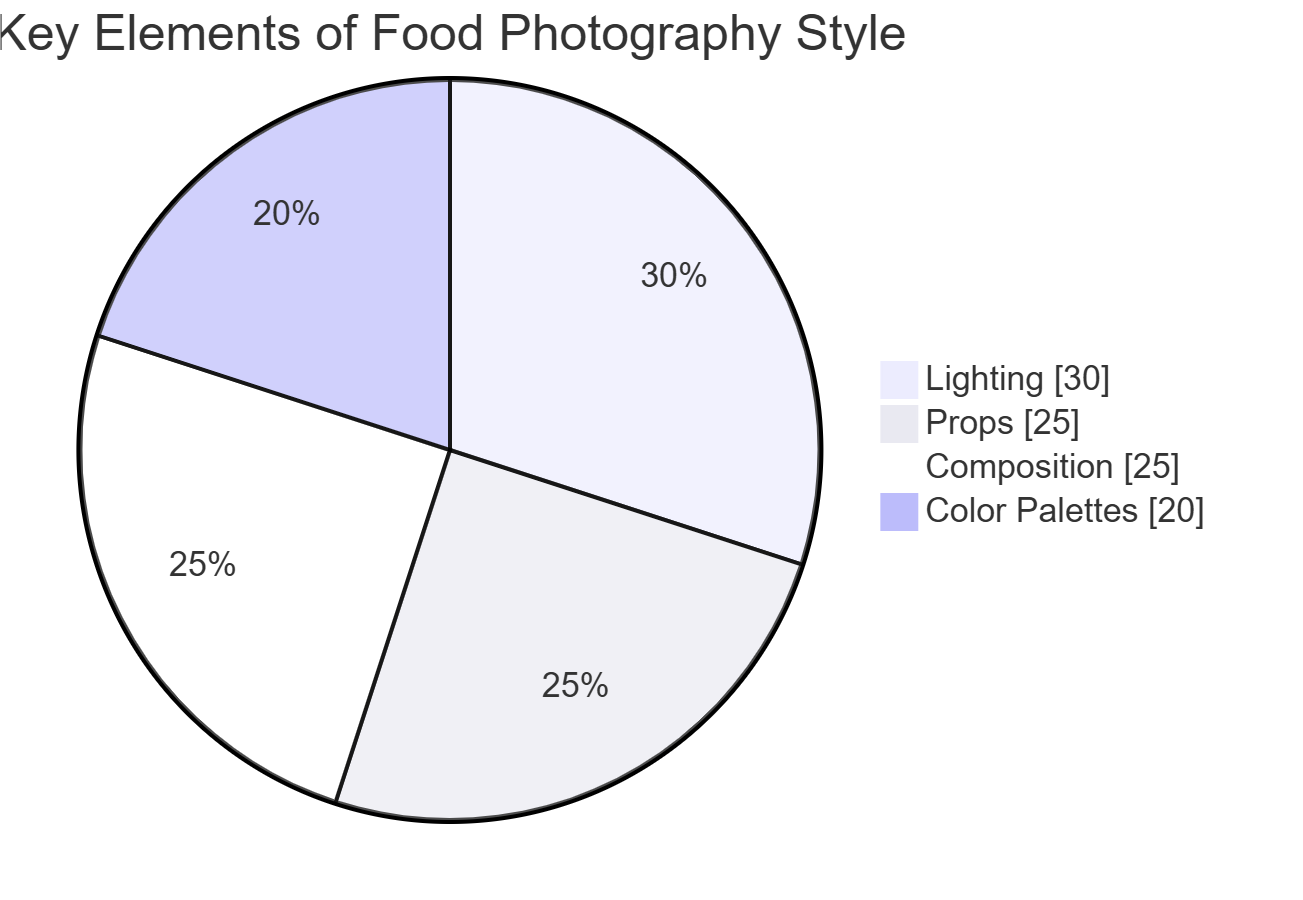
Developing Your Unique Style
A distinctive style sets you apart in a competitive market. Create a mood board on Pinterest to define your aesthetic, focusing on lighting, colors, props, and composition. Key elements to develop your style include:
- Lighting: Experiment with soft natural light for airy, approachable shots or dramatic strobes for bold, editorial images.
- Props: Use rustic wood for comfort food, sleek ceramics for fine dining, or colorful linens for vibrant dishes.
- Color Palettes: Warm tones (e.g., oranges, browns) for desserts; cool tones (e.g., blues, greens) for seafood or salads.
- Composition: Minimalist for modern dishes or layered for rustic, storytelling scenes.
Study portfolios of successful food photographers, like Donna Crous or Joanie Simon, to understand their techniques, but avoid copying. Use selective focus, chiaroscuro, or contrasting colors to evoke emotion and make your images memorable. Practice with simple subjects, like a bowl of citrus or a slice of cake, to refine your style.
Style Development Chart
Scaling Your Business
Once your business is established, explore opportunities to grow and diversify:
- Diversify Services: Offer recipe development, stop-motion videos, or social media content creation to attract more clients.
- Monetize Content: Use WP Recipe Maker for affiliate marketing or sponsored posts on your blog or website.
- Hire Assistants: Outsource editing, bookkeeping, or styling to focus on creative work.
- Expand Reach: Target national brands, pitch to magazines, or publish a food photography book.
- Teach Workshops: Share your expertise through online courses or local workshops for additional revenue.
Overcoming Common Challenges
Starting a food photography business comes with challenges. Here’s how to address them:
- High Equipment Costs: Start with used gear or rentals, focusing on versatile lenses like the 50mm.
- Client Acquisition: Build a strong portfolio and network locally to gain traction.
- Time Management: Use project management tools like Trello (free–$17.50/month) to streamline workflows.
- Skill Gaps: Take online courses (e.g., Two Loves Studio, $200–$400) to master lighting, styling, or editing.
- Pricing Mistakes: Avoid underpricing by calculating all expenses and setting a minimum hourly rate ($100–$150).
Conclusion
Launching a food photography business is an exciting journey that blends creativity with entrepreneurship. By investing in essential equipment, mastering techniques like composition and lighting, and building a solid legal foundation, you can create a sustainable, profitable venture. A compelling portfolio, strategic marketing, and a unique style will help you attract clients and stand out in a competitive market. Tools like WP Recipe Maker and platforms like WordPress, Instagram, and Pinterest can amplify your visibility and revenue streams. With dedication, continuous learning, and smart business practices, your food photography business can capture the essence of delicious dishes and the attention of clients worldwide.
Please share this Setting Up your Business as a Food Photographer with your friends and do a comment below about your feedback.
We will meet you on next article.
Until you can read, Getting Clients: Everything You Need to Know For Building Your Food Photography Portfolio