5 Steps to Launch a WordPress Recipe Website
Learn how to launch a WordPress recipe website with our 5-step guide. From domain selection to monetization, build a stunning food blog!
The internet is a treasure trove of culinary inspiration, and food lovers worldwide are turning their passion for cooking into thriving online platforms. A WordPress recipe website offers a unique opportunity to share your culinary creations, connect with a community of food enthusiasts, and even generate a side income. Whether you’re focused on a specific ingredient, like quinoa or avocados, or exploring a broad range of cuisines, launching a recipe website is an achievable goal, even for beginners. This guide provides a detailed, step-by-step roadmap to create, customize, and monetize a WordPress recipe website, tailored to stand out in a competitive niche.
Why Start a WordPress Recipe Website?
A recipe website is more than a digital cookbook; it’s a platform to showcase your culinary expertise, build a community, and potentially earn revenue. WordPress, powering over 40% of websites globally, is the ideal platform due to its flexibility, user-friendliness, and robust ecosystem of themes and plugins. For those focusing on a specific ingredient, a WordPress recipe site can carve out a unique niche, attracting dedicated followers and offering opportunities for monetization through ads, affiliate marketing, sponsored content, or product sales.
This guide addresses the process of building a recipe website, with specific advice for those emphasizing a single ingredient, as well as answers to common questions about plugins, content creation, and potential pitfalls. Let’s dive into the five essential steps to launch your WordPress recipe website.
Step 1: Choose a Domain Name and Hosting Provider
Selecting a Memorable Domain Name
Your domain name is your website’s digital address and a critical part of your brand identity. It should be memorable, relevant to your niche, and reflective of your content. For a recipe website centered on a specific ingredient, incorporate that ingredient into the domain name to signal your focus. For example, if your site revolves around quinoa, a domain like QuinoaKitchen.com or QuinoaRecipes.com is clear and effective.
To brainstorm domain names:
- Use tools like Namecheap’s Domain Name Generator or GoDaddy’s Domain Search to generate ideas.
- Keep it short, simple, and easy to spell.
- Avoid hyphens or numbers, which can confuse users.
- Check availability through registrars like Namecheap, GoDaddy, or Google Domains.
Pricing Example:
- Domain names typically cost $10–$20 per year, depending on the registrar and extension (.com, .co, .kitchen).
Choosing Reliable Web Hosting
Web hosting determines your site’s performance, speed, and uptime, all of which impact user experience and search engine rankings. Poor hosting can lead to slow load times or downtime, driving visitors away. For a recipe website, consider the following hosting types:
| Hosting Type | Pros | Cons | Price Range (Annual) |
|---|---|---|---|
| Shared Hosting | Affordable, beginner-friendly | Limited resources, slower speeds | $30–$100 |
| Managed WordPress | Optimized for WordPress, support | More expensive | $100–$300 |
| VPS Hosting | Scalable, high performance | Requires technical knowledge | $200–$600 |
Recommended Providers:
- SiteGround: Offers managed WordPress hosting with excellent support and performance (starts at ~$100/year).
- WP Engine: Premium managed WordPress hosting with robust features (starts at ~$300/year).
- Bluehost: Affordable shared hosting with one-click WordPress installation (starts at ~$35/year).
Domain and Hosting Packages
Purchasing a domain and hosting as a bundle is often more cost-effective and simplifies setup. Most providers offer packages that include a free domain for the first year. When choosing a package, evaluate:
- Storage and Bandwidth: Ensure sufficient resources for images and traffic (at least 10GB storage and 50GB bandwidth for a new site).
- Customer Support: 24/7 support via chat or phone is crucial for beginners.
- Scalability: Choose a plan that allows upgrades as your site grows.
Example Package:
- Bluehost’s Basic Plan: $2.95/month (~$35/year), includes a free domain, 50GB storage, and unmetered bandwidth.
Step 2: Install WordPress and Select a Food-Focused Theme
Installing WordPress
WordPress is the go-to platform for recipe websites due to its ease of use, SEO capabilities, and extensive plugin ecosystem. Most hosting providers offer one-click WordPress installation, making setup straightforward. If your provider doesn’t, follow these manual steps:
- Download WordPress: Visit wordpress.org and download the latest version.
- Upload to Hosting: Use an FTP client (e.g., FileZilla) to upload WordPress files to your hosting account.
- Create a MySQL Database: Set up a database and user via your hosting control panel.
- Configure wp-config.php: Edit the configuration file with your database details.
- Run Installation: Access your domain in a browser and follow the setup wizard.
Choosing a Food-Focused Theme
Your WordPress theme defines your site’s design and user experience. A food-focused theme should be visually appealing, easy to navigate, and optimized for recipe content. For a site centered on a specific ingredient, choose a theme that highlights your niche through design elements like customizable headers or recipe card layouts.
Recommended Themes:
- Foodie Pro ($129.95/year):
- Minimalist design with customizable colors and typography.
- Ideal for clean, professional recipe displays.
- Integrates seamlessly with recipe plugins.
- Cookely (~$69/year):
- Feature-rich with recipe index pages and advanced search.
- Mobile-responsive and visually engaging.
- Supports ingredient-focused layouts.
Customization Tips:
- Adjust colors and fonts to align with your brand (e.g., green tones for an avocado-focused site).
- Use a page builder like Elementor (free or $59/year for Pro) to design custom homepages, headers, and footers.
- Ensure mobile responsiveness, as 60% of recipe site traffic comes from mobile devices (Statista).
Chart: Website Setup Workflow
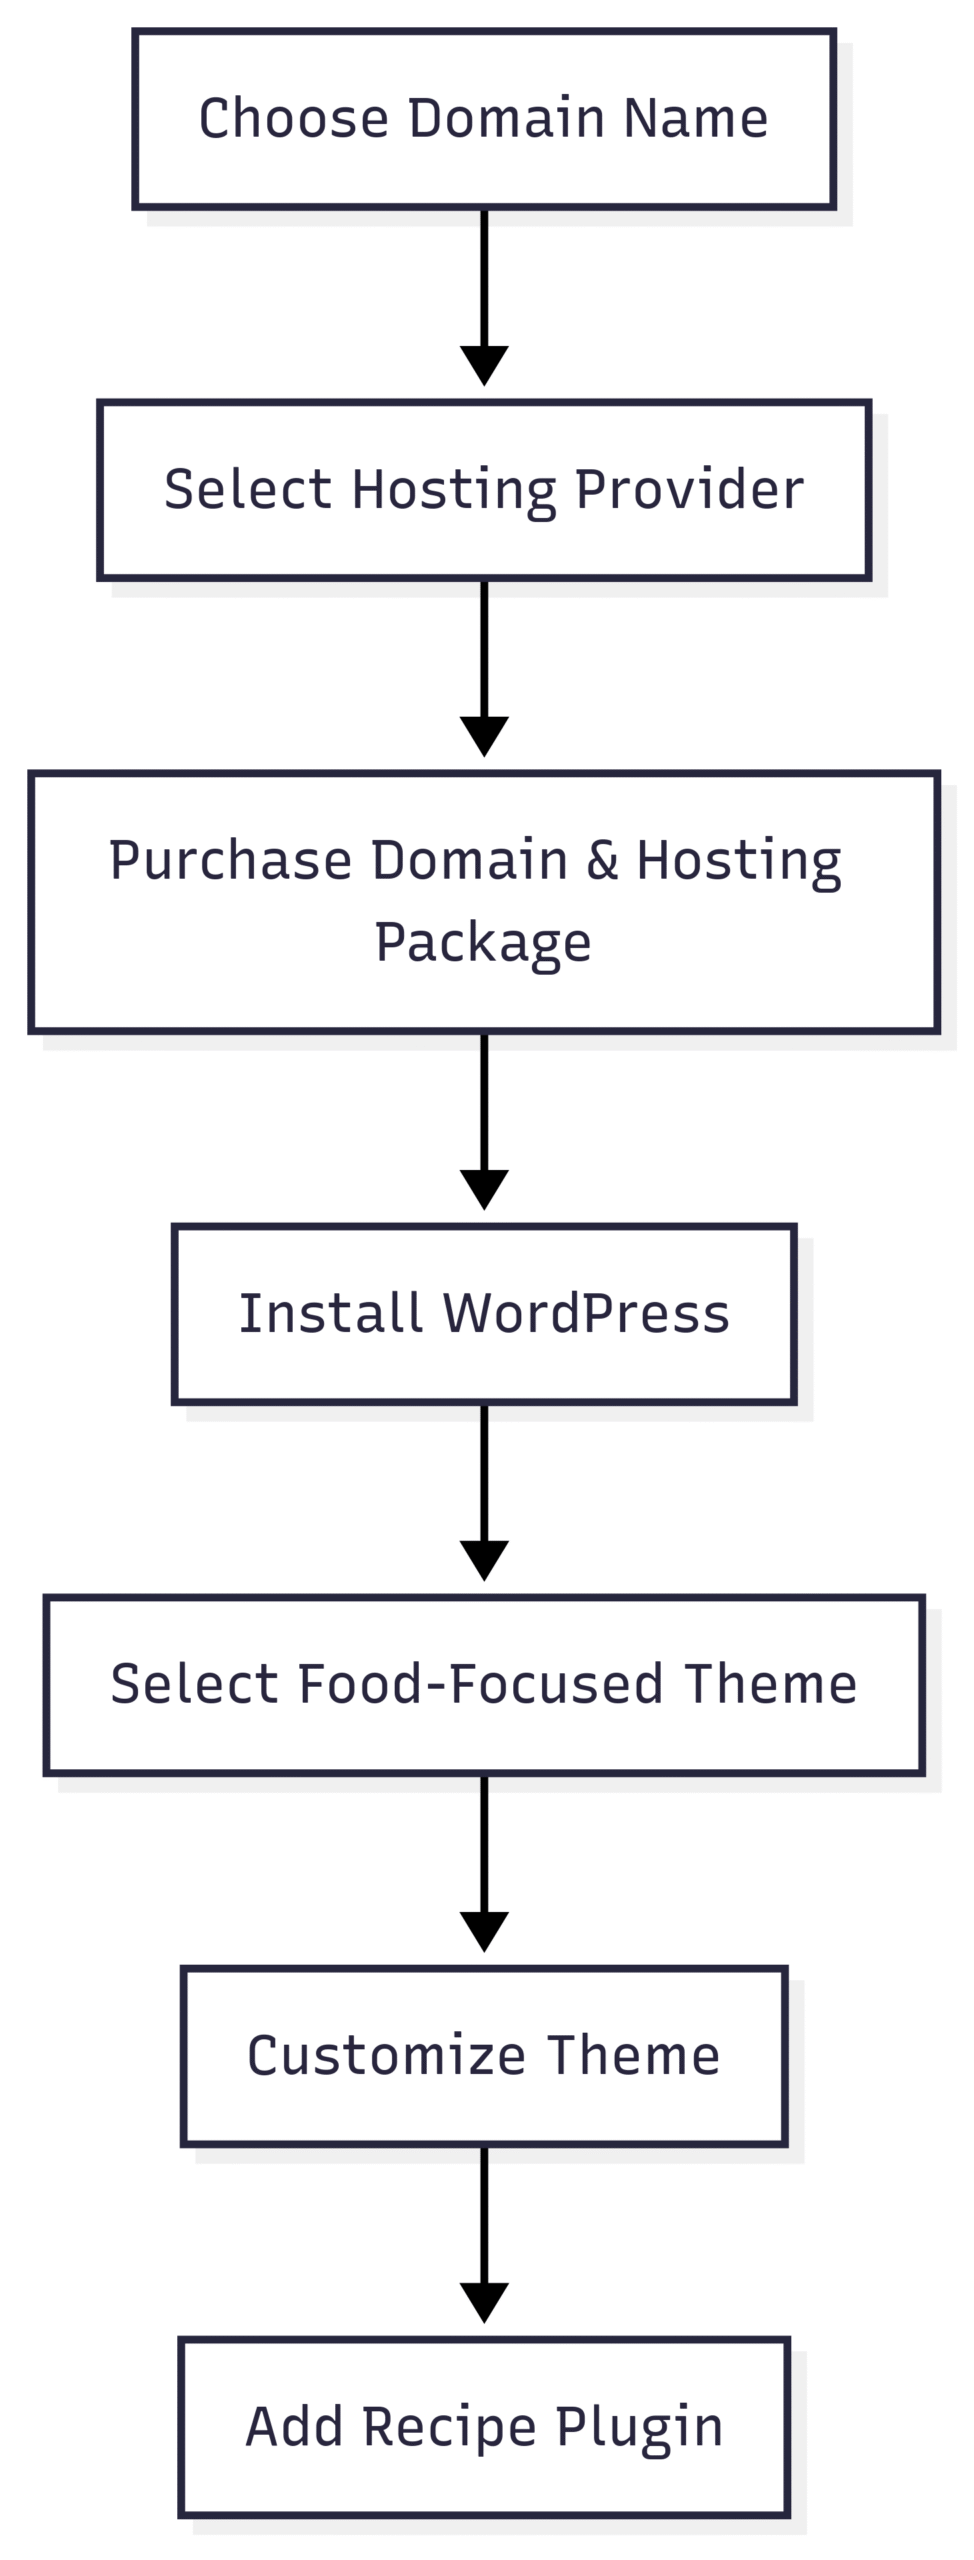
Step 3: Add Recipe-Friendly Plugins
Plugins extend WordPress functionality, and for a recipe website, they’re essential for managing and displaying recipes effectively. A good recipe plugin enhances user experience, improves SEO, and streamlines content creation.
Recommended Plugin: WP Recipe Maker
WP Recipe Maker (free or $49/year for Premium) is the top choice for recipe websites, offering:
- Customizable recipe cards with ingredients, instructions, and nutritional data.
- Automatic schema markup for SEO, boosting Google visibility.
- Social sharing buttons for platforms like Pinterest and Instagram.
- Affiliate link integration for monetization.
- Compatibility with most themes and page builders.
Alternative Plugin: Recipepress Reloaded (free or $49/year for Pro):
- Similar features to WP Recipe Maker, with a focus on recipe categorization.
- Supports schema markup and recipe indexing.
- Ideal for ingredient-focused sites with advanced filtering options.
Other Useful Plugins:
- Yoast SEO (free or $99/year): Optimizes content for search engines with keyword tools and readability checks.
- Elementor (free or $59/year): Drag-and-drop builder for custom page designs.
- Smush (free or $70/year): Compresses images to improve site speed without losing quality.
User Question: Is there any plugin and theme you recommend?
For your ingredient-focused site, WP Recipe Maker and Cookely are ideal. WP Recipe Maker’s categorization features let you highlight recipes by ingredient, while Cookely’s recipe index and search functionality make it easy for users to find dishes featuring your chosen ingredient. Additionally, consider Recipepress Reloaded for its filtering capabilities, which can help users sort recipes by your niche ingredient.
Step 4: Create High-Quality Recipe Content
Crafting Engaging Recipes
Content is the heart of your recipe website. For a site focused on a single ingredient, your recipes must be original, delicious, and visually appealing to stand out in a competitive niche. Here’s how to create compelling recipe content:
- Originality: Develop unique recipes that showcase your ingredient in creative ways (e.g., quinoa salads, desserts, or savory dishes).
- Clarity: Provide clear ingredient lists and step-by-step instructions. Use WP Recipe Maker to input data like servings, prep time, and cook time, which generates professional recipe cards.
- Visual Appeal: Include high-quality images for each recipe. Invest in a DSLR camera or hire a photographer for professional shots. Alternatively, use editing tools like Canva (free or $120/year) to enhance smartphone photos.
- Search Intent: Align recipes with user search intent (e.g., “easy quinoa dinner recipes” or “healthy avocado breakfast ideas”).
User Question: Is there any tip or advice for content?
For your ingredient-focused site:
- Highlight the versatility of your ingredient across meal types (breakfast, lunch, dinner, desserts).
- Include nutritional benefits of the ingredient to attract health-conscious readers.
- Use a consistent recipe format with WP Recipe Maker for professional presentation.
- Add a process shot for each instruction step, as Google prioritizes detailed visuals (per user feedback from r1ckd33zy). For example, show the ingredient being prepared, mixed, and cooked.
Sourcing Content Ethically
User Question: I’ve been reaching out to recipe providers via social media and other recipe sites to provide me with recipes. Is there any other ways you recommend in terms of collecting valuable content?
Collecting recipes from other creators requires ethical practices to avoid legal issues. Recipe blogging is a lucrative niche, and creators are protective of their content. Instead of scraping or requesting free recipes, consider these approaches:
- Create Original Recipes: Develop your own recipes to build authenticity and avoid copyright issues.
- Collaborate with Bloggers: Partner with other food bloggers for guest posts or recipe swaps, ensuring mutual credit and links.
- User-Generated Content: Invite your audience to submit recipes featuring your ingredient, with proper attribution and permission.
- Recipe Development Services: Hire freelance recipe developers through platforms like Upwork or Fiverr (rates: $20–$100 per recipe).
- Cookbook Inspiration: Adapt public-domain recipes from old cookbooks, modifying them to feature your ingredient.
User Feedback: Per r1ckd33zy, recipe bloggers may pursue legal action if content is scraped without permission. Always obtain explicit consent or create original content.
SEO Best Practices
To rank on Google, optimize your content with:
- Keyword Research: Use tools like Ahrefs or Google Keyword Planner to find low-competition keywords (e.g., “quinoa salad recipes”).
- Schema Markup: WP Recipe Maker automatically adds structured data to recipes, improving Google’s understanding of your content.
- Alt Text: Add descriptive alt text to images (e.g., “quinoa salad with avocado and tomatoes”).
- Internal Linking: Link to related recipes on your site to boost engagement.
- Meta Descriptions: Write concise, keyword-rich meta descriptions for each recipe post.
Table: SEO Checklist for Recipe Posts
| Task | Description | Tool/Plugin |
|---|---|---|
| Keyword Research | Identify high-traffic, low-competition keywords | Ahrefs, Google Keyword Planner |
| Schema Markup | Add structured data for recipes | WP Recipe Maker |
| Alt Text | Describe images for accessibility and SEO | WordPress Media Library |
| Internal Linking | Link to related recipes | Manual or Yoast SEO |
| Meta Description | Write 130-character summaries | Yoast SEO |
Step 5: Launch and Grow Your Website
Pre-Launch Checklist
Before launching, ensure your site is polished and functional:
- Proofread Content: Check for grammar and spelling errors using tools like Grammarly (free or $144/year).
- Test Functionality: Verify that navigation, links, and recipe cards work across devices.
- Set Up Analytics: Install Google Analytics (free) to track visitor behavior and traffic sources.
Growing Your Audience
Building an audience requires consistent effort and strategic promotion:
- High-Quality Content: Post regularly (e.g., 2–3 recipes per week) with engaging visuals and clear instructions.
- Mobile-Friendly Design: Use a responsive theme like Cookely to ensure a seamless experience on mobile devices.
- Social Media: Share recipes on Pinterest, Instagram, and Facebook, using high-quality images and hashtags like #QuinoaRecipes.
- Video Content: Create short recipe videos (1–2 minutes) for platforms like YouTube or TikTok to drive traffic.
- Email Marketing: Use Mailchimp (free or $13/month) to build an email list and send newsletters with new recipes.
- Collaborations: Partner with food bloggers or brands for guest posts or co-branded content.
- Community Engagement: Enable comments on recipes and respond to user feedback to build a loyal audience.
- Analytics: Monitor Google Analytics to identify popular recipes and optimize content.
Monetizing Your Website
Once your site gains traction, explore these monetization strategies:
- Ad Revenue: Use Google AdSense (free to join) to display ads. Earnings depend on traffic (e.g., $0.50–$2 per 1,000 views).
- Affiliate Marketing: Join Amazon Associates (free) to promote ingredient-related products (e.g., quinoa grains, kitchen tools), earning 1–10% per sale.
- Sponsored Content: Partner with brands for sponsored posts, disclosing partnerships transparently (rates: $100–$1,000 per post).
- Sell Products: Offer e-books, meal plans, or cooking classes featuring your ingredient (e.g., $10–$50 per product).
Example: Spice Up The Curry uses Google AdSense effectively, while Contemplating Sweets leverages Amazon Associates for affiliate income.
Addressing Potential Pitfalls
User Question: Is there anything I should be wary of or consider before proceeding further?
- Copyright Issues: Avoid using recipes or images without permission. Always create original content or secure explicit consent.
- SEO Competition: The recipe niche is highly competitive. Focus on long-tail keywords (e.g., “vegan quinoa breakfast bowl”) to rank higher.
- Site Performance: Slow load times can deter visitors. Use plugins like Smush to optimize images and choose a reliable host.
- User Experience: Place recipe cards at the top of posts with a “Jump to Recipe” button, as suggested by user melatronics, to improve usability.
- Legal Compliance: Disclose affiliate links and sponsored content per FTC guidelines to maintain trust.
Conclusion
Launching a WordPress recipe website focused on a specific ingredient is a rewarding endeavor that combines culinary passion with digital entrepreneurship. By following these five steps—choosing a domain and hosting, installing WordPress with a food-focused theme, adding recipe-friendly plugins, creating high-quality content, and launching strategically—you can build a site that stands out in a crowded niche. Tools like WP Recipe Maker and themes like Cookely simplify the process, while ethical content sourcing and SEO optimization ensure long-term success. With dedication to quality, user engagement, and monetization strategies, your recipe website can become a thriving platform for food lovers and a source of income.
Please share these 5 Steps to Launch a WordPress Recipe Website with your friends and do a comment below about your feedback.
We will meet you on next article.
Until you can read, Marketing Strategies for Professional Chefs