Tethered Shooting Basics for Food Photography
Tethered shooting revolutionizes food photography by connecting your camera to a computer, allowing real-time image review on a larger screen. This technique enhances precision in focus, composition, and lighting, streamlining workflows for professional and amateur photographers alike. Whether you’re shooting for a restaurant’s social media, a cookbook, or a food blog, tethering ensures high-quality results with minimal reshooting. This comprehensive guide covers essential equipment, setup steps, benefits, troubleshooting, and advanced tips to elevate your food photography.
Why Tethered Shooting Matters
Tethered shooting involves connecting a camera to a computer via a cable or wireless system, enabling instant image transfer and display on a larger screen. This setup addresses common challenges in food photography, such as missed focus or poor composition, which are hard to detect on a camera’s small LCD. By viewing images in high resolution, photographers can make immediate adjustments, collaborate efficiently, and reduce post-production time.
Key Benefits
- Enhanced Precision: A larger screen reveals details like focus accuracy, lighting balance, and stray crumbs, ensuring the “hero shot” is perfect during the shoot.
- Efficient Workflow: Real-time feedback reduces the number of shots needed, speeding up shoots and minimizing editing time.
- Client Collaboration: Clients or stylists can view images instantly, providing live feedback, which is crucial for remote shoots or brand-specific projects.
- Versatility: Adjust camera settings remotely, use live view for composition, and manage complex setups like overhead shots with ease.
- Reliability: Images save directly to the computer, eliminating SD card issues.
Real-World Impact
For restaurant owners or bloggers, tethered shooting ensures professional-grade images that stand out on social media or menus. For example, a local deli can transform a daily special’s photo into an enticing visual, competing with chain restaurants. Professionals like Joanie Simon, a renowned food photographer, emphasize tethering as a core workflow component, preventing costly reshoots and enhancing client satisfaction.
Essential Equipment for Tethered Shooting
To set up a tethered workflow, you’ll need specific gear tailored to your camera and shooting environment. Below is a breakdown of required and optional equipment, including specifications and approximate prices.
Required Gear
| Equipment | Specifications | Price (USD) |
|---|---|---|
| Camera | DSLR or mirrorless compatible with tethering software (e.g., Canon EOS R6, Nikon Z6, Sony A7 IV) | $1,500–$2,500 |
| Computer | Laptop or desktop with USB/Thunderbolt ports, 16GB RAM, SSD recommended | $800–$2,000 |
| Tethering Cable | Tether Tools TetherPro USB-C or USB 3.0, 15–31ft, high-speed transfer, gold-plated connectors | $40–$80 |
| Tethering Software | Capture One Pro (multi-brand support, advanced editing) or Lightroom Classic (Canon/Nikon/Sony) | $20/month (Capture One), $10/month (Lightroom) |
Tethering Cable Details:
- Tether Tools TetherPro USB-C: 15ft, 5Gbps transfer, compatible with USB-C cameras (e.g., Canon R5, Sony A7 IV). Price: $55.
- Area 51 Tether Cable: 31ft, USB 3.0/USB-C, high durability, fast transfer. Price: $80.
- Select cables based on camera and computer ports using Tether Tools’ compatibility tool.
Software Options:
- Capture One Pro: Robust tethering, live view, focus tools, supports Canon, Nikon, Sony, Fujifilm. Price: $299/year or $24/month.
- Lightroom Classic: Tethering for Canon, Nikon, Sony, basic controls. Price: $119/year with Adobe Creative Cloud.
- Brand-Specific (Free): Canon EOS Utility, Nikon Camera Control Pro 2, Sony Imaging Edge, Olympus OM Capture, Fujifilm X Acquire. Limited to respective brands, no editing features.
- Specialty Software: Smart Shooter 4 ($95, Canon/Nikon/Sony), Helicon Remote ($75, focus stacking), Dragonframe ($295, stop-motion).
Optional Gear
| Equipment | Specifications | Price (USD) |
|---|---|---|
| Tripod with Extension Arm | Manfrotto 055 with 90° center column, max height 170cm, load 9kg, weight 2.5kg | $348 |
| Tether Block/Jerk Stopper | Tether Tools Jerk Stopper, secures cable to prevent port damage | $20 |
| Utility Cart | Tether Tools Tether Table Aero, mounts on tripod, 16x16in, weight 1.6kg | $200 |
| External Monitor | BenQ SW272U, 27in, 4K, 99% AdobeRGB, hardware calibration | $1,300 |
| Cable Clamps | Neewer heavy-duty clamp, 4cm jaw, 5/8in stud, load 15kg | $10 |
| Power System | Tether Tools ONsite Relay C, continuous power, USB-C, 10,000mAh | $150 |
Tether Block/Jerk Stopper: Protects camera ports from cable yanks. Jerk Stopper is lightweight; Tether Block is bulkier but robust. Price: $20–$40.
Utility Cart: A wheeled cart or Tether Table Aero secures the laptop, reducing tripping risks. Tape cables to the floor in busy areas.
Setting Up Tethered Shooting
Follow these steps to establish a tethered connection:
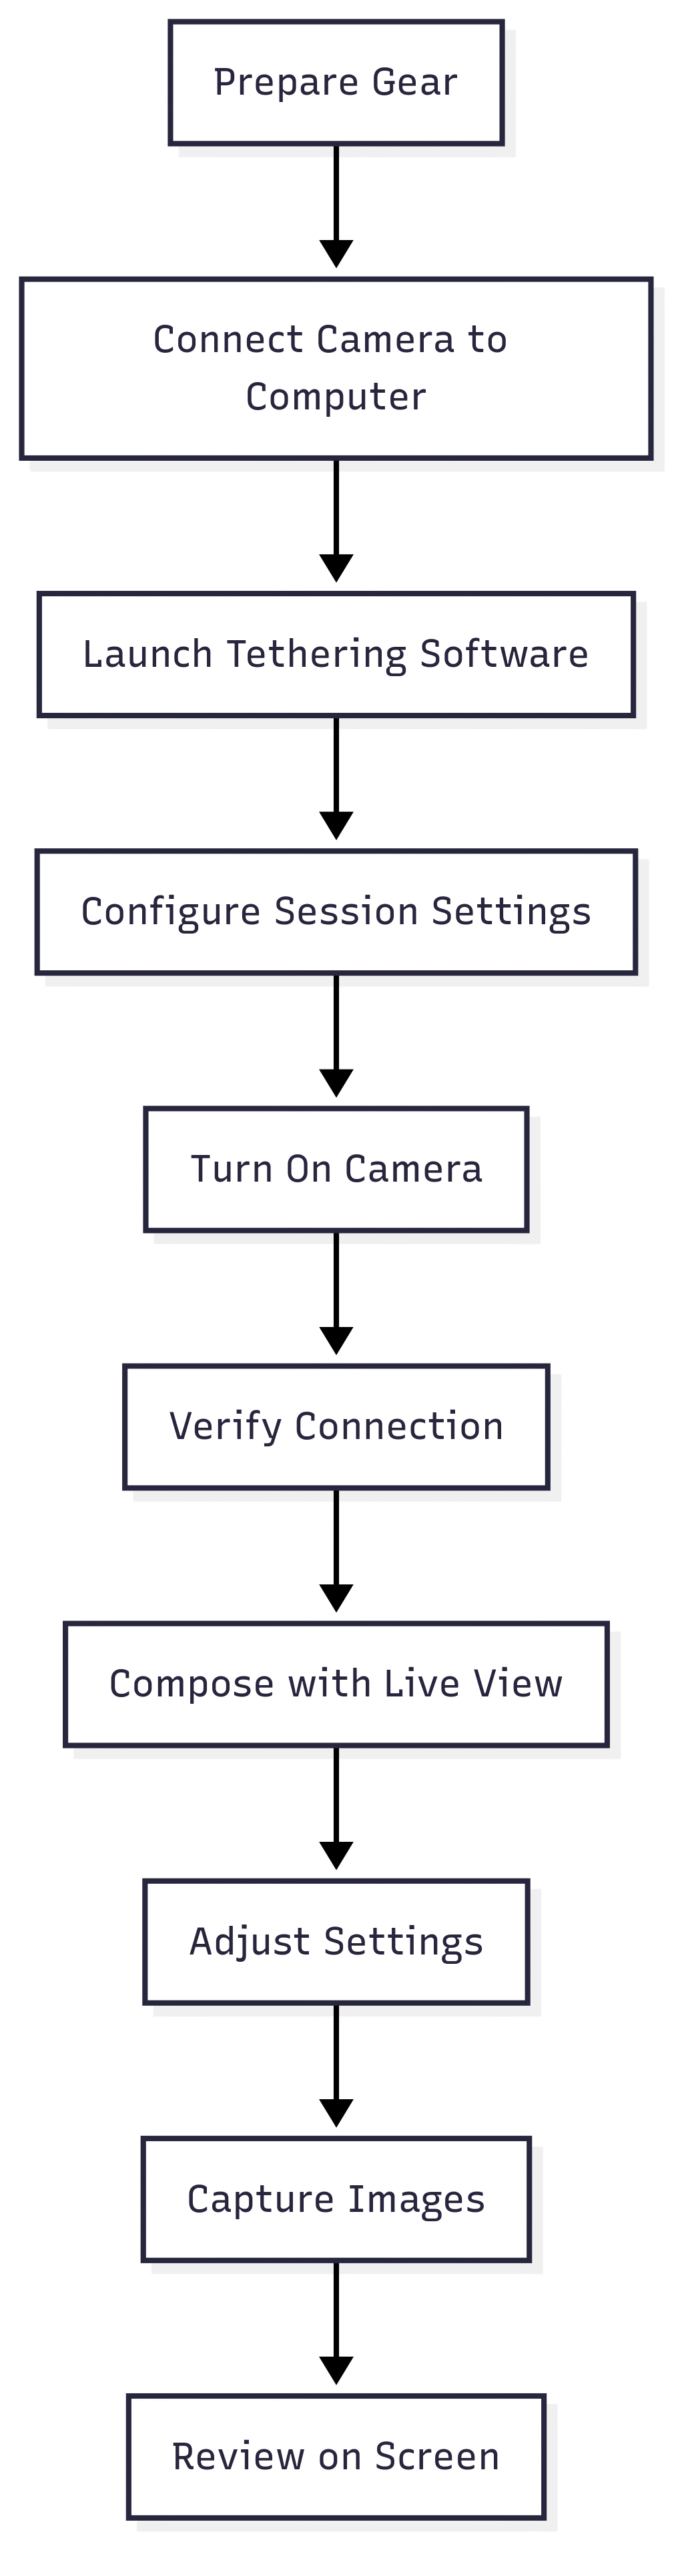
- Prepare Equipment:
- Ensure camera and computer are off.
- Connect the TetherPro cable to the camera’s port and computer’s USB/Thunderbolt port.
- Secure the cable with a Jerk Stopper to protect ports.
- Launch Software:
- Open Capture One Pro or Lightroom Classic.
- In Capture One, navigate to Camera > Start Tethered. In Lightroom, go to File > Tethered Capture > Start Tethered Capture.
- Configure session settings: name, file destination, naming templates.
- Establish Connection:
- Turn on the camera.
- Verify the software detects the camera. If not, troubleshoot (see below).
- Start Shooting:
- Use live view to compose the scene.
- Adjust settings (ISO, aperture, shutter speed) via software.
- Capture images using the software’s shutter button or a remote trigger.
Advanced Tethering Techniques
Live View for Composition
Live view displays the camera’s feed in real time, ideal for composing overhead or complex shots. In Capture One, activate live view and use the cursor to zoom in for precise focus. This is critical for flat-lay shots or when the camera is positioned high.
Remote Camera Control
Adjust aperture, ISO, shutter speed, and white balance from the computer. For example, in Capture One, use the Camera panel to tweak settings without touching the camera, saving time during intricate setups.
Focus Stacking
For macro food shots, use software like Helicon Remote to capture multiple images at different focus points, then combine them for sharp detail across the subject. This is ideal for close-ups of textured dishes like cakes or salads.
Client Collaboration
Share your screen via Zoom or similar platforms for remote clients. For instance, during a cookbook shoot, text the client to join a session, allowing real-time feedback on composition or styling, reducing reshoots.
Troubleshooting Tethered Shooting
Connection issues can disrupt time-sensitive food shoots. Try these fixes:
- Restart Devices: Turn off and on the camera and computer.
- Check Compatibility: Verify camera support on the software’s website (e.g., Capture One’s compatibility page).
- Test USB Ports: Plug a known device (e.g., thumb drive) into the computer’s port to confirm functionality.
- Mac: Check System Information > Hardware > USB.
- PC: Check Device Manager > Universal Serial Bus controllers.
- Use One Software: Close other tethering programs to avoid conflicts.
- Memory Card: Try shooting without an SD card or with a newly formatted one.
- Replace Cable: Test with a spare TetherPro cable to rule out faults.
Tethering in Action: Scenarios and Benefits
Studio Shooting
In a controlled studio, tethering ensures pristine images. Use live view to adjust props and lighting before the food arrives, capturing dishes at their freshest. A large monitor like the BenQ SW272U enhances detail checks, critical for editorial shots.
On-Location Shoots
At restaurants, tethering captures ambiance. A Tether Table Aero provides a portable workstation, while the ONsite Relay C ensures uninterrupted power. Show chefs or marketing teams images on an iPad Pro via wireless apps like CamRanger ($300).
Flat-Lay Photography
Overhead shots for Instagram require precise composition. A tripod with an extension arm and live view simplifies alignment, ensuring symmetry and focus. Tethering reduces trial-and-error, saving time.
Quick Content Creation
For social media, pair a point-and-shoot or mirrorless camera with a wireless tethering app like CamRanger. Add a Rode VideoMicro ($79) for video audio, creating engaging reels or TikToks.
Atmosphere Shots
Capture a restaurant’s vibe with props and people. Tethering allows real-time adjustments to lighting or composition, ensuring the scene reflects the brand’s identity.
Enhancing Client Experience
Tethering elevates client interactions:
- Global Reach: Share shots instantly with clients worldwide via screen-sharing, ideal for cookbooks or global brands.
- Real-Time Feedback: Clients approve shots on the spot, preventing reshoots. For example, a New York client can review Phoenix-based shoots live.
- Brand Building: Showcase tethered workflows in tutorials or behind-the-scenes content, establishing expertise and attracting clients.
Recommended Tethering Kits
| Kit | Components | Price (USD) |
|---|---|---|
| Tether Tools Starter Tethering Kit | TetherPro USB-C 15ft, Jerk Stopper, cable organization bag | $100 |
| Tether Tools Pro Tethering Kit | TetherPro USB-C 15ft, Tether Table Aero, Jerk Stopper, SecureStrap, ONsite Relay C, StrapMoore | $450 |
Starter Kit: Ideal for beginners, focuses on cable management and basic setup.
Pro Kit: Comprehensive for professionals, includes power solutions and a portable table.
Tips for a Seamless Workflow
- Secure Setup: Use a Tether Table Aero or utility cart (e.g., Amazon Basics 3-Shelf Cart, $50) to stabilize the laptop. Secure cables with clamps or tape.
- Backup Power: Keep an ONsite Relay C or a 20,000mAh power bank ($40) for long shoots.
- Cable Management: Use Tether Tools StrapMoore ($20) to secure cables or accessories to tripods.
- Test Before Shoots: Run a test session to ensure connectivity, especially with new cameras or software updates.
- Wireless Option: For mobility, consider CamRanger for wireless tethering to tablets, though it’s slower than cables.
Community Insights
Photographers on forums emphasize tethering’s impact:
- “Tethering changes everything. Instant feedback saves time and frustration.” – wanderwise223
- “For top-down shots, tethered is the only way to see what the camera sees.” – rkvance5
- “Clients love seeing images on a large screen; it reduces reshoots.” – tcphoto1
Some, like natureismyjam, argue tethering isn’t essential for all, but most agree it enhances precision and client satisfaction, especially in commercial settings.
Final Thoughts
Tethered shooting transforms food photography by offering precision, efficiency, and collaboration. A basic setup (camera, computer, TetherPro cable, software) costs $200–$300 beyond existing gear, while advanced kits with monitors and power systems reach $1,000. Start with the Tether Tools Starter Kit and Capture One Pro for a robust, scalable workflow. Experiment with live view and focus stacking to elevate your shots, and leverage tethering to build a professional brand that captivates clients and audiences.
Please share this Equipment for iPhone Food Photography with your friends and do a comment below about your feedback.
We will meet you on next article.
Until you can read, Equipment for iPhone Food Photography