The Best Recipe Writing Strategies
Master recipe writing with expert strategies! Learn tips for clear instructions, engaging titles, and stunning food photography.
Recipe writing is an art that blends culinary expertise with clear communication, transforming ingredients and techniques into dishes that inspire. Whether you’re a blogger, chef, dietitian, or home cook, mastering recipe writing can elevate your work, captivate your audience, and ensure your recipes are both accessible and delightful. A well-crafted recipe is more than a list of steps—it’s a guide that invites cooks of all levels to create something delicious with confidence. This comprehensive guide explores essential strategies for writing recipes that are clear, engaging, and visually appealing, drawing on expert advice and practical tips to help you succeed.
Why Recipe Writing Matters
Good recipe writing is a skill that transcends the kitchen. It’s a tool for sharing culture, creativity, and personal stories through food. According to Liz Weiss, MS, RD, a renowned recipe developer and blogger, “Writing recipes that are clear, easy to follow, tailored to a specific audience, and well tested and work as promised really matters. Bringing them to life visually is the icing on the cake.” Whether you’re aiming to grow a food blog, publish a cookbook, or share family recipes, effective recipe writing ensures your audience can replicate your dishes with ease and enthusiasm.
Recipe writing serves multiple purposes:
- Clarity: Guides cooks through each step without confusion.
- Inspiration: Encourages readers to try new dishes through engaging descriptions and visuals.
- Accessibility: Makes recipes approachable for diverse skill levels and dietary needs.
- Professionalism: Enhances credibility for bloggers, chefs, and authors.
By focusing on structure, specificity, and storytelling, you can create recipes that resonate with your audience and stand out in a crowded digital space.
Core Principles of Recipe Writing
Effective recipe writing follows a set of intuitive yet critical rules. These principles ensure that your recipes are user-friendly, accurate, and enticing. Below are 18 essential strategies, enriched with expert insights and practical examples.
1. Know Your Audience
Understanding your audience is the foundation of a great recipe. Are you writing for beginner cooks, professional chefs, or health-conscious readers? Tailor your language, ingredients, and techniques accordingly. For example, a recipe for a children’s cooking class might use simple ingredients and minimal equipment, while a recipe for chefs could include advanced techniques like sous-vide. Consider time constraints as well—busy parents may prefer quick 20-minute meals, while culinary enthusiasts might embrace a multi-hour project.
Example: A recipe for Instant Pot Black-Eyed Peas and Greens might emphasize a 40-minute total time to appeal to time-pressed home cooks.
2. Craft Descriptive Recipe Titles
A compelling title draws readers in. Use vivid, concise language to evoke flavor and excitement without listing every ingredient. For instance, “Mushroom Bomb Lentil Pasta” is far more inviting than “Pasta with Mushrooms.” Aim for brevity—Google favors titles under 60 characters for SEO—but ensure the title reflects the dish’s unique appeal.
Example Titles:
- Grits Smothered with Mustard Greens
- Vegan Bolognese with Lentils and Walnuts
- Chia Seed Pudding with Berries
3. Include a Recipe Description
A brief, engaging description sets the stage for your recipe. In one or two sentences, share its origin, flavor profile, or serving suggestions. For example, “This vibrant Mofongo with Caribbean Vegetable Stew draws on Puerto Rican tradition, delivering bold flavors and a hearty texture.” Descriptions add personality and context, making the recipe more relatable.
Tips for Descriptions:
- Highlight cultural or personal significance (e.g., “Inspired by my grandmother’s kitchen”).
- Describe sensory qualities (e.g., “Zesty and aromatic with a hint of spice”).
- Suggest pairings (e.g., “Perfect with a crisp cucumber salad”).
4. Specify Preparation and Cooking Times
Time estimates help cooks plan effectively. Include:
- Total Time: From start to finish, including cooking and resting periods.
- Active Time: Hands-on preparation time, excluding baking or chilling.
Test your recipe with a timer to ensure accuracy. For example, a recipe for Lemon Scones with Currants might list “Total Time: 35 minutes; Active Time: 15 minutes.”
5. Define Servings and Serving Size
Clearly state the number of servings and serving size, measured in cups, ounces, or grams. For instance, a soup recipe yielding 1 quart could specify “Serves 4 (1-cup servings).” Measuring the finished dish ensures precision, helping cooks plan portions.
Table: Common Serving Size Measurements
| Dish Type | Typical Serving Size |
|---|---|
| Soup | 1 cup (8 oz) |
| Pasta | 1–1.5 cups cooked |
| Salad | 1–2 cups |
| Dessert | 1 slice or ½ cup |
6. List Ingredients in Chronological Order
Organize ingredients in the order they’re used in the recipe. This logical flow helps cooks follow along seamlessly. For example, in a recipe for Rainbow Peanut Slaw with Mandarin Dressing, list slaw ingredients first, followed by dressing components.
7. Be Specific with Ingredients
Precision prevents confusion. Specify quantities, states (e.g., “frozen,” “chopped”), and package sizes. Instead of “1 package tofu,” write “1 (14-ounce) package firm tofu.” Use generic names (e.g., “semi-sweet chocolate chips” instead of brand names).
Example Ingredient List:
- 1 (15-ounce) can black beans, drained and rinsed
- 2 cups fresh spinach, chopped
- 1 tablespoon olive oil
8. Spell Out Measurements
Avoid abbreviations like “tsp” or “tbsp” to ensure clarity, especially for beginners. Spell out teaspoons, tablespoons, cups, and ounces. If an ingredient is used multiple times, note “divided” (e.g., “1 cup all-purpose flour, divided”).
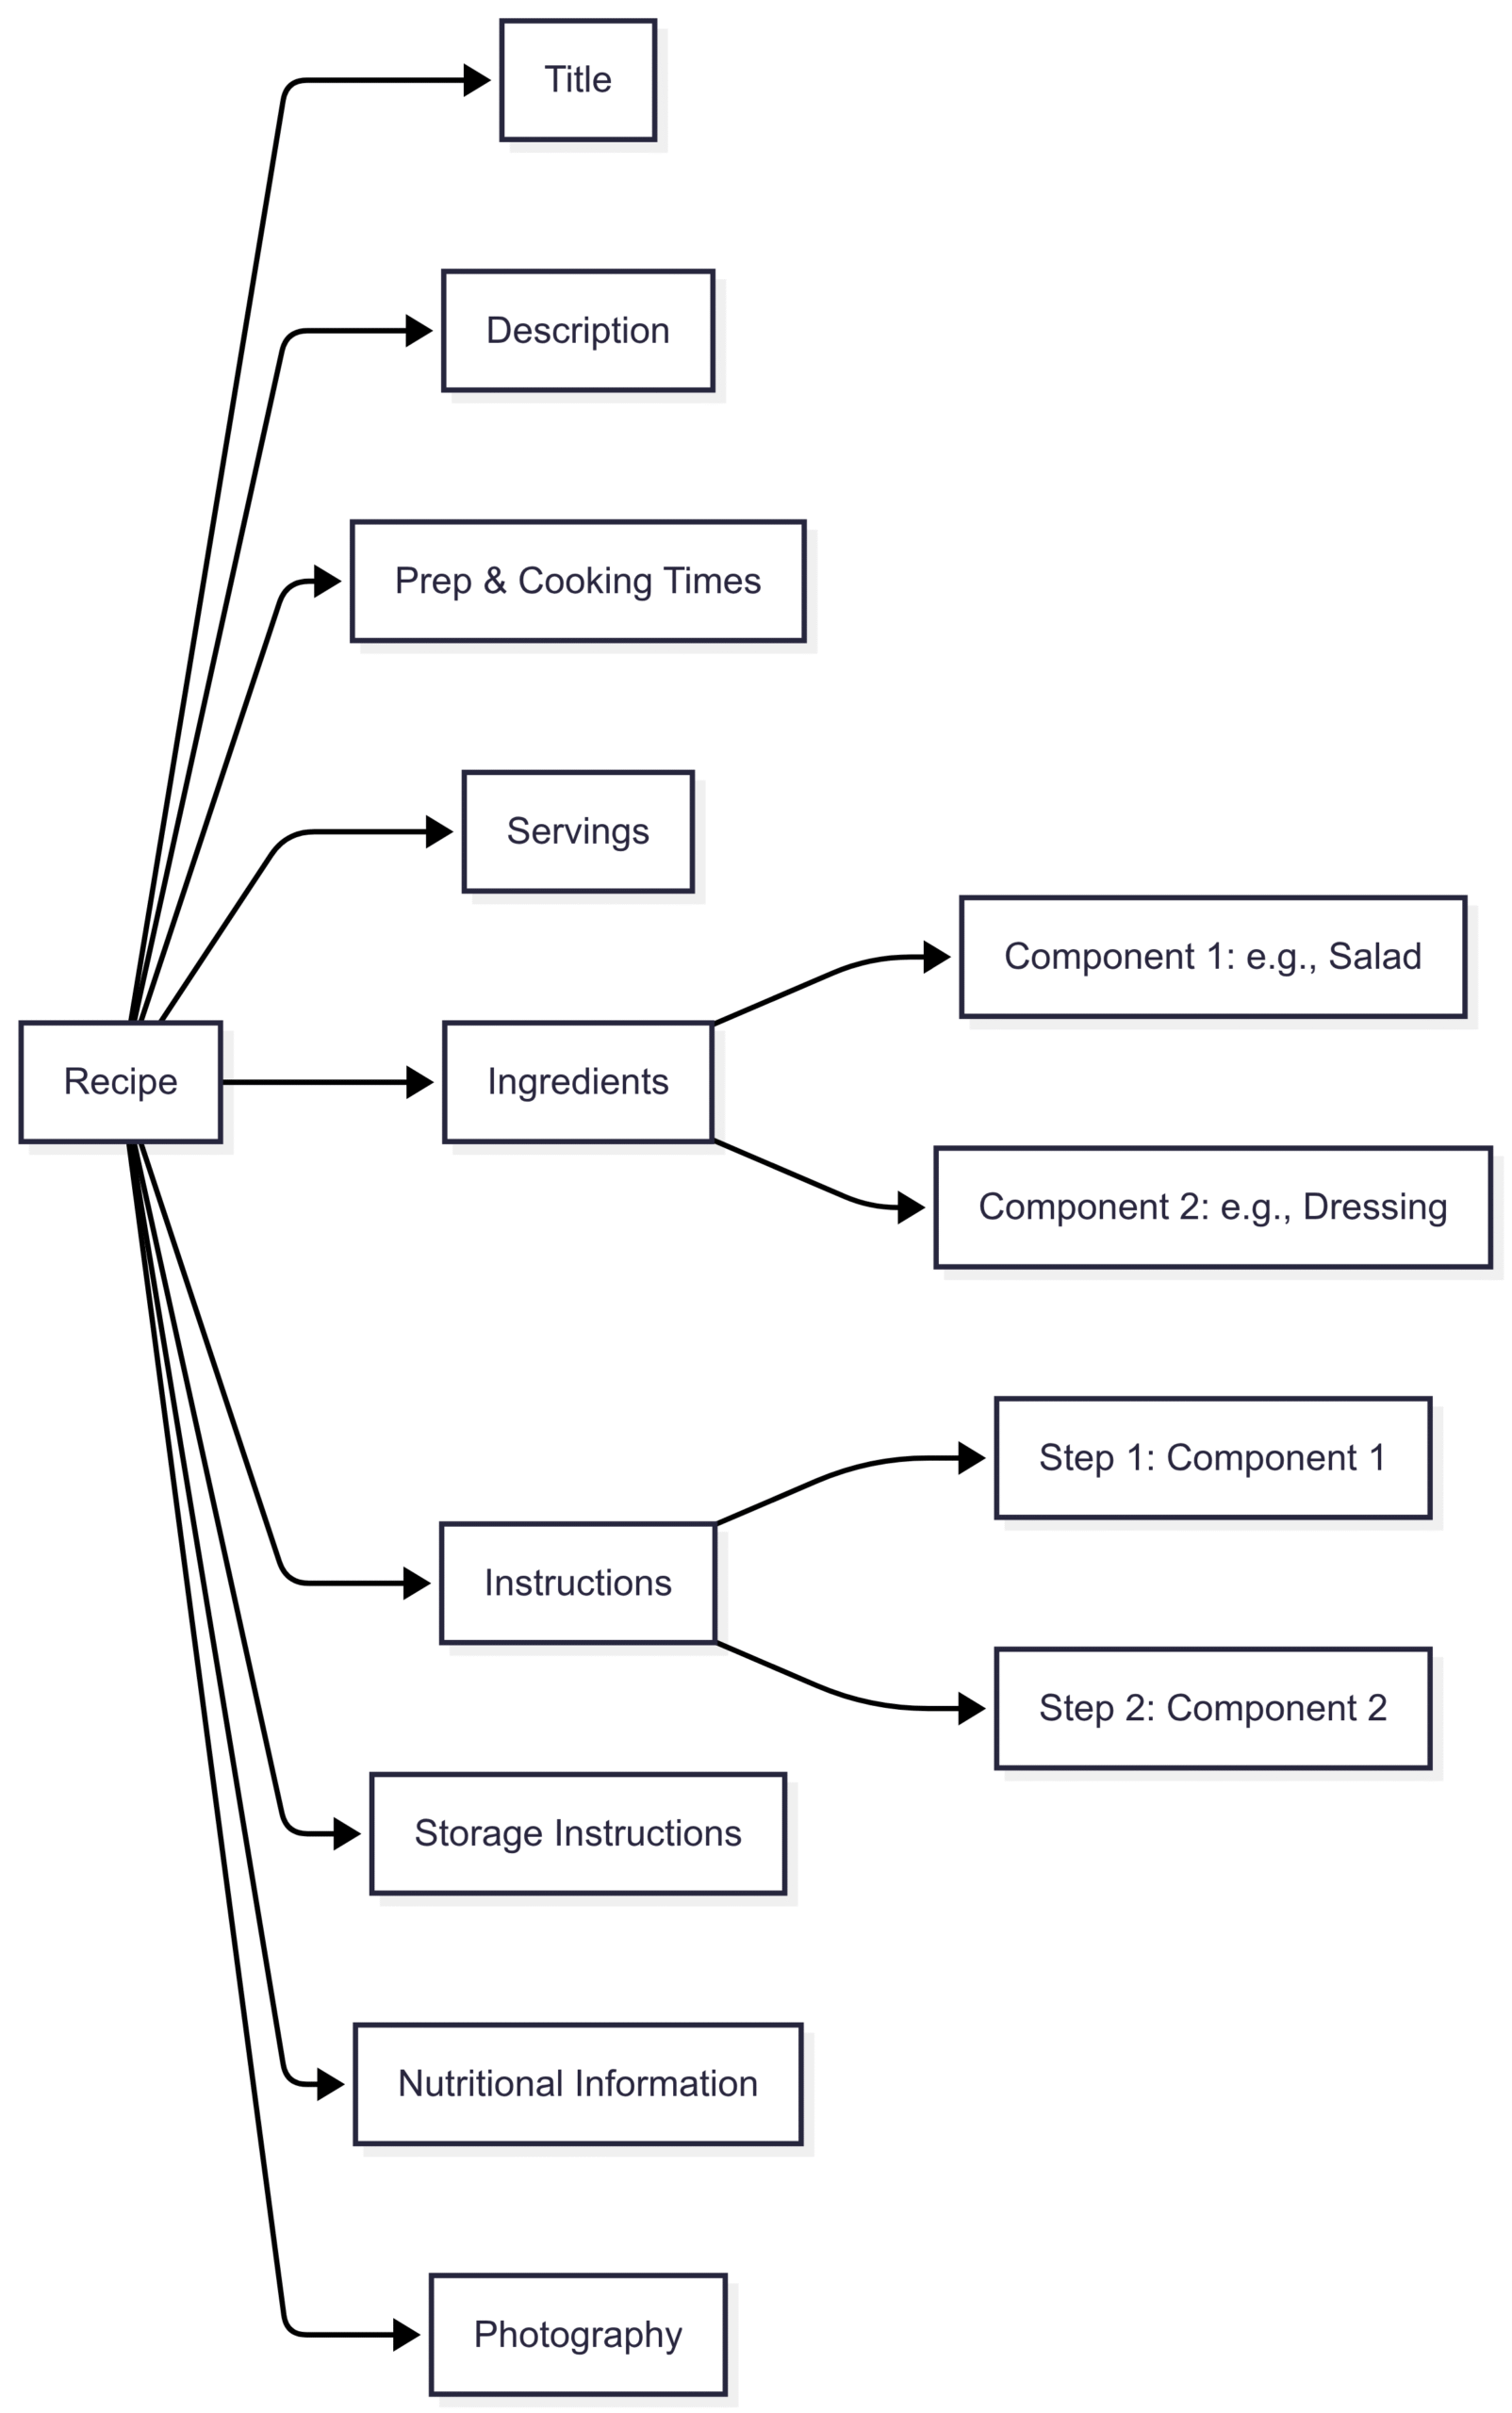
9. Group Ingredients by Recipe Components
For complex dishes, separate ingredients by component. For a salad with dressing, use subheadings like “Salad” and “Dressing.” This structure mirrors the instructions, making the recipe easier to navigate.
Diagram: Recipe Structure
10. List Unique Utensils
Specify any specialized tools, such as a food processor or cheesecloth, to prepare cooks. For example, “Requires a 9-inch springform pan” clarifies equipment needs for a cheesecake recipe.
11. Write Concise, Ordered Instructions
Instructions should mirror the ingredient order, using short, direct sentences. Avoid vague phrases like “cook until done.” Instead, provide specifics: “Bake at 350°F for 25–30 minutes, until golden brown and a toothpick inserted comes out clean.”
Example Instructions:
- Preheat oven to 375°F.
- In a large mixing bowl, combine flour, sugar, and salt.
- Add butter and mix until crumbly.
12. Specify Cookware Sizes
Indicate precise sizes for cookware, such as “9 x 13-inch baking dish” or “medium saucepan (2-quart capacity).” This eliminates guesswork and ensures consistent results.
13. Provide Doneness Indicators
Use clear cues for doneness, such as “tender when pierced with a fork” or “internal temperature of 165°F.” Combine with approximate cooking times for reliability.
14. Test Recipes Thoroughly
Test recipes multiple times—experts recommend two to four trials—to verify measurements, timing, and taste. Sharon Palmer, RDN, tested her Edamame Grain Vegan Burgers four times before publishing. Enlist taste testers to catch subtle flavor issues.
15. Include Storage Instructions
Guide cooks on storing leftovers, specifying containers and temperatures. For example, “Store in an airtight container in the refrigerator for up to 3 days.”
16. Offer Dietary Substitutions
Cater to diverse diets by suggesting substitutions, such as gluten-free flour or plant-based milk. Note these in a separate section or within the ingredient list (e.g., “Use almond milk for a vegan option”).
17. Provide Nutritional Information
Include a nutritional analysis based on the USDA database or software like Nutritionist Pro. List calories, macronutrients, and key micronutrients per serving.
Table: Nutritional Analysis Example (Per Serving of Vegan Soft Peanut Butter Cookies)
| Nutrient | Amount |
|---|---|
| Calories | 150 kcal |
| Protein | 4 g |
| Fat | 8 g |
| Carbohydrates | 18 g |
| Fiber | 2 g |
18. Enhance with Quality Photography
Visuals are critical in the digital age. High-quality photos, even taken with a smartphone, can make recipes more appealing. Use food photography backgrounds, linen napkins, and ring lights to create polished images. Capture both preparation and final dishes.
Photography Tools and Prices:
| Tool | Purpose | Approx. Price (USD) |
|---|---|---|
| Measuring Cups/Spoons | Accurate ingredient portions | $10–$20 |
| Kitchen Scale | Precise weight measurements | $15–$30 |
| Ring Light | Enhanced lighting for photos | $20–$50 |
| Food Photography Backgrounds | Professional backdrops | $15–$40 |
| Linen Napkins | Texture for styling | $10–$25 (set) |
Expert Tips for Recipe Writing Success
Beyond the basics, seasoned recipe writers share advanced strategies to elevate your work:
- Keep a Recipe Journal: Abbey Sharp, RD, recommends tracking “accidental creations” in a journal to capture spontaneous ideas. This helps refine recipes before testing.
- Test Multiple Times: Elizabeth Shaw, RD, advises testing recipes at least twice and re-reading instructions to avoid errors. Reader feedback can highlight oversights.
- Prepare for Testing: Amy Gorin, RD, buys extra ingredients and keeps a camera ready to document the process, ensuring recipes are both functional and visually appealing.
- Use Taste Testers: Kim Melton, RDN, involves others to evaluate flavors, as personal taste preferences may differ from the audience’s.
- Simplify for Beginners: Elizabeth Ward, MS, RD, emphasizes clear, explicit instructions for novice cooks, avoiding assumptions about skill levels.
Food Photography: The Visual Hook
In the era of social media, food photography is non-negotiable. A stunning image can make or break a recipe’s appeal. Here’s how to excel:
- Styling Tips: Use colorful ingredients, layer textures (e.g., linen napkins, wooden boards), and avoid clutter. Pasta bowls or shallow plates enhance presentation.
- Lighting: Natural light is ideal, but ring lights provide consistent illumination for indoor shoots.
- Backdrops: Affordable food photography backgrounds (e.g., marble or wood textures) add professionalism without breaking the bank.
- Angles: Shoot from multiple angles—overhead for flat dishes like pizza, 45° for layered dishes like salads.
Example: A photo of a Black Beans and Rice Vegan Bowl might feature vibrant greens, a rustic wooden table, and a linen napkin for texture.
Tools for Recipe Writing and Photography
Investing in the right tools streamlines recipe development and presentation. Here are must-haves:
- Measuring Tools: Ensure accuracy with calibrated cups, spoons, and a digital kitchen scale.
- Cookware: Stock various sizes (e.g., 8-inch and 9 x 13-inch baking dishes) for flexibility.
- Recipe Journal: Document ingredient tweaks and testing notes.
- Photography Gear: A ring light, food tweezers for precise styling, and neutral backdrops elevate visuals.
Popular Recipe Examples
Inspiration from well-crafted recipes can guide your writing. Here are some standout examples:
- Mofongo with Caribbean Vegetable Stew: A Puerto Rican classic with a vibrant description and clear instructions.
- Noodle Bowl with Thai Tofu and Vegetables: Comb
We will meet you on next article.
Please share this The Best Recipe Writing Strategies with your friends and do a comment below about your feedback.
Until you can read, Top 20 Tips for Succeeding at Food Blogging