3 Insanely Useful Lightroom Tips for Food Photography
Food photography demands precision in capturing the allure of dishes, where colors pop, textures tantalize, and compositions draw the eye. While styling and shooting form the foundation, post-processing in Adobe Lightroom elevates raw images into professional-grade visuals.
Lightroom excels as a non-destructive editor, allowing global and selective adjustments without altering original files. For food photographers, mastering its tools means transforming flat, desaturated shots into appetizing masterpieces that evoke freshness and flavor.
This article focuses on three powerhouse tips: HSL adjustments for color control, the radial filter for focused highlighting, and the sharpening mask for targeted detail enhancement. These techniques build on basic edits like exposure and contrast tweaks, enabling you to refine images efficiently. Whether you’re photographing vibrant salads, rich baked goods, or textured mains, these tips streamline your workflow and deliver results that stand out in portfolios, blogs, or social media.
Lightroom’s interface supports intuitive editing, with panels for basic adjustments, tone curves, and local tools. Before diving into the tips, ensure your setup uses a calibrated monitor for accurate colors—essential in food work where subtle hues like the redness of tomatoes or the green of herbs can make or break appeal. Start with raw files for maximum flexibility, as they retain more data than JPEGs.
To illustrate, consider a common scenario: a top-down shot of falafel bowls. Straight from the camera, it appears flat and muted. Basic adjustments—increasing exposure by +0.5, contrast by +20, whites by +15, blacks by -10, clarity by +10, vibrance by +15, and saturation by +5—improve it, but the real magic comes from the advanced tips below.
Understanding the Basics: Preparing Your Image for Advanced Edits
Before applying the core tips, establish a solid base. Color temperature adjustment warms up cool tones from natural light. Slide the Temp slider toward yellow (e.g., from 5500K to 6200K) to make food appear fresher, countering blue-gray casts from window light.
Next, fix white balance using the eyedropper tool. Click on a neutral area like a white plate or gray card to neutralize colors, ensuring reds and greens look true-to-life rather than off-putting.
Manage dynamic range by lifting shadows (+20-30) to reveal details in darker areas, like sauce pools, and pulling highlights (-20-30) to recover blown-out spots on shiny surfaces.
For mood, apply subtle color grading: add blue to shadows for a cool vibe or orange to midtones for warmth in items like bread.
Switch to linear profiles like Adobe Landscape or Neutral instead of Adobe Color for a natural starting point, reducing overly vibrant defaults that can make food look artificial.
Incorporate vignetting post-crop: set amount to -10-15 with midpoint at 50 and roundness at 0 for a subtle dark edge, guiding focus to the center.
These foundational steps set the stage, but the three tips that follow revolutionize your edits by offering precision control.
Tip 1: Mastering HSL Adjustments for Vibrant, Accurate Colors
HSL (Hue, Saturation, Luminance) stands out as a transformative tool in Lightroom’s Develop module. It allows isolated control over eight color channels—red, orange, yellow, green, aqua, blue, purple, magenta—without impacting the entire image. This selectivity is crucial in food photography, where enhancing the red of strawberries shouldn’t desaturate surrounding greens.
Hue shifts the shade: push yellow toward green for earthy tones in grains or toward orange for warmer fruits. Saturation intensifies or mutes: boost reds (+20) for ripe tomatoes but dial back if they overpower. Luminance controls brightness: decrease yellows (-15) to deepen falafel’s golden hue, preventing washout, or dim greens (-10) for leafy depth.
Locate the HSL panel under the Color section. Select “All” to view sliders stacked for hue, saturation, and luminance. Use the targeted adjustment tool (circle icon) to click-drag on-image for automatic channel selection—ideal for quick tweaks.
In the falafel example, after basics, the image felt balanced but lacked punch. In saturation, increase reds (+15) and yellows (+10) to make tomatoes vivid and hummus creamy. In luminance, reduce yellows (-25) to ground the falafels realistically and greens (-15) for salad dimension. Avoid hue changes here, as the natural shades worked.
Common pitfalls: Over-saturation leads to unnatural vibrancy—aim for enhancements that mimic real perception. Underuse luminance; it’s key for depth, turning flat oranges into rich, shadowed citrus.
Experiment across dishes: For baked goods, boost orange saturation (+20) and luminance (+10) for inviting warmth. In salads, desaturate blues (-10) if cool tones creep in from lighting.
This tip’s power lies in subtlety—adjustments under 30 points often suffice. Pair with split-toning for advanced grading, adding warmth to highlights or coolness to shadows.
To visualize workflow, here’s a flowchart for HSL application:
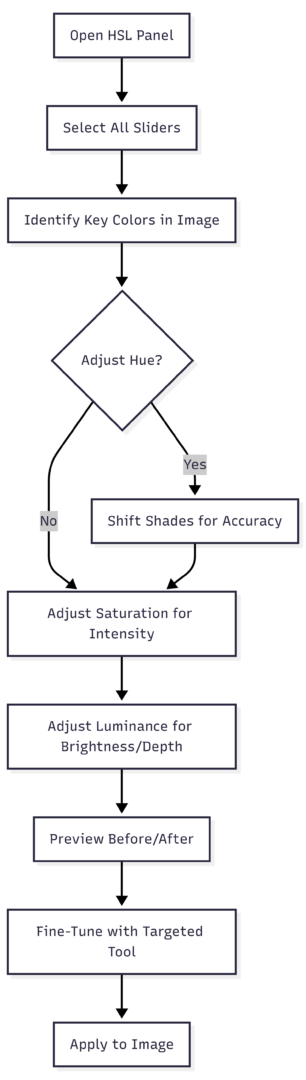
This process ensures methodical edits, typically taking 2-5 minutes per image.
Tip 2: Using the Radial Filter for Selective Focus and Drama
The radial filter (Shift+M) creates elliptical masks for localized adjustments, drawing attention to the “hero” dish while subduing surroundings. In food photography, where compositions often include props or backgrounds, this tool mimics studio lighting effects non-destructively.
Access it under the histogram toolbar. Click-drag to draw an oval around the subject, leaving buffer space. Invert the mask (checkbox) to affect inside or outside. Adjust exposure (+0.2 inside for highlight), contrast (+10), or dehaze (+15) to pop the food. Outside, reduce exposure (-0.3), saturation (-5), and clarity (-10) to darken and soften edges.
In the falafel bowls, outline the central dish loosely. Inside: exposure +0.15, clarity +5. Outside: exposure -0.25, highlights -10. This guides the eye to the falafels without obvious manipulation.
For stacked foods like brownies or pasta, use it to even lighting—brighten shadowed fronts (+0.4 exposure) while taming backlit highlights (-20). In bowl shots, counter rim shadows by boosting shadows (+20) inside.
Advanced use: Feather the mask (50-100) for seamless blends. Combine with brushes for irregular shapes. For caramel jars looking hazy, apply dehaze (+20) and clarity (+10) radially to enrich tones.
Avoid overkill: Dramatic drops (-0.5 exposure outside) scream edits; subtlety wins. Test on various setups—backlit scenes benefit most from highlight recovery.
Table of Radial Filter Settings for Common Food Scenarios:
| Scenario | Inside Adjustments | Outside Adjustments | Feather Value |
|---|---|---|---|
| Top-Down Bowl | Exposure +0.2, Clarity +10 | Exposure -0.3, Saturation -5 | 70 |
| Backlit Plate | Shadows +25, Highlights -15 | Exposure -0.4, Contrast -10 | 80 |
| Stacked Desserts | Dehaze +15, Texture +10 | Highlights -20, Clarity -15 | 60 |
| Vibrant Salads | Saturation +10, Vibrance +15 | Exposure -0.25, Shadows -10 | 75 |
These presets accelerate editing; customize per image.
Diagram for radial filter process:
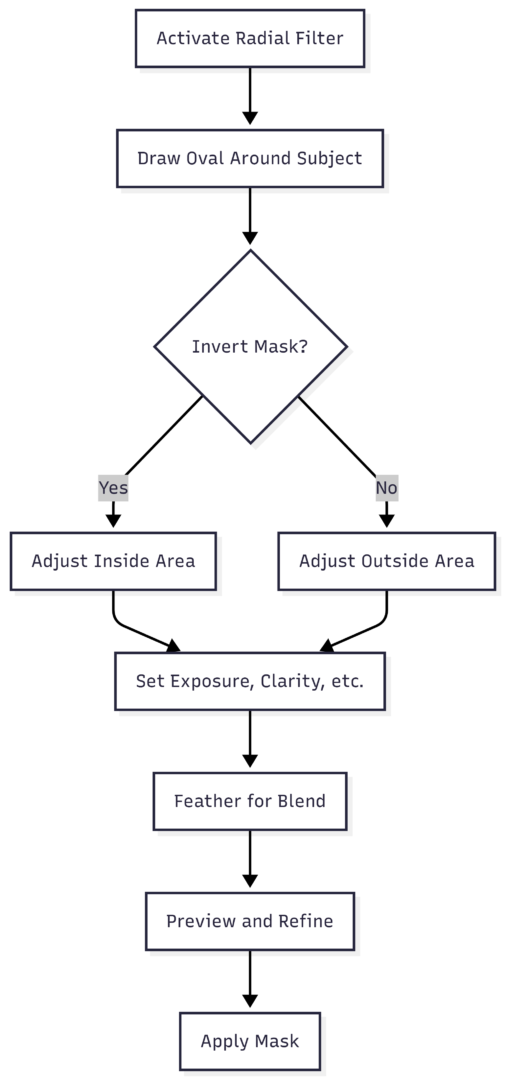
This structured approach enhances focus, making images more engaging.
Tip 3: Sharpening Mask for Precise Detail Enhancement
Sharpening boosts edge contrast for crisp details, but global application adds noise to backgrounds or bokeh. The sharpening mask refines this by targeting high-contrast areas, preserving softness elsewhere—vital for food’s tactile appeal, like crumbly textures or glossy sauces.
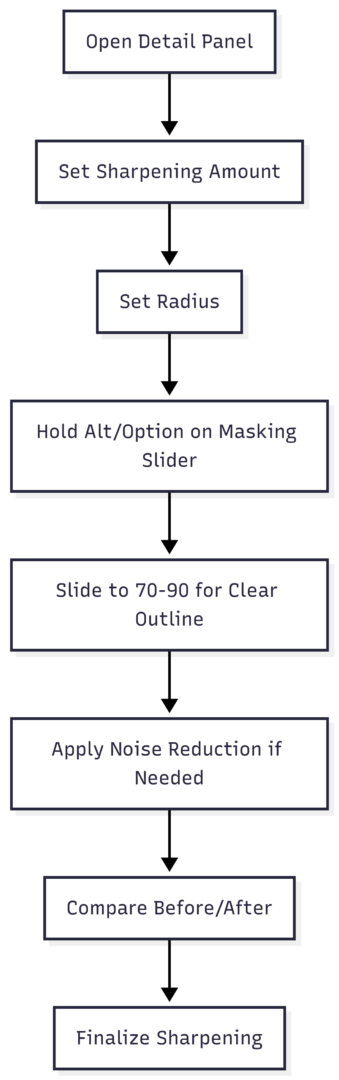
In the Detail panel, set sharpening amount (40-60) and radius (1.0-1.5). Hold Alt/Option while sliding masking (0-100); the overlay shows white (sharpened) and black (masked) areas. Aim for 70-90 to outline the subject clearly.
For falafels, amount 50, radius 1.5, masking 85—sharpens crispy edges without graining the background.
In hero-focused shots, this maintains bokeh creaminess. For printed vs. web output, adjust: higher amount (60+) for print, lower (40) for screens.
Pair with noise reduction: luminance 20-30 if grain appears. Avoid over-sharpening—halos ruin realism.
Table of Sharpening Settings by Food Type:
| Food Type | Amount | Radius | Masking | Noise Reduction |
|---|---|---|---|---|
| Crispy Textures (e.g., Falafel) | 50 | 1.5 | 85 | 25 |
| Soft Baked Goods | 40 | 1.2 | 75 | 20 |
| Glossy Sauces | 45 | 1.3 | 80 | 30 |
| Leafy Salads | 55 | 1.4 | 90 | 25 |
These optimize detail without artifacts.
Flowchart for sharpening mask:
Integrating the Tips: A Complete Workflow
Combine these for synergy. Start with basics, apply HSL for colors, radial for focus, then sharpening mask. For advanced precision, use range masks (post-2017 feature) with color eyedroppers to isolate edits, like correcting purple shifts in blue napkins without global impact.
Hotkeys speed this: R for crop, \ for before/after, O for mask overlay. Downloadable PDF guides list more, like Cmd/Ctrl + Z for undo.
Compare: Basic edits yield serviceable images; adding these tips creates depth, vibrancy, and professionalism. In the falafel before/after, colors deepen, focus sharpens, details pop—transforming meh to mesmerizing.
Additional Tools and Best Practices
Explore structure boosts: clarity (+10-20) and texture (+15) for ingredient pop, but sparingly to avoid synthetic looks.
Selective sharpening via brushes: paint over food only, amount 40-50, flow 100.
For organization, Lightroom’s database catalogs images; tag food types for quick access.
No pricing applies here—Lightroom is subscription-based via Adobe Creative Cloud, starting at $9.99/month for Photography plan.
Master these, and your food photography will captivate, driving engagement on platforms like Instagram or stock sites.
In summary, HSL, radial filters, and sharpening masks empower targeted edits, turning raw captures into irresistible visuals. Practice on diverse shoots to internalize them, refining your unique style.
Please share this 3 Insanely Useful Lightroom Tips for Food Photography with your friends and do a comment below about your feedback.
We will meet you on next article.
Until you can read, My TOP 5 Food Styling Tricks for Food Bloggers