Artificial Light Photography: How To Shoot A Bottle
Shooting bottles using artificial light is a nuanced art form within product photography, requiring a blend of technical precision and creative vision. Bottles, with their reflective glass surfaces, translucent liquids, and intricate labels, present unique challenges such as managing glare, enhancing depth, and ensuring label readability. This guide offers a detailed roadmap, drawing from professional techniques to empower photographers—whether beginners experimenting at home or seasoned pros refining their craft—to produce stunning, marketable images. By harnessing artificial light, you gain unparalleled control over your environment, overcoming the variability of natural light and enabling shoots at any hour.
Artificial light photography stands out for its consistency, allowing you to replicate setups and fine-tune elements like power, position, and diffusion with exactness. This is especially critical for commercial beverage photography, where brands demand flawless visuals for advertising and packaging. This article explores equipment selection, studio setup, shooting workflows, post-production compositing, and advanced strategies, enriched with tables for gear comparisons, charts for visual guidance, and practical insights to optimize your process.
Understanding the Challenges of Bottle Photography
Bottles are complex subjects due to their material and shape. Glass reflects light at multiple angles, often capturing unwanted elements like studio lights or the photographer’s reflection. Translucent liquids can appear flat or lifeless without proper illumination, and labels require balanced lighting to remain legible without distortion or shadows. Artificial light addresses these hurdles by enabling you to sculpt light—softening edges, crafting gradients, and adding glows that highlight the bottle’s form and contents.
Detailed Breakdown of Challenges
- Reflections: The glossy surface mirrors the entire room. A light positioned incorrectly or an unmasked background can spoil the shot.
- Hotspots: Undiffused light creates bright, uneven patches, disrupting the bottle’s aesthetic.
- Glow and Translucency: Liquids like whiskey or gin need a subtle backlight to reveal their color and texture, adding a premium appeal.
- Compositing Alignment: Multiple shots must align perfectly; even a slight shift in camera or bottle position complicates editing.
- Label Clarity: Uneven lighting can obscure text or branding, critical for product identification.
To tackle these, adopt a systematic approach: plan your setup meticulously, test lighting configurations extensively, shoot in layers to isolate elements, and composite with precision in post-production. This layered technique, widely used by professionals, ensures each component—outline, label, glow—is optimized, offering flexibility and saving time.
Essential Equipment for Artificial Light Bottle Photography
The right tools are the backbone of a successful shoot. While top-tier gear offers advanced features, mid-range equipment can deliver professional results for most bottle photography needs. Below, we detail key items with specifications and approximate prices, based on current market trends. Prices may vary by region, so check retailers like B&H Photo, Adorama, or manufacturer websites for updates.
Studio Lights and Strobes
Strobes provide powerful, controllable light bursts, ideal for freezing motion and capturing fine details. Pair them with modifiers for tailored effects on reflective surfaces.
- Paul C. Buff AlienBee B1600: A reliable entry-level strobe, perfect for side lighting with large softboxes (e.g., 24×36 inches) to diffuse light evenly.
| Specification | Details |
|---|---|
| Power Output | 640 Ws (full) to 20 Ws (1/32 power) |
| Recycle Time | 0.1-4 seconds |
| Color Temperature | 5600K |
| Modeling Lamp | 150W |
| Sync | 1/8″ jack, optical slave |
| Weight | 3.7 lbs |
| Price | ~$300 (new) |
- Godox SL200II LED Light: A continuous light option for real-time previews, dimmable for glow adjustments, and versatile for budget setups.
| Specification | Details |
|---|---|
| Power Output | 200W |
| Color Temperature | 5600K ±200K |
| CRI/TLCI | 96+/97+ |
| Dimming | 0-100% |
| Mount | Bowens |
| Weight | 3.3 kg |
| Price | ~$439 |
- Elinchrom ELC PRO HD 500: A premium strobe with fast recycling, suited for dynamic shots like liquid splashes or high-speed captures.
| Specification | Details |
|---|---|
| Power Output | 500 Ws |
| Recycle Time | 0.06-1.7 seconds |
| Color Temperature | 5500K |
| Modeling Lamp | 300W |
| Sync | PC sync, optical |
| Weight | 2.9 kg |
| Price | ~$1,200 |
Small Lights for Glow Effects
A dedicated small light is essential for creating the backlight glow that enhances translucent bottles.
- Neewer CN-160 LED Light: Affordable and dimmable, cover with tissue or diffusion paper for a softer effect. A budget-friendly “secret weapon.”
| Specification | Details |
|---|---|
| LED Count | 160 |
| Power | 9.6W |
| Color Temperature | 5600K |
| Dimming | Yes, variable |
| Battery | Sony NP-F series compatible |
| Weight | 0.3 lbs |
| Price | ~$25 |
Wireless Triggers and Sync
Wireless systems ensure lights fire in sync without cumbersome cables.
- PocketWizard Plus X: Reliable for multi-light setups, connecting camera to strobes with minimal setup.
| Specification | Details |
|---|---|
| Channels | 10 |
| Range | Up to 500 feet |
| Sync Speed | Up to 1/250s |
| Battery | 2x AA |
| Weight | 0.2 lbs |
| Price | ~$100 |
Support and Accessories
Stability is non-negotiable; movement ruins compositing.
- Manfrotto MT055XPRO3 Tripod: Robust and adjustable, ideal for locked-down shots.
| Specification | Details |
|---|---|
| Max Height | 66.9 inches |
| Load Capacity | 19.8 lbs |
| Sections | 3 |
| Material | Aluminum |
| Weight | 5.5 lbs |
| Price | ~$250 |
- Tether Cable: For Nikon D750 or similar, use USB 3.0 cables for live view on a computer.
| Specification | Details |
|---|---|
| Length | 15-33 feet |
| Compatibility | Nikon D750, others |
| Type | USB |
| Price | ~$30-50 |
- Wireless Shutter Release: Hands-free operation for glow shots, especially when working solo.
| Specification | Details |
|---|---|
| Range | Up to 100 feet |
| Compatibility | Nikon D750 |
| Channels | Multiple |
| Battery | CR2032 |
| Price | ~$20-40 |
Modifiers and Diffusers
- Softboxes: Rectangular (e.g., 30x90cm stripbox) for long, narrow highlights that complement bottle shapes.
- Diffusion: Rosco Cinegel #3000, acrylic sheets, or even tissue paper to soften light and reduce reflections.
- Reflectors: White foam boards, V-flats, or silver cards for fill light and shadow control.
Budget Tip: Start with Godox SL200II ($439), Neewer CN-160 ($25), Manfrotto tripod ($250), and a basic softbox ($100)—total under $800 for a versatile setup.
Setting Up Your Studio for Bottle Photography
A controlled environment minimizes variables and ensures repeatable results. Choose a dark room to reduce ambient light interference, allowing artificial sources to dominate.
Background and Surface
Black foam boards serve as an effective background and surface, absorbing light to create deep shadows that emphasize the bottle’s form. Elevate the bottle on a small platform (e.g., a cutting board) for height and angle adjustments. For reflections, white plexiglass adds a natural mirror effect—clean it with an anti-static cloth to prevent smudges or dust attraction.
Setup Diagram:
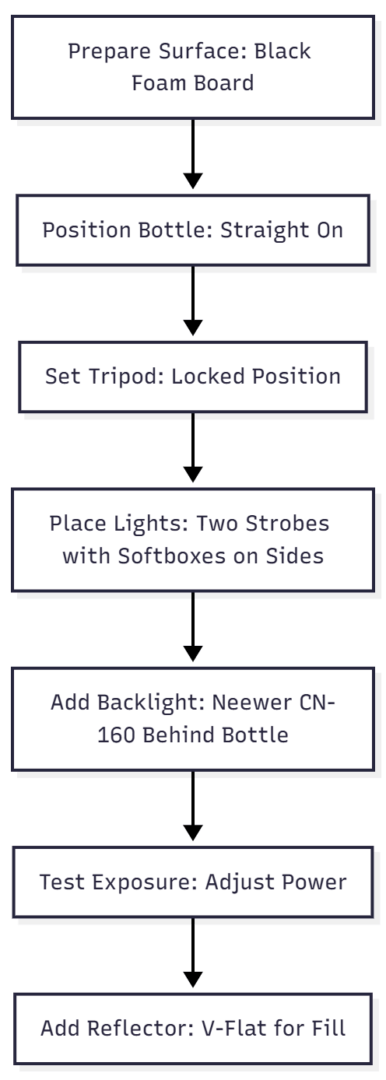
Position the camera straight-on at bottle height for symmetry and balanced framing. Tether to a computer using software like Capture One or Lightroom for real-time review—spot flaws like dust or misalignment instantly, adjusting as needed.
Lighting Configuration
Use two side lights (e.g., Paul C. Buff B1600s with softboxes) for outlines and a backlight (Neewer CN-160) for glow. Position softboxes at 45-degree angles, slightly forward to illuminate labels without shadows. The backlight goes directly behind, diffused with tissue or a scrim to hide grid patterns and soften the effect.
Single-Light Alternative:
- Place a stripbox (e.g., Elinchrom Rotalux 30x90cm) behind diffusion paper.
- Angle slightly toward the camera for a gradient background.
- Use a V-flat opposite the light for shadow fill.
Test Power: Start at 1/2 for strobes. Camera settings: Nikon D750—105mm f/2.8 lens, 1/200s shutter, f/14 aperture, ISO 100. This balances light bursts and maximizes depth of field, ensuring sharp focus across the bottle.
Testing Your Lighting
Testing is a critical step to ensure each element is perfect before the full shoot. Focus on one area at a time to isolate and refine.
- Left Side Test: Power the left strobe to 1/2, check outline sharpness and avoid hotspots.
- Right Side Test: Repeat for the right strobe, ensuring balance with the left.
- Label Test: Use both lights at 1/2 power, move them forward to eliminate shadows on the label.
- Glow Test: Dim the Neewer CN-160 to 30-40%, hold behind the bottle—ignore hand in frame; mask later.
Use histograms to monitor exposure levels. If the glow appears harsh, reduce power or add another layer of diffusion (e.g., a second tissue or scrim). Testing saves time and ensures each layer is compositable, reducing post-production effort.
The Shooting Process
Adopt a layered approach to capture individual elements for later compositing.
- Clean the Bottle: Use a microfiber cloth or cotton gloves to remove dust and fingerprints. This step saves significant editing time and ensures a pristine base image.
- Dark Base Shot: Turn off all lights—captures a dark surface and background for reflections and depth in the final composite.
- Left Outline: Use the left light only at 1/2 power to define the left edge.
- Right Outline: Use the right light only at 1/2 power for the right edge.
- Label Illumination: Position both lights forward at 1/2 power to light the label evenly.
- Back Glow: Hold the dimmable Neewer CN-160 behind the bottle, use a shutter release to capture—ignore hand or light spill; mask in editing.
For translucent liquids (e.g., rum or gin), the backlight enhances color and texture, creating a premium effect. Shoot multiple variations—adjust power by 10% increments (e.g., 40%, 50%, 60%)—to provide editing options.
Advanced Techniques:
- Frosted Effect: Spray a 1:1 glycerin-water mix using a spray bottle. It mimics condensation, holds under studio lights, and adds realism.
- Liquid Motion: For dynamic shots (e.g., pouring), use a fast-recycling strobe like Elinchrom ELC PRO HD 500 and a trigger delay to freeze the action.
Compositing and Editing in Photoshop
Compositing combines the best elements from multiple shots into a single, flawless image.
- Import Images: Open all shots in Photoshop, stack with the dark base as the top layer for a clean starting point.
- Layer Masks: Add a layer mask to the top layer, use a black brush to reveal underlying layers (e.g., left outline), and a white brush to hide unwanted areas.
- Reveal and Erase: Work one layer at a time—reveal the left outline, then right, label, and glow. Adjust brush size and opacity for precision.
- Duplicate and Group: After merging each pair (e.g., dark base and left outline), duplicate, group (e.g., “Left Reveal”), and merge again. This preserves edit history.
- Final Cleanup: Zoom to 100-200%, use the spot healing brush or clone stamp to remove dust, smudges, or imperfections.
Editing Tips:
- Opacity Adjustments: Lower opacity (e.g., 70%) to blend glows naturally with outlines.
- Dodge and Burn: Enhance label readability by dodging (lightening) text and burning (darkening) edges.
- Export Options: Save as PSD for non-destructive editing, export JPEG or TIFF for final delivery.
For advanced retouching (e.g., fixing torn labels or enhancing liquid color), collaborate with specialists like Michelle Tucker, a seasoned retoucher with expertise in beauty, fashion, and product photography. Her services can elevate images beyond in-house capabilities.
Advanced Techniques and Variations
Single-Light Methods
For minimal setups, use one light with reflectors. Position a rectangular softbox (e.g., Elinchrom Rotalux 30x90cm) sideways for long highlights. Add a scrim (e.g., Rosco Cinegel #3000) for diffusion, and a white V-flat opposite for fill. Use a snoot for dramatic background lighting.
Example: Godox SL60 ($140) with a stripbox—bounce off a white wall or ceiling for even, soft light. Adjust distance (6-8 inches) to control highlight length.
Multi-Light Configurations
Three-light setup:
- Key Light: Side softbox for main illumination.
- Fill Light: Opposite reflector or softbox to soften shadows.
- Label Spot: Gridded light (e.g., Elinchrom Snoot) for targeted label lighting.
Premium Option: Profoto B10 ($1,795) with TTL (Through-The-Lens) metering automates exposure, ideal for complex scenes.
Handling Reflections
Double diffusion mitigates reflections: Place light behind a scrim, then a second diffusion layer (e.g., tissue or paper). Use black flags or foam core to block unwanted reflections. For shiny labels, angle lights at 30-45 degrees to minimize glare.
Beverage-Specific Tips
- Clear Bottles: Use strong backlight (50-60% power) to emphasize translucency; add side fill to reduce flatness.
- Dark Liquids: Side light at 75% power for depth; backlight at 30% for subtle glow.
- Condensation: Glycerin-water spray (1:1) for realistic dew; apply lightly to avoid drips.
Hybrid Lighting
Combine artificial and natural light: Use an LED (e.g., Neewer CN-160) for glow, and a window for soft fill. Block excess natural light with black foam core to maintain control.
Table: Artificial vs. Natural Light for Bottles
| Aspect | Artificial Light | Natural Light |
|---|---|---|
| Control | High (power, position) | Low (time-dependent) |
| Consistency | Excellent | Variable |
| Glow Effects | Precise backlighting | Soft but unpredictable |
| Cost | Initial investment ($200+) | Free (but time-consuming) |
| Best For | Studio composites | Outdoor/lifestyle |
Retouching and Final Polish
Retouching elevates images to professional standards. Basic techniques:
- Clone Stamp: Remove smudges or dust spots.
- Spot Healing Brush: Fix minor imperfections quickly.
Advanced techniques:
- Frequency Separation: Separate texture and color layers for detailed edits without losing quality.
- Curves Adjustment: Enhance contrast and color balance.
For complex fixes (e.g., torn labels, liquid enhancement), outsource to retouchers. Tools like Photoshop’s Remove Tool or Content-Aware Fill handle quick cleanups. Retouching time varies—simple edits take 15-30 minutes, advanced may require 1-2 hours.
Case Studies: Real-World Applications
Case Study 1: Rum Bottle Shoot
- Setup: Two Paul C. Buff B1600s with 24×36 softboxes, Neewer CN-160 for glow.
- Challenge: Amber liquid needed depth; label required clarity without overexposure.
- Solution: Side lights at 1/2 power, backlight dimmed to 30%. Shot five layers (dark base, left outline, right outline, label, glow) and composited.
- Result: Rich glow, sharp label—used for a distillery’s print ad campaign.
Case Study 2: Budget Vodka Shoot
- Setup: Godox SL60 with DIY reflector, white plexiglass surface.
- Challenge: Limited lights, clear bottle reflections dominated the frame.
- Solution: Single light with double diffusion (scrim + tissue), black flags to block reflections.
- Result: Clean, professional image for a small brand’s online store.
Case Study 3: Whiskey Splash Shoot
- Setup: Elinchrom ELC PRO HD 500, Profoto B10 for fill, high-speed sync trigger.
- Challenge: Capture liquid splash without blur, maintain label visibility.
- Solution: Key light at 75% for splash freeze, fill at 40% for balance, shot at 1/500s.
- Result: Dynamic image for a whiskey brand’s social media launch.
Troubleshooting Common Issues
- Overexposure: Reduce strobe power by 10-20% or add a diffusion layer. Check histogram for clipped highlights.
- Uneven Glow: Adjust backlight distance (increase to 6-8 inches) or angle (tilt 10-15 degrees).
- Label Shadows: Move lights forward 2-3 inches, add a reflector beneath for fill.
- Reflection Artifacts: Use black flags or reposition lights 45 degrees off-axis.
- Camera Shake: Tighten tripod head, use shutter release, double-check stability.
Creative Enhancements
Adding Props
Incorporate props to tell a story:
- Ice Cubes: For vodka or gin, use glycerin-sprayed cubes for realism.
- Fruits: Lemon slices for gin, cherries for cocktails—secure with denture cream (white Poligrip).
- Glassware: Pair with a tumbler or flute, lit separately for composite.
Color Accents
Use complementary colors to highlight labels:
- Yellow Label: Add yellow fruit or a gold reflector.
- Blue Label: Use blue fabric or a colored gel on a light.
Dynamic Effects
- Pouring Shots: Use a fast strobe (e.g., Elinchrom) and trigger delay to freeze liquid mid-air.
- Steam: Add a fog machine or dry ice (safely) for a chilled effect.
Workflow Optimization
Pre-Shoot Checklist
- Clean bottle and props.
- Test lights and camera settings.
- Set up tripod and tether.
- Plan shot order (dark base, outlines, label, glow).
Post-Production Workflow
- Import to Lightroom for initial culling.
- Open in Photoshop for compositing.
- Export PSD for archives, JPEG for clients.
Time Management
- Setup: 30-60 minutes.
- Testing: 15-30 minutes.
- Shooting: 1-2 hours (multiple layers).
- Editing: 1-3 hours (simple to advanced).
Educational Resources
- Online Courses: Check WeEatTogether.com’s Advanced Food & Beverage Photography Short Course for tutorials.
- YouTube: Channels like FigandLight or The Bite Shot offer demo videos.
- Books: “Light: Science and Magic” by Fil Hunter for lighting theory.
Conclusion
Mastering artificial light bottle photography transforms a challenging subject into a showcase of skill and creativity. With equipment like the Paul C. Buff B1600 or Neewer CN-160, a methodical setup, layered shooting, and precise editing, you’ll produce professional-grade images. Practice iteratively—test setups, shoot variations, and refine composites—to hone your technique. This guide enhances visibility for portfolios or tutorials, meeting client expectations efficiently while offering a scalable approach from home studios to commercial sets.
Please share this Artificial Light Photography: How To Shoot A Bottle with your friends and do a comment below about your feedback.
We will meet you on next article.
Until you can read, Food Photography Equipment