Food Photography Equipment
Food photography is an art form that transforms everyday meals into visual masterpieces, captivating audiences on social media, blogs, cookbooks, and advertisements. It requires a keen eye for composition, lighting, and detail, but equally important is the right equipment to bring those visions to life. Whether you’re a novice starting with borrowed gear or a seasoned professional building a dedicated studio, the tools you choose can significantly impact the quality and efficiency of your work. This comprehensive guide explores essential food photography equipment, from cameras and lenses to lighting modifiers and editing software. We’ll delve into specifications, current prices, pros and cons, usage tips, and real-world applications to help you make informed decisions. By focusing on versatile, scalable gear, you can create appetizing images that highlight textures, colors, and stories without overwhelming your budget or space.
Understanding the Basics of Food Photography Equipment
Before diving into specific recommendations, it’s crucial to grasp why certain equipment is vital for food photography. Unlike general photography, food shots often involve close-ups, controlled lighting, and static subjects, demanding gear that offers precision and consistency. Beginners might start with minimal setups—perhaps a second-hand camera and natural light—but as skills grow, investing in quality tools becomes essential for professional results.
Key principles include:
- Control and Flexibility: Equipment should allow manual adjustments for exposure, focus, and lighting to handle varying conditions.
- Durability and Portability: Food shoots can occur in kitchens, studios, or on location, so gear needs to be robust yet easy to transport.
- Budget Considerations: Start thrifty with used items, but prioritize lenses and tripods where quality matters most.
- Scalability: Choose pieces that “grow with you,” like lenses compatible with full-frame cameras.
Common pitfalls for beginners include over-relying on smartphone cameras, which lack the depth and control of DSLRs or mirrorless systems, or skimping on lighting, leading to harsh shadows or flat images. Professionals, meanwhile, emphasize tethering for real-time previews and artificial lights for reliability during deadlines.
In the following sections, we’ll break down categories, providing detailed specs, updated pricing, and practical advice drawn from expert insights and user experiences.
Cameras for Food Photography: The Core of Your Setup
The camera body serves as the heart of your food photography kit, capturing the raw data that you’ll refine in post-production. In food photography, where subjects are stationary, features like high dynamic range, low-light performance, and RAW shooting are paramount. Full-frame sensors are ideal for their superior depth of field control and noise reduction, making food look more three-dimensional and appetizing. However, crop-sensor cameras are excellent entry points due to their affordability.
When selecting a camera, consider:
- Sensor Size: Full-frame for better bokeh and low-light handling; crop for budget-friendly options.
- Resolution: 20-30MP suffices for most prints and digital use; higher isn’t always better as it increases file sizes.
- Autofocus and Stabilization: Crucial for sharp details in macro shots.
- Video Capabilities: Useful if you create recipe videos alongside photos.
Here are top recommendations, with pros, cons, and tips:
- Canon EOS 6D: This full-frame DSLR boasts a 20.2MP CMOS sensor, ISO range of 100-25,600 (expandable to 102,400), 11 autofocus points, and Full HD 1080p video at 30fps. It features a 3-inch LCD, Wi-Fi for remote control via apps, and a durable magnesium alloy body weighing 1.7 pounds. Pros: Affordable entry into full-frame, excellent color reproduction for food tones, compact for kitchen setups. Cons: Older model with limited autofocus points compared to newer mirrorless; no 4K video. Usage Tip: Pair with the Canon Camera Connect app for wireless tethering during overhead shots—ideal for adjusting compositions without disturbing the scene. Current price: Approximately $800 for renewed models (from Amazon and eBay listings).
- Canon EOS 6D Mark II: An upgrade with a 26.2MP full-frame sensor, ISO 100-40,000 (expandable to 102,400), 45 cross-type autofocus points, vari-angle 3-inch touchscreen, and 1080p video with 4K time-lapse. It includes Dual Pixel CMOS AF for smooth focusing and weighs 1.7 pounds. Pros: Flip-out screen perfect for awkward angles like flatlays; improved autofocus for quick setups. Cons: Battery life could be better in continuous shooting; not as rugged as pro bodies. Usage Tip: Use the vari-angle screen for low-angle shots of plated dishes, ensuring precise focus on key elements like steam or drizzles. Current price: Around $829 for used, $1,429 new (from eBay, KEH, and Walmart).
- Nikon Z6: A mirrorless full-frame with 24.5MP BSI CMOS sensor, ISO 100-51,200 (expandable to 204,800), 273 autofocus points, in-body 5-axis stabilization, and 4K UHD video. It has a 3.2-inch tilting touchscreen and weather-sealed body weighing 1.5 pounds. Pros: Silent shooting mode avoids disturbing delicate setups; excellent stabilization for handheld close-ups. Cons: Adapter needed for non-Z lenses; EVF can drain battery faster. Usage Tip: Leverage the in-body stabilization for sharper images in dim kitchens, reducing the need for tripods in casual shoots. Current price: About $809 used, $1,600 new (from eBay, Amazon, and KEH).
- Sony A7 III: Mirrorless full-frame featuring a 24.2MP BSI sensor, ISO 100-51,200 (expandable to 204,800), 693 phase-detection autofocus points, 5-axis stabilization, and 4K video. It includes a 3-inch tilting touchscreen and weighs 1.4 pounds. Pros: Superior autofocus tracking for action like pouring sauces; hybrid photo/video prowess. Cons: Menu system can be complex for beginners; overheating in extended video. Usage Tip: Use eye AF for shots involving human elements, like hands slicing cake, to keep focus sharp on details. Current price: $1,699 new (from Sony, Amazon, and Best Buy).
For beginners, the Canon EOS 6D offers great value, allowing experimentation without high costs. Professionals might prefer the Sony A7 III for its speed. Always test ergonomics—how the camera feels in hand during long shoots.
| Camera Model | Sensor Type | Megapixels | ISO Range | Autofocus Points | Video Capabilities | Approx. Price (2025) |
|---|---|---|---|---|---|---|
| Canon EOS 6D | Full-Frame | 20.2 | 100-25,600 | 11 | 1080p | $800 (renewed) |
| Canon EOS 6D Mark II | Full-Frame | 26.2 | 100-40,000 | 45 | 1080p/4K time-lapse | $829 (used) / $1,429 (new) |
| Nikon Z6 | Full-Frame | 24.5 | 100-51,200 | 273 | 4K | $809 (used) / $1,600 (new) |
| Sony A7 III | Full-Frame | 24.2 | 100-51,200 | 693 | 4K | $1,699 (new) |
Transitioning to mirrorless like the Nikon Z6 or Sony A7 III is recommended for future-proofing, as they offer electronic viewfinders for precise composition previews.
Lenses for Food Photography: Capturing the Details
Lenses are where the magic happens in food photography, dictating sharpness, bokeh, and perspective. Prime lenses with wide apertures are favorites for their light-gathering ability and isolation of subjects. A 50mm is versatile for overall scenes, while macros like 100mm excel at textures—think crumbly cookies or glossy sauces.
Factors to consider:
- Focal Length: 35-50mm for wide shots; 85-105mm for close-ups.
- Aperture: f/1.8 or wider for shallow depth; f/2.8 for macros with stabilization.
- Build Quality: Weather-sealing and metal mounts for durability in humid kitchens.
- Compatibility: Ensure mount matches your camera; adapters for mirrorless.
Recommended lenses:
- Canon EF 50mm f/1.8 STM: 50mm focal length, f/1.8 max aperture, 7 rounded diaphragm blades, STM stepping motor for quiet autofocus, 6 elements in 5 groups, minimum focus distance 1.15 feet. Pros: Affordable “nifty fifty” with smooth bokeh; lightweight at 5.6 ounces. Cons: Plastic build feels cheap; no image stabilization. Usage Tip: Shoot at f/2.8 for flatlays to keep the entire plate in focus while blurring backgrounds subtly. Current price: $125-169 (from Amazon, Canon USA, and Walmart).
- Canon EF 100mm f/2.8L IS USM Macro: 100mm focal length, f/2.8 aperture, Hybrid IS (4 stops), 1:1 magnification, USM autofocus, 15 elements in 12 groups, minimum focus 0.99 feet. Pros: Razor-sharp details for macro work; stabilization reduces handheld blur. Cons: Heavier at 1.4 pounds; premium price. Usage Tip: Use 1:1 macro for extreme close-ups of ingredients, like sugar crystals on donuts, and IS for steady shots without tripods. Current price: $1,299 (from Amazon, Canon, and Walmart).
- Nikon AF-S NIKKOR 105mm f/2.8G IF-ED: 105mm focal length, f/2.8 aperture, VR (3 stops), 1:1 magnification, ED glass, 14 elements in 12 groups, minimum focus 1 foot. Pros: Vibration reduction for low-light macros; excellent color accuracy. Cons: Bulkier design; older tech without silent wave motor. Usage Tip: Ideal for product shots in food branding, capturing fine textures like herb leaves. Current price: $896 new, $446 used (from Amazon, KEH, and Best Buy).
- Sigma 50mm f/1.4 DG HSM Art (for Nikon): 50mm focal length, f/1.4 aperture, HSM motor, 13 elements in 8 groups, minimum focus 1.31 feet. Pros: Superior sharpness and bokeh; Art series build quality. Cons: Heavier at 1.8 pounds; potential autofocus inconsistencies. Usage Tip: Wide f/1.4 aperture for dreamy portraits of dishes in dim restaurants. Current price: $949 (from Amazon, B&H, and Best Buy).

This flowchart aids in lens selection. Beginners should start with a 50mm for its all-around utility, while pros add macros for specialized work. Clean lenses regularly with microfiber cloths to avoid dust spots in food details.
Tripods and Accessories: Stability for Precision
In food photography, where even slight movements can blur details, a tripod is indispensable for sharp images and consistent framing. It frees your hands for styling and allows long exposures in low light.
Key specs:
- Height and Load: Tall enough for overheads; strong for heavy cameras.
- Head Type: Geared for fine adjustments; ball for quick setups.
- Material: Carbon fiber for lightness; aluminum for affordability.
Recommendations:
- Manfrotto 058B Triaut Tripod: Aluminum construction, 2 leg sections, max height 85.4 inches, min 17.3 inches, load capacity 26.5 lbs, weight 13.6 lbs, geared legs for simultaneous release. Pros: Sturdy for studio use; precise control. Cons: Heavy for travel; no center column. Usage Tip: Use the geared mechanism for micro-adjustments in overhead flatlays, ensuring perfect alignment. Current price: $449-769 (from Amazon, B&H, and Filmtools).
- Gitzo GT2541EX Explorer: Carbon fiber, 4 sections, max height 64.6 inches, min 1.2 inches, load 26.5 lbs, weight 3 lbs. Pros: Lightweight and compact; versatile for location shoots. Cons: Expensive; requires separate head. Usage Tip: The low min height is great for ground-level shots of ingredients. Current price: $799 (from Helix, B&H, and Unique Photo).
- NEEWER 79-inch Camera Tripod: Aluminum, max height 79 inches, load 33 lbs, weight 5.7 lbs, includes ball head and monopod mode. Pros: Budget-friendly with extras; convertible design. Cons: Less durable than premium brands. Usage Tip: Convert to monopod for quick handheld stability in tight spaces. Current price: $136 (from Amazon, Neewer, and B&H).
Accessories enhance usability: Overhead arms for flatlays, spirit levels for straight horizons, and clamps for securing boards.
| Tripod Model | Material | Max Height | Load Capacity | Weight | Price (2025) |
|---|---|---|---|---|---|
| Manfrotto 058B | Aluminum | 85.4″ | 26.5 lbs | 13.6 lbs | $449-769 |
| Gitzo GT2541EX | Carbon Fiber | 64.6″ | 26.5 lbs | 3 lbs | $799 |
| NEEWER 79-inch | Aluminum | 79″ | 33 lbs | 5.7 lbs | $136 |
Avoid cheap tripods—they wobble and break. Maintain by tightening screws regularly.
Backdrops and Surfaces: Setting the Scene
Backdrops provide context and texture, elevating food from mundane to artistic. Vinyl is popular for its rollable storage and cleanability, while tiles or wood offer authenticity.
- Vinyl Backdrops: From brands like Captured by Lucy (marble, wood textures) or Dropawall (concrete, 36×48 inches). Pros: Durable, stain-resistant; easy to store. Cons: Can crease if not rolled properly. Usage Tip: Tape to tables for seamless curves in shots.
- Tiles: Home Depot 18×18-inch matte porcelain. Pros: Realistic, inexpensive. Cons: Heavy, limited size.
- Wood Boards: Woodville Workshop handmade, dual-sided. Pros: Unique textures; photographic appeal. Cons: Costly, prone to scratches.
Store vertically to prevent warping. Experiment with neutral tones for versatile storytelling.
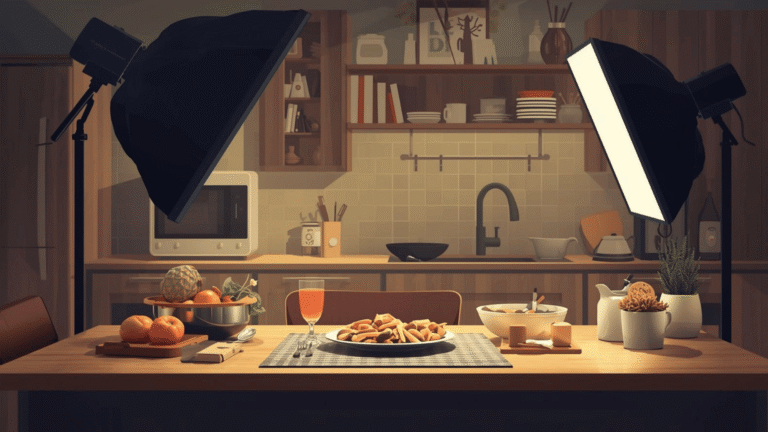
Lighting Equipment: Mastering Shadows and Highlights
Lighting is the soul of food photography, revealing forms and colors. Natural light is free and beautiful, but modifiers tame it; artificial lights offer control for any time or weather.
Natural Light Modifiers
- Diffusers: Neewer 4×6-foot with black cover. Softens harsh sun for even illumination. Pros: Portable; dual-purpose. Usage Tip: Position opposite windows to reduce shadows.
- Foam Boards: White/black, 2 each. Reflect or block light for depth. Pros: Cheap, versatile. Cons: Bulky.
- Clamps: Plastic for hands-free setup.
Artificial Lighting
- Profoto B10X: 250Ws strobe, bi-color, app control, continuous light mode. Pros: Powerful, portable; TTL compatibility. Cons: High cost. Usage Tip: Use for consistent client work, adjusting color temp for warm food tones. Current price: $1,495 (from Amazon, Best Buy, and Walmart).
- Aputure Amaran 200x S: 200W LED, bi-color 2700-6500K, CRI 95+, app control. Pros: Affordable, continuous for video. Cons: Requires modifiers for softness. Usage Tip: Pair with softboxes for diffused light mimicking overcast days. Current price: $349 (from Amazon, Texas Media Systems, and B&H).
Modifiers: Aputure Light Dome SE softbox for even spread. Stands: Neewer C-Stand with sandbags for safety.

This diagram illustrates workflows. Beginners stick to natural; pros mix for flexibility. Test setups with test shots to avoid surprises.
Editing Software and Storage: Polishing Your Work
Post-processing turns good shots into great ones. RAW files capture maximum data for adjustments.
- Adobe Lightroom Classic: Tools for exposure, color, presets; cloud sync. Pros: Intuitive, batch editing. Cons: Subscription-based. Usage Tip: Create presets for consistent food styles, like vibrant colors for desserts. Current price: $11.99/month (from Adobe).
Alternatives: Capture One for tethering; DaVinci Resolve (free) for video.
Storage: Dual backups prevent loss.
- Seagate Slim 2TB Hard Drive: USB 3.0, portable. Pros: Reliable, affordable. Cons: Mechanical, slower than SSDs. Usage Tip: Backup weekly, labeling drives by shoot date. Current price: $68 (from Amazon, Walmart, and Best Buy).
Additional Accessories: Enhancing Workflow
- Camera Straps: WANBY for secure handling.
- Tethering Cables: For live previews on computers.
- Bags: BAGSMART waterproof backpack with compartments.
- Reflectors: Konseen 5-in-1 for multi-effects.
These streamline shoots, reducing frustration.
Setting Up a Home Food Photography Studio
Combine gear: Place tripod near windows, add diffusers, use vinyl backdrops on adjustable tables. Budget: $500-2000 for basics. Tips: Organize with carts; test lighting daily.
Common Mistakes and Advanced Techniques
Mistakes: Ignoring white balance (food looks off-color); over-editing (unnatural results). Advanced: Tethering for client approvals; stacking images for depth.
Conclusion
Crafting stunning food photography is as much about skill as it is about selecting the right equipment. This guide has outlined essential tools—cameras like the Canon EOS 6D or Nikon Z6, versatile lenses such as the 50mm f/1.8 or 100mm macro, sturdy tripods like the Manfrotto 058B, and lighting solutions from diffusers to Profoto strobes—that empower photographers to capture appetizing images with precision and creativity. Backdrops, editing software like Adobe Lightroom, and accessories like clamps further enhance workflows, while dual storage ensures data safety. Beginners can start with affordable, used gear, focusing on quality lenses and stable tripods, while professionals benefit from mirrorless systems and artificial lighting for consistency. The key is scalability: invest in equipment that grows with your skills, prioritizing control over flashiness. Avoid common pitfalls like neglecting lighting or over-relying on post-processing, and practice techniques like tethering for efficiency. Ultimately, your creativity, paired with these tools, transforms simple dishes into visual stories. Whether shooting for social media or clients, build your kit gradually, test thoroughly, and let passion drive your craft. With the right gear and relentless practice, your food photography will not only look delicious but also tell compelling, mouthwatering tales.
Please share this Food Photography Equipment with your friends and do a comment below about your feedback.
We will meet you on next article.
Until you can read, Artificial Lights for Food Photography