Professional Cocktail Photography Styling Tips
Cocktail photography is a captivating blend of art and technique, transforming a simple drink into a visual masterpiece that evokes desire and tells a story. Whether you’re shooting for a restaurant menu, a cocktail blog, or an Instagram feed, mastering the art of styling and photographing cocktails can elevate your work to professional levels. This comprehensive guide provides actionable tips on lighting, composition, props, and post-production to help you create vibrant, appetizing images that stop viewers in their tracks. From managing reflections to capturing dynamic pours, these techniques will help you craft cocktail photos that are as enticing as the drinks themselves.
Why Cocktail Photography Matters
Cocktail photography is more than just capturing a drink in a glass—it’s about conveying the drink’s personality, mood, and flavor through visuals. A well-styled cocktail photo can increase engagement on social media by up to 38%, according to Social Media Examiner, making it a powerful tool for restaurants, bars, and content creators. By focusing on lighting, composition, and thoughtful styling, you can create images that not only look professional but also resonate with your audience, whether for commercial use or personal projects.
Key Elements of Cocktail Photography
To create stunning cocktail photos, you need to balance four core elements:
- Lighting: The foundation of any great photo, lighting highlights texture, color, and clarity.
- Composition: Thoughtful arrangement of the drink, props, and background guides the viewer’s eye.
- Styling: Glassware, garnishes, and props enhance the drink’s appeal and tell its story.
- Post-Production: Editing refines the image, ensuring colors pop and imperfections are removed.
Below, we explore these elements through practical tips, equipment recommendations, and visual aids to help you master cocktail photography.
Essential Tools for Cocktail Photography
Before diving into styling techniques, having the right tools is crucial. Here’s a breakdown of must-have equipment, with approximate prices:
| Tool | Purpose | Approx. Price |
|---|---|---|
| Canon EOS R6 Mark II | High-quality DSLR/mirrorless camera for detailed shots | $2,500 |
| Canon RF50mm f/1.8 STM Lens | Sharp, versatile lens for close-ups and bokeh | $200 |
| Canon RF100mm f/2.8L Macro | Captures fine details like garnishes and condensation | $1,200 |
| Godox V1 Flash | Artificial lighting for controlled setups | $260 |
| Softbox (Neewer 24×24″) | Diffuses light for soft, even illumination | $50 |
| White Foam Boards (20×30″) | Reflects or blocks light to manage reflections | $10 |
| Glass Cleaning Cloths (3-pack) | Keeps glassware spotless | $10 |
| Cotton Gloves | Prevents fingerprints on glassware | $8 |
| Museum Putty | Stabilizes glassware for straight alignment | $5 |
| Fake Ice Cubes (Amazon Basics) | Non-melting ice for long shoots | $15 |
| Trengrove Ice Cubes | High-quality fake ice for professional shots | $100+ |
| Wintersmiths Phantom Ice Maker | Creates clear ice cubes or spheres | $90 |
| Spray Bottle (for glycerin mix) | Adds fake condensation | $5 |
Smartphone Alternative: Modern smartphones like the iPhone 14 Pro or Samsung Galaxy S23 offer high-resolution cameras with manual settings via apps like ProCamera for stability.
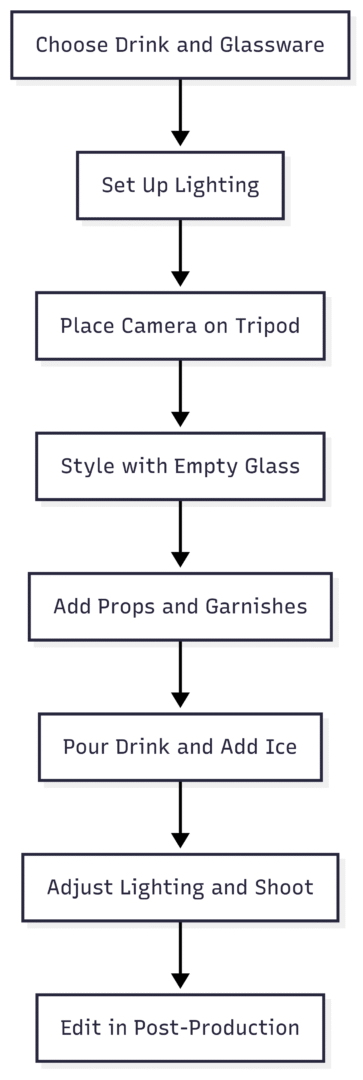
Diagram: Cocktail Photography Setup Workflow
10 Professional Cocktail Photography Styling Tips
1. Master Lighting for Vibrant Cocktails
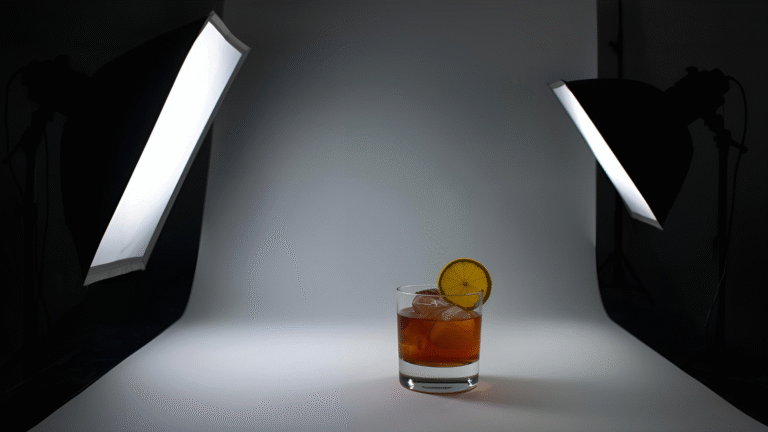
Lighting is the cornerstone of cocktail photography, enhancing clarity, texture, and color. Here are key lighting techniques:
- Natural Light: Position your setup near a large window with indirect sunlight. Use a sheer curtain to soften harsh light, creating gentle shadows. Ideal for bright, airy cocktails like a mojito.
- Backlighting: Place the light source (e.g., Godox V1 with softbox, $310) behind and slightly above the drink to make clear liquids glow. Use a reflector (~$10) to bounce light back onto the front, preventing silhouetting.
- Double Diffusion: Use two diffusers (e.g., a softbox and a scrim, ~$70 total) to soften reflections on glassware, creating natural highlights. Position the light slightly to the back to minimize harsh reflections.
- Hard Light: For bold drinks like whiskey, use an unmodified strobe for sharp, dramatic shadows. Position the light high and angled diagonally for a prism-like effect on the glass.
Lighting Setup Guide:
| Technique | Best For | Equipment | Effect |
|---|---|---|---|
| Natural Light | Airy cocktails | Sheer curtain, reflector | Soft, inviting glow |
| Backlighting | Clear drinks | Softbox, reflector | Glowing transparency |
| Double Diffusion | Glassware-heavy shots | Softbox, scrim | Softened reflections |
| Hard Light | Strong liquors | Bare strobe | Dramatic shadows |
2. Choose the Right Glassware
Glassware shapes the aesthetic of your cocktail photo. Select glasses that complement the drink’s style and enhance its visual appeal.
- Types: Use vintage coupes, clean-lined tumblers for variety.
- Scale: Balance glass height with props like liquor bottles. A tall bottle next to a short glass can look unbalanced, so opt for stemmed glasses for harmony.
- Cleaning: Use glass cleaning cloths to keep glassware spotless, reducing post-production work.
Tip: Source unique glassware from thrift stores or Etsy for budget-friendly, distinctive options.
3. Use Clear or Fake Ice for Elegance
Ice is a critical element in cocktail photography, conveying chill and freshness. Cloudy ice distracts, so prioritize clear ice.
- Clear Ice: Use a Wintersmiths Phantom Ice Maker from convenience stores.
- Fake Ice: For long shoots, use Amazon Basics fake ice cubes for professional results. Fake ice eliminates melting issues under hot lights.
- Styling Tip: Fill the glass to the brim with ice to avoid a “watered-down” look. For muddled drinks, cloudy ice is less noticeable and can be enhanced with fruit slices.
Ice Comparison:
| Type | Pros | Cons | Approx. Price |
|---|---|---|---|
| Clear Ice (Homemade) | Professional look, catches light | Time-consuming to make | $90 (ice maker) |
| Bagged Clear Ice | Affordable, quick | Less control over shape | $2 |
| Fake Ice (Amazon) | Non-melting, budget-friendly | Less realistic | $15 |
| Trengrove Ice | Highly realistic, durable | Expensive | $100+ |
4. Create Fake Condensation for a Frosty Look
A frosted glass screams refreshment, but real condensation fades quickly. Use a 50/50 mix of water and glycerin to create long-lasting condensation.
- How to Apply: Mist the glass lightly for a beaded, frosty effect. This lasts longer than real condensation and works on room-temperature glasses.
- Benefit: Reduces reflections and adds a chilled aesthetic, especially during the “window of fog” when condensation is translucent.
5. Leverage Garnishes for Visual Pop
Garnishes add color, texture, and personality to your cocktail photos.
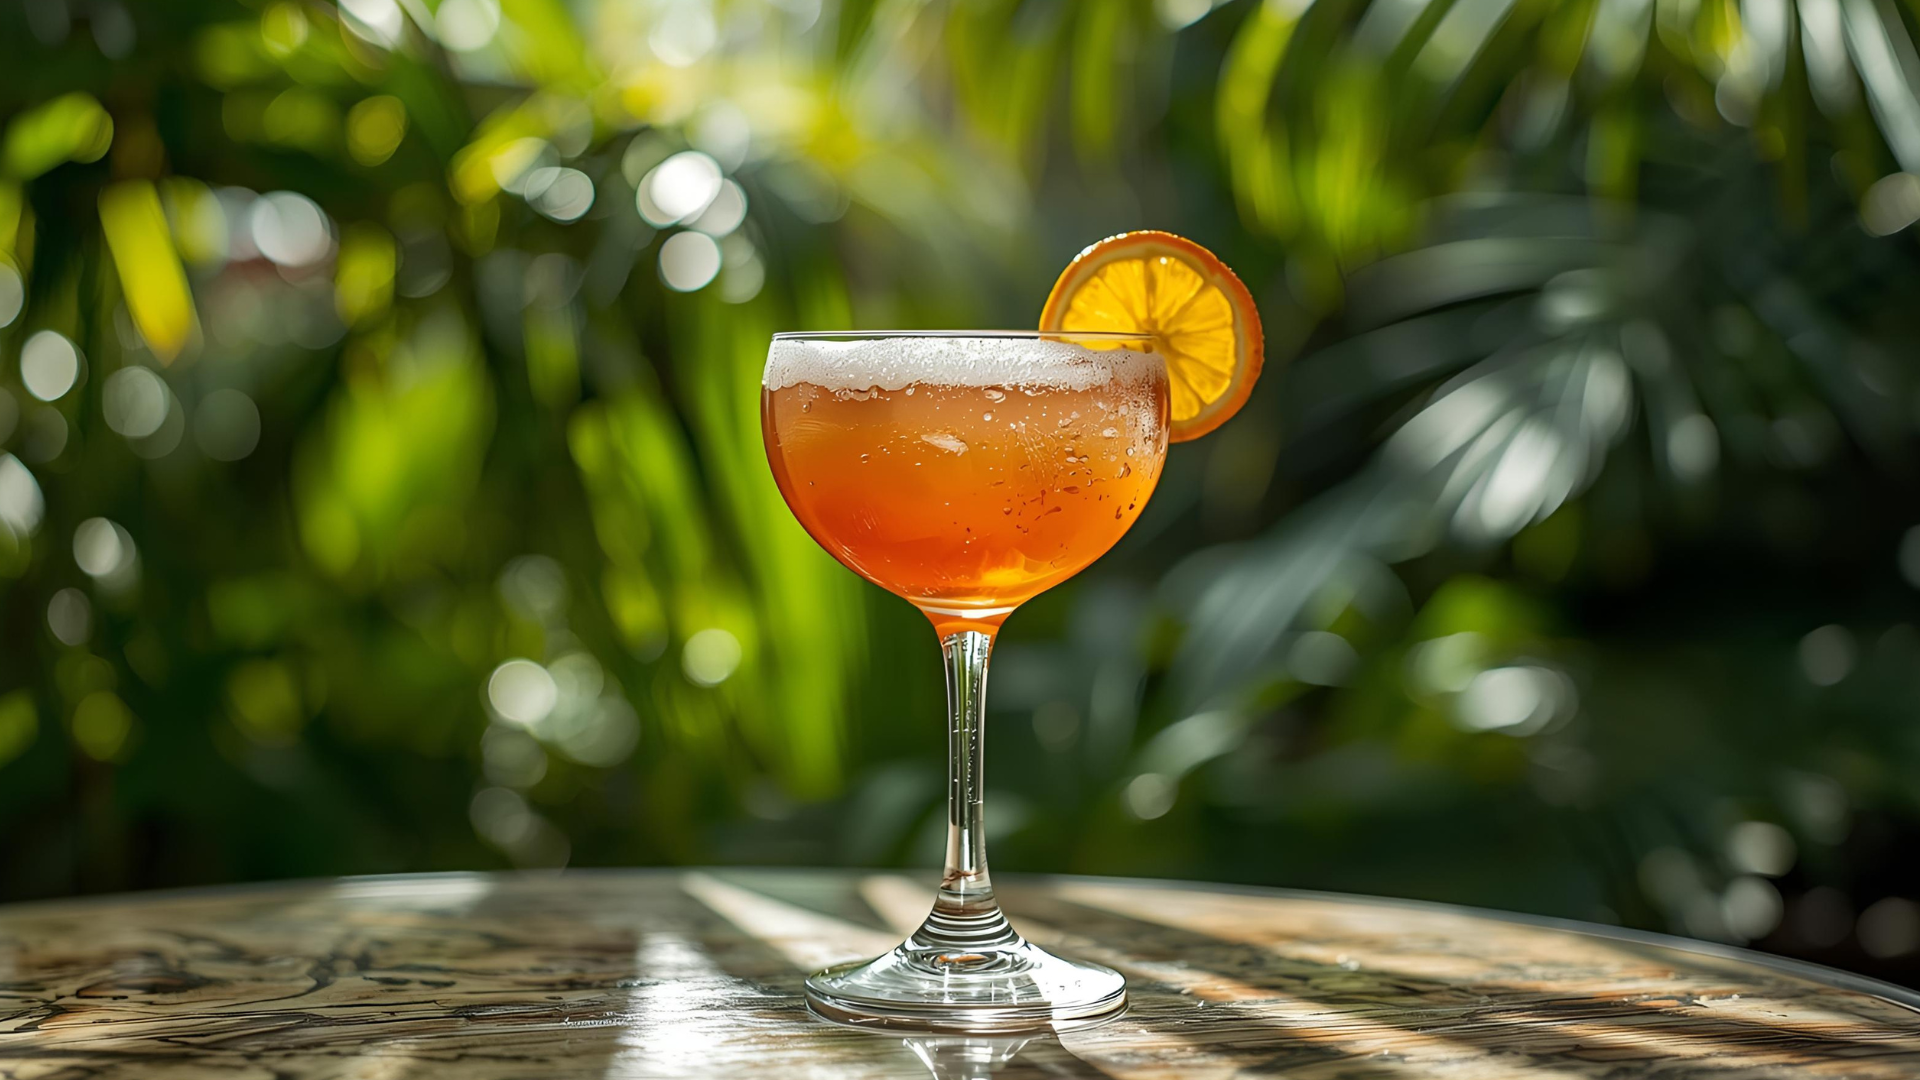
- Types: Use citrus twists, fresh herbs (mint, rosemary), edible flowers, or dehydrated fruit slices for vibrancy. For example, a dehydrated lemon slice adds texture to a grapefruit cocktail.
- Color Theory: Choose complementary colors (e.g., orange drink with green mint on a blue backdrop) for contrast. Use a color wheel app like Adobe Color (free) to plan.
- Placement: Position garnishes to face the camera, using cocktail picks (~$10) to secure them. Avoid overcrowding—1-2 garnishes are enough.
Garnish Color Palette:
| Drink Color | Garnish | Backdrop | Effect |
|---|---|---|---|
| Orange | Green mint | Blue | Bold contrast |
| Clear | Red cherry | White | Clean, vibrant |
| Brown | Orange peel | Dark wood | Warm, moody |
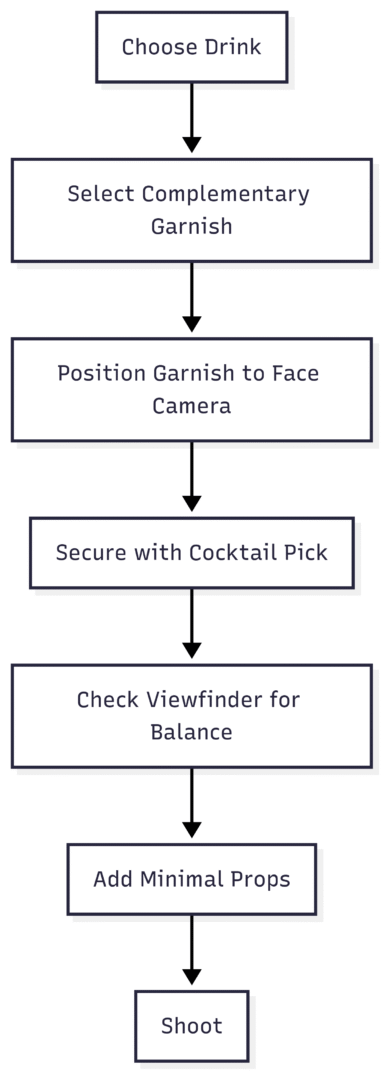
Diagram: Garnish Styling Workflow
6. Apply the Rule of Odds and Thirds
Composition techniques like the Rule of Odds and Rule of Thirds create balanced, engaging images.
- Rule of Odds: Use odd numbers of elements (e.g., three glasses) for visual harmony. Arrange in a triangle to guide the eye to the main drink.
- Rule of Thirds: Divide the frame into a 3×3 grid and place the drink or garnish at an intersection. Enable your camera’s grid overlay for easy alignment.
- Example: Position three tumblers with the hero drink at the front-left intersection, creating a dynamic flow.
7. Capture Dynamic Action Shots
Action shots like pours, splashes, or swirls add energy to your photos.
- Setup: Use a tripod (e.g., Manfrotto 055, ~$300) to keep the camera steady. Capture a clean shot of the empty glass first, then shoot the action.
- Settings: Use a fast shutter speed (1/500s or higher for natural light, strobe sync speed for artificial) and continuous shooting mode.
- Compositing: Combine the clean glass shot with the action shot in Photoshop (~$10/month) to perfect the image.
Camera Settings for Action Shots:
| Scenario | Shutter Speed | Aperture | ISO |
|---|---|---|---|
| Natural Light Pour | 1/500s | f/5.6 | 100-200 |
| Artificial Light Splash | Strobe sync speed | f/8 | 100 |
8. Use Backdrops and Surfaces Thoughtfully
Backdrops and surfaces set the mood and enhance the drink’s appeal.
- Options: Use wooden boards, or vinyl backdrops (e.g., Bessie Bakes, ~$40, use code REGANBARONI for 15% off). Dark surfaces create a moody vibe, while light ones feel airy.
- Reflective Surfaces: Polished wood or glass (~$20) adds reflections for sophistication but requires careful lighting to avoid glare.
- Tip: Swap surfaces to match the drink’s personality—dark slate for a whiskey sour, white marble for a gin fizz.
9. Incorporate Human Elements
Adding a human element makes photos relatable and inviting.
- Examples: Include a hand pouring the drink or reaching for the glass. Use models that match the drink’s vibe (e.g., playful for a margarita, sophisticated for a martini).
- Tip: Ensure clean hands and nails, or use gloves to avoid smudges. Position the hand to create leading lines toward the drink.
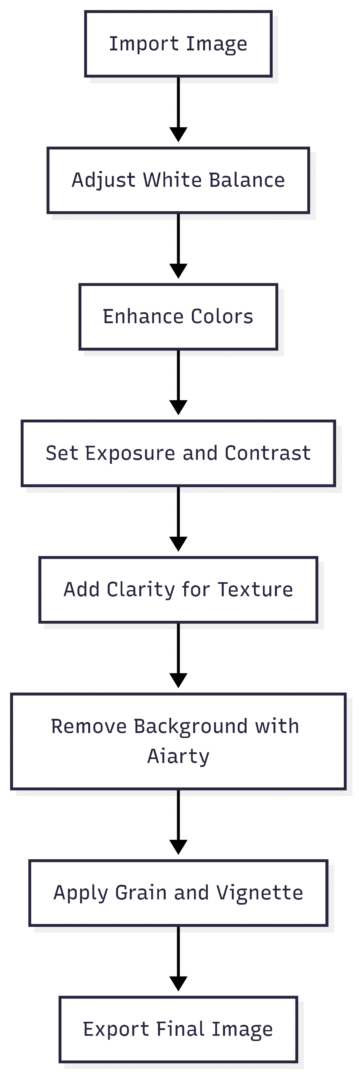
10. Enhance with Post-Production
Post-production polishes your images for a professional finish. Use tools like Adobe Lightroom for editing.
- Color Correction: Adjust white balance to enhance the drink’s hues. For example, boost oranges and yellows for a margarita while desaturating blues.
- Contrast and Texture: Use clarity and structure sliders to highlight ice sparkle or garnish texture. Apply a luma curve for subtle contrast.
- Background Removal: Use Aiarty Image Matting (free trial) to remove distracting backgrounds, preserving glassware details.
- Grain: Add subtle grain for a vintage look, especially for moody cocktails.
Editing Workflow:
Advanced Techniques for Cocktail Photography
1. Use Polarizing Filters
Polarizing filters (~$30) reduce glare on glassware and liquor bottles. Screw the filter onto your lens and rotate it to adjust reflections, especially useful for reflective surfaces.
2. Create Foam with the Dry Shake Technique
For cocktails with foam (e.g., Ramos Gin Fizz), use the dry shake method: shake ingredients without ice first, then add ice and shake again. This creates a thick, photogenic foam.
3. Substitute Liquids for Cost Savings
For test shots, save expensive spirits by using substitutes:
- Clear Spirits: Replace vodka or gin with water.
- Red Wine: Use water with red food coloring.
- White Wine/Whiskey: Mix water with a few drops of soy sauce or Kitchen Bouquet (~$5).
4. Use Sticky Tac for Stability
To correct glassware tilt due to lens distortion, place a small piece of sticky tac (~$5) under the glass to align it with the camera frame. Remove in Photoshop for a seamless look.
5. Capture Steam for Hot Drinks
For hot drinks like coffee or hot chocolate, add steam in Photoshop or use a steamer (~$30) during the shoot. Use skim milk for frothier coffee shots, and spoon whipped cream onto cooled hot chocolate to avoid melting.
Common Mistakes to Avoid
- Overcomplicating the Scene: Too many props distract from the drink. Stick to 2-3 props for simplicity.
- Cloudy Ice: Always use clear ice or fake ice for a professional look.
- Harsh Lighting: Avoid direct, unmodified light unless intentional. Use diffusers to soften shadows.
- Overfilling Glasses: Leave a slight gap (1/8–1/4 inch) from the rim for a balanced fill line, unless aiming to reduce reflections.
Practical Tips for Beginners
- Plan Ahead: Use a pre-pour checklist to set up lighting, glassware, and props before adding liquid. This saves time as ice melts quickly.
- Practice with Substitutes: Use water or simple syrup for test shots to save on costly ingredients.
- Study Professionals: Analyze work from photographers on Instagram for inspiration.
- Budget Hacks: Source props from thrift stores, use foam boards for quick clear ice.
Recommended Resources
- Courses: Food Photography Masterclass (~$100-$300) for in-depth training.
- Books: “Food Photography: From Snapshots to Great Shots” by Nicole S. Young (~$25).
- YouTube: Channels like The Bite Shot offer free tutorials.
- Tools: Download a free Rule of Thirds grid from photography blogs to plan compositions.
Conclusion
Cocktail photography is a dynamic and rewarding niche that combines creativity with technical precision. By mastering lighting techniques, choosing the right glassware, styling with thoughtful garnishes, and refining your images in post-production, you can create stunning photos that capture the essence of each drink. Experiment with angles, props, and action shots to develop your unique style, and leverage tools like Aiarty Image Matting for polished results. Whether you’re shooting for a blog, social media, or a professional client, these tips will help you craft cocktail images that are as delightful to the eye as the drinks are to the palate.
Please share this Professional Cocktail Photography Styling Tips with your friends and do a comment below about your feedback.
We will meet you on next article.
Until you can read, Food Photography Composition Tips