Food Photography Composition Tips for Beginners: The Rule of Thirds
Food photography is an art form that blends creativity with technical precision, transforming a simple dish into a visual masterpiece that captivates viewers. For beginners, the challenge lies in arranging elements—food, props, and backgrounds—in a way that feels natural yet striking. Among the many composition techniques available, the Rule of Thirds stands out as a foundational guideline that’s easy to grasp and highly effective. This article dives deep into the Rule of Thirds, exploring its mechanics, applications, and nuances in food photography, while also touching on complementary techniques to elevate your images. Whether you’re shooting with a DSLR, mirrorless camera, or even a smartphone, these tips will help you create balanced, eye-catching food photos that tell a story.
Understanding Composition in Food Photography
Composition in photography refers to how elements are arranged within the frame to guide the viewer’s eye and evoke a desired response. In food photography, composition is critical because it determines whether a dish looks appetizing, sophisticated, or inviting. A well-composed food photo doesn’t just showcase the food; it tells a story about the dish, its ingredients, or the mood of the moment. The Rule of Thirds is one of the most accessible and versatile tools to achieve this, but it’s just one piece of the puzzle. Other elements like angles, props, color theory, and negative space also play significant roles in crafting compelling images.
For beginners, the process of composing a food photo can feel overwhelming. Where should the plate go? How many props are too many? What angle highlights the dish best? These questions often lead to trial and error, but starting with a structured approach like the Rule of Thirds provides a reliable framework. It’s a technique that’s intuitive once understood, and it can be adapted to suit various styles, from minimalist flat lays to elaborate tablescapes.
What is the Rule of Thirds?
The Rule of Thirds is a fundamental composition technique used across photography genres, including food photography. It involves dividing the frame into nine equal parts by overlaying two equally spaced horizontal lines and two equally spaced vertical lines, creating a 3×3 grid. The points where these lines intersect—known as power points or focal points—are considered the strongest areas of visual interest. The idea is to place the most important elements of your photo along these lines or at these intersections, rather than centering them, to create a balanced and dynamic composition.
Why does this work? The human eye naturally gravitates toward off-center points rather than the dead center of an image. Centering a subject can feel static or predictable, while placing it along the gridlines or intersections creates a sense of movement and harmony. In food photography, this technique helps highlight the dish (the “hero” of the image) while allowing supporting elements like props or garnishes to enhance the overall scene without overwhelming it.
Visualizing the Rule of Thirds
Imagine a photo of a vibrant salad bowl. If you place the bowl directly in the center of the frame, the image might feel balanced but uninspired. Now, picture the same bowl positioned at the intersection of the bottom-left gridlines. Suddenly, the composition feels more engaging, with the negative space around the bowl drawing attention to its textures and colors. The grid helps you make intentional choices about placement, ensuring the viewer’s eye is guided to the most important parts of the image.
Most modern cameras, including DSLRs, mirrorless cameras, and smartphones, offer a grid overlay feature that displays the Rule of Thirds grid in the viewfinder or on the screen during live view. This feature is a game-changer for beginners, as it eliminates guesswork and helps you align elements in real time. To enable it, check your camera’s menu settings under “Grid Display” or “Guidelines.” For example, Canon cameras often list this under “Camera Setup,” while smartphones like iPhones have a grid option in the camera settings. If your camera lacks this feature, you can mentally visualize the grid or use editing software like Adobe Lightroom to apply it during post-processing.
Why the Rule of Thirds Matters in Food Photography
The Rule of Thirds is particularly effective in food photography because it creates a sense of balance that feels natural to the viewer. Food photos often aim to evoke emotions—hunger, nostalgia, or curiosity—and a well-composed image can amplify these feelings. By placing the main subject off-center, you create a visual flow that encourages the viewer to explore the entire frame, taking in not just the food but also the props, textures, and colors that tell its story.
For example, consider a photo of a slice of chocolate cake. Placing the cake at the bottom-right intersection of the grid, with a fork positioned along the top horizontal line and a scattering of cocoa powder in the negative space, creates a composition that feels dynamic yet cohesive. The viewer’s eye is drawn to the cake first, then guided to the fork and the surrounding elements, creating a narrative about indulgence and anticipation.
The Rule of Thirds also helps avoid common beginner mistakes, such as overcrowding the frame or centering every element. It encourages thoughtful placement, ensuring that each component serves a purpose in the composition. While it’s a guideline rather than a strict rule, mastering it provides a solid foundation for experimenting with more advanced techniques.
How to Apply the Rule of Thirds in Food Photography
Applying the Rule of Thirds in food photography involves a few key steps: planning, shooting, and refining. Here’s a detailed guide to get you started.
Step 1: Plan Your Composition
Before you even pick up your camera, take a moment to plan your shot. Ask yourself:
- What is the main subject (hero) of the photo? This could be a plate of pasta, a single cupcake, or a bowl of soup. Identify the element you want to highlight most.
- What angle will best showcase the dish? Common angles in food photography include overhead (90 degrees), 45 degrees, and straight-on. Each angle affects how the Rule of Thirds grid is applied.
- Where should the subject be placed? Decide which gridline or intersection will give the subject the most impact. For example, an overhead shot might place a plate at the bottom-left intersection, while a 45-degree shot might align a horizon (like a table edge) with the top horizontal line.
- What supporting elements will enhance the scene? Consider props like utensils, napkins, or ingredients that complement the dish without stealing focus.
Sketching your composition can be incredibly helpful. Use a notebook or a printable composition planner to draw a rough layout of your scene, marking where the main subject and props will sit on the Rule of Thirds grid. This pre-visualization helps you approach the shoot with intention, saving time and reducing guesswork.
Step 2: Set Up Your Camera
Once you have a plan, set up your camera to make the Rule of Thirds easy to implement:
- Enable the Grid Overlay: If your camera or smartphone has a grid display option, turn it on. This will show the 3×3 grid in live view or the viewfinder, helping you align elements precisely.
- Use a Tripod: A tripod stabilizes your camera, allowing you to focus on arranging elements within the frame. It’s especially useful for overhead shots or when shooting tethered (connected to a computer for real-time previews).
- Choose the Right Angle: Adjust your camera angle based on your plan. For overhead shots, position the camera directly above the scene, parallel to the table. For 45-degree or straight-on shots, ensure the camera is level to avoid distortion.
Step 3: Compose the Scene
With your camera set, start building the scene:
- Place the Hero Subject: Position the main dish or focal point along one of the gridlines or at an intersection. For example, in an overhead shot of a pizza, place the pizza slice at the top-right intersection to create visual interest.
- Add Supporting Elements: Arrange props like forks, napkins, or garnishes along other gridlines to guide the viewer’s eye. Ensure these elements complement the hero without overpowering it.
- Incorporate Negative Space: Leave empty space around the subject to emphasize it. Negative space can be a plain backdrop, a bare table, or a subtle texture that doesn’t distract.
- Check the Balance: Step back and review the composition through the viewfinder or live view. Adjust elements as needed to ensure the scene feels balanced and harmonious.
Step 4: Shoot and Refine
Take test shots to evaluate the composition. If you’re shooting tethered, use software like Adobe Lightroom or Capture One to view images on a larger screen, making it easier to spot misalignments. If something feels off, adjust the placement of elements or tweak the camera angle. For example, if the subject feels too crowded, move props further out or crop them partially to create breathing room.
Step 5: Edit with the Rule of Thirds in Mind
If your composition isn’t perfect in-camera, you can refine it during post-processing. Adobe Lightroom and Photoshop offer crop tools with Rule of Thirds grid overlays. Press the “O” key in Lightroom’s crop module to cycle through grid options, including the Rule of Thirds. Adjust the crop to reposition the subject along the gridlines or intersections, ensuring a balanced final image.
Examples of the Rule of Thirds in Action
To illustrate how the Rule of Thirds works in food photography, let’s explore three common angles with specific examples.
Overhead (90-Degree) Shot
Overhead shots, also known as flat lays, are popular for showcasing the entire dish and its arrangement. Imagine a photo of a charcuterie board with cheeses, meats, and fruits. By placing the main cheese platter at the bottom-left intersection of the Rule of Thirds grid, you draw the viewer’s eye to the star of the show. Supporting elements, like a glass of wine or scattered nuts, can be placed along the top or right gridlines to create a visual path. The negative space around the platter emphasizes its textures and colors, making the composition feel clean yet engaging.
Example Setup:
- Subject: A charcuterie board with brie, prosciutto, and grapes.
- Placement: The brie wheel sits at the bottom-left intersection, with prosciutto fanned out along the bottom horizontal line. Grapes are scattered along the right vertical line, and a wine glass rests at the top-right intersection.
- Negative Space: The top-left and bottom-right sections of the frame are left bare, using a wooden table surface to create contrast without distraction.
This setup ensures the viewer’s eye moves naturally across the frame, starting with the brie and exploring the supporting elements.
45-Degree Shot
The 45-degree angle mimics how we view food at a dining table, making it relatable and versatile. Consider a photo of a stack of pancakes drizzled with syrup. By aligning the horizon (the table edge) with the top horizontal line of the Rule of Thirds grid, you create a stable base. Place the pancake stack at the bottom-left intersection, with a fork along the left vertical line and a butter pat at the top-right intersection. This arrangement highlights the pancakes while using the fork and butter to frame the scene.
Example Setup:
- Subject: A stack of pancakes with syrup and berries.
- Placement: The pancakes sit at the bottom-left intersection, with the syrup drizzle aligned along the bottom horizontal line. A fork rests along the left vertical line, and a small bowl of berries is placed at the top-right intersection.
- Negative Space: The background is a blurred linen backdrop, creating depth without competing with the pancakes.
This composition feels dynamic, with the angled perspective adding depth and the Rule of Thirds ensuring balance.
Straight-On Shot
Straight-on shots are ideal for tall or layered foods, like burgers or cocktails. Imagine a photo of a layered cocktail with a garnish. Place the glass at the right vertical line, with the garnish (like a lime wedge) at the top-right intersection. The horizon (the bar surface) aligns with the bottom horizontal line, and a straw or stirrer runs along the left vertical line. This setup emphasizes the cocktail’s height and details while maintaining balance.
Example Setup:
- Subject: A layered mojito with a mint sprig.
- Placement: The glass is positioned along the right vertical line, with the mint sprig at the top-right intersection. The bar surface aligns with the bottom horizontal line, and a straw runs along the left vertical line.
- Negative Space: The left side of the frame is left empty, with a dark backdrop to highlight the cocktail’s colors.
This composition creates drama and draws attention to the mojito’s vibrant layers.
Complementary Composition Techniques
While the Rule of Thirds is a powerful starting point, combining it with other techniques can elevate your food photography further. Here are some additional strategies to enhance your compositions.
1. Balance and Symmetry
Balance in food photography can be symmetrical (equal elements on both sides) or asymmetrical (unequal elements that still feel balanced). The Rule of Thirds naturally supports asymmetrical balance by placing the subject off-center. For example, a bowl of soup at the bottom-left intersection can be balanced by a spoon and napkin at the top-right intersection. This creates a sense of harmony without mirroring elements exactly.
To visualize balance, consider a photo of a dessert plate. Place the dessert at the bottom-right intersection, with a fork along the left vertical line and a small vase of flowers at the top-left intersection. The differing sizes and textures of the props create an asymmetrical balance that feels natural and engaging.
2. Negative Space
Negative space is the empty or minimally detailed area around your subject. It provides breathing room, emphasizing the hero dish and reducing visual clutter. When using the Rule of Thirds, negative space often occupies the areas outside the gridlines or intersections. For instance, in an overhead shot of a single cupcake, place the cupcake at the top-left intersection and leave the bottom-right section of the frame empty. This draws attention to the cupcake’s details and creates a clean, sophisticated look.
Negative space is also practical for commercial photography, as it provides room for text overlays in ads or social media posts. A plain wooden table or a subtle fabric backdrop can serve as effective negative space without distracting from the food.
3. Leading Lines and Shapes
Leading lines guide the viewer’s eye toward the main subject, enhancing the Rule of Thirds’ effect. In food photography, lines can be created by utensils, napkins, or even the food itself. For example, in a photo of sushi, place the sushi roll at the bottom-right intersection and arrange chopsticks along the top horizontal line, pointing toward the roll. This creates a visual path that reinforces the subject’s importance.
Shapes, such as circles or triangles, can also enhance composition. In an overhead shot, a round plate at the bottom-left intersection can be complemented by circular garnishes along the right vertical line, creating a cohesive pattern. Experimenting with shapes adds a graphic element that makes the photo more visually striking.
4. Color Theory
Colors play a significant role in food photography, influencing mood and focus. The Rule of Thirds can help you position colorful elements strategically. For example, in a photo of a green salad, place the salad bowl at the bottom-left intersection and a red tomato slice at the top-right intersection. The contrasting colors draw attention to both elements, with the salad remaining the hero.
Color theory includes:
- Monochromatic: Using varying shades of one color (e.g., different greens in a salad photo).
- Complementary: Using opposite colors on the color wheel (e.g., red strawberries against a green backdrop).
- Analogous: Using adjacent colors on the color wheel (e.g., yellow lemons and orange slices for a warm, cohesive look).
When applying the Rule of Thirds, ensure that colorful props or garnishes are placed along gridlines or intersections to enhance, not overpower, the main subject.
5. Depth of Field
Depth of field (DOF) refers to how much of the image is in focus. A shallow DOF (low f-stop, like f/2.8) blurs the background, emphasizing the subject, while a deep DOF (high f-stop pats, like f/11) keeps everything in focus. In a Rule of Thirds composition, a shallow DOF can highlight the hero subject at a grid intersection while softening props in the background. For example, in a 45-degree shot of a pasta dish, place the pasta at the bottom-left intersection with a shallow DOF (f/4) to blur the napkin and fork along the top line, keeping the focus on the dish.
6. Framing and Layers
Framing involves using props or ingredients to create a visual border around the subject, reinforcing the Rule of Thirds’ focal points. For example, in an overhead shot of a dessert, place the dessert at the top-right intersection and surround it with scattered berries and a spoon along the gridlines, forming a subtle frame. Layers, such as a textured backdrop, a napkin, and the food, add depth to the composition, making it more engaging.
Advanced Composition Techniques
Once you’re comfortable with the Rule of Thirds, you can explore more advanced composition systems to add variety to your food photography.
The Golden Ratio (Phi Grid)
The Golden Ratio is a refined version of the Rule of Thirds, with a narrower central section based on the 1:1.618 ratio. It creates a more dynamic flow, ideal for overhead shots with multiple elements. Place the main dish in the center of the narrower section, with props spiraling outward along the gridlines.
Mermaid Chart Example:

The Golden Triangle
The Golden Triangle divides the frame into four triangles, guiding the viewer’s eye through dynamic lines. This is effective for action shots, like pouring syrup, where the action aligns with the triangle’s lines.
Mermaid Chart Example:

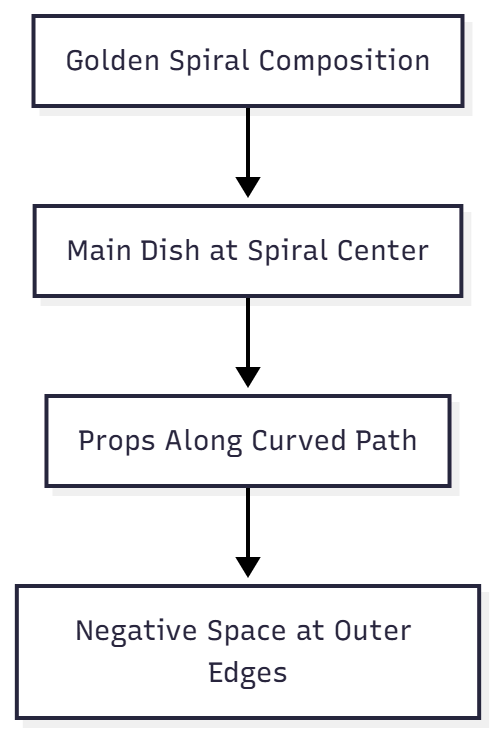
The Golden Spiral
The Golden Spiral creates a swirling path that leads the eye to the focal point. Place the main dish at the spiral’s center, with props arranged along the curve.
Mermaid Chart Example:
Dynamic Symmetry
Dynamic Symmetry uses a complex grid of intersecting lines to create balanced yet intricate compositions. Place the main subject at the center of the grid, with props positioned along the radiating lines for an elegant, harmonious look.
Equipment and Setup for Rule of Thirds Photography
To effectively apply the Rule of Thirds, you’ll need the right tools. Here’s a breakdown of essential equipment and their approximate prices (in USD, based on general market trends):
| Equipment | Description | Approx. Price |
|---|---|---|
| Tripod | A sturdy tripod (e.g., Manfrotto 055 Aluminum) stabilizes the camera for precise composition. | $100–$300 |
| DSLR/Mirrorless Camera | Entry-level models like the Canon EOS Rebel T7 or Sony Alpha a6000 are great for beginners. | $500–$1,000 |
| Smartphone | Modern smartphones (e.g., iPhone 13 or Samsung Galaxy S21) offer grid overlays and good sensors. | $600–$1,200 |
| Lens | A 50mm prime lens (f/1.8) or 24–70mm zoom lens is versatile for food photography. | $100–$500 |
| Tether Cable | Tether Tools cables connect your camera to a computer for real-time previews. | $30–$50 |
| Editing Software | Adobe Lightroom or Capture One for post-processing with Rule of Thirds crop overlays. | $10/month (Lightroom) |
| Lighting | Softbox lights or work lights with diffusion for consistent illumination. | $50–$200 |
| Backdrops | Wooden boards, linen, or foam boards for versatile backgrounds. | $20–$100 |
Shooting Tethered
Shooting tethered—connecting your camera to a computer—allows you to view images on a larger screen, making it easier to align elements with the Rule of Thirds grid. Use software like Lightroom or Capture One, and ensure your tether cable is compatible with your camera and computer ports.
Practical Tips for Mastering the Rule of Thirds
- Practice with Simple Subjects: Start with a single dish, like a bowl of fruit, and experiment with placing it at different grid intersections. Take multiple shots to compare results.
- Use Props Sparingly: Choose one or two props that complement the dish, placing them along gridlines to avoid clutter.
- Experiment with Angles: Try overhead, 45-degree, and straight-on shots to see how the Rule of Thirds affects each perspective.
- Break the Rules Occasionally: Once you’re confident, try centering the subject or using alternative grids like the Golden Spiral to develop your unique style.
- Review and Adjust: After each shoot, review your images with the Rule of Thirds grid overlay in editing software. Crop or reposition as needed to refine the composition.
Common Mistakes to Avoid
- Centering Everything: Avoid placing the main subject dead-center unless it serves a specific purpose, as it can make the image feel static.
- Overcrowding the Frame: Too many props can distract from the hero dish. Use the Rule of Thirds to prioritize the main subject and leave negative space.
- Ignoring Negative Space: Failing to incorporate empty space can make the image feel cluttered. Use the grid to allocate space strategically.
- Inconsistent Lighting: Harsh or uneven lighting can disrupt the balance of a Rule of Thirds composition. Use soft, diffused light to highlight the subject evenly.
Conclusion
The Rule of Thirds is a timeless and versatile tool for beginner food photographers, offering a simple yet powerful way to create balanced, engaging compositions. By dividing the frame into a 3×3 grid and placing key elements along the lines or intersections, you can guide the viewer’s eye to the hero dish while maintaining harmony in the scene. Combining this technique with complementary strategies like negative space, leading lines, and color theory allows you to craft professional-quality food photos that captivate and inspire.
To get started, enable your camera’s grid overlay, plan your composition with a sketch, and experiment with different angles and props. Use editing software to refine your images, ensuring the Rule of Thirds enhances the final result. While the Rule of Thirds is a guideline, not a strict rule, it provides a solid foundation for developing your unique style. As you practice, you’ll gain confidence in breaking the rules creatively, producing food photos that are both technically sound and artistically compelling.
So grab your camera, set up a simple dish, and start applying the Rule of Thirds. With time and practice, you’ll transform your food photography from ordinary to extraordinary, creating images that make viewers hungry for more.
This article provides a comprehensive guide to the Rule of Thirds in food photography, with practical examples, equipment recommendations, and advanced techniques to help beginners elevate their skills. The mermaid charts and equipment table add visual and practical value, while the focus on actionable tips ensures readers can immediately apply what they’ve learned.
Please share this Food Photography Composition Tips for Beginners: The Rule of Thirds with your friends and do a comment below about your feedback.
We will meet you on next article.
Until you can read, Food Styling A Flying Food Photo