Lighting Setups for Drink Photography
Drink photography presents unique challenges due to reflective glassware, translucent liquids, and the need for dynamic highlights and shadows. Proper lighting is essential to capture the glow, texture, and form of beverages while managing reflections and creating mood. This comprehensive guide explores proven lighting setups, equipment essentials, and practical tips to elevate your images. Whether using natural or artificial light, these methods focus on control and creativity for professional-quality results.
Essential Equipment for Drink Photography
Selecting the right gear ensures consistency and versatility. Below is a table summarizing key equipment mentioned in various setups, including specifications and approximate current prices (based on major retailers like Amazon, B&H, and KEH; prices may vary by region and condition; used options often available at 20-50% less).
| Category | Item | Key Specifications | Approximate Price (USD) |
|---|---|---|---|
| Cameras | Nikon D750 | 24.3MP full-frame CMOS, ISO 100-12800, 6.5 fps, weather-sealed | $980 (used) – $1,200 (new/refurb) |
| Fujifilm X-T4 | 26.1MP APS-C X-Trans CMOS, ISO 160-12800, 15 fps, IBIS (up to 6.5 stops) | $1,499 (body only) | |
| Canon EOS 5DS | 50.6MP full-frame CMOS, ISO 100-6400, 5 fps, high-resolution for detail | $1,200 (used) – $1,499 (new) | |
| Canon Rebel T7 | 24.1MP APS-C CMOS, ISO 100-6400, 3 fps, entry-level DSLR | $448 (with 18-55mm lens kit) | |
| Lenses | Nikon 105mm f/2.8 | Macro lens, VR stabilization, 1:1 magnification, 52mm filter thread | $195 (used) – $1,050 (new Z-mount version) |
| Nikon 24-70mm f/2.8 | Zoom lens, ED glass, Nano Crystal Coat, constant f/2.8 aperture | $1,158 (used) – $2,350 (new Z-mount) | |
| Fujinon 18-55mm f/2.8-4 | Kit zoom, OIS stabilization, linear motor AF, 58mm filter | $400 (used) – $699 (new) | |
| Canon 100mm Macro f/2.8L | Macro lens, IS stabilization, 1:1 magnification, 67mm filter | $1,259 (new) – $1,399 | |
| Canon 50mm f/1.8 | Prime lens, STM AF, compact, 49mm filter | $117 – $125 | |
| Canon 100mm Macro (non-IS) | Macro lens, USM AF, 1:1 magnification, 58mm filter | $616 (used/refurb) | |
| Lights | Paul C. Buff White Lightning 1600 | 660Ws monolight, recycle time 0.1-2.5s, modeling lamp | $150 (used) – $200 |
| Elinchrom ELC PRO HD 500 | 500Ws compact monolight, fast recycle (0.06-1.7s), OLED display | $995 – $1,059 | |
| Profoto B10X | 250Ws battery-powered, continuous light up to 3250lm, TTL | $1,475 – $1,495 | |
| Profoto B1 (discontinued) | 500Ws battery-powered, TTL, high-speed sync | $1,000 (used) – $2,000 (kits) | |
| Godox V1 | 76Ws round-head flash, Li-ion battery, TTL, modeling LED | $199 – $259 | |
| Modifiers | Elinchrom Rotalux 30x90cm Stripbox | Strip softbox, rotatable, quick setup | $166 |
| Elinchrom Snoot with Grid | Snoot reflector, 15-20° beam, grid included | $57 – $144 | |
| Profoto 2×3 Softbox | Rectangular softbox, heat-resistant, quick-fold | $179 – $401 | |
| Aputure Barndoors with Honeycomb Grid | For COB lights, 30° grid, magnetic gels | $59 – $83 | |
| Neewer 40×60 Diffuser | 5-in-1 collapsible (translucent, silver, gold, black, white) | $40 – $60 | |
| Other | Manfrotto 055 Tripod | Aluminum 3-section, 9kg load, ball head option | $274 – $550 (with head) |
| Fake Ice Cubes (acrylic, pack of 20-200) | Clear, reusable, 1-inch cubes for props | $8 – $50 | |
| Polarizing Filter (generic, 58-67mm) | Circular polarizer, reduces glare | $20 – $80 | |
| Shadow Boards (set of 3-9) | Acrylic or foam, cutouts for hard shadows | $60 – $150 |
This equipment provides a solid foundation. For beginners, start with a DSLR like the Canon Rebel T7 and a macro lens like the Canon 100mm for close-up detail. Advanced users may prefer strobes like the Profoto B10X for portability and power.
Key Lighting Techniques for Drinks
Lighting dictates the mood—soft for balanced, even illumination or hard for dramatic contrast. Here’s a comparison table of soft vs. hard light:
| Aspect | Soft Light | Hard Light |
|---|---|---|
| Source Size | Large (e.g., softbox, diffuser) | Small (e.g., bare bulb, snoot) |
| Shadows | Gradual transitions, subtle | Sharp edges, high contrast |
| Best For | Even illumination, minimizing harsh reflections | Dramatic mood, texture emphasis, shadow play |
| Modifiers | Softboxes, umbrellas, diffusers | Barndoors, grids, shadow boards |
| Example Use | Glowing cocktails, subtle gradients | Sunny scenes, bold highlights |
Experiment with these to match your beverage’s character—e.g., soft for wine, hard for whiskey.
1. Side Light Setup
Position the light on one or both sides of the drink for natural dimension and texture revelation.
Setup Details:
- Use one strobe (e.g., Elinchrom ELC PRO HD 500) on the right side.
- Add double diffusion: Softbox over the light plus a large diffuser (e.g., Neewer 40×60) in front to soften reflections.
- Result: Soft, non-distracting highlights on glassware.
This creates balanced shadows, ideal for coupe glasses on dark backgrounds. For added fill, place a white foam board opposite the light.
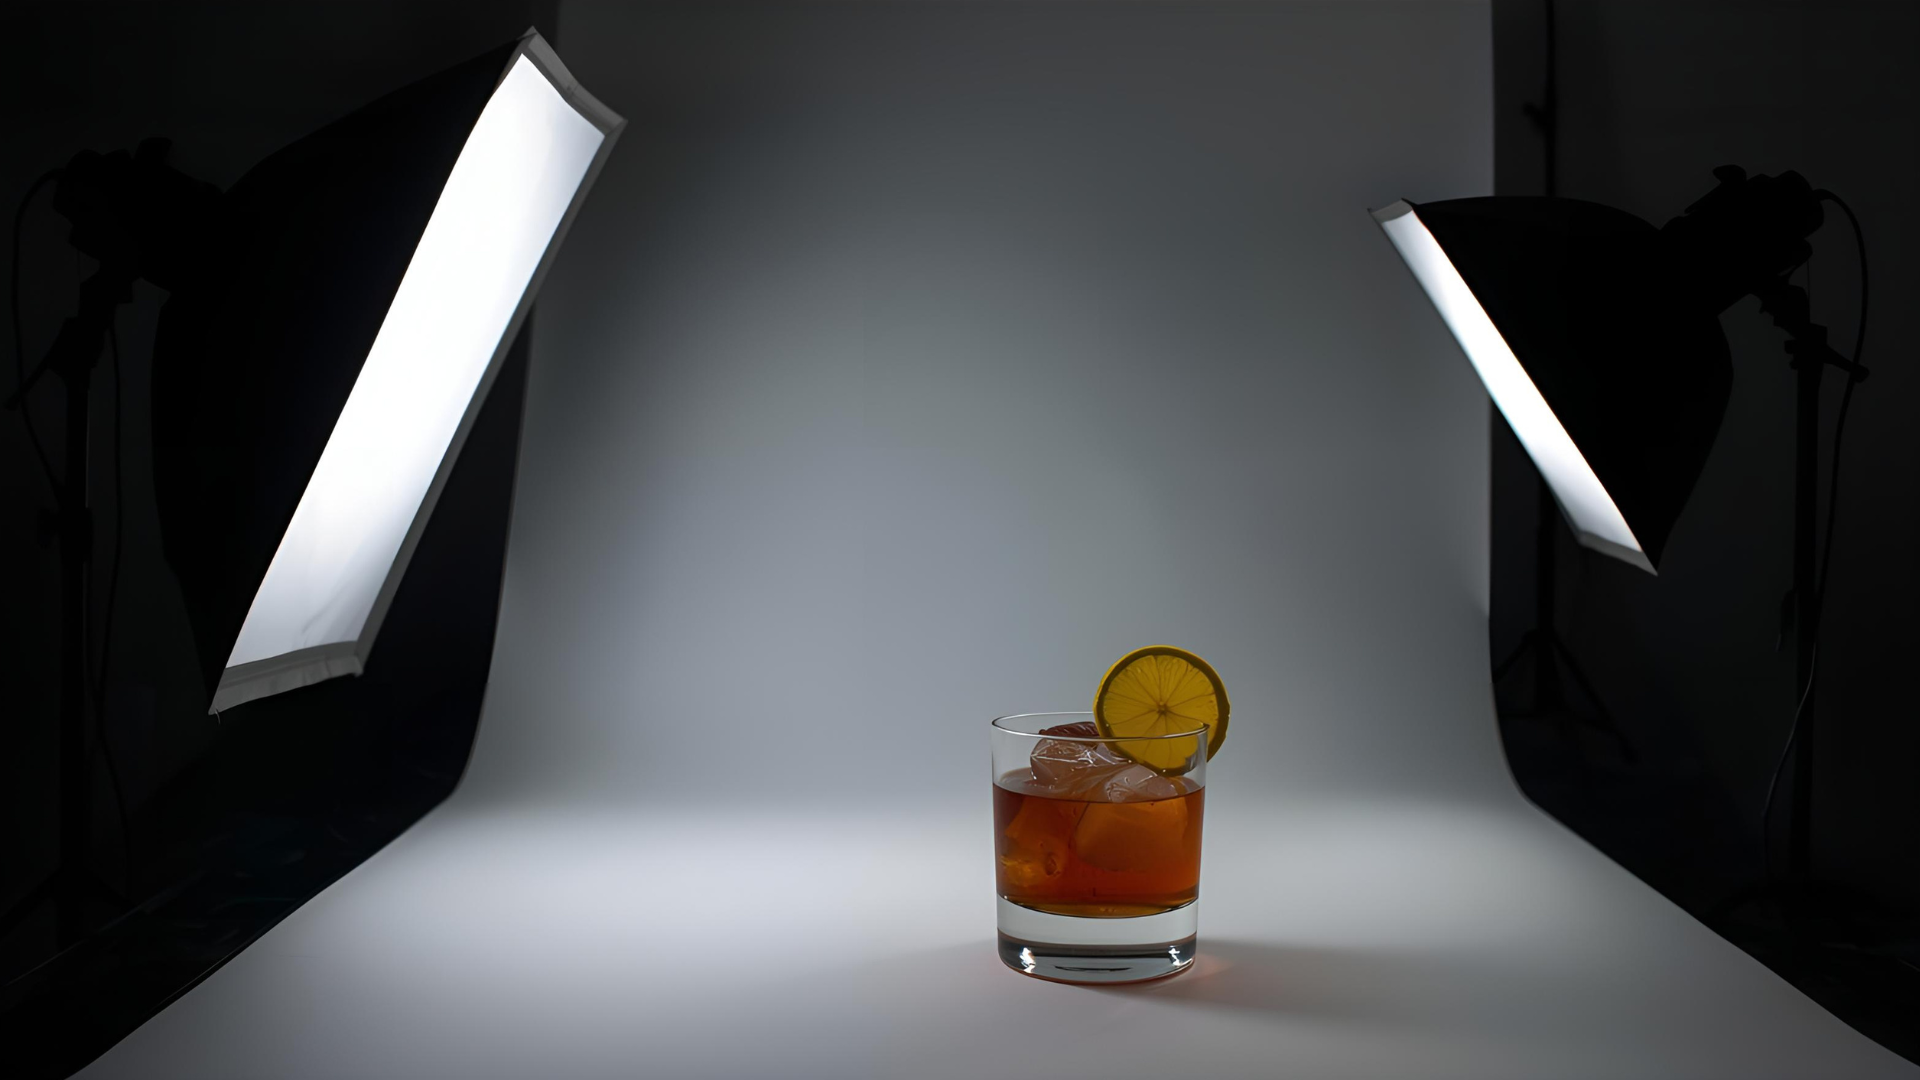
2. Back Light Setup
Place the light behind the drink to create a glow, emphasizing translucency.
Setup Details:
- Position a strobe (e.g., Paul C. Buff White Lightning 1600) behind a black foam board slightly taller than the glass.
- Use a large softbox to partially spill light around the board.
- Raise the light for a gradient effect, brighter at the top.
This works well for martinis on reflective surfaces, making liquids glow without visible reflections in the camera view.
3. Back Light with Gels
Enhance color effects by adding gels to backlighting.
Setup Details:
- Light behind the glass, no softbox but with a diffuser.
- Attach colored gels (pink, blue) over the light source.
- Elevate for gradients.
Compare with/without gels to see vibrant transformations—fun for creative wine glass shots.
4. Hard Light Setup
Direct, unmodified light for bold contrast and strong shadows.
Setup Details:
- One strobe (e.g., Godox V1) on the side, slightly above and forward.
- No modifiers; expose the bulb.
- Use props like palm fronds or aluminum wire for custom shadows.
Pro Tip: Hard light mimics sunny days; ideal for tropical drinks. For easier control, upgrade to shadow boards.
5. Hard Light with Shadow Boards
Incorporate cutout boards for precise shadow patterns.
Setup Details:
- Position shadow board at the top, closer to one side.
- Light (e.g., Profoto B1) with beauty dish behind the board, angled down.
- Raise and direct for long shadows simulating window light.
Shadow boards (priced $60-150/set) simplify setups, creating sun-like effects without mess.
6. Soft Light Setup
Even, spread-out light for balanced scenes with minimal shadows.
Setup Details:
- Strobe with umbrella or softbox (e.g., Profoto 2×3) at the top.
- Position for subtle darkening toward the bottom.
- Use reflectors to fill shadows.
Perfect for gin bottles; modifiers like softboxes ($179+) ensure gentle transitions.
Managing Reflections and Advanced Tips
Reflections from glass can ruin shots. Use these strategies:
- Backlighting to Eliminate Reflections: Position light behind to hide large highlights. Compare side vs. back: Side shows softbox glare; back creates glow.
- Hard Light for Easy Edits: Small sources create tiny spots, removable in post with healing brushes.
- Polarizing Filters: Screw-on filters ($20-80) reduce glare; rotate to adjust.
- Double Diffusion: Multiple layers (diffuser + softbox) smooth reflections.
- Environment Control: Black flags block stray light; white reflectors brighten edges.
For one-light tutorials (e.g., bourbon composites):
- Plan shots: Key image with softbox, reflector, diffuser.
- Reposition for details: Side-back for edges.
- Add snoot ($57+) for background drama.
- Composite 4-5 exposures in post for full control.
Ice and Condensation:
- Use clear fake ice cubes ($8-50/pack) to avoid melting.
- Spray glycerin-water mix for lasting beads.
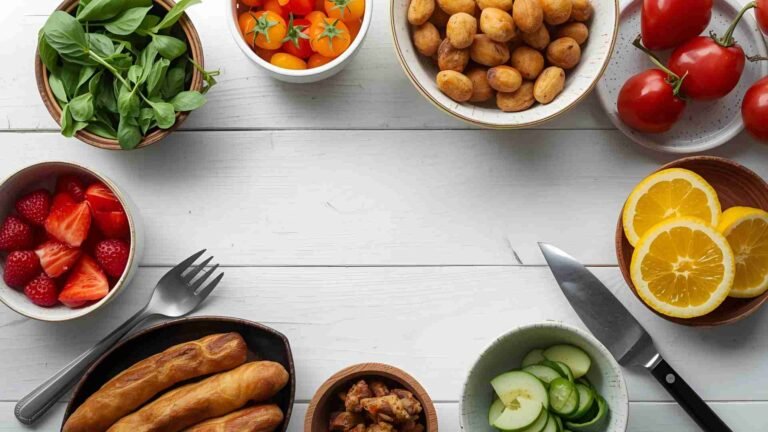
Composition and Styling:
- Rule of Odds: Odd props (3 glasses) for balance.
- Leading Lines: Garnishes pointing to the drink.
- Depth of Field: Shallow (f/2.8) for focus on glass; deep for flat lays.
- Fill Line: High (1/8 inch from rim) to minimize reflections.
Filled Hard Light for Dynamic Mood
For advanced users, filled hard light combines drama with subtlety.
Setup Details:
- Key Light: Profoto B10X with barndoors and honeycomb grid ($59-83), high and angled down.
- Fill Light: Second strobe (e.g., Profoto B1) with softbox, pointed at ceiling for bounce.
- Modifiers: Plant for dappled shadows; tupperware lid as subtle diffuser.
- Position: Key at top-right (5ft away); fill at top-left, low power.
This lightens shadows while keeping hard edges, ideal for ceviche or beer scenes.
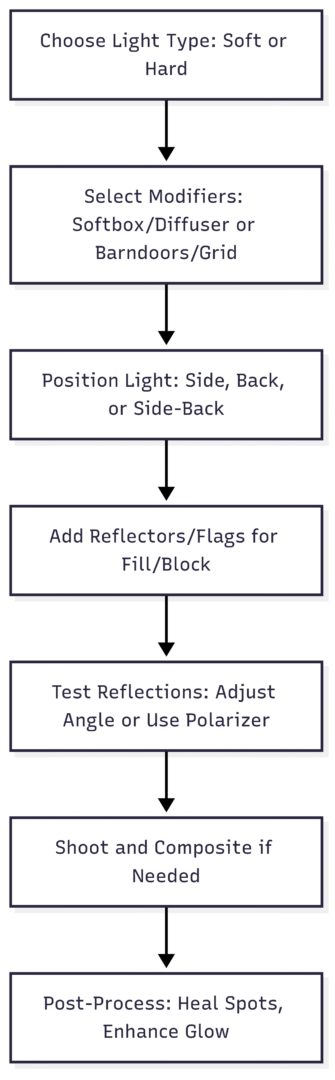
This flowchart outlines the setup process for efficient workflows.
Human Elements and Splashes
Add authenticity:
- Include hands reaching for glasses.
- Props: Fruits, tools for storytelling.
- Splashes: Fast shutter (1/8000s), continuous mode; drop items like olives.
Conclusion
Mastering lighting setups transforms drink photography from challenging to rewarding. Start with side or back light, experiment with modifiers, and refine through practice. With the right equipment and techniques, you’ll create images that highlight the magic of beverages—glowing liquids, sharp textures, and compelling moods. Invest in versatile tools like strobes and diffusers for long-term gains, and always prioritize planning to capture pristine moments before ice melts or garnishes wilt.
Please share this Lighting Setups for Drink Photography with your friends and do a comment below about your feedback.
We will meet you on next article.
Until you can read, How To Use Pinterest For Your Photography Business