Lightroom Color Grading: Guide for Food Photographers
Introduction to Color Grading in Food Photography
Color grading in Adobe Lightroom stands as one of the most powerful yet underutilized tools in the food photographer’s arsenal. While basic color correction ensures technical accuracy—neutralizing unwanted casts from mixed lighting or camera sensor limitations—color grading transcends correction to become a creative storytelling device. It allows photographers to manipulate shadows, midtones, and highlights independently, transforming a technically sound but emotionally flat image into one that evokes hunger, nostalgia, or freshness.
For food photographers specifically, color grading addresses three critical challenges:
- Appetite Appeal: Subtle warmth in highlights can make pastries glow like they’re fresh from the oven; cool shadows can make salads look crisp and dewy.
- Mood Control: A cozy breakfast scene demands golden midtones; a sleek restaurant dish might benefit from muted, cool elegance.
- Brand Consistency: Whether you’re building a rustic farmhouse aesthetic or a minimalist Scandinavian look, color grading ensures every image feels part of the same visual family.
This comprehensive guide covers every aspect of Lightroom’s Color Grading panel—from its evolution from Split Toning to its modern three-way split system, to advanced techniques for analog film emulation, to integration with full editing workflows. By the end, you’ll not only understand the mechanics but also develop an intuitive sense of when and how to apply color grading to elevate your food photography from good to gallery-worthy.
The Evolution: From Split Toning to Modern Color Grading
To fully appreciate Lightroom’s current Color Grading panel, we must trace its lineage. Prior to Lightroom Classic version 10.1, photographers relied on the Split Toning panel. This tool divided the image into two tonal zones—highlights and shadows—and allowed independent color tints in each. While revolutionary when introduced, it had limitations:
- Only two zones meant midtones were either ignored or awkwardly blended.
- No luminance control—tints were applied at fixed brightness.
- Global adjustments were impossible without affecting the split.
In late 2020, Adobe rebranded and rebuilt the tool as Color Grading, introducing a three-way split (shadows, midtones, highlights) and a global wheel. The change wasn’t merely cosmetic; it reflected professional cinema grading workflows where cinematographers treat each tonal range as a separate layer.
For food photographers, this evolution means:
- Greater subtlety: Midtones can now carry warmth without bleeding into shadows.
- Better control over texture: Luminance sliders prevent muddy shadows in chocolate or overly bright highlights in whipped cream.
- Film emulation precision: Analog films rarely split cleanly into two tones; three-way grading better mimics Kodak Portra’s warm mids and cool shadows.

Deep Dive: Anatomy of the Color Grading Panel
The Color Grading panel resides in the Develop module, below the Tone Curve and HSL panels. Let’s dissect each component:
1. The Four Color Wheels
| Wheel | Purpose | Food Photography Application |
|---|---|---|
| Shadows | Controls darkest 25-30% of tones | Add blue/cyan for fresh greens; teal for seafood; deep purple for moody desserts |
| Midtones | Controls central 40-50% of tones | Warm slightly (orange/yellow) for balance; keep neutral in minimalist shots |
| Highlights | Controls brightest 20-25% of tones | Golden yellow for baked goods; soft orange for sunset-lit dishes |
| Global | Affects entire image uniformly | Subtle overall warmth/coolness without disrupting tonal relationships |
Pro Tip: Click the small circle icons at the top to open a dedicated large wheel for any zone. This reveals Hue and Saturation sliders—some photographers prefer numerical precision over wheel dragging.
2. Saturation and Hue Mechanics
- Saturation increases radially from center to edge.
- Hue rotates circumferentially (0° = red, 60° = yellow, etc.).
- Command/Ctrl + click locks saturation while adjusting hue.
- Shift + drag locks hue while adjusting saturation.
3. Luminance Sliders
Located beneath each wheel, these control the brightness of the applied tint:
- Lower luminance = darker tint (great for deep, rich shadows in coffee or chocolate).
- Higher luminance = brighter tint (ideal for glowing highlights in citrus or ice cream).
Food-Specific Rule: Never set luminance below -50 in shadows or above +50 in highlights—extremes create unnatural halos around food edges.
4. Blending and Balance Sliders
| Slider | Range | Effect | Food Use Case |
|---|---|---|---|
| Blending | 0–100 | Controls overlap between zones | 0 = hard edges (dramatic); 100 = smooth gradients (natural light) |
| Balance | -100 to +100 | Shifts tonal band sizes | -50 = cooler overall (seafood); +50 = warmer (baked goods) |
Visualization: Imagine three overlapping bands. Blending controls how much they bleed; Balance controls their relative widths.

Complete Lightroom Workflow for Food Photography
A professional food editing workflow follows a strict order. Color grading sits near the end but influences earlier decisions. Here’s the full 12-step process:
Step 1: Import and Organize
- Import RAW files.
- Apply metadata (recipe name, ingredients, shoot date).
- Rate images (1–5 stars) during import.
Step 2: Lens Corrections
- Enable Profile Corrections: Fixes distortion, vignetting.
- Remove Chromatic Aberration: Eliminates purple/green fringing on high-contrast edges (e.g., fork tines).
Step 3: Crop and Composition
- Use Rule of Thirds overlay.
- Ensure negative space frames the hero dish.
- Straighten horizons (especially important for flat lays).
Step 4: White Balance
- Method 1: In-camera gray card → eyedropper on card.
- Method 2: Click neutral area (white plate, napkin).
- Creative WB: Slightly cool (4500K) for freshness; warm (6000K) for comfort.
Step 5: Exposure and Tone
- Exposure: Global brightness.
- Highlights: -50 to recover blown cream.
- Shadows: +30 to reveal texture in dark chocolate.
- Whites: +20 for pop.
- Blacks: -30 for depth.
Step 6: Tone Curve
- Create soft S-curve:
- Anchor shadows at (10, 5)
- Lift midtones to (50, 60)
- Anchor highlights at (90, 85)
- Use RGB channels for color-specific contrast.
Step 7: Texture and Clarity
- Texture: +15 (enhances crumbs, herbs).
- Clarity: +25 (mid-tone contrast without dryness).
- Avoid over +40—food looks dehydrated.
Step 8: Vibrance and Saturation
- Vibrance: +15 (smart saturation).
- Saturation: +5 max (global boost).
Step 9: HSL Panel
Target specific ingredients:
| Color | Adjustment | Example |
|---|---|---|
| Red | Hue +5, Sat +10 | Riper tomatoes |
| Green | Hue -10 (toward yellow), Lum +15 | Fresher herbs |
| Yellow | Sat +8 | Brighter lemon zest |
| Blue | Sat -20 | Mute background |
Step 10: Color Grading (Core Focus)
See detailed tutorial below.
Step 11: Local Adjustments
- Radial Filters: Warm center, cool edges.
- Graduated Filters: Simulate window light.
- Brush: Selective sharpening on food only.
Step 12: Final Touches and Export
- Vignette: Amount -15, Feather 70.
- Sharpening: Amount +70, Masking +65 (hold Alt).
- Export: 300 DPI (print), sRGB (web), 2048px long edge (social).
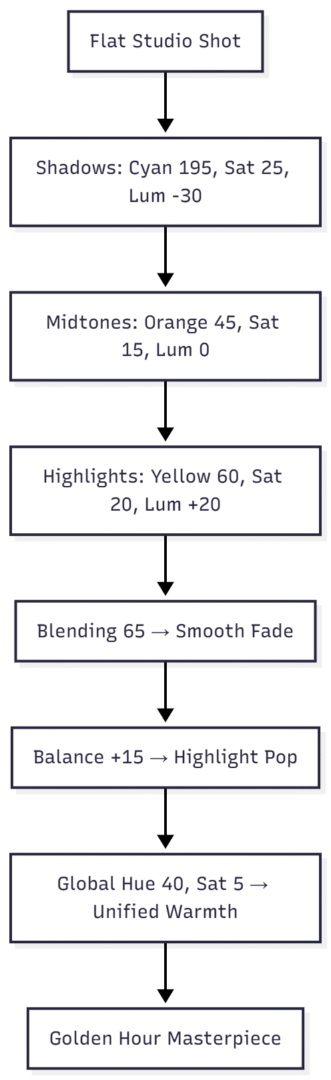
Color Grading Tutorial: Golden Hour Studio Shot
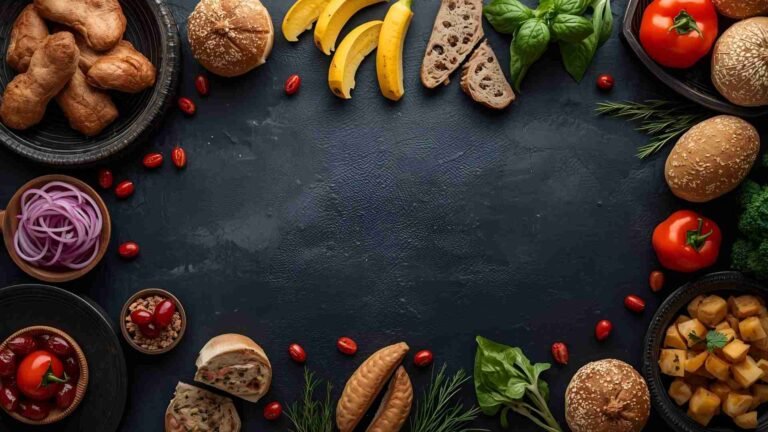
Let’s apply the panel to a real-world scenario: a chocolate cake shot under artificial light, but you want it to feel like late-afternoon sunlight.
Starting Point (Before)
- Lighting: Even LED panels (5600 K)
- Shadows: Cool, flat, no depth
- Midtones: Neutral, lifeless brown
- Highlights: Dull, no sparkle on frosting
Goal: Warm, glowing highlights (sunset rim light), cool, deep shadows (blue-hour overlap), and buttery-smooth tonal transitions.
Step-by-Step Grading
1. Shadows Wheel
- Hue: 195 (cyan-blue)
- Saturation: 25
- Luminance: -30
Why?
Cyan-blue shadows mimic the cool ambient light that lingers after sunset. The low luminance (-30) pushes the tint deeper into the crevices of the cake stand and plate, creating 3D depth. Saturation is moderate (25) to avoid cartoonish teal.
2. Midtones Wheel
- Hue: 45 (warm orange)
- Saturation: 15
- Luminance: 0 (neutral)
Why?
The cake body lives in the midtones. A subtle orange warmth (Hue 45) adds richness without turning chocolate into carrot cake. Low saturation (15) keeps it natural; zero luminance change preserves texture detail in the sponge.
3. Highlights Wheel
- Hue: 60 (golden yellow)
- Saturation: 20
- Luminance: +20
Why?
Frosting and sugar crystals catch the last rays of sun. Hue 60 is pure golden-hour yellow. +20 luminance lifts the tint so highlights glow, not just color-shift. Saturation 20 gives sparkle without neon.
4. Blending: 65
Why?
At 0, zones would look like hard color blocks (fake). At 100, everything blends into soup. 65 creates a natural gradient—shadows fade into warm mids, mids melt into glowing highlights. Perfect for layered cakes.
5. Balance: +15
Why?
Shifts tonal bands slightly toward highlights. This makes the frosting pop while keeping the plate grounded in cool shadow—mimicking how sunlight hits the top first.
6. Global Wheel (Optional Fine-Tune)
- Hue: 40 (warm orange)
- Saturation: 5
Why?
A micro global push ties everything together. Saturation 5 is barely perceptible—just enough to unify the scene without flattening your split.
Final Result
- Shadows: Deep, cool, sculpted
- Midtones: Rich, warm, textured
- Highlights: Glowing, golden, inviting
- Transitions: Seamless, film-like
Pro Tip: Save this as a preset named “Golden Hour Cake”. Apply to any studio dessert, then tweak Balance ±10 based on frosting brightness.
Advanced Techniques
1. Analog Film Emulation
Step 1: Import reference film scan (e.g., Portra 400).
Step 2: Open large Shadow wheel → check “Custom Color” → eyedropper darkest area.
Step 3: Right-click swatch → “Set to Current”.
Step 4: Repeat for mids/highs.
Step 5: Save as preset: “Portra Warm”.
Food-Specific Films:
- Kodak Portra 160: Warm mids, cyan shadows → ideal for desserts.
- Fuji Pro 400H: Green highlights → great for herbs and salads.
2. Color Theory Applications
| Scheme | Colors | Mood | Example Dish |
|---|---|---|---|
| Complementary | Blue + Orange | Energetic | Blueberry pancakes with orange zest |
| Analogous | Green-Yellow-Orange | Harmonious | Avocado toast with poached egg |
| Triadic | Red + Blue + Yellow | Playful | Neapolitan ice cream |
3. Frequency Separation for Texture
- Duplicate layer in Photoshop (Lightroom → Edit In → Photoshop).
- Apply Gaussian Blur (8px) to low-frequency layer.
- Use high-frequency layer for texture sharpening.
- Re-import to Lightroom for final grading.
4. Mobile Workflow
Lightroom Mobile syncs color grading presets via Creative Cloud. Use for:
- Quick client previews
- Instagram Stories
- On-location tweaks
Presets and Batch Processing
Create 10 foundational food presets:
- Fresh Greens (cool shadows, neutral mids)
- Golden Bakery (warm highlights, orange mids)
- Moody Chocolate (deep teal shadows, muted highlights)
- Citrus Pop (vibrant yellows, cool blues)
- Rustic Wood (earthy browns, soft contrast)
Batch Apply:
- Select 50 images.
- Apply “Golden Bakery” preset.
- Sync only Color Grading settings.
- Fine-tune exposure per image.
Hardware and Software Recommendations
| Category | Product | Price | Why for Food |
|---|---|---|---|
| Camera | Canon R6 Mark II | $2,499 | 45MP, IBIS, food-friendly color science |
| Lens | RF 85mm f/2 Macro | $599 | Perfect working distance, sharp textures |
| Lighting | Godox SL60W | $139 | Color accurate, dimmable |
| Tripod | Manfrotto Befree | $199 | Overhead arm for flat lays |
| Software | Adobe CC Photography | $9.99/mo | Lightroom + Photoshop |
Troubleshooting Common Issues
| Problem | Cause | Fix |
|---|---|---|
| Muddy shadows | Low luminance + high saturation | Increase luminance to -10; reduce sat to 15 |
| Orange food | Over-warmed midtones | Shift midtone hue to 30 (less red) |
| Flat transitions | Blending too low | Increase to 60–80 |
| Inconsistent series | No presets | Create and sync |
Frequently Asked Questions
Split Toning only adjusts highlights and shadows; Color Grading adds a midtones wheel, luminance sliders, blending, and balance controls for far more precise food-friendly edits.
Keep saturation below 30, luminance between -40 and +40, and always check skin-tone-like colors (meats, breads). Use the global wheel for tiny overall shifts only.
Start with shadows to set mood (cool for freshness, warm for comfort), then balance with midtones, and finish with highlights for glow.
You can use it on JPEGs, but RAW gives much more latitude and prevents banding in shadows or highlights.
After dialing in your settings, click the “+” in the Presets panel, check only “Color Grading,” name it (e.g., “Golden Bakery”), and apply with one click later.
Blending 60–75 for smooth, natural transitions; Balance -20 to +20 depending on whether you want a cooler or warmer overall feel.
Yes—tap “Color” → “Grading” to get the three wheels and sliders; presets sync automatically via Creative Cloud.
Conclusion
Lightroom’s Color Grading panel is not merely a tool—it’s a language for visual storytelling in food photography. By mastering its wheels, sliders, and integration with broader workflows, you gain the ability to:
- Transform sterile studio shots into sunlit masterpieces.
- Evoke specific emotions—comfort, freshness, luxury—with precise color control.
- Build a recognizable style that sets your portfolio apart.
Practice daily. Start with one dish, one preset, one mood. Over time, color grading becomes intuitive, like seasoning a dish—you’ll know exactly how much warmth or coolness your image needs.
Your food photos deserve to look as delicious as they taste. With this guide, you now have the complete roadmap to make that happen in Lightroom.
Please share this Lightroom Color Grading: Guide for Food Photographers with your friends and do a comment below about your feedback.
We will meet you on next article.
Until you can read, Food Photos with Leading Lines: Composition Tutorial