Food Styling A Flying Food Photo
Food styling for flying food photography transforms ordinary ingredients into dynamic, gravity-defying compositions that capture attention and evoke excitement. This technique combines meticulous planning, precise execution, and skilled post-production to create images where cocktails explode, teas pour mid-air, or burgers disassemble in flight. Mastering this genre requires understanding layer-based compositing, consistent lighting, and creative suspension methods to achieve seamless, professional results.
Understanding Flying Food Photography
Flying food photography creates the illusion of ingredients suspended in air, revealing every component of a dish in a single frame. Unlike traditional food shots that rely on plated presentation, flying compositions demand deconstruction and reconstruction through multiple captures. The final image assembles separately photographed elements—background, vessel, liquid splashes, and individual ingredients—into one cohesive scene.
This approach excels for recipes with distinct components. A grapefruit margarita, for example, allows styling of salt-rimmed glass, citrus wedges, sugar cubes, and liquid streams independently before compositing. The method ensures perfect positioning of each piece while maintaining natural motion in liquids. Professional studios use this technique for advertising because it highlights textures, colors, and freshness impossible in single-exposure shots.
The genre’s popularity stems from its ability to generate visual impact. Images appear energetic and three-dimensional, drawing viewers into the preparation process. Instagram algorithms favor such content due to extended engagement times as users examine floating elements. Commercial clients commission flying shots for menus, packaging, and social media because they differentiate brands in saturated markets.
Pre-Visualization and Planning
Success begins with detailed pre-visualization. Create a clear mental image of the final composition, including color palette, motion direction, and depth relationships. For an exploding cocktail, envision liquid arcs, ingredient trajectories, and foreground blur for dimensionality.
Transfer this vision to paper through sketching. Break down the scene into discrete layers:
- Base background
- Hero vessel (glass or cup)
- Primary liquid splash
- Secondary liquid elements
- Large solid ingredients (citrus pieces, sugar cubes)
- Small debris and droplets
- Foreground out-of-focus elements
This breakdown determines shoot requirements. Plan for 10-15 separate captures minimum. Identify potential challenges like liquid consistency, ingredient stability, and shadow management. Consider physics—how far can elements realistically fly from the vessel? Maintain proportional scaling across layers.
Develop a shot list with specific instructions:
- Clean background plate
- Empty glass positioned
- Glass with base liquid level
- Primary splash capture
- Individual grapefruit wedges (3-5 variations)
- Sugar cubes in flight (multiple angles)
- Salt grains and rim details
- Foreground blur elements
Include backup positions for flexibility during compositing. This planning prevents missing crucial layers and minimizes reshoots.
Ingredient Selection and Preparation
Choose ingredients for visual appeal and structural integrity. Select grapefruit with vibrant color and firm texture that holds shape when cut. Pick sugar cubes with clean edges rather than granulated sugar for better control. Use fresh lime for bright green contrast.
Prepare components in advance:
- Cut grapefruit into precise wedges (1/4 inch thick)
- Rim glass with salt using consistent grain size
- Mix cocktail base to exact color and viscosity
- Create multiple identical glasses for different layers
- Prepare suspension tools (cocktail sticks, acrylic rods)
For liquids, test viscosity with corn syrup additions to control splash patterns. Prepare extra quantities—splashes require multiple attempts. Keep ingredients at room temperature for easier handling unless cold enhances appearance.
Studio Setup and Protection
Cover all surfaces with plastic sheeting or disposable tablecloths. Flying elements create inevitable mess from liquid sprays and dropped solids. Protect lighting equipment with clear plastic bags. Use absorbent mats under primary splash zones.
Position backdrop material—seamless paper or painted board—at consistent distance. Mark floor positions for lights and camera to maintain alignment. Create a splash containment area using acrylic sheets or shallow trays to control liquid spread while preserving capture angles.
Lighting Consistency
Use artificial lighting exclusively for absolute control. Studio strobes with softboxes provide consistent color temperature and intensity across all captures. Position key light at 45-degree angle to subject for dimensional modeling.
Standard three-point setup:
- Key light: Large softbox camera left, 45° angle, 6 feet distance
- Fill light: Smaller softbox camera right, lower power
- Backlight: Strip box behind subject for rim lighting
Set strobe power to f/8 at ISO 100, 1/200 second. Test with gray card for white balance. Lock all light positions with tape marks. Use modeling lights to verify shadow patterns remain identical.
For liquid motion freezing, employ strobes with short flash duration (1/10000 second or faster). Broncolor or Profoto units excel here, though speedlights work for smaller setups. Avoid mixing continuous LED with strobes unless perfectly matched in color temperature.
Camera Settings and Equipment
Mount camera on heavy-duty tripod with geared head for precise adjustments. Use mirrorless or DSLR with live view for accurate focusing. Essential settings:
- Manual mode
- ISO 100
- Aperture f/8-f/11 for depth of field
- Shutter speed 1/200 (sync speed)
- White balance: Custom set with gray card
- File format: RAW
- Focus mode: Manual with live view magnification
Use 50mm or 85mm prime lens for natural perspective. Enable mirror lock-up to reduce vibration. Tether to laptop for immediate review—Capture One or Lightroom both work excellently. Mark tripod position with tape to prevent movement between shots.
Shooting Sequence
Follow systematic capture order:
- Base Plate: Empty background, perfect exposure
- Hero Vessel: Position glass exactly, capture clean
- Liquid Base: Fill glass to precise level
- Primary Splash: Throw liquid upward, capture peak moment
- Secondary Splashes: Multiple angles and intensities
- Large Solids: Suspend grapefruit wedges on cocktail sticks
- Sugar Cubes: Position individually at varying heights
- Fine Details: Salt grains, lime zest particles
- Foreground Elements: Out-of-focus pieces near lens
- Backup Variations: Alternative positions for flexibility
For splashes, use consistent throwing technique. Practice motion to achieve repeatable arcs. Assistant throws while photographer triggers shutter. Use sound trigger for precise timing if available.
For solid elements, employ suspension methods:
| Method | Material | Best For | Removal Difficulty |
|---|---|---|---|
| Cocktail sticks | Bamboo | Large pieces | Easy |
| Acrylic rods | Clear plastic | Medium elements | Moderate |
| Fishing line | Monofilament | Small items | Hard |
| Steel wire | Thin gauge | Heavy objects | Moderate |
Position supports outside final crop when possible. For elements crossing multiple planes, shoot separately and composite.
Suspension Techniques
Cocktail Stick Method: Insert bamboo sticks into ingredients, position in frame, support with hand or clamp. Paint sticks same color as background for easier removal. Use multiple sticks for stability.
Acrylic Rod System: Drill small holes in base board, insert clear rods at calculated heights. Attach ingredients with hot glue or mounting putty. Rods transmit light naturally, minimizing shadow issues.
Wire Suspension: Thread thin wire through ingredients, attach to overhead rig. Use black wire against dark backgrounds. Requires precise tension control.
Hand-Held Technique: Hold elements in position during exposure. Wear black gloves. Remove hand in post-production using content-aware fill.
Throw and Freeze: For small particles, physically throw into frame. Requires high-speed sync and precise timing. Practice extensively.
Liquid Capture Strategies
Control liquid behavior through viscosity modification. Add corn syrup to thicken for longer streams. Use food coloring for color matching. Temperature affects flow—warmer liquids move faster.
Capture techniques:
- Pour Method: Assistant pours from height while camera fires continuously
- Throw Technique: Scoop and throw upward for explosive effect
- Syringe Injection: Precise control for specific stream shapes
- Dropper Method: Individual droplet capture for fine details
Use shallow trays to contain liquid while maintaining capture angle. Clean glass between takes. Capture multiple splash variations—select best in post.
Post-Production Workflow
Image Selection: Review all captures at 100%. Select primary elements plus 2-3 backups each. Rate images 1-5 stars in Lightroom.
Basic Processing: Apply identical adjustments across all selected images:
- Lens correction
- White balance synchronization
- Exposure matching
- Noise reduction
Export as PSD or TIFF with layers preserved.
Compositing Process:
- Open base background as bottom layer
- Add hero vessel layer, mask precisely
- Stack splash layers, blend using layer masks
- Position solid elements individually
- Adjust each layer’s opacity and blending mode
- Match color and lighting between layers
- Remove all support structures
Masking Technique:
- Select subject with Quick Selection tool
- Refine edge for hairline details
- Fill mask with black to hide
- Paint white to reveal desired areas
- Use soft brush for natural transitions
Shadow Management:
- Create new layers for shadows
- Paint with soft black brush at 10-20% opacity
- Apply Gaussian blur matching light direction
- Adjust layer opacity for realism
Advanced Compositing
For complex motion, combine multiple splash captures. Use frequency separation for texture preservation during retouching. Match grain across layers for cohesion.
Create depth through:
- Foreground blur (Gaussian blur on near elements)
- Scale variation (larger pieces closer to camera)
- Atmospheric perspective (slight desaturation in distance)
Use adjustment layers clipped to specific elements for localized color correction. Maintain consistent light temperature throughout.
Common Challenges and Solutions
Inconsistent Lighting: Solution—use incident light meter readings at subject position for each setup variation.
Liquid Color Mismatch: Solution—create custom white balance target with liquid sample.
Scale Discrepancies: Solution—include ruler in frame for reference, remove in post.
Motion Blur in Solids: Impossible to avoid completely—shoot static and add motion blur in post if needed.
Shadow Conflicts: Shoot elements against green screen for easier isolation.
Equipment Recommendations
| Category | Recommendation | Price Range |
|---|---|---|
| Camera | Canon R5 / Sony A7R IV | $3500-4000 |
| Lens | Canon RF 50mm f/1.2 / Sigma 85mm f/1.4 | $500-2300 |
| Lighting | Profoto B10X Plus (2 units) | $4000 |
| Modifiers | 3×4′ softboxes with grids | $300 each |
| Tripod | Manfrotto 055 with geared head | $500 |
| Tethering | Tether Tools cable + Capture One | $100 |
| Suspension | Acrylic rods (various lengths) | $50 set |
| Software | Adobe Photoshop + Lightroom | $10/month |
Professional Tips
- Depth Creation: Position some elements 6-12 inches from background, others 2-3 feet forward. Use f/11 for sufficient depth of field.
- Color Harmony: Select palette before shooting. Use color checker passport for accurate reproduction.
- Texture Preservation: Shoot at base ISO. Use sharpening selectively in post.
- Efficiency: Develop template actions in Photoshop for repetitive tasks.
- Client Communication: Present progress composites during shoot for feedback.
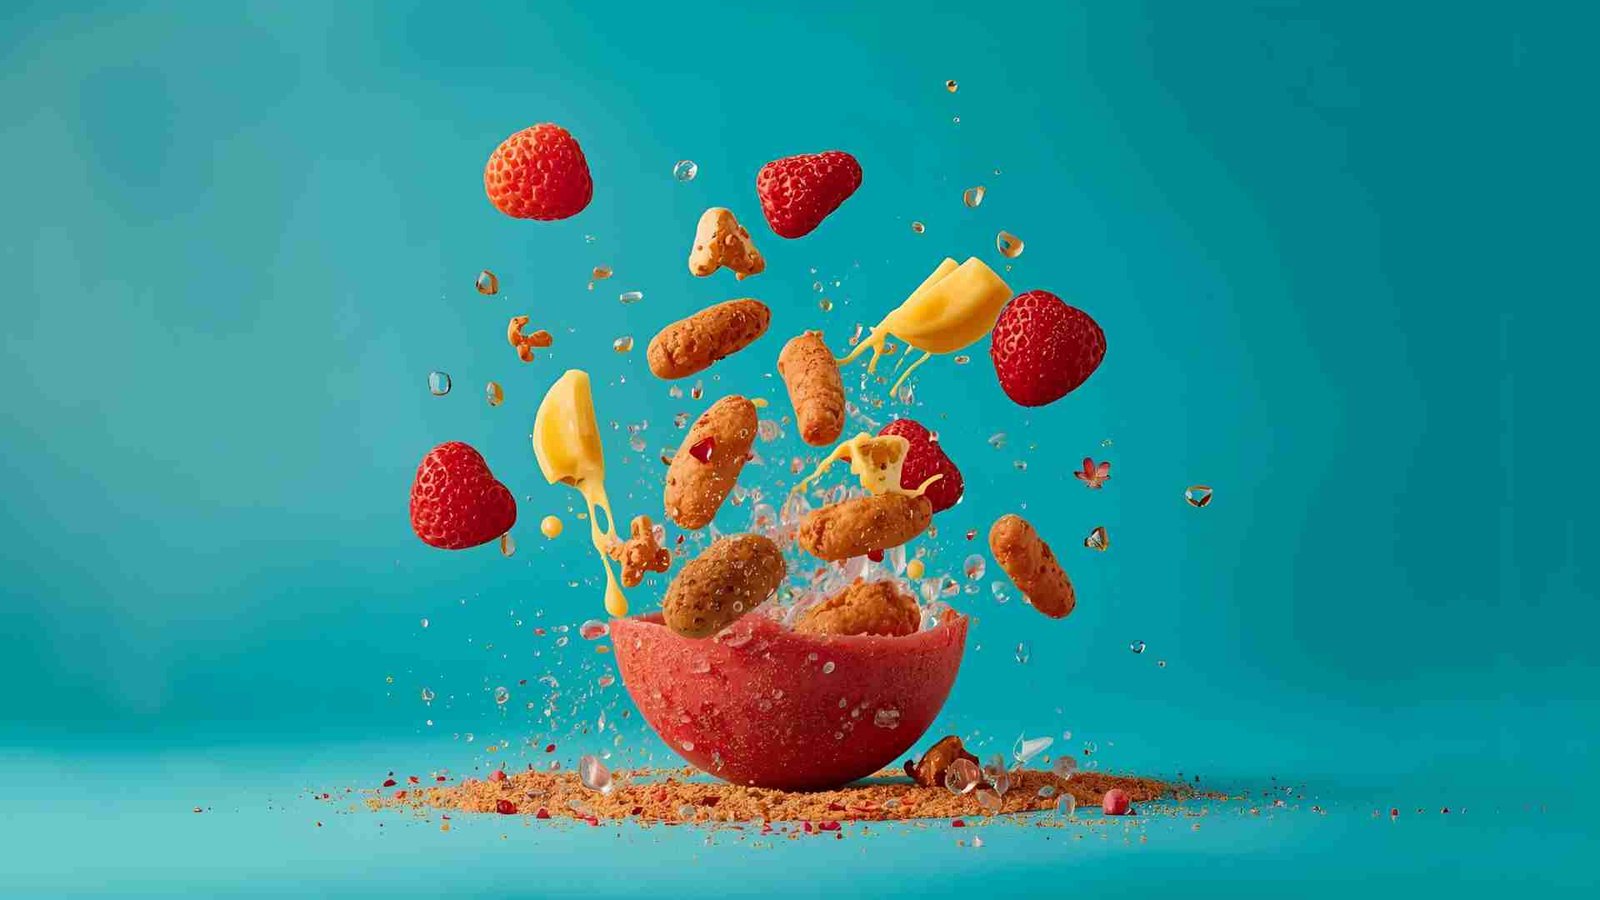
Case Study: Grapefruit Margarita Explosion
Concept: Salt-rimmed glass with grapefruit wedges, sugar cubes, and pink liquid exploding outward.
Layer Breakdown:
- Layer 1: Dark gradient background
- Layer 2: Empty glass with salt rim
- Layer 3: Base liquid in glass
- Layer 4: Primary liquid arc (thrown upward)
- Layer 5-7: Grapefruit wedges at varying distances
- Layer 8-10: Sugar cubes in flight
- Layer 11: Fine salt particles
- Layer 12: Foreground blur droplets
Execution: 47 total captures. Primary splash required 12 attempts. Used cocktail sticks for wedges, hand-thrown liquid. Compositing time: 4 hours.
Result: Dynamic image showing every ingredient clearly with realistic motion and depth.
Variations and Creative Applications
Flying Tea: Substitute tea streams for cocktail liquid. Use steam capture with black background and backlight. Position tea leaves individually.
Burger Deconstruction: Photograph each patty, vegetable, and condiment layer separately. Arrange in perfect vertical alignment with slight rotation for dynamism.
Pasta Twirl: Capture pasta strands mid-twirl using fishing line suspension. Add sauce droplets in post for realism.
Dessert Explosion: Style macarons or cookies bursting from container. Use powdered sugar clouds for atmosphere.
Troubleshooting Table
| Issue | Cause | Solution |
|---|---|---|
| Visible support remnants | Incomplete masking | Use clone stamp at 50% opacity |
| Color temperature shift | Mixed lighting | Custom white balance per setup |
| Scale inconsistency | Lens distortion | Apply lens correction to all layers |
| Unnatural shadows | Missing cast shadows | Paint shadows on separate layers |
| Liquid appears flat | Insufficient highlights | Dodge highlights on liquid edges |
Frequently Asked Questions
Flying food photography is a composite technique that makes ingredients, liquids, and vessels appear to float or explode in mid-air with no visible support. The final image is built from 10–50 separate captures layered in Photoshop, not a single “frozen” exposure.
No. Any mirrorless or DSLR that shoots RAW, has manual mode, and can tether is sufficient. A 50 mm or 85 mm prime lens (f/1.8 or better) is ideal, but kit zooms work for practice.
Only if conditions remain stable for 2–3 hours (heavy overcast or north-facing window). Even slight cloud movement creates exposure and color shifts that ruin compositing. Artificial light is the professional standard.
Plan for 12–25 layers on average:
1 clean background
1 hero vessel (glass/cup)
1–3 base liquid levels
3–6 splash variations
4–8 solid ingredients in different positions
2–4 foreground blur elements
1–2 backup sets
Complex shots (burger stacks, full tea explosions) can exceed 40 captures.
Cocktail-stick + hand method for beginners:
Insert bamboo stick into grapefruit wedge or sugar cube.
Hold stick just outside frame or paint it background color.
Mask hand/stick in post.
Acrylic rods or monofilament are cleaner but require more setup.
Use studio strobes with flash duration ≤ 1/5000 s (most modern packs) at low power. Shutter speed is irrelevant—only flash duration freezes the splash.
Mask the ingredient.
Use Content-Aware Fill on a duplicated background layer.
Clone-stamp at 40 % opacity for final texture blend.
Flying food photography demands patience, precision, and creative problem-solving. The composite nature allows perfection unattainable in single captures. Master the workflow through practice—begin with simple two-layer compositions and progress to complex multi-element scenes. The technique’s versatility spans commercial advertising, editorial features, and social media content. Professional execution requires investment in consistent lighting, precise camera work, and advanced Photoshop skills. When executed properly, flying food images create memorable visual experiences that elevate culinary presentation beyond traditional photography.
Please share this Food Styling A Flying Food Photo with your friends and do a comment below about your feedback.
We will meet you on next article.
Until you can read, Food Photography Questions To Ask Before Estimating A Photo Shoot