Getting Started in Food Photography
Food photography is a captivating blend of art, science, and storytelling that transforms dishes into visually irresistible creations. Whether you’re a food blogger, an aspiring professional, or simply passionate about capturing culinary moments, food photography offers endless creative possibilities. You don’t need a fortune in gear or Michelin-star cooking skills to begin—just a camera, a willingness to learn, and a sprinkle of creativity. This comprehensive guide provides everything you need to start, from essential equipment to lighting, styling, and composition techniques. With practical tips, affordable gear recommendations, and actionable exercises, you’ll be crafting mouthwatering images in no time.
Why Food Photography?
Food photography is more than just snapping a picture of a meal—it’s about evoking emotion, telling a story, and making viewers hungry. High-quality images drive engagement on blogs, Instagram, and Pinterest, where visuals often matter more than text. For example, a vibrant photo of fudgy brownies can entice readers to try a recipe far more than words alone. This guide demystifies the process, showing you how to start with minimal investment while building skills that can lead to a thriving hobby or career.
Essential Gear for Beginners
You don’t need the most expensive camera to create stunning food photos. The key is understanding your tools and using them effectively. Below is a breakdown of the must-have equipment, with specifications and price ranges, to get you started.
| Gear | Model Examples | Price Range | Where to Buy | Purpose |
|---|---|---|---|---|
| Camera (Smartphone) | iPhone 14, Samsung Galaxy S23 | $0-$200 (used) | Amazon, eBay | Entry-level, high-quality photos |
| Camera (DSLR) | Nikon D3500, Canon EOS Rebel T7 | $300-$500 | Amazon, B&H | Manual control, versatile |
| Camera (Mirrorless) | Fujifilm X-T30, Canon EOS M50 | $500-$800 | Amazon, Adorama | Compact, professional-grade |
| Lens (DSLR) | Nikon/Canon 50mm f/1.8 | $100-$200 | Amazon, B&H | Sharp, versatile for food shots |
| Lens (Mirrorless) | Fujinon XF 35mm f/2 | $200-$400 | Amazon, Adorama | Compact, great for flatlays |
| Tripod | Manfrotto 055, Oben CT-3561 | $50-$150 | Amazon, B&H | Stabilizes for sharp images |
| Reflector/Diffuser | Neewer 5-in-1 43″ | $20-$40 | Amazon, Neewer | Softens and directs light |
| Foam Core (White/Black) | 40″x60″ | $5-$10 | Michaels, Office Depot | Reflects or absorbs light |
| Props (Plates, Bowls) | Neutral whites, grays | $2-$10 | Thrift stores, IKEA | Adds context, style |
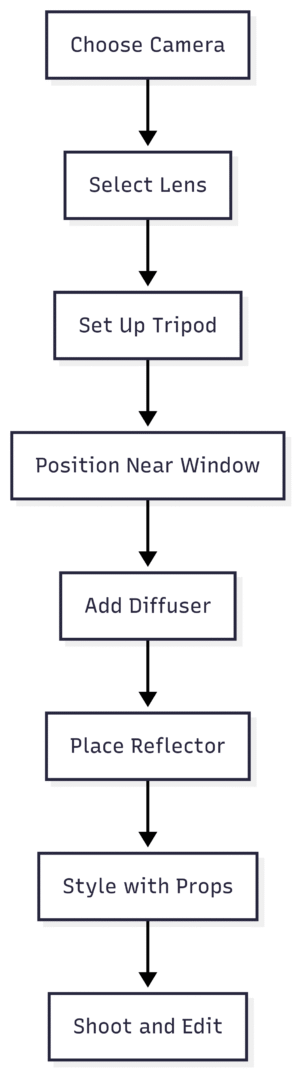
Chart: Gear Setup Workflow
Cameras: Start with What You Have
A common myth is that you need a high-end camera to take great food photos. In reality, even a smartphone can produce professional-quality images with the right techniques. For example, Rachel Korinek started with an iPhone, leveraging its advanced sensor to practice composition and lighting.
- Smartphone ($0-$200, used): Modern smartphones like the iPhone 14 or Samsung Galaxy S23 have excellent cameras with adjustable settings via apps like Lightroom Mobile ($4.99/month, App Store). They’re perfect for beginners on a budget.
- DSLR ($300-$500): Entry-level models like the Nikon D3500 or Canon EOS Rebel T7 offer manual controls for learning aperture, shutter speed, and ISO. Buy used from eBay to save money.
- Mirrorless ($500-$800): Compact and powerful, cameras like the Fujifilm X-T30 or Canon EOS M50 are ideal for portability and quality. They’re a worthwhile investment as your skills grow.
Lenses: The “Nifty Fifty” and Beyond
Lenses have a bigger impact on image quality than the camera body. A good lens can last your entire career, making it a smarter investment than splurging on a camera.
- 50mm f/1.8 ($100-$200, Amazon): Known as the “nifty fifty,” this prime lens (Nikon or Canon) is affordable, lightweight, and versatile for food photography. Its wide aperture creates a shallow depth of field for that dreamy bokeh effect.
- Kit Lens (18-55mm, often bundled): If your camera comes with a kit lens, it’s sufficient for beginners. It covers a range of focal lengths, ideal for experimenting with angles.
- Mirrorless Lenses ($200-$400): For mirrorless cameras, lenses like the Fujinon XF 35mm f/2 offer similar benefits to the 50mm for DSLR users.
Pro Tip: Rent lenses from services like LensRentals ($20-$50/week) to test before buying.
Tripods: Stability is Key
A tripod eliminates camera shake, ensuring sharp images, especially in low light. It also frees your hands for styling.
- Manfrotto 055 ($100-$150, Amazon): Adjustable legs and a ball head make it versatile for overhead and angled shots. Pair with an extension arm ($20-$30, Impact) for overhead setups.
- Oben CT-3561 ($50-$100, B&H): Lightweight and portable, with flip-up legs for overhead shots without an extension arm.
Lighting Tools: Reflectors and Diffusers
Natural light is the go-to for most food photographers due to its soft, flattering quality. Tools like reflectors and diffusers help control it.
- Neewer 5-in-1 Reflector ($20-$40, Amazon): This collapsible disc softens light (diffuser) or bounces it back (reflector) to fill shadows.
- Foam Core ($5-$10, Michaels): White foam core reflects light for a brighter look; black absorbs it for moodier shots.
Props: Build a Collection on a Budget
Props add personality and context to your photos but can get expensive. Start small and shop smart.
- Thrift Stores ($2-$10): Find neutral plates, bowls, and cutlery at Goodwill or local thrift shops. Whites, grays, and muted tones are versatile and timeless.
- IKEA ($5-$15): Affordable linens, glassware, and wooden boards are perfect for beginners.
- Handmade Pieces ($20-$50, Etsy): Save for a few unique items to elevate your style once you understand your aesthetic.
Exercise: Visit a thrift store and buy three props (e.g., a plate, bowl, and napkin) for under $15. Practice styling a simple dish like a salad to test their versatility.
Mastering Natural Light
Natural light is the heart of food photography, offering a soft, authentic glow that’s hard to replicate. Here’s how to harness it effectively.
Find the Best Window
Set up near a window to maximize natural light. North- or south-facing windows provide consistent, indirect light, ideal for food photography.
- How to Test: Place a bowl of fruit near a window and observe how light changes throughout the day. Note shadow softness and color temperature (warm or cool).
- Example: A north-facing window provides steady, diffused light, perfect for shooting vibrant salads or desserts.
Soften Light with a Diffuser
Direct sunlight creates harsh shadows. A diffuser softens light for a glowing effect.
- DIY Option: Tape muslin cloth ($5-$10, Amazon) or baking paper ($3-$5, Walmart) over the window.
- Professional Option: Use a Neewer 43″ 5-in-1 Diffuser ($20-$40, Amazon) for portability.
Control Shadows with Reflectors
Reflectors bounce light back onto the food, reducing harsh shadows.
- White Foam Core ($5-$10, Michaels): Place opposite the window to brighten the scene.
- Black Foam Core ($5-$10, Office Depot): Use for a moody, high-contrast look, ideal for dishes like chocolate cake.
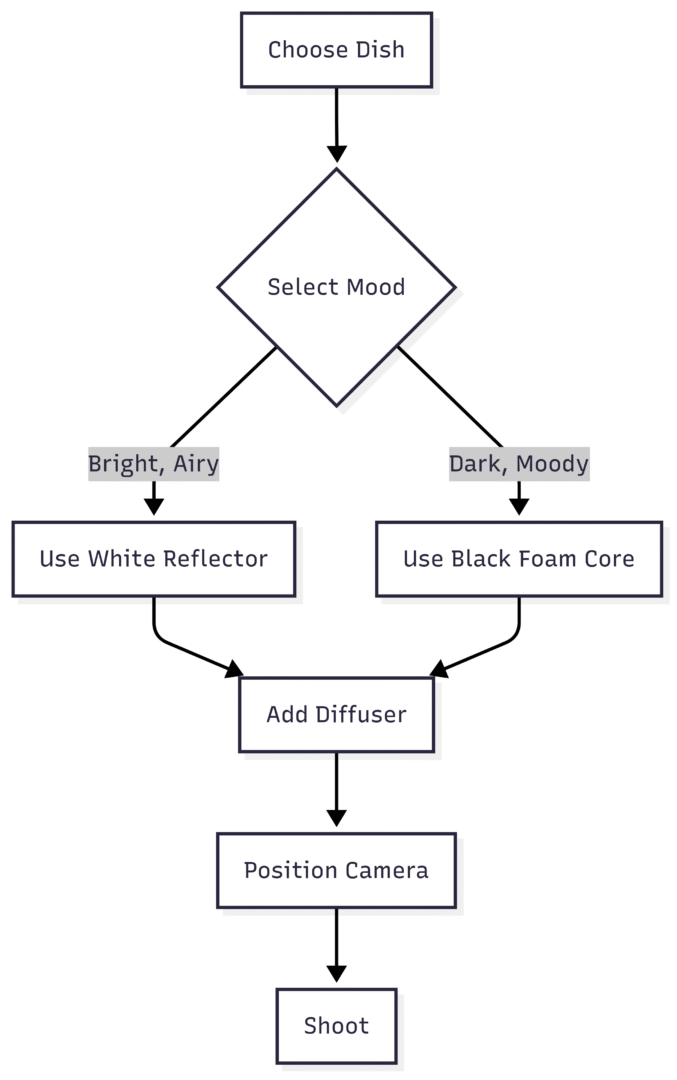
Chart: Lighting Setup Decision
Camera Settings for Natural Light
Shooting in manual mode gives you control over exposure. Here’s a starting point:
- Aperture: f/2.8-f/5.6 for a shallow depth of field, blurring the background while keeping the food sharp.
- Shutter Speed: 1/60s-1/200s, depending on light intensity. Use a tripod for speeds below 1/100s to avoid blur.
- ISO: 100-400 to minimize noise. Increase to 800 in low light, but avoid higher to prevent graininess.
- White Balance: Set to “Daylight” (5500K) or adjust manually to avoid color casts.
Example Settings: For a sunny-day shot of pancakes, try f/4.5, 1/125s, ISO 100, with a tripod for stability.
Composition and Styling Techniques
Composition and styling turn a simple dish into a visual story. Here are key techniques to master.
Camera Angles
Two angles dominate food photography: the 45-degree angle and the 90-degree (overhead) angle.
- 45-Degree Angle: Mimics how we view food at a table, ideal for layered dishes like cakes or burgers. Use f/2.8-f/5.6 for a balanced depth of field.
- 90-Degree Angle (Overhead): Perfect for flatlays, showcasing shapes and textures in dishes like tacos or charcuterie boards. Use f/8-f/16 to keep everything in focus.
Rule of Thirds
The Rule of Thirds divides your frame into a 3×3 grid, placing key elements at intersections for balance.
- How to Apply: Position the main dish or a hero prop (e.g., a vintage spoon) at a grid intersection. Use camera gridlines or imagine the grid.
- Example: In a burger shot, place the burger at the lower-right intersection, with a napkin and fries along the gridlines for flow.
Styling Tips
Styling enhances the food’s appeal and tells a story.
- Keep It Simple: Use 2-3 props (e.g., a plate, fork, and linen) to avoid clutter. For example, a white plate with a gray napkin complements a colorful salad.
- Add Texture: Scatter crumbs, herbs, or drizzle sauce for a lived-in feel. Spray pancakes with Scotchgard ($8-$12, Amazon) to prevent syrup absorption.
- Use Ingredients as Props: Include raw ingredients (e.g., fresh herbs or lemons) to hint at the recipe’s story.
- Color Theory: Pair complementary colors (e.g., orange food with blue props) to make elements pop. Use Canva’s Color Wheel tool (free) to experiment.
Example: For a pasta dish, use a dark plate, a green herb sprig, and a red sauce drizzle to create contrast and movement.
Layers and Framing
Layers add depth, while framing directs the viewer’s eye.
- Layers: Place props in the foreground (e.g., a napkin) and background (e.g., a glass) to create depth. Use a shallow depth of field (f/2.8) to blur non-essential elements.
- Framing: Use props like cutlery or a tray to frame the dish. For example, a fork and spoon around a pasta plate guide the viewer’s focus.
Editing for Impact
Post-processing polishes your images, enhancing colors and mood.
| Software/App | Price | Where to Buy | Key Feature |
|---|---|---|---|
| Adobe Lightroom | $9.99/month | Adobe | Versatile editing, masking |
| Capture One | $24/month | Capture One | Precise color control |
| Lightroom Mobile | Free/$4.99/month | App Store | Mobile editing, user-friendly |
| VSCO | Free/$19.99/year | App Store | Stylish filters for smartphones |
| Snapseed | Free | Google Play | Quick adjustments, healing tool |
- Lightroom ($9.99/month): Adjust exposure, contrast, and vibrancy. Use masking to enhance specific areas, like brightening a dish’s highlights.
- Capture One ($24/month): Ideal for professionals needing precise color grading.
- Smartphone Apps: Lightroom Mobile or Snapseed (free) offer powerful editing tools for beginners. Boost vibrancy and clarity to counter washed-out colors.
Example Edit: For a muffin shot, increase exposure by +0.5, boost vibrancy by +20, and add a subtle vignette in Lightroom to draw focus to the food.
Developing Your Style
Your unique style sets you apart. To find it:
- Inspiration Exercise: Create a Pinterest board with 50+ food photos you love. Note common elements (e.g., moody lighting, minimal props) to define your preferences.
- Practice Consistently: Shoot a simple dish (e.g., a bowl of fruit) weekly, experimenting with angles, props, and lighting.
- Build a Portfolio: Curate 10-15 of your best images to showcase your growth. Share on Instagram or a personal website to attract feedback or clients.
Rachel Korinek’s Journey: A Case Study
Rachel Korinek, founder of Two Loves Studio, started with a second-hand Nikon D300 and a borrowed 24-70mm lens. By 2013, she landed her first paid commission after a Google search led a client to her blog. Her key lessons:
- Take Action: Rachel said “yes” to opportunities, even when they felt daunting, like shooting 55 recipes for a cookbook in five weeks.
- Learn from Failure: Early challenges, like low-budget shoots, built her portfolio and skills.
- Focus on Passion: In 2017, she prioritized personal projects, leading to workshops, a podcast, and an e-masterclass with hundreds of students.
Her journey shows that starting small, practicing relentlessly, and investing wisely in gear and education can lead to success.
Practical Exercises to Get Started
- Light Observation: Place a bowl of fruit near a window and photograph it hourly for a day. Note how light changes and affects shadows and colors.
- Thrift Store Challenge: Spend $15 on three props and style a dish using only those items.
- Angle Experiment: Shoot the same dish from 45-degree and 90-degree angles. Compare results to identify your preferred style.
- Editing Practice: Edit one photo in Lightroom Mobile, adjusting exposure, contrast, and vibrancy. Compare before and after to see the impact.
Artificial Light as a Backup
If natural light is limited, artificial lighting can mimic its effects.
- Godox SL-150W ($120-$150, B&H): A continuous light that replicates soft window light when paired with a 120cm softbox ($30-$50, Neewer).
- Speedlights ($50-$100, Amazon): Affordable and portable for beginners. Use with a diffuser for softer light.
Pro Tip: Position artificial lights like a window (e.g., to the side or behind) and use reflectors to control shadows.
Conclusion
Getting started in food photography is an exciting journey that blends creativity and technical skill. Begin with a simple camera—whether a smartphone or an entry-level DSLR—focus on mastering natural light, and practice composition and styling with affordable props. Invest in a good lens like the 50mm f/1.8, use a tripod for stability, and edit with tools like Lightroom to polish your images. By practicing consistently, experimenting with angles, and learning from failures, you’ll develop a unique style that captivates viewers. Start small, stay curious, and let your passion for food photography shine.
Please share this Getting Started in Food Photography with your friends and do a comment below about your feedback.
We will meet you on next article.
Until you can read, Natural Light Food Photography Tips