Creating a recipe website in WordPress lets you own your content, rank in Google search results with rich recipe snippets, and turn cooking passion into traffic and income. Self-hosted WordPress (WordPress.org) powers the majority of successful food blogs because it offers full control, excellent SEO tools, unlimited customization, and easy integration with recipe cards that display cook times, ratings, and nutrition in search results.
Unlike closed platforms, you control your domain, data, email list, and monetization options such as ads, affiliates, and digital products. Follow these five practical steps to launch a professional, mobile-friendly recipe site without coding knowledge. The process focuses on speed, usability, and search visibility so readers can jump straight to ingredients while Google understands your recipes clearly.
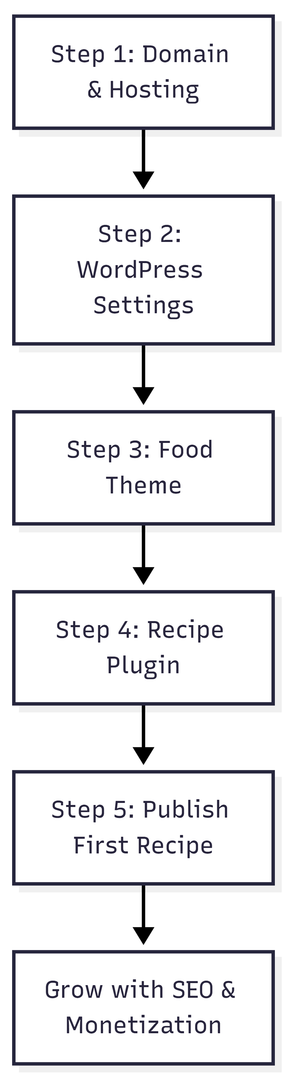
Step 1: Choose a Domain Name and Web Hosting
Your domain is the permanent address readers type or find via search. Pick a short, memorable name tied to food or your niche—examples include variations of “bites,” “kitchen,” “recipes,” or a personal brand. Check availability through registrars and secure matching social handles at the same time. Many hosts include a free domain for the first year.
Web hosting stores your files, images, and database. Food blogs need solid performance because recipe posts contain multiple high-resolution photos. Prioritize WordPress-optimized plans with SSD or NVMe storage, free SSL, automatic backups, and one-click WordPress installation.
Recommended hosting comparison (intro pricing; renewals higher):
| Host | Starting Price (approx.) | Best For | Key Specs | Free Domain |
|---|---|---|---|---|
| Hostinger | $2.99/mo (long-term) | Budget + speed | NVMe, LiteSpeed, 3+ sites | Year 1 |
| Bluehost | $3.99/mo | Absolute beginners | One-click WP, guided setup | Year 1 |
| SiteGround | $2.99–$6.99/mo | Reliability & support | Google Cloud, daily backups | No |
Install WordPress directly from the host dashboard after purchase. Log in at yourdomain.com/wp-admin. This single action gives you a fully functional site foundation.
Step 2: Configure Essential WordPress Settings
After installation, set up core settings for usability and SEO. Go to Settings > General and enter your site title (e.g., “Home Cook Recipes”) plus a short tagline describing your focus.
Under Settings > Permalinks, select “Post name.” This creates clean URLs such as yourdomain.com/crispy-garlic-chicken instead of long query strings. Clean permalinks help both users and search engines.
Create essential pages: Home, About, Contact, and a Recipe Index (you can expand this later). Add a privacy policy and any legal pages required for monetization. Install a basic security plugin and caching tool early for speed. These foundations prevent technical debt as you add content.
Step 3: Choose a Food-Friendly Theme
A theme controls layout, mobile responsiveness, and visual appeal. Food blogs need clean designs that highlight large photos, easy navigation, and recipe indexes. Choose a lightweight, mobile-first theme that works well with recipe plugins and loads quickly even with image-heavy posts.
Popular theme options:
| Theme | Price | Strengths | Ideal Use Case |
|---|---|---|---|
| Astra | Free (Pro ~$69/yr) | Speed, starter templates, flexibility | Custom builds + page builders |
| Foodica | ~$69/yr (Lite free) | Recipe index, photography focus | Ready-made food blogs |
| Cookely | ~$69/yr | Bold visuals, magazine style | Image-driven recipe sites |
Install via Appearance > Themes > Add New. Search the name, install, and activate. Many food themes offer demo import so you can preview layouts with sample recipes and replace them with your own. Prioritize themes that support Gutenberg blocks and load under 2–3 seconds on mobile.
Step 4: Install a Recipe Plugin
A dedicated recipe plugin turns ordinary posts into structured recipe cards with ingredients, numbered steps, times, servings, nutrition, and Schema markup. Proper Schema helps Google show star ratings, cook time, and calories directly in search results—boosting click-through rates.
Top recipe plugin comparison:
| Plugin | Free Version | Paid Starting Price | Key Features |
|---|---|---|---|
| WP Recipe Maker | Yes | $49/yr (Premium) | Customizable cards, Schema, ratings, scaling |
| Tasty Recipes | Limited | ~$49 first year | Beautiful templates, nutrition, print/save |
| Recipe Card Blocks | Yes | ~$59/yr | Block editor focus, AI tools in some plans |
Install from Plugins > Add New. Activate and configure basic settings such as default units and template style. Most plugins add a dedicated block or button in the post editor so you can insert a full recipe card with one click. They automatically generate JSON-LD Schema—no coding required. Test one recipe in Google’s Rich Results Test tool after publishing.
Step 5: Add and Publish Your First Recipe
Create a new post via Posts > Add New. Write a short, engaging introduction that hooks readers with a personal story, sensory description, or quick benefit (e.g., “ready in 20 minutes”). Place a “Jump to Recipe” button near the top for users who want the card immediately.
Use the recipe plugin block to fill in:
- Recipe title (include main keyword)
- Prep time, cook time, total time, servings
- Exact ingredient list with measurements
- Numbered, concise instructions
- Notes, tips, substitutions, and variations
- High-quality featured image (natural light, clear plating)
Add categories and tags such as “Dinner,” “Quick Meals,” or cuisine type. Optimize the SEO title and meta description (under 160 characters) to include the primary keyword. Insert 4–8 process photos with descriptive alt text. Publish when ready.
Writing best practices for higher engagement and rankings:
- Keep instructions short and numbered so cooks with messy hands can follow easily.
- Include pro tips (e.g., how to prevent a sauce from breaking) and dietary swaps.
- End with a call to action: rate the recipe, leave a comment, or try a related post.
- Use H2 and H3 headings naturally for scannability and SEO.
High-quality photos are non-negotiable. Shoot in natural light from multiple angles and keep backgrounds simple so the food remains the focus. Compress images for speed without losing quality.
Growing and Monetizing Your Recipe Website
After the first posts, focus on consistent publishing and technical SEO. Optimize every recipe for target keywords people actually search (e.g., “easy weeknight chicken thighs”). Use internal links between related recipes and build a clear recipe index or category pages.
Monetization paths that work for recipe sites:
- Display ads once traffic qualifies for networks.
- Affiliate links for kitchen tools, ingredients, or cookbooks.
- Sponsored posts with brands aligned to your niche.
- Digital products such as recipe ebooks or meal plans.
- Optional online courses or printables.
Engage readers through comments, email newsletters, and social sharing (especially Pinterest, where recipe pins perform strongly). Mobile performance matters—most users open recipes on phones while cooking, so keep pages fast and buttons large.
Frequently Asked Questions
Domain and basic hosting often total $40–$100 for the first year. A premium theme and recipe plugin add $50–$150 annually. Many begin under $150 total.
No. WordPress themes, plugins, and the block editor handle everything visually.
Use proper Schema via a recipe plugin, target specific long-tail keywords in titles and headings, provide clear value, and earn backlinks and shares over time. Consistent high-quality content compounds results.
Yes. Recipe data from major plugins is generally portable, though visual styling changes with themes.
A recipe website built on WordPress gives you ownership, scalability, and the tools to reach hungry readers through search. Follow the five steps above, publish consistently, and refine based on what your audience engages with. Start with one solid recipe post today—your online kitchen can be live within hours and grow from there.
Please share this How to Create a Recipe Website in WordPress [5 Easy Steps!] with your friends and do a comment below about your feedback.
We will meet you on next article.
Until you can read, How to Get More Recipe Reviews & Increase Rankings!