
How to Update Your Permalink Structure
Your WordPress permalink structure controls how every URL on your site looks — and it has a direct impact on SEO, user experience, and long-term site health. Most WordPress sites ship with a default URL format that looks something like yourdomain.com/?p=123, which tells search engines and readers almost nothing about the content behind the link.
Changing your permalink structure to something clean and descriptive — like yourdomain.com/post-name — is one of the highest-ROI improvements you can make to a WordPress site. This guide covers everything: what permalinks are, which structure to use, how to change it safely, and how to protect existing traffic with redirects.
What Is a WordPress Permalink?
A permalink (permanent link) is the full URL of a specific page or post on your website. It consists of your domain plus a slug — the part of the URL that identifies the content. For example:
https://yourdomain.com/how-to-bake-sourdough
Here, /how-to-bake-sourdough is the slug. WordPress lets you control the format of these slugs site-wide through the Permalink Settings panel.
WordPress Permalink Structure Options
WordPress offers six built-in permalink formats:
| Structure | Example URL | SEO Value |
|---|---|---|
| Plain | /?p=123 | ❌ Poor |
| Day and name | /2024/03/15/post-title | ⚠️ Weak |
| Month and name | /2024/03/post-title | ⚠️ Weak |
| Numeric | /archives/123 | ❌ Poor |
| Post name | /post-title | ✅ Best |
| Custom structure | /category/post-title | ✅ Good |
The clear winner for most sites is Post name (/%postname%/). It produces short, descriptive, keyword-rich URLs that are easy to read, easy to share, and easy for search engines to parse.
Which Permalink Structure Is Best for SEO?
Use /%postname%/ — your domain followed only by the post slug.
This works best because:
- No dates in URLs — evergreen content doesn’t look stale. A post written years ago won’t signal to readers or Google that it’s outdated just from the URL.
- No categories in URLs — if you ever reorganize your content taxonomy, you won’t have to change hundreds of URLs.
- Short and readable — clean URLs perform better in social shares, email, and backlink anchor text.
- Keyword placement — the slug is right after the domain, which gives it maximum weight in search engine parsing.
Avoid structures that include /category/ in the path unless your taxonomy is extremely stable and SEO-critical. Adding categories to permalinks creates long URLs and creates a maintenance problem whenever you restructure your site.
How to Change the Permalink Structure in WordPress
Changing your permalink structure takes less than two minutes. Here’s the exact process:
Step 1: Log In and Navigate to Permalink Settings
From your WordPress dashboard, go to:
Settings → Permalinks
Step 2: Select Post Name
In the Permalink Settings section, click the radio button next to Post name.
This sets your URL format to /%postname%/, which produces URLs like:
yourdomain.com/your-post-title
Step 3: Save Changes
Scroll to the bottom and click Save Changes. WordPress will flush the rewrite rules and apply the new structure immediately.
That’s it for new posts. But if your site already has published content, there’s a critical additional step.
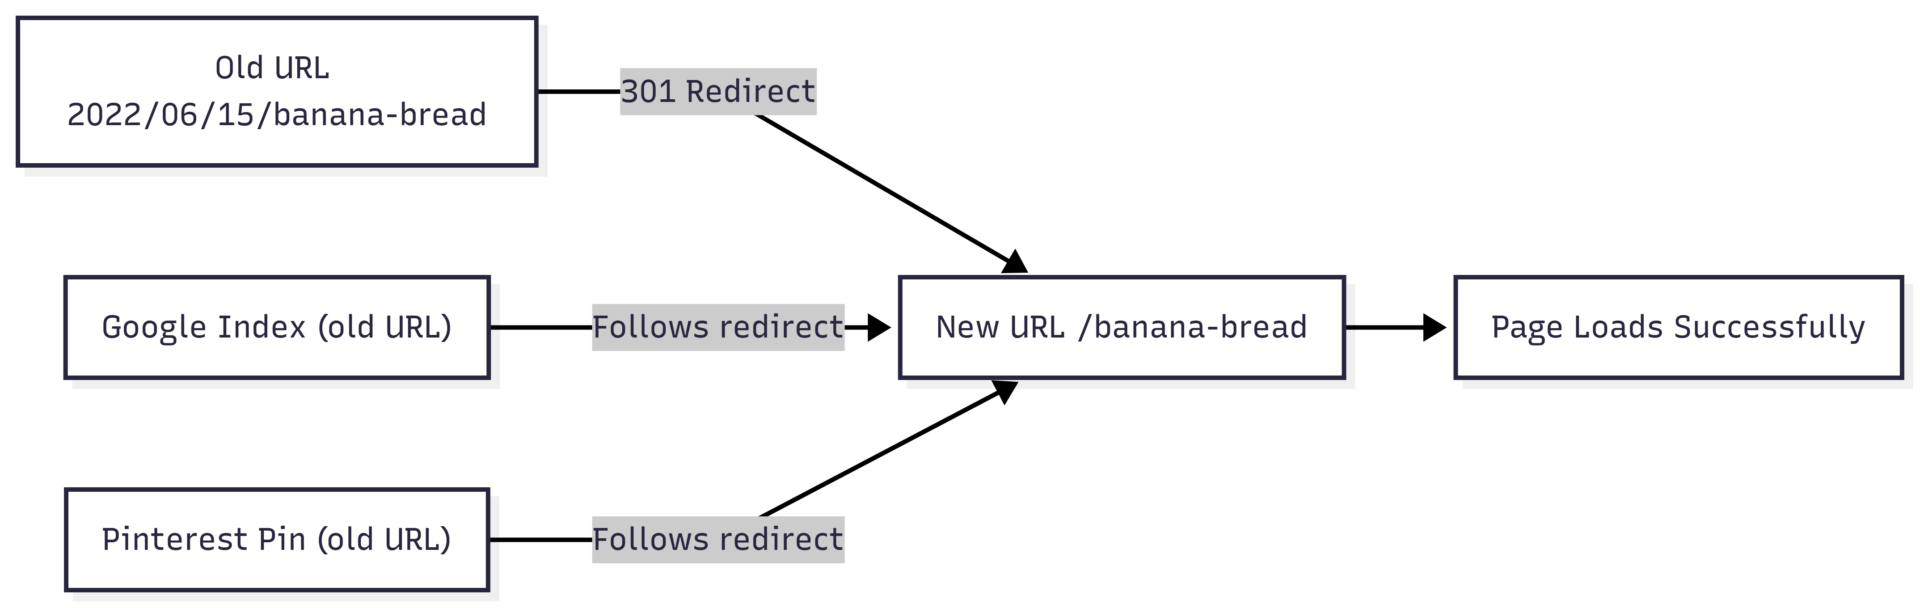
The Most Important Step: Setting Up 301 Redirects
Here’s what most guides skip over: changing your permalink structure does not automatically redirect old URLs.
If you have published posts with URLs like /2022/06/banana-bread-recipe, those old URLs still exist in:
- Google’s search index
- Backlinks from other sites
- Saved Pinterest pins
- Your own internal links
Without redirects, anyone clicking those old URLs lands on a 404 error page. That means lost traffic, broken backlinks, and potential SEO damage.
A 301 redirect tells browsers and search engines: “This content has permanently moved to a new URL.” When configured correctly, all the SEO equity from old URLs transfers to the new ones, and visitors are seamlessly sent to the right page.
Redirect Options
Option 1: Redirection Plugin (Free)
The Redirection plugin is the most widely used free option. After installing it:
- Go to Tools → Redirection
- Under “Add new redirection,” enter the old URL in the Source URL field
- Enter the new URL in the Target URL field
- Click Add Redirect
For bulk redirects from date-based URLs, you can use regex in the Source URL field:
- Source URL:
^/\d{4}/\d{2}/\d{2}/(.*) - Target URL:
/$1
Enable the Regex checkbox before saving. This single rule catches all old date-based URLs and redirects them to the matching post-name URL.
Option 2: AIOSEO Pro (Paid, All-in-One)
If you’re already using AIOSEO as your SEO plugin, the Pro plan includes a built-in Redirect Manager. Go to AIOSEO → Redirects, enter the source and target URLs, set the type to 301 Permanent, and save. It also monitors for 404 errors automatically.
Option 3: Yoast SEO + .htaccess
Yoast SEO’s redirect tool generates code you can paste directly into your .htaccess file. This is the most technically precise method and doesn’t rely on a plugin running on every page load — but it requires server file access.
Permalink Structure Comparison: Before and After
How to Change a Single Post’s Permalink
You don’t always need to change your entire site structure. If you only want to update one post’s URL:
- Open the post in the WordPress editor
- In the right sidebar, find the Permalink field (under the post title or in the Document panel)
- Click on the slug and edit it directly
- Click Save or Update
Common reasons to change a single permalink:
- Fix a typo in the slug (
choclate-chip→chocolate-chip) - Remove a year from an evergreen post slug
- Shorten an overly long URL
Even for single post changes, you still need a redirect if the post was already published and indexed.
Custom Permalink Structure Tags
If you choose the Custom Structure option in Settings → Permalinks, you can build your own URL format using these available tags:
| Tag | What It Inserts |
|---|---|
%year% | Year of publication |
%monthnum% | Month (numeric) |
%day% | Day of month |
%hour% | Hour of publication |
%minute% | Minute of publication |
%second% | Second of publication |
%post_id% | Numeric post ID |
%postname% | Post slug |
%category% | Post category slug |
%author% | Author username |
A commonly used custom structure for content-heavy blogs is /%category%/%postname%/, which produces URLs like yourdomain.com/recipes/banana-bread. This works well if your categories are stable and meaningful to readers — but avoid it if you plan to reorganize your taxonomy.
Changing Category and Tag Base URLs
By default, WordPress category pages use the format:
yourdomain.com/category/recipes
And tag pages use:
yourdomain.com/tag/breakfast
You can change the words “category” and “tag” in these URLs. In Settings → Permalinks, scroll down to the Optional section and enter your preferred base words. For example, changing the category base to topics produces:
yourdomain.com/topics/recipes
Leave the field blank and save to reset to the default.
Common Permalink Mistakes to Avoid
1. Changing URLs without setting up redirects This is the single most damaging mistake. Every published URL that changes without a redirect becomes a 404 error. Traffic drops, backlinks break, and Google has to recrawl and reprocess every affected page.
2. Including categories in permalinks when your taxonomy isn’t stable If you use /%category%/%postname%/ and later reorganize your categories, every URL changes. Use post name only unless your categories are permanent.
3. Changing permalink structure repeatedly Each change adds a layer of redirects. Too many redirect chains slow your site and can cause search engines to devalue the destination pages. Set a structure once and keep it.
4. Over-optimizing individual slugs Shorter is usually better, but too vague loses meaning. /cookies is worse than /chocolate-chip-cookies for both users and search engines.
5. Skipping a backup before making changes Always create a full site backup before modifying permalink settings, especially on established sites with significant traffic.
Pre-Change Checklist
Before clicking Save Changes on any permalink update, run through this:
- ✅ Full site backup created
- ✅ Redirect plugin installed and tested
- ✅ List of high-traffic URLs documented for redirect verification
- ✅ Internal links reviewed (or a broken link scanner queued)
- ✅ Google Search Console set up to monitor 404 errors post-change
Resetting Permalinks to Fix Errors
If you encounter 404 errors after a permalink change — even without switching structure — WordPress may need its rewrite rules flushed. The fix is simple:
- Go to Settings → Permalinks
- Note your current structure
- Select any different structure and click Save Changes
- Re-select your original structure and click Save Changes again
This forces WordPress to regenerate its rewrite rules without actually changing anything visible to users or search engines.
Final Thoughts
Your permalink structure is the foundation every URL on your site is built on. Getting it right early saves enormous work later. If you’re starting fresh, set it to Post name (/%postname%/) before publishing a single post. If your site already has content, the change is still worth making — just do it with a redirect plugin in place, test your most important URLs afterward, and monitor Google Search Console for 404 spikes in the weeks that follow.
One thoughtful change now prevents years of messy, inconsistent URLs and gives your content the cleanest possible foundation for search visibility.
Please share this How to Update Your Permalink Structure with your friends and do a comment below about your feedback.
We will meet you on next article.
Until you can read, How To Switch to a Pinterest Business Account: 3 Easy Steps