Food Photography Composition Techniques
Introduction
Food photography composition is the art of arranging elements within the frame to create visually compelling images that draw viewers in and highlight the subject’s appeal. In a world where social media and digital content dominate, the ability to capture mouthwatering photos of food has become not just a skill but a necessity for bloggers, chefs, restaurants, and hobbyists alike. Whether you’re a beginner capturing simple dishes on your smartphone or a professional styling elaborate scenes for commercial shoots, mastering composition transforms ordinary shots into professional-level stories that evoke emotion, tell a narrative, and even drive sales.
At its core, composition in food photography is about balance, intention, and creativity. It’s the difference between a flat, uninspiring snapshot and a dynamic image that makes viewers salivate. Beautiful lighting, exquisite props, and perfectly styled dishes are foundational, but how you compose these elements elevates the photo into a stunning food story. This comprehensive guide delves deep into essential techniques, from basic camera setups to advanced principles like the rule of thirds and golden ratio. We’ll explore practical steps, tools, and strategies to refine your skills, ensuring every image tells a mouthwatering tale.
Drawing from years of experience in food photography, including teaching college courses and analyzing thousands of images, this article synthesizes expert insights. We’ll cover everything from setting up your camera for optimal control to using color theory, props, and visual elements to enhance appeal. By the end, you’ll have a toolkit to create compositions that not only look better but also engage viewers on a deeper level. Expect explanations, real-world examples, tips for common pitfalls, and recommendations for gear—all aimed at helping you produce actionable content. Let’s dive in and turn your food photos into art.
Camera Setup Essentials
The journey to masterful food photography composition begins long before you arrange your first prop— it starts with your camera setup. A well-thought-out setup provides stability, consistency, and the freedom to focus on creativity rather than technical hassles. Without it, even the most beautifully styled dish can result in blurry, poorly framed images. Let’s break down the essentials, step by step, to ensure your foundation is solid.
First and foremost, invest in a reliable tripod. Tripods are magical tools in food photography because they allow hands-free operation, which is crucial for styling to the camera—a technique where you build your composition while viewing it through the lens. This method gives you a fixed frame of reference, letting you track changes as you add elements one by one. Handholding the camera leads to constant refocusing, re-exposing, and recomposing, which wastes time and energy. A tripod frees your hands to tweak props, adjust food, and experiment without disrupting the frame.
For standard setups, the Manfrotto 055 Aluminum Tripod with XPRO Magnesium Ball Head (priced around $250) is an excellent choice. It’s lightweight, durable, and features an adjustable center column for quick height changes. The ball head allows smooth panning and tilting, essential for fine-tuning angles. If you’re on a budget, the AmazonBasics 60-Inch Lightweight Tripod ($25) offers basic stability, though it lacks the precision of higher-end models.
Overhead shots, popular for flat-lay compositions, require a specialized setup to avoid awkward positioning or falling into your food. A simple, portable overhead rig can be assembled using everyday studio equipment. Here’s a detailed breakdown:
- 2 Light Stands or C-Stands: Manfrotto models ($100 each) provide height and stability. C-stands are heavier but more robust for professional use.
- 1 40-Inch Extension Arm with Grip Head: Impact brand ($50) extends the camera over the table.
- 2 Grip Heads: Impact ($20 each) secure the arm and camera.
- 1 Spigot: Neewer ($10) connects the ball head.
- 1 Tripod Ball Head: Reuse the Manfrotto XPRO ($150) for versatility.
Assembly is straightforward: Attach the extension arm to one stand via a grip head, secure the ball head with the spigot, and mount your camera. This setup breaks down in five minutes, making it ideal for home, studio, or on-location shoots at restaurants. For dual-angle shooting (overhead and level), invest in a second ball head and camera, though that’s more advanced.
Tip: If you already own the Manfrotto 055, repurpose its ball head for overhead use to save costs. However, for simultaneous angles, duplicate the heads.
Shooting tethered takes composition to the next level by displaying images on a larger screen in real-time. This reveals subtle flaws like uneven spacing or distracting shadows that camera LCDs miss. To tether:
- Use a compatible cable from Tether Tools ($30–$50; select based on camera model and computer port).
- Software like Adobe Lightroom or Capture One ($10/month subscription) imports shots instantly.
For iPhone users, the screen serves as a pseudo-tether. Enable grid overlays in settings for compositional guides. Pair with a flexible tripod like the Joby GorillaPod ($30–$50) for stable angles.
Why does this setup matter for composition? It shifts your workflow from reactive to proactive. With the camera locked, you build layers intentionally—start with an empty table, add the main dish, then props—consulting the viewfinder after each change. This iterative process ensures every element serves the story, avoiding chaos.
In practice, set your camera first: Choose angle, exposure, and focus. Then style. For artificial lighting mimicking natural (recommended for consistency), position softboxes at 45° to the subject. Test shots reveal highlights and shadows, allowing adjustments before final styling.
Common pitfalls: Skipping the tripod leads to shaky images and inconsistent framing. Over-relying on handholding limits creativity. Solution: Always tripod-mount for food shoots.
By prioritizing setup, you gain control, efficiency, and precision—key to compositions that captivate.
Choosing the Right Camera Angles
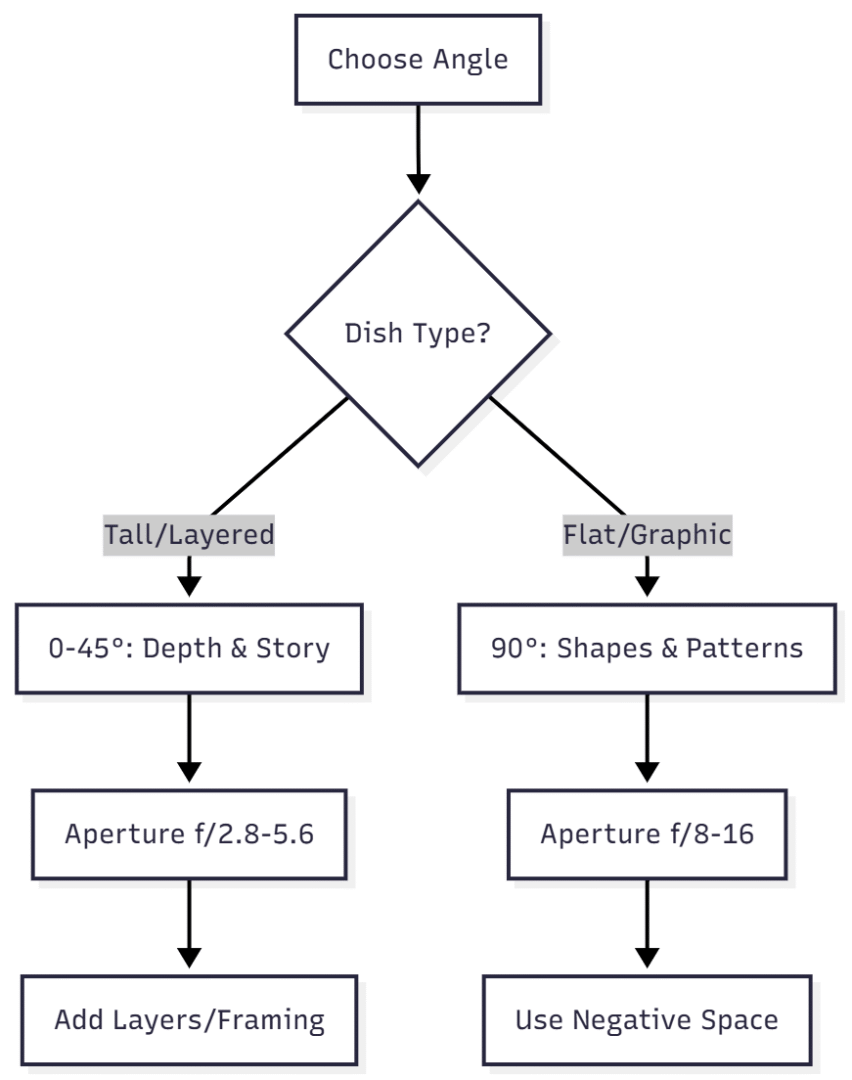
Selecting the right camera angle is pivotal in food photography, as it influences depth, emphasis, and viewer engagement. Angles aren’t arbitrary; they should complement the dish’s characteristics, enhancing its visual story. From my experience reviewing thousands of photos as a college lecturer, only two angles consistently excel in professional work: the 0–45° and 90° overhead. Let’s explore these in depth, including when to use each, technical tips, and variations.
The 0–45° angle is the “big daddy” of food photography—versatile, descriptive, and natural. It replicates how we view food when seated at a table, making it relatable and receptive. This angle excels for tall or layered dishes, revealing internal details like cake layers or burger stacks. For example, photographing a shrimp and curry potato tower at 90° hides the underlying structure, but 45° showcases every yummy layer.
Technically, position the camera on an imaginary arc slightly above table level. Use apertures between f/2.8 and f/5.6 to achieve balanced depth of field—enough blur to separate the subject from background distractions, but sufficient sharpness for the dish. Too shallow (f/1.4) blurs most of the food; too narrow (f/8) lets background details compete.
Advantages:
- Descriptive Depth: Includes foreground and background for storytelling. Add props like forks or fabrics to create layers.
- Compositional Flexibility: Employ techniques like framing (e.g., utensils around pasta) or bokeh for dreamy textures.
- Viewer Comfort: Mimics real-life perspective, increasing appeal.
Disadvantages:
- Risk of distortion if not level—food may appear to slide.
- Less graphic than overhead.
Example: For a Caprese salad, 45° highlights tomato textures and mozzarella layers, with blurred basil in the foreground adding depth.
The 90° overhead angle offers a yin to the 45°’s yang—graphic, abstract, and attention-grabbing. It transforms ordinary views into unique patterns, like aerial landscapes. Ideal for flat foods where shape matters, such as pizzas or repeating cookies.
Shoot directly downward, using f/8–f/16 for full focus, giving a sharp, illustrative look. This angle traps the eye in shapes: circular foods on square plates for contrast, or patterns like triangular arrangements.
Advantages:
- Shape Emphasis: Reveals geometries lost in angled shots.
- Eye Trapping: Compose in circles, bounces, or triangles to keep viewers engaged.
- Negative Space Opportunities: Leaves room for text, menus, or recipes.
Disadvantages:
- Flattens dimension, hiding layers.
- Requires overhead rig for stability.
Example: For wagyu beef dumplings on an odd-shaped platter, overhead uses parallel lines from spoons and sauce for symmetry.
Variations: Experiment with straight-on (0°) for height emphasis, like drinks or sandwiches. Or try extreme close-ups for textures. Orientation matters—vertical for mobile/Instagram, horizontal for websites.
Tip: Always level to the table; use bubble levels on tripods. Avoid gimmicky angles; creativity comes from within the frame.
| Angle | Ideal Dishes | Aperture | Key Benefits | Potential Drawbacks |
|---|---|---|---|---|
| 0–45° | Layered, tall (cakes, towers) | f/2.8–5.6 | Depth, natural view, bokeh | Distortion if unlevel |
| 90° Overhead | Flat, patterned (pizzas, salads) | f/8–16 | Graphic shapes, eye trapping | Loss of dimension |
| Straight-On | Height-focused (burgers, drinks) | f/4–8 | Emphasizes verticality | Limited context |
Mastering angles requires practice—shoot the same dish from multiple to see differences.
Core Composition Techniques
Core techniques form the building blocks of compelling food photography compositions. These time-tested methods—lines, layers, framing, repeating patterns, and composing for light—guide the eye, add depth, and infuse energy. Let’s dissect each, with detailed explanations, examples, and applications to help you implement them effectively.
Lines: Never underestimate lines’ power to direct attention and add dynamism. Leading lines draw the eye to the subject, creating movement in static scenes. Use props like skewers or cutlery to point toward the dish. Diagonal lines energize; parallel provide symmetry.
Example: In a smoked salmon bowl, lemon slices create diagonals leading to the fish. For seared cod, sprigs accentuate multiple lines for excitement. Price tip: Basic cutlery sets ($20) suffice.
Application: Scan for natural lines in food (e.g., grill marks) and enhance with props. Avoid obvious staging.
Layers: Layers single out subjects by offering foreground, middle, and background. This technique shines at 45°, framing the dish naturally. Think creatively—layers aren’t just objects but added story depth.
Example: For quail eggs, place the main bowl in the middle, with blurred fabrics foreground and props background. This adds dimension to simple setups.
Application: Use 3–4 layers max; pair with shallow DOF (f/4) for dreamy blur. Cost: Fabrics like linen napkins ($10/pack).
Framing: Framing signals importance, done overtly (dish on plate) or subtly (pot spout over baklava). Frame key ingredients to clarify mixed dishes.
Example: Whole figs framed by props in a platter remind viewers of the dish’s essence.
Application: Surround the subject without overcrowding. Useful for storytelling in ethnic cuisines.
Repeating Patterns or Shapes: Repetition creates striking visuals. Bake sets instead of singles; match prop shapes to food.
Example: Strawberry rhubarb crostatas in multiples; circular bowls with tortillas. Diagonal straws or tangerine patterns add harmony.
Application: If short on props, edit duplicates in post (Photoshop trick, $10/month). Brains love patterns—exploit this for engagement.
Composing for Light: Light interacts uniquely with food. Shiny surfaces (soups, fruits) need rotation to capture reflections, avoiding dullness.
Example: Twist lamb chops to reflect light, showing juiciness. Science: Angle of incidence = reflection.
Application: Test rotations; use soft artificial lights ($100 kit) mimicking natural.
Integrate techniques: Start with lines, build layers, frame, repeat, adjust light. Practice on simple dishes like pasta.
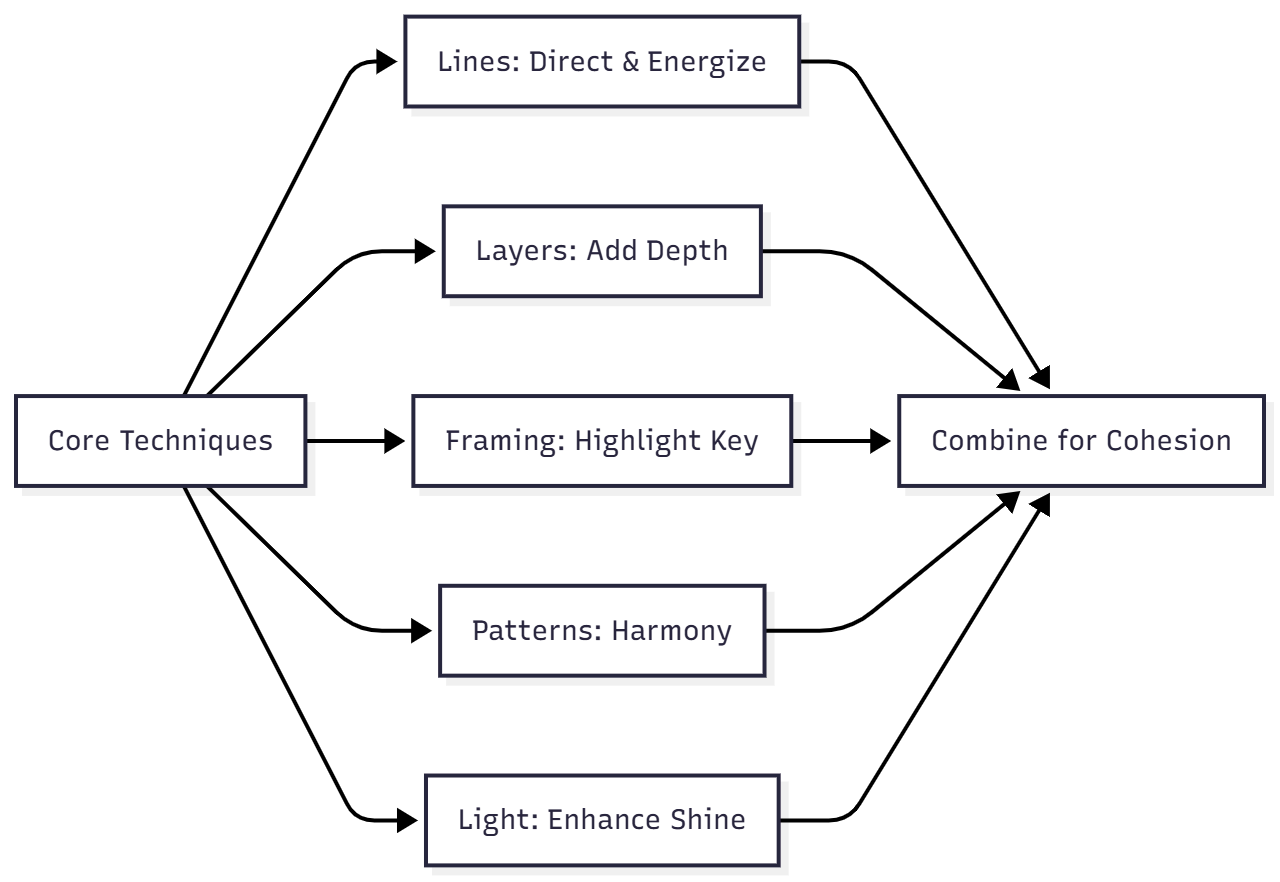
These form a versatile toolkit; expand with advanced rules.
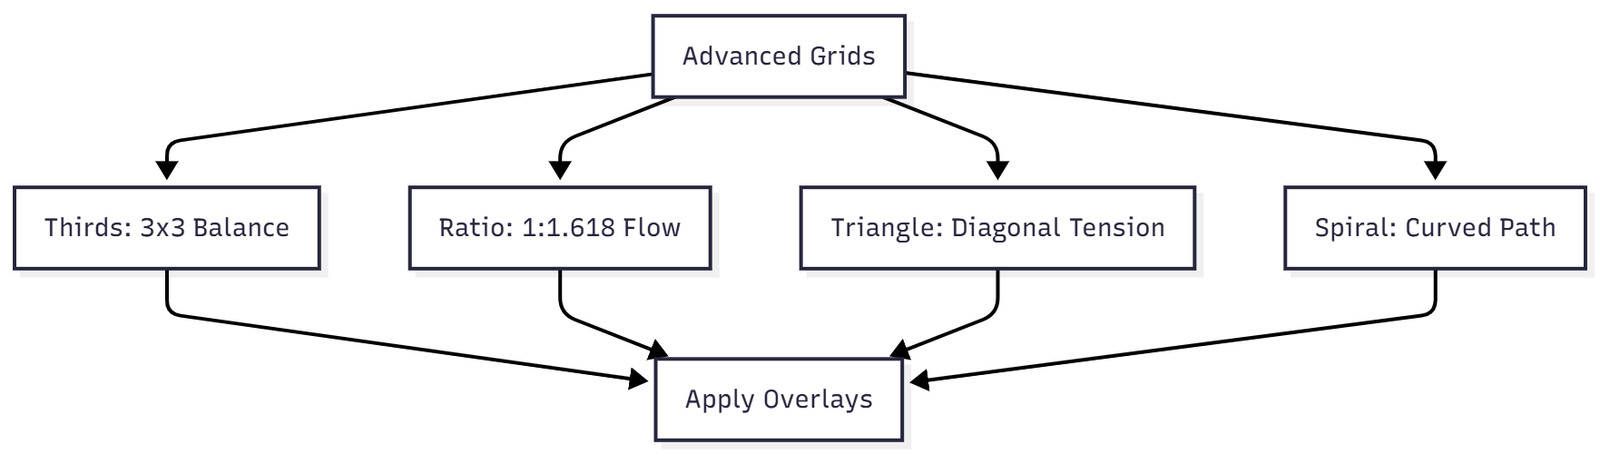
Advanced Composition Rules and Grids
Advanced rules add mathematical precision to intuition, creating harmonious compositions. From the rule of thirds to the S-curve, these grids guide placement for professional results. We’ll explore each, with history, applications, and tips.
Rule of Thirds: Divide the frame into 3×3; place elements on lines/intersections. Originating from art, it avoids centered stagnation.
Application: Pomegranates on right vertical line; cherries on bottom horizontal. Enable camera grids.
Golden Ratio (Phi Grid): Based on 1:1.618, a thinner middle third. Seen in nature (nautilus shells), it creates natural flow.
Application: Position horizons; cake slice on top middle for negative space. Lightroom overlay (O key).
Golden Triangle: Diagonals with perpendiculars form triangles for tension.
Application: Dumplings at bottom intersection, props along lines. Adds movement.
Golden Spiral: Spiral guides eye to focal point.
Application: Pie at center, plates along tail. Implies leading lines.
S-Curve: Curved path for soothing flow.
Application: Spices in S around dish. Horizontal/vertical thinking.
Rule of Odds: Odd groups (3,5,7) for balance.
Application: Three pies in line, forming triangles.
Use overlays; break rules after mastering for creativity.
| Rule | Origin | Food Example | Benefit |
|---|---|---|---|
| Thirds | Art theory | Bowl on intersection | Balance |
| Golden Ratio | Mathematics/nature | Dish on spiral | Harmony |
| Triangle | Geometry | Props at points | Tension |
Practice on varied dishes to internalize.
Color Theory and Visual Elements
Color theory is powerful in food photography, evoking emotions and guiding eyes. The color wheel divides into cool (greens, blues—freshness) and warm (reds, oranges—comfort).
Schemes:
- Monochromatic: Shades of one color for subtlety (e.g., green veggies on sage backdrop).
- Complementary: Opposites for impact (blue plate with orange carrots).
- Analogous: Adjacent for soothing (yellow lemons with orange fruits).
Match props to food; experiment to find dominant/accent colors.
Backdrops change mood: Light for airy, dark for dramatic. Vinyl backdrops ($50) are durable.
Ingredients as elements: Add herbs for pops, building from bare to full.
Visual elements like texture (brown foods via crops) enhance.
Props, Backdrops, and Styling Tips
Props support the story. Choose artisanal or vintage ($20–$50) for authenticity.
Backdrops: Wood ($40), linen ($30), metal ($50) for texture.
Styling: Hero side by rotation. Complementary colors. Napkin styles: Fold+tuck, peeking, scrunch, knot, flow.
Repetition for multiples. Texture focus for browns. Different lengths: Macro for details, 85mm for depth.
Diptychs for stories. Layer 3–4 interest levels. Custom backdrops DIY ($20 paint).
Triangles unite subjects.
Depth of Field and Focus Strategies
- DOF controls blur/sharpness. Wide for isolation, narrow for detail.
- Strategies: Portrait mode on phones. Focus on textures.
Negative Space and Leading Lines
- Negative space balances, allows text.
- Leading lines guide; mix shapes.
- Diagonals movement, off-center.
- Layers texture. Framing story. Patterns graphic. Foreground depth.
The Rule of Odds for Balanced Groups
- Odds create focus. Examples: 3,5,7 items.
- Plan sketches.
Planning and Refining Your Compositions
- Sketch grids. Tether for feedback.
- Refine for light.
Common Mistakes and How to Avoid Them
Even experienced photographers make these errors in food photography composition. Here’s an expanded look at five key mistakes, with practical solutions and examples to help you avoid them.
- Overcrowding the Frame Problem: Too many props or elements create clutter, pulling focus from the main dish and making the image chaotic. Solution: Simplify—limit to 1 hero dish and 2–3 supporting items. Use negative space for balance. Example: A pasta plate with just a fork and napkin looks clean; adding extra bowls distracts. Tip: Review your setup on a larger tethered screen to spot excess early.
- Using Bold Patterns on Plates or Fabrics Problem: Busy patterns compete with the food, drawing the eye away from the subject. Solution: Opt for neutrals like solid colors, whites, or creams to let the dish stand out. Test plates without patterns first. Example: A colorful salad on a plain white plate pops; on a floral one, the pattern dominates. Tip: Reserve patterns for subtle accents, like a faint linen texture.
- Ignoring Light Reflections on Shiny Foods Problem: Dull or uneven lighting makes juicy foods look dry, like unreflective meats or soups. Solution: Rotate the subject to capture light at the angle of incidence (equals reflection). Use soft, diffused light. Example: Twist lamb chops to highlight glossy fat; without, they appear flat. Tip: Shoot test frames and adjust positioning before final styling.
- Centering the Subject Too Much Problem: Placing the main dish dead-center creates static, uninteresting compositions. Solution: Off-center using the rule of thirds—align with grid lines or intersections for dynamic balance. Example: A cake slice on the left third draws the eye naturally; centered feels boring. Tip: Enable your camera’s grid overlay to guide placement.
- Lack of Flow or Movement Problem: Straight, parallel lines make images feel rigid and lifeless. Solution: Introduce curves, diagonals, or S-curves with props to guide the eye fluidly. Example: Diagonal napkin placement adds energy to a still-life pie; straight lines stagnate. Tip: Sketch curves before styling to plan natural progression.
By addressing these, your compositions will feel more intentional and engaging.
Tools and Gear Recommendations
Essential gear enhances composition precision without breaking the bank. Here’s an expanded overview of key tools, including options, prices, and why they matter.
- Tripod: The Manfrotto 055 Aluminum with XPRO Ball Head ($250) offers stability for hands-free styling and overhead setups. Budget alternative: AmazonBasics 60-Inch ($25) for beginners. Essential for consistent framing.
- Tether Cable: Tether Tools cables ($40) connect DSLR/mirrorless to computers for real-time viewing. Choose based on port (USB-C/3.5mm). Speeds up refinements.
- Backdrops: Best Ever Backdrops sets ($50+) are lightweight, stain-resistant vinyl for easy mood changes. Wood or linen options ($30–$80) add texture. Versatile for light/dark tones.
- Lenses: Canon/Nikon 100mm macro ($800) captures fine details with shallow DOF. Wide-angle 50mm ($200) for broader scenes. Macro excels for close-ups.
- Software: Adobe Lightroom ($10/month) for tethering, grids, and editing overlays. Capture One ($299 one-time) alternative for advanced cropping. Enables post-composition tweaks.
Case Studies and Examples
These case studies illustrate techniques in action, with before/after analysis for real-world application.
Case 1: Burger Shoot—45° Angle with Rule of Odds Setup: Tall burger emphasizing layers. Before: Centered, even props (2 buns, 4 toppings)—flat, balanced but dull. After: 45° angle, 3 odd elements (burger, 1 fry, 1 pickle) on thirds grid. Added depth with foreground bun, bokeh background. Result: Dynamic height, focused story. Analysis: Odds create natural triangles; angle reveals textures. (f/4, 100mm lens).
Case 2: Salad Overhead—Golden Spiral for Flow Setup: Flat salad with colorful veggies. Before: Centered, no pattern—static, eye escapes frame. After: 90° overhead, ingredients along spiral curve (bowl center, greens tail). Negative space on sides. Result: Guided eye movement, harmonious colors. Analysis: Spiral adds organic flow; f/11 ensures sharpness. (50mm lens).
Case 3: Cake—Golden Triangle for Tension Setup: Layered cake with slices. Before: Straight-on, crowded—lacks energy. After: 45° with triangle grid: Cake at bottom intersection, slices/props at points. Diagonal lines from knife. Result: Tense, appetizing composition. Analysis: Triangles unite elements; f/5.6 blurs distractions. (85mm lens).
These examples show how techniques solve issues, transforming basic shots.
Advanced Topics: Storytelling and Emotional Unity
Elevate compositions by weaving narrative and cohesion.
Unify Emotions: Balance, Light, Color Ensure elements align—soft light with gentle colors for calm; high contrast for drama. Example: Warm oranges and balanced props evoke cozy pasta scenes. Mismatch (harsh light on soft food) confuses mood. Tip: Assess overall tone pre-shoot.
Storytelling: Props Imply Narrative Props suggest action—half-eaten plate implies enjoyment; scattered ingredients show prep. Example: Fork mid-bite tells a “just served” story. Tip: Limit to 3 props that relate directly.
Symmetry vs. Asymmetry Symmetry (even balance) for calm, graphic appeal (e.g., aligned cookies). Asymmetry (imbalance) for tension, dynamism (e.g., off-center steak). Example: Symmetric pizza for order; asymmetric salad for energy. Tip: Use for mood—symmetry in overheads, asymmetry at angles.
Practice Exercises and Challenges
Build skills through targeted practice.
Exercise 1: Shoot Same Dish, Different Angles Photograph one dish (e.g., sandwich) at 0°, 45°, and 90°. Compare depth, emphasis. Goal: Understand angle impacts. Time: 30 minutes. Tip: Use tripod for consistency.
Exercise 2: Apply Grids to Old Photos Select 5 past images; overlay thirds/phi grids in Lightroom. Crop to improve balance. Goal: Refine intuition. Time: 1 hour. Tip: Note changes in focus.
Challenge: 7-Day Composition Series Day 1: Rule of thirds. Day 2: Odds. Day 3: Lines. Etc. Shoot daily, one dish. Review weekly. Goal: Internalize techniques. Tip: Theme by cuisine for variety.
Conclusion
Mastering food photography composition transforms your images from snapshots to captivating stories that engage and inspire. By integrating techniques like the rule of thirds, golden ratio, and thoughtful use of angles, props, and colors, you create visually harmonious photos that evoke emotion and appetite. Practice is key—experiment with layers, lines, and lighting to refine your style. Embrace tools like tripods and tethering for precision, and avoid common pitfalls like overcrowding. With dedication, your photos will not only showcase dishes but also tell compelling narratives, making every shot a mouthwatering masterpiece that resonates with viewers. Keep shooting, refining, and creating!
Please share this Food Photography Composition Techniques with your friends and do a comment below about your feedback.
We will meet you on next article.
Until you can read, Chocolate Photography Tips (and other Brown Foods)